Ingredients
-
Classic Oreo Cookies: 1 package (you will use the half with the cream filling for each eyeball)
-
Gummy Rings: 1 bag (such as Life Savers Gummies). You’ll need one for each eyeball.
-
Semi-Sweet Chocolate Chips: 1/2 cup (or mini M&M’s). You’ll need one for each eyeball.
-
Red Decorating Gel or Writing Icing: 1 tube with a fine tip.
Instructions
Part 1: Prepare Your Workspace and Your Cookies
-
Set Up Your Station: Line a baking sheet or a large platter with parchment paper or wax paper. This will be your work surface and will also prevent the decorating gel from sticking as it sets.
-
Separate the Oreos: This is the most crucial technique. Hold an Oreo cookie firmly and gently twist the two chocolate wafers in opposite directions. The goal is to have all of the white creme filling remain intact on one half of the cookie. Don’t worry if a few break; they make for a good snack! Place all the cream-topped cookie halves on your prepared baking sheet, cream-side up.
-
Handle the Leftovers: You will have a pile of plain chocolate cookie wafers. Set them aside for now (we have some great ideas for them in the FAQ section!).
Part 2: Creating the Eyeball Features
-
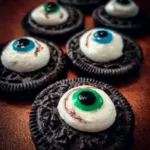
Create the Iris: Take one gummy ring and gently press it into the center of the white creme filling of an Oreo half. Press just hard enough for it to stick securely. The creme filling is soft enough to act as a perfect “glue.” Repeat this process for all of your cookie halves.
-
Add the Pupil: Place one semi-sweet chocolate chip, point-side down, into the hole in the center of the gummy ring. If you are using a mini M&M, place it “m”-side down. Press it gently to secure it. Your cookies should now look like clean, wide-open eyes.
Part 3: The Final Gruesome Touch
-
Draw the Bloodshot Veins: Take your tube of red decorating gel. Starting from the outer chocolate edge of the cookie, draw thin, wavy, and squiggly lines moving inward toward the gummy ring iris. Don’t let the lines touch the iris.
-
Vary Your Veins: For a more realistic look, don’t make all the lines the same. Draw some short, some long, and even some that fork into two smaller veins. Remember, messy and imperfect is the key to a truly bloodshot and creepy look!
-
Let Them Set: Allow the decorated eyeballs to sit at room temperature for at least 30-60 minutes. This gives the decorating gel time to set slightly, which will help prevent smudging.
Nutrition
- Serving Size: one normal portion
- Calories: 80-100 kcal