


I’ll never forget the year my son, then seven years old, declared he wanted our house to be the “scariest on the block” for Halloween. This, of course, extended to the party food. I was scrolling through pages of complex, multi-day baking projects, feeling my enthusiasm wane, when I stumbled upon the idea for Oreo Cookie Eyeballs. It seemed almost too simple to be true. No baking? No mixers? Just a few simple store-bought ingredients? I was skeptical, but I bought the supplies. That weekend, my son and I set up an “eyeball factory” on our kitchen table. He was the chief candy-placer, meticulously choosing the perfect gummy ring “iris” for each cookie. I handled the delicate task of drawing the bloodshot veins. We laughed the entire time, and in less than thirty minutes, we had a whole platter of gruesome, ghastly, and surprisingly adorable eyeballs staring back at us. At the party, they were an absolute sensation. The kids shrieked with delight before devouring them, and the adults were endlessly impressed, asking me for the “complicated” recipe. It’s been our go-to Halloween treat ever since—a deliciously spooky project that proves you don’t need hours in the kitchen to create something truly memorable.
Why This Oreo Cookie Eyeball Recipe is a Terrifyingly Good Choice
Before we pop open that package of Oreos, let’s focus our gaze on why this specific recipe is a must-make for any Halloween festivity. It’s the perfect storm of ease, fun, and visual “wow” factor, making it a guaranteed winner for ghouls and goblins of all ages.
- Absolutely No Baking Required: This is perhaps the most magical part of the recipe. In the midst of planning costumes, decorations, and party logistics, the last thing you need is a complicated baking project. This recipe requires zero oven time, no mixing bowls, and no special equipment. It’s an assembly-only project, making it the ultimate low-stress, high-reward treat.
- Insanely Easy and Kid-Friendly: This is the perfect recipe to make with children. The steps are simple, repetitive, and hands-on. Kids love the tactile process of twisting the Oreos, pressing the candies into the cream, and, of course, seeing the creepy final product come to life. It’s a craft and a snack all in one.
- Visually Spectacular: Let’s be honest, these Oreo Cookie Eyeballs look incredible. They are instantly recognizable, delightfully creepy, and perfectly on-theme for Halloween. They provide maximum visual impact for minimal effort, turning a simple platter of cookies into a centerpiece for your dessert table.
- Common and Affordable Ingredients: There are no fancy, hard-to-find ingredients here. A quick trip to any major grocery store is all you need. Oreos, gummy rings, chocolate chips, and a tube of decorating gel are all readily available and budget-friendly, which is a huge plus when you’re often making large quantities for a party.
Anatomy of a No-Bake Nightmare: The Key Components
Understanding the role each simple ingredient plays is the key to appreciating the genius of this recipe. It’s a testament to how a few well-chosen components can create something greater than the sum of its parts.
The Base: The All-Mighty Oreo
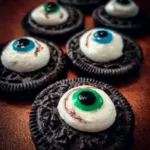
The classic Oreo cookie is the unsung hero of this creation. We specifically use the original Oreos with the white creme filling. When twisted apart correctly, one half of the cookie provides a perfect, round, white sclera (the white part of the eye). The dark chocolate cookie border creates a natural, dark outline, almost like an eyelid or long, dark lashes. The firm texture of the Oreo creme is ideal; it’s sturdy enough to hold the candy “iris” and “pupil” in place without them sinking or sliding around.
The Iris: The Gummy Ring Gaze
This is what gives the eyeball its color and personality. Gummy rings, like Life Savers Gummies, are the perfect ingredient for the iris. They are the ideal size, have a hole in the middle for the pupil, and come in various colors. You can create a platter of green, red, orange, and yellow-eyed monsters. The slightly translucent, glossy nature of the gummy candy adds a layer of realism, mimicking the look of a real iris.
The Pupil: The Chocolate Chip Center
The final touch that brings the eye into focus is the pupil. A single semi-sweet chocolate chip, placed point-down into the center of the gummy ring, makes for a perfect, dark pupil. The size is just right, and the chocolate flavor pairs perfectly with the Oreo cookie. Alternatively, a mini M&M can also be used, offering another opportunity to add a pop of color or a simple, dark brown center.
The Details: The Bloodshot Veins
What truly transforms this from a simple candy-topped cookie into a gruesome Halloween treat is the bloodshot effect. This is achieved with a tube of red decorating gel or writing icing. The thin nozzle allows for precise application, letting you draw fine, squiggly lines that look like irritated blood vessels. The beauty of this step is that imperfection is the goal. Messy, uneven, and shaky lines make the eyeballs look even more realistic and creepy.
Oreo Cookie Eyeballs: The Complete Ingredient List
Gather your simple supplies! This recipe is more of an assembly project, so having everything laid out makes it a quick and fun process.
- Classic Oreo Cookies: 1 package (you will use the half with the cream filling for each eyeball)
- Gummy Rings: 1 bag (such as Life Savers Gummies). You’ll need one for each eyeball.
- Semi-Sweet Chocolate Chips: 1/2 cup (or mini M&M’s). You’ll need one for each eyeball.
- Red Decorating Gel or Writing Icing: 1 tube with a fine tip.
Step-by-Step Instructions: Assembling Your Ghoulish Gaze
Follow these simple instructions to create your platter of peepers. This is a wonderfully easy process that’s perfect for getting the whole family involved.
Part 1: Prepare Your Workspace and Your Cookies
- Set Up Your Station: Line a baking sheet or a large platter with parchment paper or wax paper. This will be your work surface and will also prevent the decorating gel from sticking as it sets.
- Separate the Oreos: This is the most crucial technique. Hold an Oreo cookie firmly and gently twist the two chocolate wafers in opposite directions. The goal is to have all of the white creme filling remain intact on one half of the cookie. Don’t worry if a few break; they make for a good snack! Place all the cream-topped cookie halves on your prepared baking sheet, cream-side up.
- Handle the Leftovers: You will have a pile of plain chocolate cookie wafers. Set them aside for now (we have some great ideas for them in the FAQ section!).
Part 2: Creating the Eyeball Features
- Create the Iris: Take one gummy ring and gently press it into the center of the white creme filling of an Oreo half. Press just hard enough for it to stick securely. The creme filling is soft enough to act as a perfect “glue.” Repeat this process for all of your cookie halves.
- Add the Pupil: Place one semi-sweet chocolate chip, point-side down, into the hole in the center of the gummy ring. If you are using a mini M&M, place it “m”-side down. Press it gently to secure it. Your cookies should now look like clean, wide-open eyes.
Part 3: The Final Gruesome Touch
- Draw the Bloodshot Veins: Take your tube of red decorating gel. Starting from the outer chocolate edge of the cookie, draw thin, wavy, and squiggly lines moving inward toward the gummy ring iris. Don’t let the lines touch the iris.
- Vary Your Veins: For a more realistic look, don’t make all the lines the same. Draw some short, some long, and even some that fork into two smaller veins. Remember, messy and imperfect is the key to a truly bloodshot and creepy look!
- Let Them Set: Allow the decorated eyeballs to sit at room temperature for at least 30-60 minutes. This gives the decorating gel time to set slightly, which will help prevent smudging.
Nutrition Facts
- Servings: This recipe makes approximately 16-18 eyeballs (based on a standard package of Oreos).
- Calories per serving (1 Oreo Cookie Eyeball): Approximately 80-100 kcal.
Disclaimer: The nutritional information provided is an estimate and can vary based on the specific brands of cookies and candies used.
Preparation Time Breakdown
- Active Preparation Time: 15-20 minutes
- Setting Time: 30-60 minutes
- Total Time: Approximately 45 minutes to 1 hour 20 minutes
- Baking Time: 0 minutes!
How to Serve and Display Your Creepy Creations
Don’t just throw these on a plate! A little creative presentation can turn these fun treats into a jaw-dropping Halloween masterpiece.
- The Classic “Eyes on a Platter”:
- Arrange the Oreo Cookie Eyeballs on a stark black or dark purple platter. The dark background makes the white of the eyes and the red veins pop for a dramatic effect.
- Scatter a few plastic spiders or gummy worms among the eyeballs for an extra creepy-crawly vibe.
- Peeking from the Grave:
- Make a “graveyard” dirt pudding by layering chocolate pudding and crushed plain Oreo wafers in a trifle bowl or rectangular dish.
- Strategically place the Oreo Cookie Eyeballs so they are peeking up from the “dirt,” as if monsters are rising from their graves.
- Mad Scientist’s Specimens:
- For a truly spooky display, carefully place a few eyeballs inside a large, clean glass jar or beaker. It will look like a collection of creepy specimens in a mad scientist’s laboratory.
- The Ultimate Cupcake Topper:
- Frost cupcakes with dark chocolate or even green frosting.
- Place one Oreo Cookie Eyeball right on top of each cupcake for an instant, easy, and impressive decoration.
- Monster Mash-Up Platter:
- Create a large dessert board featuring the Oreo Cookie Eyeballs as the star. Surround them with other spooky treats like “Witch Finger” pretzels, marshmallow ghosts, and a bowl of “monster guts” (gummy worms and green Jell-O).
Additional Tips for Eye-Catching Results
Follow these five expert tips to ensure your Oreo Cookie Eyeballs are perfectly spooky every time.
- Master the Oreo Twist: The key to a clean separation is a gentle but firm twisting motion, not pulling. If your creme is splitting, try chilling the Oreos in the refrigerator for about 30 minutes before you start. The cold will help the creme filling stay firm and stick to one side more reliably.
- Get Creative with Your Candies: Don’t feel limited to one type of candy! Use green gummy rings for monster eyes, yellow for werewolf eyes, or red for vampire eyes. For the pupil, you can use different colored mini M&M’s, a dab of black decorating icing, or even a single black nonpareil sprinkle for a beady-eyed look.
- Vary Your Vein Technique for Realism: To make your bloodshot effect look more authentic, use a light hand and vary the pressure on the gel tube. This will create veins of different thicknesses. Overlapping a few lines and adding forked “Y” shapes will take your design from cartoony to convincingly creepy.
- Make it a Family “Assembly Line”: This recipe is perfect for turning into a fun family activity. Set up an assembly line: one person twists the Oreos, the next person places the gummy rings, a third person adds the pupils, and the final person (usually an adult or older child with a steady hand) draws the veins. It makes the process even faster and creates great Halloween memories.
- Proper Storage is Key: To keep your Oreo Cookie Eyeballs looking their best, store them in a single layer in an airtight container at room temperature. Do not stack them, as the decorating gel can remain slightly sticky and will cause them to meld together. Avoid refrigerating them, as condensation can form, which will make the cookies soft and may cause the red gel to bleed. They are best served within 48 hours of making them.
Frequently Asked Questions (FAQ)
Here are the answers to some of the most common questions about making these spooktacular treats.
1. Do I have to use brand-name Oreo cookies?
While you can use other brands of chocolate sandwich cookies, genuine Oreos tend to work best. The creme filling in Oreos is famously firm, which helps it withstand the twisting motion without crumbling and provides a sturdy base for the candies. Some store-brand cookies have a much softer filling that can make separation difficult and may not hold the candies as well.
2. I can’t find gummy rings. What can I use as a substitute for the iris?
No gummy rings? No problem! You have several creative options. You can use a regular round gummy candy (like a gummy drop) and simply press the chocolate chip pupil into its center. You can also use a large, round candy like a regular M&M, a Skittle, or a Necco wafer for a more cartoony eye. Another great option is to pipe a thick circle of colored frosting to create the iris.
3. What can I do with all the leftover plain chocolate cookie halves?
Don’t throw them away! Those plain wafers are a delicious ingredient. The most popular use is to crush them into crumbs. You can use these crumbs as a topping for ice cream or yogurt, mix them into a milkshake, or use them to make a delicious cookie crumb pie crust for a cheesecake or chocolate cream pie. Or, you can simply enjoy them with a tall glass of milk.
4. My red decorating gel is smudging and not setting. What should I do?
The type of decorating gel you use matters. Some gels are designed to stay wet and glossy, while others, often labeled as “writing icing,” are formulated to dry harder. If your gel is too runny, try looking for one that specifically says it “sets” or “dries.” Additionally, high humidity can significantly slow down the drying time. Be patient and give them plenty of time to set in a dry, cool place.
5. Can I make these Oreo Cookie Eyeballs ahead of a party?
Yes, you can! These are a great make-ahead treat. For the best freshness and appearance, it’s recommended to make them no more than 1-2 days before your event. Assemble them completely and store them as directed (in a single layer in an airtight container at room temperature). This saves you from a last-minute rush on party day.
Oreo Cookie Eyeballs recipe
Ingredients
-
Classic Oreo Cookies: 1 package (you will use the half with the cream filling for each eyeball)
-
Gummy Rings: 1 bag (such as Life Savers Gummies). You’ll need one for each eyeball.
-
Semi-Sweet Chocolate Chips: 1/2 cup (or mini M&M’s). You’ll need one for each eyeball.
-
Red Decorating Gel or Writing Icing: 1 tube with a fine tip.
Instructions
Part 1: Prepare Your Workspace and Your Cookies
-
Set Up Your Station: Line a baking sheet or a large platter with parchment paper or wax paper. This will be your work surface and will also prevent the decorating gel from sticking as it sets.
-
Separate the Oreos: This is the most crucial technique. Hold an Oreo cookie firmly and gently twist the two chocolate wafers in opposite directions. The goal is to have all of the white creme filling remain intact on one half of the cookie. Don’t worry if a few break; they make for a good snack! Place all the cream-topped cookie halves on your prepared baking sheet, cream-side up.
-
Handle the Leftovers: You will have a pile of plain chocolate cookie wafers. Set them aside for now (we have some great ideas for them in the FAQ section!).
Part 2: Creating the Eyeball Features
-
Create the Iris: Take one gummy ring and gently press it into the center of the white creme filling of an Oreo half. Press just hard enough for it to stick securely. The creme filling is soft enough to act as a perfect “glue.” Repeat this process for all of your cookie halves.
-
Add the Pupil: Place one semi-sweet chocolate chip, point-side down, into the hole in the center of the gummy ring. If you are using a mini M&M, place it “m”-side down. Press it gently to secure it. Your cookies should now look like clean, wide-open eyes.
Part 3: The Final Gruesome Touch
-
Draw the Bloodshot Veins: Take your tube of red decorating gel. Starting from the outer chocolate edge of the cookie, draw thin, wavy, and squiggly lines moving inward toward the gummy ring iris. Don’t let the lines touch the iris.
-
Vary Your Veins: For a more realistic look, don’t make all the lines the same. Draw some short, some long, and even some that fork into two smaller veins. Remember, messy and imperfect is the key to a truly bloodshot and creepy look!
-
Let Them Set: Allow the decorated eyeballs to sit at room temperature for at least 30-60 minutes. This gives the decorating gel time to set slightly, which will help prevent smudging.
Nutrition
- Serving Size: one normal portion
- Calories: 80-100 kcal


