Ingredients
-
For the Chicken Wings:
-
3 pounds of chicken wings: When shopping, look for packages labeled “party wings” or “wingettes and drumettes.” This means the wings have already been separated. If you can only find whole wings, you can easily separate them yourself (see instructions below). Look for wings that are plump and have an even, pale color. If possible, opt for “air-chilled” chicken. Air-chilled chicken is cooled with cold air instead of being submerged in chlorinated cold water, resulting in a skin that has less retained moisture—a huge advantage for achieving maximum crispiness.
-
2 tablespoons olive oil or vegetable oil: The oil serves two purposes. First, it acts as a binder, helping the salt, baking powder, and dry rub adhere to the skin. Second, it’s a conductor of heat, helping the skin to crisp up more evenly. A neutral oil with a relatively high smoke point, like vegetable, canola, or avocado oil, is a great choice.
-
1 tablespoon aluminum-free baking powder (NOT baking soda): This is the non-negotiable secret weapon for crispy skin. Baking powder is alkaline. When applied to chicken skin, it raises the pH level, which helps to break down the proteins more efficiently. This process leads to faster browning and a crisper texture. It’s crucial to use aluminum-free baking powder, as regular baking powder can sometimes impart a faint metallic taste. Do not confuse this with baking soda, which is much stronger and will give the wings an unpleasant chemical flavor.
-
2 teaspoons kosher salt: We use kosher salt for a reason. Its larger flakes are better at drawing moisture out of the skin than fine table salt. This process, known as a dry brine, is the first step in dehydrating the skin for a better crunch. It also seasons the meat more deeply.
-
-
For the Ultimate Dry Rub:
-
2 teaspoons smoked paprika: This is the heart of the rub, providing a deep, smoky, and slightly sweet flavor that mimics the taste of slow-smoked barbecue. It also gives the wings a beautiful, rich reddish-brown color. For a different profile, try hot smoked paprika for more heat or sweet paprika for a milder flavor.
-
2 teaspoons garlic powder: Provides a savory, aromatic base. We use powder instead of fresh garlic because fresh minced garlic would burn and turn bitter over the high heat of the grill.
-
2 teaspoons onion powder: Complements the garlic powder with a sweeter, toasted onion flavor, adding another layer to the savory foundation.
-
1 teaspoon black pepper: For a touch of pungent warmth. Use freshly ground black pepper if possible; its flavor is far more potent and complex than pre-ground pepper.
-
1 teaspoon ground mustard: This adds a subtle, tangy sharpness that cuts through the richness of the chicken fat and balances the other flavors.
-
1/2 teaspoon cayenne pepper (optional): This is for heat. Feel free to adjust the amount to your personal preference. For a smokier heat, substitute with chipotle powder. For a fruitier, milder heat, try ancho chili powder.
-
1/2 teaspoon brown sugar (optional): A small amount of sugar doesn’t make the wings taste sweet; it helps to balance the savory and spicy notes. More importantly, the sugar will aid in caramelization on the grill, contributing to a better crust and deeper color.
-
Instructions
Phase 1: Preparation (The Foundation of Crisp)
-
Separate the Wings (If Necessary): If you have whole wings, start by separating them. Place a wing on a cutting board. Feel for the joint between the drumette and the flat. Using a sharp chef’s knife, cut firmly through that joint. You should feel a pop as you cut through the cartilage. Do the same for the joint connecting the flat and the wingtip. The tips have very little meat; save them in a bag in the freezer to make a rich chicken stock later.
-
The Drying Process: This is the most important step for crispy skin. Place the wing pieces on a baking sheet lined with paper towels. Use more paper towels to pat each wing thoroughly until the skin feels as dry as possible. Any surface moisture will create steam on the grill, which is the enemy of crispiness.
-
The Crispy Skin Coating: Transfer the dry wings to a large bowl. Drizzle with the olive oil and toss until every piece has a light, even sheen. In a separate, small bowl, whisk together the baking powder and kosher salt. Sprinkle this mixture over the wings and toss with your hands or tongs until every single wing piece is evenly and thinly coated.
-
The Crucial Chill: For truly spectacular, glass-like skin, arrange the coated wings in a single layer on a wire rack set inside a baking sheet. Do not let them touch. Place the baking sheet, uncovered, in the refrigerator for at least 1 hour, or ideally, up to overnight (8-24 hours). This resting period allows the salt and baking powder to work their magic, drawing out maximum moisture from the skin in a process called dry-brining. The circulating air of the fridge will further dehydrate the surface.
-
Mix and Apply the Dry Rub: While the wings are chilling, combine all the dry rub ingredients in a small bowl and whisk until uniform. When you are ready to grill, remove the wings from the refrigerator. You’ll notice the skin looks tighter and drier. Sprinkle the dry rub mixture evenly over all the wings. Toss them thoroughly to ensure they are completely coated in the seasoning.
Phase 2: The Grill (Where the Magic Happens)
-
Prepare Your Grill for Two-Zone Cooking: The key to perfectly cooked wings is creating two distinct heat zones on your grill: a hot side for direct heat and a cooler side for indirect heat.
-
For a Gas Grill: Turn all burners to high and preheat the grill for 10-15 minutes with the lid closed until the internal temperature reaches about 400°F to 450°F. Once hot, turn off the burners on one side of the grill completely. This is now your indirect heat zone. The side with the burners still on is your direct heat zone.
-
For a Charcoal Grill: Use a chimney starter for the cleanest flavor. Fill it with charcoal briquettes or lump charcoal and light it. Once the coals are hot and covered in a light grey ash (about 15-20 minutes), carefully dump them all onto one side of the grill’s charcoal grate. This creates a hot direct heat zone over the coals and a cooler indirect heat zone on the empty side. Pro-Tip: Add a chunk of smoking wood, like apple or hickory, on top of the hot coals for an extra layer of smoky flavor.
-
Final Prep: Regardless of your grill type, use a grill brush to scrape the cooking grates clean. Then, dip a wadded-up paper towel in a high-heat oil (like vegetable oil), hold it with long tongs, and rub it over the grates to create a non-stick surface.
-
-
Grill the Wings (The Two-Stage Process):
-
Stage 1: Indirect Heat (The Render): Place the seasoned wings on the cooler, indirect heat side of the grill. Arrange them in a single layer, not crowded. Cover the grill and let them cook for 15 to 20 minutes. This initial phase gently cooks the wings through and, most importantly, allows the fat in the skin to render slowly. This melting fat is what will eventually “fry” the skin, making it crispy.
-
Stage 2: The Flip and Finish: After 15-20 minutes, open the grill and use tongs to flip each wing. Cover the grill again and continue to cook on the indirect side for another 10-15 minutes. At this point, the wings should be opaque and starting to brown. The total time on indirect heat will be about 25-35 minutes. Use an instant-read thermometer to check for doneness. While chicken is safe to eat at 165°F, wings are actually more tender and delicious when cooked to a higher internal temperature of 175°F to 185°F. This extra heat helps to break down the collagen and connective tissue, making the meat fall-off-the-bone tender.
-
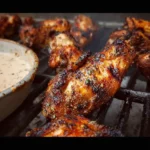
Stage 3: Direct Heat (The Crisp): Once the wings are cooked through, it’s time for the final, glorious step. Move the wings from the indirect side directly over the hot coals or lit burners. This is where the magic happens. Grill them for just 2-3 minutes per side, flipping frequently. Stay right by the grill during this phase, as the rendered fat can cause flare-ups. You’re looking for lightly charred spots and unbelievably crispy skin.
-
-
Rest and Serve: Remove the wings from the grill and place them on a clean platter. Let them rest for 5-10 minutes. This vital step allows the juices to redistribute throughout the meat, ensuring a more succulent and flavorful bite. Serve them immediately as is, or toss them in your favorite sauce while they are still hot.
Nutrition
- Serving Size: one normal portion
- Calories: 250-350