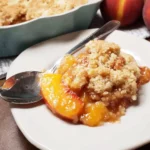
There are certain desserts that feel like sunshine in a bowl, and a bubbling, golden-topped peach cobbler is the undisputed queen of them all. For years after I transitioned to a gluten-free lifestyle, I mourned the loss of a true, old-fashioned cobbler. My attempts were always a compromise. The biscuit toppings were either gritty and sandy or dense and gummy. The fillings were often watery, lacking that jammy perfection. I had almost resigned myself to a life of crustless baked peaches. Then, one perfect summer afternoon, armed with a bushel of fresh peaches from the farmers market and a stubborn refusal to give up, I finally cracked the code. This recipe is the culmination of that effort. The first time I served it, no one even knew it was gluten-free. My family, including the most discerning gluten-eaters, hovered over the baking dish, scooping up every last bit of the jammy, cinnamon-kissed peaches and the impossibly tender, sugar-crusted biscuit topping. The secret, I discovered, wasn’t in some obscure, expensive ingredient, but in the right combination of a good flour blend, cold butter, and a little bit of technique. This isn’t just a “good for gluten-free” recipe; it is a genuinely spectacular peach cobbler, period. It’s the taste of late summer, of family gatherings, and of sweet, delicious victory.
What Makes This Gluten-Free Peach Cobbler Extraordinary?
Creating a gluten-free dessert that rivals its gluten-filled counterpart is all about understanding the science behind the bake. A perfect cobbler has two distinct personalities: the sweet, jammy fruit base and the soft, cakey, biscuit-like topping. Here’s why this recipe succeeds spectacularly on both fronts.
The Perfect Peach Filling: The biggest pitfall of any fruit cobbler, gluten-free or not, is a watery filling. A soupy base makes for a soggy, unpleasant topping. We conquer this challenge with a few key techniques:
- Cornstarch Slurry: A simple slurry of cornstarch and a little liquid acts as our thickening agent. As the cobbler bakes, the cornstarch activates, transforming the juices released by the peaches into a rich, luscious, syrupy sauce that clings to the fruit.
- Lemon Juice: This isn’t just for flavor. The acid in the lemon juice brightens the taste of the peaches, preventing them from being one-dimensionally sweet. It also helps the peaches maintain a bit of their texture and color during baking.
- The Right Spices: A careful blend of cinnamon and nutmeg complements the peaches without overpowering them. It adds that quintessential warm, cozy, and aromatic quality that we all associate with a classic cobbler.
The Flawless Gluten-Free Biscuit Topping: This is where so many gluten-free recipes fail, but where ours truly shines. The goal is a topping that is tender and fluffy on the inside with a slightly crisp, sugary crust.
- A High-Quality 1-to-1 Flour Blend: The cornerstone of this topping is using a reliable gluten-free all-purpose flour blend that already contains xanthan gum. Brands like Bob’s Red Mill 1-to-1 Baking Flour or King Arthur Measure for Measure are formulated to mimic the properties of regular all-purpose flour, making them perfect for creating a soft, cohesive dough. Xanthan gum provides the structure and elasticity that gluten normally would, preventing a crumbly, sandy texture.
- Cold Butter is Crucial: We use very cold, cubed butter and cut it into the flour mixture. This classic biscuit-making technique creates small pockets of butter throughout the dough. As the cobbler bakes, these butter pockets melt and release steam, creating air pockets that result in an incredibly light, flaky, and tender texture.
- Buttermilk for Tenderness and Flavor: The acidity in buttermilk reacts with the baking powder to give the biscuit topping an extra lift, making it soft and fluffy. It also imparts a subtle, pleasant tang that balances the sweetness of the peaches and the richness of the butter.
- The Sugar Crust: Brushing the tops of the biscuits with a little milk and sprinkling them with coarse sugar before baking is the final touch. This creates a beautiful, golden, slightly crunchy lid that provides a wonderful textural contrast to the soft biscuit and jammy fruit below.
Complete Ingredient List
For the best results, use a kitchen scale to measure the flour. If you don’t have one, use the “spoon and level” method described in the tips section.
For the Jammy Peach Filling:
- 6-7 medium ripe peaches (about 3 pounds or 1.3kg), peeled, pitted, and sliced ½-inch thick (you can also use frozen peaches, see FAQ)
- ½ cup (110g) packed light brown sugar
- ¼ cup (50g) granulated sugar
- ¼ teaspoon ground cinnamon
- ⅛ teaspoon ground nutmeg
- A pinch of fine sea salt
- 2 tablespoons cornstarch
- 1 tablespoon fresh lemon juice
- 1 teaspoon pure vanilla extract
For the Gluten-Free Biscuit Topping:
- 2 cups (280g) high-quality gluten-free all-purpose 1-to-1 baking flour (with xanthan gum)
- ¼ cup (50g) granulated sugar
- 2 teaspoons baking powder
- ½ teaspoon fine sea salt
- ½ cup (113g or 1 stick) unsalted butter, very cold and cut into ½-inch cubes
- ¾ cup (180ml) full-fat buttermilk, cold
- 1 tablespoon milk or cream, for brushing
- 2 tablespoons coarse sugar (like turbinado or demerara), for sprinkling
Step-by-Step Instructions for Cobbler Perfection
Follow these detailed steps carefully for a foolproof and delicious result. The process is simple, but the techniques are important.
Part 1: Prepare the Peach Filling
- Preheat and Prepare Pan: Preheat your oven to 375°F (190°C). Have a 9×13 inch baking dish or a similar 3-quart casserole dish ready.
- Combine Ingredients: In a large bowl, gently toss the sliced peaches with the light brown sugar, granulated sugar, cinnamon, nutmeg, and salt.
- Make the Slurry: In a separate small bowl, whisk together the cornstarch and the fresh lemon juice until a smooth paste (a slurry) forms. Whisking it separately prevents lumps of cornstarch in your final filling.
- Thicken the Filling: Pour the cornstarch slurry and the vanilla extract over the peaches. Gently stir everything together until the peaches are evenly coated.
- Transfer to Dish: Pour the peach mixture into your ungreased 9×13 inch baking dish and spread it into an even layer.
- Pre-Bake the Filling: Place the dish in the preheated oven and bake for 10 minutes. This initial bake gives the filling a head start, helps it begin to thicken, and prevents the biscuit topping from getting a soggy bottom.
Part 2: Prepare the Gluten-Free Biscuit Topping
While the peach filling is pre-baking, prepare your biscuit dough.
- Combine Dry Ingredients: In a large bowl, whisk together the gluten-free 1-to-1 flour, granulated sugar, baking powder, and salt.
- Cut in the Cold Butter: Add the cold, cubed butter to the flour mixture. Using a pastry cutter, two knives, or your fingertips, cut the butter into the flour until the mixture resembles coarse crumbs with some pea-sized pieces of butter still visible. Working quickly is key to keeping the butter cold.
- Add Buttermilk: Pour the cold buttermilk over the mixture. Use a fork or a spatula to gently stir until a soft, shaggy dough comes together. Be very careful not to overmix! Stop as soon as the flour is just hydrated. Gluten-free dough can become tough if overworked.
Part 3: Assemble and Bake the Cobbler
- Remove Filling from Oven: Carefully take the hot baking dish with the peach filling out of the oven. The filling should be bubbly around the edges.
- Top with Biscuit Dough: Using a large spoon or a cookie scoop, drop large dollops of the biscuit dough evenly over the hot peach filling. It’s okay to leave some gaps between the dollops; the biscuits will spread as they bake, and the bubbling peach filling peeking through is part of a cobbler’s charm.
- Add the Finishing Touch: Gently brush the tops of the dough dollops with the 1 tablespoon of milk or cream. Sprinkle generously with the coarse sugar. This will create a beautiful, golden, crunchy top.
- Bake to Golden Perfection: Place the assembled cobbler on a baking sheet to catch any potential drips. Return the dish to the 375°F (190°C) oven. Bake for 30-35 minutes, or until the biscuit topping is a deep golden brown and cooked through, and the peach filling is thick and bubbling vigorously around the edges.
- Cool Before Serving: This is an important step! Let the cobbler cool on a wire rack for at least 20-30 minutes before serving. This allows the filling to set up properly. If you scoop into it while it’s piping hot, the filling will be very runny.
Nutrition Facts
- Servings: 8-10 servings
- Calories per serving: Approximately 380-450 calories (This is an estimate and will vary based on the specific gluten-free flour blend used and the size of your peaches).
Preparation and Cook Time
- Prep Time: 20 minutes
- Cook Time: 40-45 minutes
- Total Time: Approximately 1 hour 5 minutes
How to Serve Your Glorious Gluten-Free Peach Cobbler
A warm peach cobbler is a thing of beauty on its own, but the right accompaniment can elevate it to legendary status. It’s best served warm, not piping hot.
- The Classic Scoop:
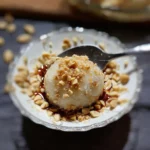
- Vanilla Bean Ice Cream: This is the quintessential pairing for a reason. The cool, creamy vanilla melting into the warm, spiced peaches and soft biscuit is pure heaven.
- Cinnamon Ice Cream: Leans into the warm spice notes of the cobbler for a cozy and comforting combination.
- Salted Caramel Ice Cream: The salty-sweet notes of the caramel provide a delicious and sophisticated contrast to the tangy peaches.
- A Dollop of Cream:
- Freshly Whipped Cream: A light, unsweetened or lightly sweetened whipped cream provides a simple, airy counterpoint to the rich cobbler.
- Bourbon-Infused Whipped Cream: For an adult twist, fold a tablespoon of your favorite bourbon into the whipped cream for a smoky, oaky flavor that pairs beautifully with peaches.
- Crème Fraîche: For a more elegant and tangy option, a dollop of thick crème fraîche cuts through the sweetness beautifully.
- Simple and Unadorned:
- Enjoy a scoop all by itself to fully appreciate the complex flavors and textures you’ve created. A light dusting of extra cinnamon just before serving is also a lovely touch.
Additional Tips for Cobbler Success
- Don’t Overmix the Biscuit Dough: This is the golden rule of any biscuit or scone recipe, and it’s doubly important for gluten-free baking. Mix the dough only until it just comes together. Overworking it will result in a tough, dense topping. A shaggy, slightly messy dough is exactly what you’re looking for.
- How to Easily Peel Peaches: The easiest way to peel a large number of peaches is by blanching them. Bring a large pot of water to a rolling boil. Use a knife to score a small “X” on the bottom of each peach. Drop the peaches into the boiling water for 30-60 seconds. Remove them with a slotted spoon and immediately plunge them into a large bowl of ice water. The skins will slip off effortlessly.
- Fresh vs. Frozen vs. Canned Peaches: Fresh, ripe, in-season peaches will always give you the best flavor and texture. However, this recipe works wonderfully with frozen peaches too! Simply thaw the frozen peaches and drain any excess liquid before using them in the recipe. Canned peaches can also be used in a pinch, but be sure to buy them packed in juice, not heavy syrup, and drain them very well. You may also want to reduce the sugar in the filling slightly.
- Making It Dairy-Free: This recipe can easily be adapted to be dairy-free. For the biscuit topping, use a dairy-free butter substitute (the kind that comes in firm sticks) and a dairy-free buttermilk substitute (mix ¾ cup of unsweetened almond or soy milk with 2 teaspoons of lemon juice or apple cider vinegar and let it sit for 5-10 minutes). Brush the top with a dairy-free milk alternative.
- Look for the Bubbles: The best indicator that your cobbler is done is the filling. Look for thick, jammy bubbles emerging vigorously all around the edges of the pan between the biscuits. This tells you the cornstarch has fully activated and the filling is perfectly thickened. The biscuit topping should be a deep, confident golden brown.
Frequently Asked Questions (FAQ)
Q1: What is the best gluten-free flour to use for this recipe?
A: The best choice is a high-quality “cup-for-cup” or “1-to-1” gluten-free all-purpose flour blend that already contains xanthan gum. Brands like Bob’s Red Mill 1-to-1 Baking Flour, King Arthur Baking’s Gluten-Free Measure for Measure Flour, or Cup4Cup are excellent choices because they are designed to be a direct substitute for regular wheat flour in recipes like this. Using a single flour like almond or coconut flour will not work.
Q2: My biscuit topping was soggy on the bottom. Why did that happen?
A: A soggy bottom is almost always caused by putting the raw biscuit dough directly onto a raw, cold fruit filling. The fruit releases a lot of water as it heats up, which steams the bottom of the biscuits instead of baking them. That’s why the step of pre-baking the filling for 10 minutes is so crucial. It gets the filling hot and bubbly, so when you add the dough, the bottom starts to bake immediately.
Q3: Can I use other fruits besides peaches in this cobbler?
A: Absolutely! This recipe is a fantastic base for all sorts of fruit cobblers. It works beautifully with a mix of berries (like blueberries, blackberries, and raspberries), cherries, or a combination of apples and pears in the fall. You may need to adjust the sugar and cornstarch slightly depending on the sweetness and juiciness of the fruit you choose.
Q4: How should I store and reheat leftover peach cobbler?
A: Cover the cooled cobbler tightly with plastic wrap or transfer it to an airtight container and store it in the refrigerator for up to 4 days. To reheat, you can microwave individual portions for 30-60 seconds. For the best result and to re-crisp the topping, place the desired amount in an oven-safe dish and bake at 350°F (175°C) for 10-15 minutes, or until warmed through.
Q5: My peach filling turned out watery even though I used cornstarch. What went wrong?
A: This can happen for a couple of reasons. You may have used exceptionally juicy peaches, which require a little extra cornstarch (try increasing to 2.5 or 3 tablespoons). Another common reason is not letting the cobbler bake long enough for the cornstarch to fully activate and thicken the juices. Make sure you see those thick, jammy bubbles all around the edges of the pan before you pull it from the oven. Finally, not letting the cobbler cool for at least 20-30 minutes before serving is a key culprit; the filling sets up considerably as it cools.
Gluten Free Peach Cobbler recipe
Ingredients
For the Jammy Peach Filling:
-
6-7 medium ripe peaches (about 3 pounds or 1.3kg), peeled, pitted, and sliced ½-inch thick (you can also use frozen peaches, see FAQ)
-
½ cup (110g) packed light brown sugar
-
¼ cup (50g) granulated sugar
-
¼ teaspoon ground cinnamon
-
⅛ teaspoon ground nutmeg
-
A pinch of fine sea salt
-
2 tablespoons cornstarch
-
1 tablespoon fresh lemon juice
-
1 teaspoon pure vanilla extract
For the Gluten-Free Biscuit Topping:
-
2 cups (280g) high-quality gluten-free all-purpose 1-to-1 baking flour (with xanthan gum)
-
¼ cup (50g) granulated sugar
-
2 teaspoons baking powder
-
½ teaspoon fine sea salt
-
½ cup (113g or 1 stick) unsalted butter, very cold and cut into ½-inch cubes
-
¾ cup (180ml) full-fat buttermilk, cold
-
1 tablespoon milk or cream, for brushing
-
2 tablespoons coarse sugar (like turbinado or demerara), for sprinkling
Instructions
Part 1: Prepare the Peach Filling
-
Preheat and Prepare Pan: Preheat your oven to 375°F (190°C). Have a 9×13 inch baking dish or a similar 3-quart casserole dish ready.
-
Combine Ingredients: In a large bowl, gently toss the sliced peaches with the light brown sugar, granulated sugar, cinnamon, nutmeg, and salt.
-
Make the Slurry: In a separate small bowl, whisk together the cornstarch and the fresh lemon juice until a smooth paste (a slurry) forms. Whisking it separately prevents lumps of cornstarch in your final filling.
-
Thicken the Filling: Pour the cornstarch slurry and the vanilla extract over the peaches. Gently stir everything together until the peaches are evenly coated.
-
Transfer to Dish: Pour the peach mixture into your ungreased 9×13 inch baking dish and spread it into an even layer.
-
Pre-Bake the Filling: Place the dish in the preheated oven and bake for 10 minutes. This initial bake gives the filling a head start, helps it begin to thicken, and prevents the biscuit topping from getting a soggy bottom.
Part 2: Prepare the Gluten-Free Biscuit Topping
While the peach filling is pre-baking, prepare your biscuit dough.
-
Combine Dry Ingredients: In a large bowl, whisk together the gluten-free 1-to-1 flour, granulated sugar, baking powder, and salt.
-
Cut in the Cold Butter: Add the cold, cubed butter to the flour mixture. Using a pastry cutter, two knives, or your fingertips, cut the butter into the flour until the mixture resembles coarse crumbs with some pea-sized pieces of butter still visible. Working quickly is key to keeping the butter cold.
-
Add Buttermilk: Pour the cold buttermilk over the mixture. Use a fork or a spatula to gently stir until a soft, shaggy dough comes together. Be very careful not to overmix! Stop as soon as the flour is just hydrated. Gluten-free dough can become tough if overworked.
Part 3: Assemble and Bake the Cobbler
-
Remove Filling from Oven: Carefully take the hot baking dish with the peach filling out of the oven. The filling should be bubbly around the edges.
-
Top with Biscuit Dough: Using a large spoon or a cookie scoop, drop large dollops of the biscuit dough evenly over the hot peach filling. It’s okay to leave some gaps between the dollops; the biscuits will spread as they bake, and the bubbling peach filling peeking through is part of a cobbler’s charm.
-
Add the Finishing Touch: Gently brush the tops of the dough dollops with the 1 tablespoon of milk or cream. Sprinkle generously with the coarse sugar. This will create a beautiful, golden, crunchy top.
-
Bake to Golden Perfection: Place the assembled cobbler on a baking sheet to catch any potential drips. Return the dish to the 375°F (190°C) oven. Bake for 30-35 minutes, or until the biscuit topping is a deep golden brown and cooked through, and the peach filling is thick and bubbling vigorously around the edges.
-
Cool Before Serving: This is an important step! Let the cobbler cool on a wire rack for at least 20-30 minutes before serving. This allows the filling to set up properly. If you scoop into it while it’s piping hot, the filling will be very runny.
Nutrition
- Serving Size: one normal portion
- Calories: 380-450