


Of all the treats I make for Halloween, nothing disappears from the dessert table faster than these Chocolate Spider Truffles. The first time I made them, I thought they might be a little too spooky for the younger kids at our annual party. I set them on a platter, their little candy eyes staring up, their spindly chocolate legs looking ready to scry away. Within minutes, a crowd of little ghosts, vampires, and superheroes had formed. There were gasps, then giggles, then the tentative reach of a small hand. The first bite was a moment of pure magic. The crisp chocolate shell gave way to the impossibly rich, melt-in-your-mouth truffle center, and suddenly, the spooky spiders weren’t scary at all—they were delicious. My son declared them “the best part of Halloween, after the candy,” which, coming from him, is the highest praise imaginable. These truffles have since become our signature Halloween tradition, a perfect blend of creepy, cute, and utterly decadent that delights kids and adults alike. They aren’t just a dessert; they’re an activity, a centerpiece, and a memory in the making.
The Anatomy of a Perfect Chocolate Spider Truffle
Before we gather our cauldron of ingredients, let’s understand what makes this recipe so special. It’s a creation of contrasts. The success of these spiders lies in the balance of textures and flavors, transforming a simple chocolate truffle into a multi-sensory Halloween experience.
- The Body (The Truffle Core): This is the heart and soul of the treat. We’re creating a classic chocolate ganache—a luscious, silky-smooth mixture of high-quality chocolate and heavy cream. It needs to be firm enough to hold its shape but soft enough to deliver that signature, luxurious melt-in-your-mouth texture. This rich, deep chocolate flavor is the decadent reward inside the spooky exterior.
- The Exoskeleton (The Chocolate Shell): This provides the crucial textural contrast. A thin, crisp shell of hardened chocolate encases the soft ganache. When you bite into it, you get a satisfying snap before the creamy center is revealed. This shell also provides the perfect canvas for our spooky decorations.
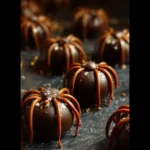
- The Features (The Decorations): This is where the magic happens and our truffles become spiders. The candy eyes give them personality—a little bit goofy, a little bit creepy. The carefully piped chocolate legs complete the illusion, transforming a delicious chocolate ball into a creature that looks like it crawled right out of a storybook.
This recipe is designed to master all three elements, ensuring your spider truffles are as delightful to eat as they are to behold.
Complete with the ingredients amount
The quality of your ingredients will directly impact the final taste and texture of your truffles. For a treat this simple, using the best you can find makes all the difference.
For the Rich Chocolate Truffle Ganache (The Body):
- 10 oz (285g) High-Quality Semisweet or Bittersweet Chocolate (60-72% cacao): This is the star of the show. Do not use standard chocolate chips, as they contain stabilizers that prevent them from melting into a smooth, fluid ganache. Look for high-quality chocolate bars (like Ghirardelli, Lindt, or Callebaut) or chocolate callets/wafers designed for melting. A cacao percentage between 60% and 72% provides a deep, rich chocolate flavor that isn’t overly sweet. Finely chop the chocolate to ensure it melts evenly and quickly.
- ¾ cup (180ml) Heavy Whipping Cream: The fat content in heavy cream (at least 36%) is essential for creating a stable, rich, and creamy ganache. Do not substitute with milk, half-and-half, or light cream, as the ganache will not set properly.
- 2 tbsp (28g) Unsalted Butter, softened to room temperature: Butter adds an extra layer of richness, a beautiful sheen, and a velvety smooth mouthfeel to the finished ganache. Having it at room temperature allows it to emulsify seamlessly into the mixture.
- 1 tbsp Light Corn Syrup or Glucose Syrup: This is a professional trick for perfect truffles. Corn syrup is an invert sugar, which helps prevent the sugar in the chocolate from crystallizing. This results in an ultra-smooth ganache and gives it a longer shelf life. It’s optional, but highly recommended for the best texture.
- 1 tsp Pure Vanilla Extract: Vanilla enhances and rounds out the flavor of the chocolate, adding a layer of aromatic warmth.
For the Chocolate Coating and Spider Decorations:
- 12 oz (340g) Dark or Black Candy Melts OR Tempered Dark Chocolate:
- Candy Melts: This is the easiest and most foolproof option for beginners. Candy melts (like Wilton brand) are designed to melt smoothly and harden quickly with a nice sheen, without the need for tempering. Black candy melts are perfect for creating a spooky, dark spider.
- Tempered Chocolate: For the chocolate purists, using real tempered chocolate will provide a superior flavor and a more satisfying snap. This process is more advanced, involving heating and cooling the chocolate to specific temperatures to stabilize the cocoa butter crystals.
- Candy Eyeballs: You’ll need at least two per truffle. You can find these in the baking aisle of most craft or grocery stores, especially around Halloween. Get a variety of sizes for more character!
- 2 oz (55g) of your remaining melted chocolate or candy melts: This will be used for piping the legs.
Instructions
Follow these detailed steps carefully. We’ll build our spiders in phases, allowing for proper chilling and setting times, which are crucial for success.
Phase 1: Creating the Rich Chocolate Ganache Body
- Prepare the Chocolate: Finely chop your 10 oz of high-quality semisweet or bittersweet chocolate. The smaller and more uniform the pieces, the more evenly and quickly they will melt. Place the chopped chocolate into a medium-sized, heatproof bowl.
- Heat the Cream: In a small saucepan, combine the ¾ cup of heavy cream and 1 tbsp of corn syrup (if using). Heat over medium heat, stirring occasionally, just until the mixture begins to gently simmer around the edges. You’ll see small bubbles forming. Do not let it come to a rolling boil.
- Combine and Emulsify: Immediately pour the hot cream mixture over the chopped chocolate in the bowl. Let it sit, completely undisturbed, for 5 minutes. This allows the heat from the cream to gently and evenly melt the chocolate from the inside out. Do not stir it yet!
- Create the Ganache: After 5 minutes, begin to stir the mixture. Start in the very center of the bowl, using a small spatula or whisk, and make small, gentle circles. The mixture will look broken and unappealing at first—this is normal. Continue stirring, gradually widening your circles to incorporate all the chocolate from the sides. As you stir, the mixture will come together into a thick, dark, and glossy emulsion.
- Add the Finishers: Once the ganache is smooth, add the 2 tbsp of softened butter and 1 tsp of vanilla extract. Gently stir until the butter is fully melted and incorporated, and the ganache is uniformly smooth and shiny.
- Chill the Ganache: Press a piece of plastic wrap directly onto the surface of the ganache to prevent a skin from forming. Let it cool at room temperature for about an hour, then transfer it to the refrigerator to chill until it’s firm enough to scoop, about 2-3 hours. It should have the consistency of firm cookie dough.
Phase 2: Forming the Truffle Bodies
- Scoop the Truffles: Line a baking sheet with parchment paper. Use a small cookie scoop (about 1 tablespoon size) or a regular spoon to portion out the chilled ganache.
- Roll into Balls: Lightly dust your hands with unsweetened cocoa powder to prevent sticking. Quickly roll each portion of ganache between your palms to form a smooth, round ball. Work quickly, as the heat from your hands will begin to soften the ganache.
- Place and Chill Again: Place the rolled truffles on the prepared baking sheet. Once all the ganache is rolled, return the baking sheet to the refrigerator for at least 30 minutes (or the freezer for 15 minutes) to allow the truffles to firm up again before dipping. Cold truffles are essential for a clean coating.
Phase 3: Creating the Chocolate Shell
- Melt the Coating: Place your 12 oz of candy melts or tempered chocolate in a microwave-safe bowl. Microwave in 30-second intervals, stirring well between each interval, until the coating is completely melted and smooth. Be careful not to overheat it. The ideal bowl for dipping is one that is deep enough to submerge a truffle but not too wide.
- Dip the Truffles: Remove the chilled truffles from the refrigerator. Working one at a time, drop a truffle into the melted coating. Use a dipping tool or a fork to roll it around until it’s fully coated.
- Remove and Drip: Lift the truffle out of the coating with the fork. Gently tap the fork on the side of the bowl to allow any excess coating to drip off. A thin, even coat is what you’re aiming for.
- Set on Parchment: Carefully slide the coated truffle off the fork and back onto the parchment-lined baking sheet.
Phase 4: Bringing Your Spiders to Life!
- Attach the Eyes: While the chocolate coating is still wet, immediately press two candy eyeballs onto the top of each truffle to create the spider’s face. You have to work quickly here, as the cold truffle will cause the coating to set fast. If it sets too quickly, you can use a dab of leftover melted chocolate as “glue.”
- Prepare for Piping: Let the coated truffles set completely at room temperature or for a few minutes in the refrigerator. Transfer your remaining 2 oz of melted chocolate or candy melts into a small piping bag fitted with a small, plain round tip (like a Wilton #2 or #3), or into a small zip-top bag with a tiny corner snipped off.
- Pipe the Legs: Once the bodies are firm, it’s time to give them legs. On the parchment paper, pipe four legs on one side of the truffle body, starting from the base and extending outwards. Then, pipe four legs on the other side. A classic spider leg shape involves a small “knee” bend in the middle.
- Final Set: Let the truffles sit at room temperature for about 20-30 minutes, or until the legs are completely firm and hardened. Once set, you can carefully lift them off the parchment paper.
Nutrition Facts (Servings and calories per serving)
- Servings: Approximately 24 truffles
- Calories per serving (1 truffle): 150-180 kcal
Disclaimer: This is an approximation. The actual nutritional value will vary depending on the specific type of chocolate, candy melts, and other ingredients used.
Preparation time
- Active Prep Time: 45 minutes
- Chilling & Setting Time: 3-4 hours
- Total Time: Approximately 4-5 hours (most of this is hands-off chilling time)
How to Serve
Presentation is everything when it comes to these spooky treats. Here’s how to make them the star of your Halloween spread:
- Create a Spider Invasion:
- Arrange the finished spiders on a large white platter or cake stand to make their dark bodies pop.
- Position them as if they are scurrying in different directions for a dynamic, creepy-crawly effect.
- Build a Spider’s Nest:
- Use “cotton candy spider web” (available at party stores or easily made by stretching out cotton candy) and drape it over a platter or a tiered stand.
- Carefully nestle the chocolate spiders within the web for a truly spooky and impressive centerpiece.
- The Graveyard Scene:
- Cover a tray with crushed Oreo cookies to create edible “dirt.”
- Place the spiders crawling over the dirt. You can even add cookie “tombstones” (like Milano cookies) and gummy worms for a full graveyard effect.
- As Cupcake Toppers:
- Place one finished spider truffle on top of a frosted cupcake (orange, green, or purple frosting works well). It’s an easy way to elevate simple cupcakes into gourmet Halloween desserts.
- Party Favors:
- Place one or two spiders in a small, clear cellophane bag.
- Tie the bag with a festive orange and black ribbon for a memorable and delicious take-home treat for your guests.
Additional tips
- Don’t Overheat Your Chocolate: Whether making the ganache or the coating, scorching the chocolate is the fastest way to ruin it. Use low heat, go slowly, and stir frequently. For the ganache, letting the chocolate sit in the hot cream for 5 minutes is a foolproof way to melt it gently.
- Embrace the Chill: Chilling is not an optional step. A well-chilled ganache is easy to roll. A cold, firm truffle ball is essential for dipping, as it helps the outer coating set quickly and prevents the truffle from melting into the warm coating.
- The Fork is Your Friend: A regular dinner fork is one of the best tools for dipping truffles. It allows you to easily lift the truffle and lets the excess coating drip through the tines, giving you a clean, professional finish.
- Practice Your Piping: Before piping legs directly onto your finished truffles, do a few practice runs on a spare piece of parchment paper. This helps you get a feel for the pressure and speed needed to create consistent, non-blobby legs.
- Work in Small Batches: If your kitchen is warm, don’t take all the rolled truffles out of the refrigerator at once. Work with 5-6 at a time, leaving the rest to stay firm in the fridge. This prevents them from softening and becoming difficult to handle while you’re dipping and decorating.
FAQ section
1. Can I use regular chocolate chips to make the ganache?
It’s not recommended. Chocolate chips contain emulsifiers and stabilizers that help them keep their shape during baking. This means they resist melting into the smooth, fluid consistency needed for a perfect ganache. You may end up with a grainy or overly thick texture. For the best results, stick to high-quality chocolate bars or callets.
2. My ganache is too soft and won’t form a ball. What did I do wrong?
This usually happens if the ratio of chocolate to cream is off, or if it simply hasn’t chilled for long enough. If after several hours in the fridge it’s still too soft, you can try to fix it by melting an additional 1-2 ounces of finely chopped chocolate and stirring it into the ganache. Then, chill it again until firm.
3. The candy melt coating is too thick for dipping. How can I thin it?
If your melted candy melts are too thick, you can stir in a very small amount (start with ½ teaspoon) of vegetable shortening or paramount crystals (a professional confectioner’s ingredient). Do not add water, milk, or butter, as this will cause the candy melts to “seize” and become a lumpy, unusable mess.
4. How should I store the finished Chocolate Spider Truffles?
Store your finished spiders in a single layer in an airtight container. They are best kept in a cool, dry place. If your house is warm, you can store them in the refrigerator. However, truffles are best enjoyed at cool room temperature, so let them sit out for about 15-20 minutes before serving to allow the ganache to soften slightly. They will keep for up to a week in the fridge.
5. Can I make these ahead of time?
Yes, this recipe is great for making ahead! You can make the ganache and keep it refrigerated for up to a week before rolling. You can also roll the truffles and freeze them on a baking sheet before dipping. Once frozen solid, transfer them to a freezer-safe bag for up to two months. You can then dip and decorate the frozen truffles (no need to thaw), which actually makes the coating set even faster.
Chocolate Spider Truffles recipe
Ingredients
For the Rich Chocolate Truffle Ganache (The Body):
-
10 oz (285g) High-Quality Semisweet or Bittersweet Chocolate (60-72% cacao): This is the star of the show. Do not use standard chocolate chips, as they contain stabilizers that prevent them from melting into a smooth, fluid ganache. Look for high-quality chocolate bars (like Ghirardelli, Lindt, or Callebaut) or chocolate callets/wafers designed for melting. A cacao percentage between 60% and 72% provides a deep, rich chocolate flavor that isn’t overly sweet. Finely chop the chocolate to ensure it melts evenly and quickly.
-
¾ cup (180ml) Heavy Whipping Cream: The fat content in heavy cream (at least 36%) is essential for creating a stable, rich, and creamy ganache. Do not substitute with milk, half-and-half, or light cream, as the ganache will not set properly.
-
2 tbsp (28g) Unsalted Butter, softened to room temperature: Butter adds an extra layer of richness, a beautiful sheen, and a velvety smooth mouthfeel to the finished ganache. Having it at room temperature allows it to emulsify seamlessly into the mixture.
-
1 tbsp Light Corn Syrup or Glucose Syrup: This is a professional trick for perfect truffles. Corn syrup is an invert sugar, which helps prevent the sugar in the chocolate from crystallizing. This results in an ultra-smooth ganache and gives it a longer shelf life. It’s optional, but highly recommended for the best texture.
-
1 tsp Pure Vanilla Extract: Vanilla enhances and rounds out the flavor of the chocolate, adding a layer of aromatic warmth.
For the Chocolate Coating and Spider Decorations:
-
12 oz (340g) Dark or Black Candy Melts OR Tempered Dark Chocolate:
-
Candy Melts: This is the easiest and most foolproof option for beginners. Candy melts (like Wilton brand) are designed to melt smoothly and harden quickly with a nice sheen, without the need for tempering. Black candy melts are perfect for creating a spooky, dark spider.
-
Tempered Chocolate: For the chocolate purists, using real tempered chocolate will provide a superior flavor and a more satisfying snap. This process is more advanced, involving heating and cooling the chocolate to specific temperatures to stabilize the cocoa butter crystals.
-
-
Candy Eyeballs: You’ll need at least two per truffle. You can find these in the baking aisle of most craft or grocery stores, especially around Halloween. Get a variety of sizes for more character!
-
2 oz (55g) of your remaining melted chocolate or candy melts: This will be used for piping the legs.
Instructions
Phase 1: Creating the Rich Chocolate Ganache Body
-
Prepare the Chocolate: Finely chop your 10 oz of high-quality semisweet or bittersweet chocolate. The smaller and more uniform the pieces, the more evenly and quickly they will melt. Place the chopped chocolate into a medium-sized, heatproof bowl.
-
Heat the Cream: In a small saucepan, combine the ¾ cup of heavy cream and 1 tbsp of corn syrup (if using). Heat over medium heat, stirring occasionally, just until the mixture begins to gently simmer around the edges. You’ll see small bubbles forming. Do not let it come to a rolling boil.
-
Combine and Emulsify: Immediately pour the hot cream mixture over the chopped chocolate in the bowl. Let it sit, completely undisturbed, for 5 minutes. This allows the heat from the cream to gently and evenly melt the chocolate from the inside out. Do not stir it yet!
-
Create the Ganache: After 5 minutes, begin to stir the mixture. Start in the very center of the bowl, using a small spatula or whisk, and make small, gentle circles. The mixture will look broken and unappealing at first—this is normal. Continue stirring, gradually widening your circles to incorporate all the chocolate from the sides. As you stir, the mixture will come together into a thick, dark, and glossy emulsion.
-
Add the Finishers: Once the ganache is smooth, add the 2 tbsp of softened butter and 1 tsp of vanilla extract. Gently stir until the butter is fully melted and incorporated, and the ganache is uniformly smooth and shiny.
-
Chill the Ganache: Press a piece of plastic wrap directly onto the surface of the ganache to prevent a skin from forming. Let it cool at room temperature for about an hour, then transfer it to the refrigerator to chill until it’s firm enough to scoop, about 2-3 hours. It should have the consistency of firm cookie dough.
Phase 2: Forming the Truffle Bodies
-
Scoop the Truffles: Line a baking sheet with parchment paper. Use a small cookie scoop (about 1 tablespoon size) or a regular spoon to portion out the chilled ganache.
-
Roll into Balls: Lightly dust your hands with unsweetened cocoa powder to prevent sticking. Quickly roll each portion of ganache between your palms to form a smooth, round ball. Work quickly, as the heat from your hands will begin to soften the ganache.
-
Place and Chill Again: Place the rolled truffles on the prepared baking sheet. Once all the ganache is rolled, return the baking sheet to the refrigerator for at least 30 minutes (or the freezer for 15 minutes) to allow the truffles to firm up again before dipping. Cold truffles are essential for a clean coating.
Phase 3: Creating the Chocolate Shell
-
Melt the Coating: Place your 12 oz of candy melts or tempered chocolate in a microwave-safe bowl. Microwave in 30-second intervals, stirring well between each interval, until the coating is completely melted and smooth. Be careful not to overheat it. The ideal bowl for dipping is one that is deep enough to submerge a truffle but not too wide.
-
Dip the Truffles: Remove the chilled truffles from the refrigerator. Working one at a time, drop a truffle into the melted coating. Use a dipping tool or a fork to roll it around until it’s fully coated.
-
Remove and Drip: Lift the truffle out of the coating with the fork. Gently tap the fork on the side of the bowl to allow any excess coating to drip off. A thin, even coat is what you’re aiming for.
-
Set on Parchment: Carefully slide the coated truffle off the fork and back onto the parchment-lined baking sheet.
Phase 4: Bringing Your Spiders to Life!
-
Attach the Eyes: While the chocolate coating is still wet, immediately press two candy eyeballs onto the top of each truffle to create the spider’s face. You have to work quickly here, as the cold truffle will cause the coating to set fast. If it sets too quickly, you can use a dab of leftover melted chocolate as “glue.”
-
Prepare for Piping: Let the coated truffles set completely at room temperature or for a few minutes in the refrigerator. Transfer your remaining 2 oz of melted chocolate or candy melts into a small piping bag fitted with a small, plain round tip (like a Wilton #2 or #3), or into a small zip-top bag with a tiny corner snipped off.
-
Pipe the Legs: Once the bodies are firm, it’s time to give them legs. On the parchment paper, pipe four legs on one side of the truffle body, starting from the base and extending outwards. Then, pipe four legs on the other side. A classic spider leg shape involves a small “knee” bend in the middle.
-
Final Set: Let the truffles sit at room temperature for about 20-30 minutes, or until the legs are completely firm and hardened. Once set, you can carefully lift them off the parchment paper.
Nutrition
- Serving Size: one normal portion
- Calories: 150-180 kcal


