Ingredients
-
- Berries (Dino Eggs & Small Bites):
-
- Strawberries: 1 pint, hulled (can be left whole, halved, or sliced)
-
- Blueberries: 1 pint, washed
-
- Raspberries: 1 pint, washed
-
- Blackberries: 1 pint, washed
-
- Grapes: 1-2 cups, red or green, seedless (can be dinosaur “eyes” or “eggs”)
-
- Berries (Dino Eggs & Small Bites):
-
- Melons (Dino Body Parts & Scales):
-
- Watermelon: ½ small seedless watermelon, cubed, balled, or cut into fun shapes with cookie cutters (e.g., triangles for scales)
-
- Cantaloupe: 1 small, cubed, balled, or cut into fun shapes
-
- Honeydew Melon: 1 small, cubed, balled, or cut into fun shapes
-
- Melons (Dino Body Parts & Scales):
-
- Tropical & Other Fruits (Dino Spikes, Necks & More):
-
- Kiwi: 3-4, peeled and sliced into thick rounds or cut into jagged “leaf” shapes
-
- Pineapple: 1 medium, cored and cubed or cut into triangles/spears for “spikes”
-
- Mango: 1-2 ripe but firm, peeled and cubed
-
- Oranges/Mandarins: 2-3, peeled and segmented
-
- Bananas: 2-3, sliced (best if added just before serving or treated with lemon juice to prevent browning)
-
- Tropical & Other Fruits (Dino Spikes, Necks & More):
-
- Special Equipment & Optional Additions:
-
- Skewers: Wooden or bamboo skewers (about 6-10 inches long). If using for very young children, consider blunt-ended skewers or alternatives.
-
- Small Cookie Cutters: Dinosaur shapes, stars, triangles, or circles can add extra flair.
-
- Lemon Juice: 1-2 tablespoons (optional, to prevent browning on fruits like apples or bananas if using).
-
- Optional Dip (The “Watering Hole”):
-
- Yogurt Dip: 1 cup plain or vanilla Greek yogurt mixed with a teaspoon of honey or maple syrup.
-
- Chocolate Dip: Melted dark or milk chocolate (for a more indulgent treat).
-
- Fruit Puree Dip: Blended strawberries or raspberries.
-
- Optional Dip (The “Watering Hole”):
-
- Special Equipment & Optional Additions:
Instructions
-
- Prepare Your “Paleontology Lab” (Workstation):
-
- Wash your hands thoroughly.
-
- Clean all fruits under cool running water. Pat them dry gently with paper towels.
-
- Set up a clean cutting board and have your skewers and any cookie cutters ready.
-
- Prepare Your “Paleontology Lab” (Workstation):
-
- Cut and Shape the Fruits:
-
- Berries: Hull strawberries if needed. Leave smaller berries like blueberries and raspberries whole. Grapes can be left whole or halved for smaller children (halve lengthwise to reduce choking risk).
-
- Melons: Cut melons in half, scoop out the seeds. Cut the flesh into 1-inch cubes, use a melon baller to create spheres (“dino eggs”), or slice thinly and use cookie cutters to create dinosaur shapes, triangles (for “Stegosaurus plates”), or other fun forms.
-
- Kiwi: Peel and slice into ½-inch thick rounds. You can also cut these rounds into halves or quarters, or use a small knife to create jagged “leaf” or “spike” shapes.
-
- Pineapple: Remove the core and tough outer skin. Cut into 1-inch chunks or long, triangular “spear” shapes for a dramatic effect.
-
- Mango: Peel and cut the flesh away from the pit. Dice into 1-inch cubes.
-
- Oranges/Mandarins: Peel and separate into segments.
-
- Bananas/Apples (if using): Slice just before assembling. If preparing slightly ahead, toss these fruits gently in a bowl with a tablespoon or two of lemon juice to prevent browning.
-
- Cut and Shape the Fruits:
-
- Plan Your “Dinosaur” Designs (Optional but Fun!):
-
- Think about creating patterns. For example:
-
- Long-Neck Brontosaurus: A trail of green grapes for the neck, a chunk of melon for the body, more grapes for the tail.
-
- Stegosaurus Spine: Alternate melon cubes with triangular pineapple or kiwi “plates.”
-
- Rainbow-Saurus: Simply thread fruits in a rainbow color order (strawberry, orange segment, pineapple, kiwi, blueberry, grape).
-
- Dino Egg Nests: A cluster of melon balls and grapes at one end.
-
- Think about creating patterns. For example:
-
- Plan Your “Dinosaur” Designs (Optional but Fun!):
-
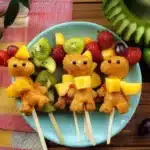
- Thread the Fruits onto Skewers:
-
- Safety First: If children are helping, supervise them closely, especially with pointed skewers. For younger children, an adult should do the skewering.
-
- Carefully thread the fruit pieces onto the skewers. Leave a little space at each end of the skewer for easier handling.
-
- Vary the colors, shapes, and textures on each skewer for maximum visual appeal.
-
- Don’t overcrowd the skewers, as this can make them harder to eat and can cause softer fruits to break.
-
- You can make all skewers identical or create a variety of different “Fruit-A-Saurus” species.
-
- Thread the Fruits onto Skewers:
-
- Arrange and Serve:
-
- Once all skewers are assembled, arrange them attractively on a platter.
-
- If using a dip, place it in a small bowl in the center or alongside the platter.
-
- Serve immediately for the best freshness, or cover and refrigerate for up to a few hours.
-
- Arrange and Serve:
Nutrition
- Serving Size: one normal portion
- Calories: 50-100