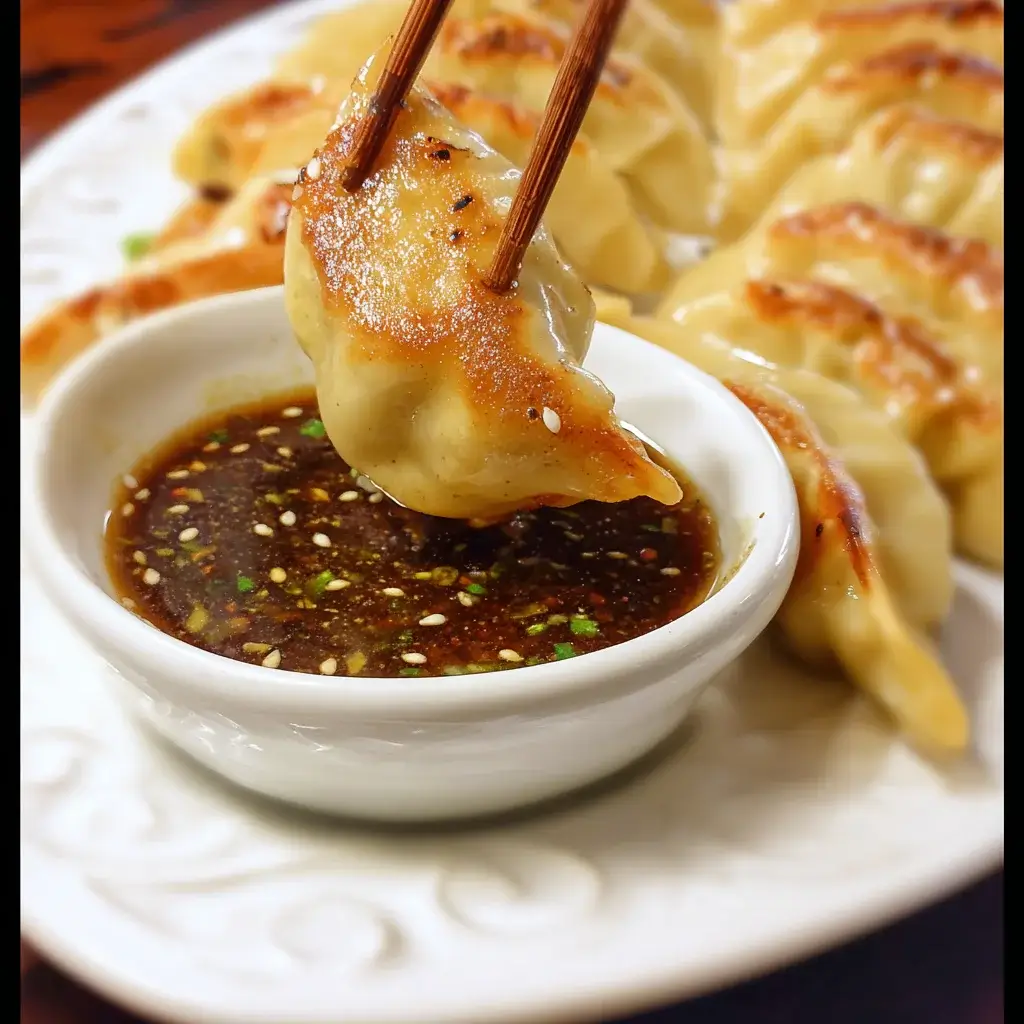

Of all the quick weeknight dinners in my arsenal, none disappear from the table faster than a heaping platter of perfectly cooked frozen potstickers. For years, I followed the package directions, often ending up with a mixed bag of results – some were a bit soggy, others stuck stubbornly to the pan, and the crispy bottom I craved was more of a happy accident than a reliable outcome. But then, after a bit of trial, error, and a dash of culinary stubbornness, I cracked the code. Now, a bag of frozen potstickers isn’t just a backup meal; it’s a planned event. The sizzle as they hit the hot pan, the satisfying hiss when the water is added, and the final reveal of a golden-brown, shatteringly crisp bottom paired with a tender, juicy top… it’s pure magic. The dipping sauce, a simple but perfectly balanced concoction, is the final touch that elevates this humble freezer staple into something truly special. The kids call them “crispy-soft dumplings,” and there’s never, ever a single one left. This is more than just a recipe; it’s a foolproof method for transforming a simple ingredient into a restaurant-quality feast in under 15 minutes.
The Ultimate Guide to Perfect Frozen Potstickers
Welcome to your definitive resource for cooking frozen potstickers. We’re not just going to cook them; we’re going to master them. Forget soggy, sticky dumplings forever. With this guide, you’ll achieve that coveted textural contrast—a deeply golden, crispy-fried bottom and a tender, perfectly steamed top—every single time. And the dipping sauce? It’s a game-changer that you’ll want to put on everything.
Why This Method Works So Well
Before we dive into the recipe, let’s understand the “why” behind this technique. This isn’t just about heating them through; it’s a specific culinary process designed for maximum deliciousness.
- The Initial Pan-Fry: This step is all about creating the “guo tie” or “pot-stuck” crust. Searing the flat bottoms of the dumplings in hot oil develops a deep, savory, golden-brown crust through the Maillard reaction. This is where the flavor foundation is built.
- The Steam-Fry: By adding water to the hot pan and immediately covering it, we create a high-pressure steam environment. This steam does two crucial things: it fully cooks the filling and the wrapper dough on the top and sides, making them tender and chewy.
- The Final Crisp: Once the water evaporates, the potstickers fry in the remaining oil for another minute or two. This final step drives off any remaining moisture from the bottom crust, making it extra-crisp and ensuring it doesn’t get soggy.
This three-stage process ensures a perfect textural symphony in every single bite.
Choosing the Best Frozen Potstickers
The freezer aisle can be overwhelming. While this recipe will work with any brand, here are a few things to look for to ensure the best results:
- Filling: Classic fillings include pork and cabbage, chicken and vegetable, or all-vegetable. Choose what you love! Pork tends to be juicier due to its higher fat content, while vegetable options are often lighter.
- Wrapper Thickness: Look for potstickers with a relatively thin wrapper. Overly thick or doughy wrappers can become gummy when steamed and may not cook through as evenly.
- Shape: The classic crescent or half-moon shape with a flat bottom is ideal for this pan-frying method as it provides a large surface area for crisping.
Don’t be afraid to try a few different brands to find your family’s favorite. Some popular options you might find are from brands like Bibigo, Trader Joe’s, or Tai Pei, but even store brands can be excellent.
Ingredients for Perfect Potstickers & Dipping Sauce
This recipe is designed for a standard-sized bag of frozen potstickers and yields a generous amount of our signature dipping sauce.
For the Frozen Potstickers:
- Frozen Potstickers: 1 bag (approx. 16-20 ounces or 20-25 potstickers)
- Neutral Oil: 2 tablespoons (such as canola, vegetable, grapeseed, or avocado oil)
- Water: ½ to ⅔ cup, cool or room temperature
For the Ultimate Dipping Sauce:
- Low-Sodium Soy Sauce: ¼ cup (or Tamari for a gluten-free option)
- Rice Vinegar: 2 tablespoons (unseasoned is best)
- Toasted Sesame Oil: 1 teaspoon
- Freshly Grated Ginger: 1 teaspoon
- Freshly Minced Garlic: 1 clove
- Honey or Maple Syrup: ½ teaspoon (optional, to balance the acidity)
- Chili Garlic Sauce or Sriracha: ½ to 1 teaspoon (or more, to taste)
- Optional Garnishes for Sauce: Finely sliced scallions (green parts only), toasted sesame seeds.
Step-by-Step Instructions
Follow these steps precisely for flawless results. The key is to control the heat and be patient during the final crisping stage.
Part 1: Prepare the Dipping Sauce
- Combine Ingredients: In a small bowl, whisk together the low-sodium soy sauce, rice vinegar, toasted sesame oil, grated ginger, minced garlic, optional honey, and chili garlic sauce.
- Let it Mingle: Set the sauce aside while you cook the potstickers. This gives the flavors of the garlic and ginger time to infuse into the sauce, making it even more delicious. If you have time, making it 30 minutes ahead is even better.
Part 2: Cook the Frozen Potstickers to Perfection
- Heat the Pan and Oil: Place a large, 10 or 12-inch non-stick skillet with a tight-fitting lid over medium-high heat. Add the 2 tablespoons of neutral oil and swirl to coat the bottom of the pan evenly. The oil is ready when it shimmers slightly. A non-stick pan is highly recommended to prevent any possibility of sticking.
- Arrange the Potstickers: Carefully place the frozen potstickers in a single layer in the hot pan, flat-side down. You can arrange them in a circular pattern or in rows. Do not thaw them first! They must be cooked from frozen. You should hear a satisfying sizzle as they hit the pan. Don’t overcrowd the pan; leave a little space between each potsticker. If necessary, cook in two batches.
- Pan-Fry for the Crust: Let the potstickers fry, undisturbed, for 2-3 minutes. The goal is to get a beautiful, deep golden-brown crust on the bottom. You can lift one gently with tongs to check the color.
- Add Water and Steam: Have your lid ready. Carefully pour the ½ cup of water into the hot pan. It will sizzle, bubble, and steam aggressively, so be cautious. Immediately cover the pan with the tight-fitting lid to trap the steam.
- Steam to Cook Through: Reduce the heat to medium and let the potstickers steam for 6-8 minutes, or until most of the water has been absorbed/evaporated. You will hear the loud sizzling subside as the water cooks off. This step cooks the filling and softens the wrapper.
- The Final Crisp: Once you hear the sizzling sound return, it means the water is gone. Remove the lid. There might be a starchy film on the bottom of the pan—this is normal and will contribute to the crust. Let the potstickers continue to cook for another 1-2 minutes to allow the bottoms to re-crisp and get even deeper in color.
- Serve Immediately: Use a spatula to remove the potstickers from the pan and transfer them to a serving platter, crispy side up. Serve immediately with the prepared dipping sauce.
Nutrition Facts
- Servings: Approximately 4-5 servings
- Calories per serving (approx. 5 potstickers + sauce): 350-450 kcal
Disclaimer: The nutritional information is an estimate and will vary significantly based on the brand of frozen potstickers used (pork vs. chicken vs. vegetable), the exact size of the potstickers, and the amount of sauce consumed.
Preparation and Cook Time
- Preparation Time: 5 minutes (for making the sauce)
- Cook Time: 10-13 minutes
- Total Time: Approximately 15-18 minutes
This truly is one of the fastest and most satisfying meals you can make.
How to Serve Your Perfect Potstickers
While fantastic on their own, potstickers can be the star of a larger meal or part of an appetizer spread. Here’s how to serve them for maximum impact:
- As an Appetizer:
- Arrange them crispy-side-up on a large platter.
- Place the bowl of dipping sauce in the center for easy access.
- Garnish the entire platter with a sprinkle of toasted sesame seeds and thinly sliced scallions for a pop of color and flavor.
- As a Main Course:
- With Rice: Serve a generous portion of potstickers alongside a bowl of fluffy steamed jasmine or short-grain rice. The rice is perfect for soaking up any extra dipping sauce.
- With a Simple Salad: A crisp, refreshing Asian-inspired salad is a perfect counterpoint. Try a simple cucumber salad with sesame and rice vinegar, or a slaw made with shredded cabbage, carrots, and a light vinaigrette.
- With Steamed Vegetables: A side of steamed broccoli, bok choy, or edamame drizzled with a touch of sesame oil makes for a well-rounded and healthy meal.
- As Part of a Larger Spread:
- Create a “Dumpling Night” by pairing them with other Asian-inspired appetizers like spring rolls, crab rangoon, or a savory scallion pancake.
- Add them to a bowl of simple noodle soup, like a miso or chicken broth with noodles. They will absorb the broth and become wonderfully plump, though you will lose the crispy bottom.
Alternative Cooking Methods
While the pan-fry and steam method is the gold standard for classic potstickers, here are other ways to cook them from frozen.
How to Cook Frozen Potstickers in an Air Fryer
This method is fantastic for achieving an all-over crispy texture, more like a fried wonton than a traditional potsticker.
- Preheat your air fryer to 380°F (195°C).
- Lightly spray the frozen potstickers with cooking spray or toss them in a teaspoon of oil. This prevents them from drying out and helps them crisp up.
- Arrange the potstickers in a single layer in the air fryer basket. Do not overcrowd.
- Air fry for 8-12 minutes, flipping or shaking the basket halfway through, until they are golden brown and cooked through.
- Serve immediately with the dipping sauce.
How to Steam Frozen Potstickers
For a lighter, healthier option that results in a soft, chewy dumpling all over, steaming is a great choice.
- Line a bamboo or metal steamer basket with parchment paper or cabbage leaves to prevent sticking. If using parchment, poke a few holes in it to allow steam to circulate.
- Arrange the frozen potstickers in a single layer in the basket, leaving space between each one.
- Fill a wok or pot with about an inch of water and bring it to a boil.
- Place the steamer basket over the boiling water, cover, and steam for 8-10 minutes, or until the wrappers are translucent and the filling is cooked through.
- Serve immediately with the dipping sauce.
Additional Tips for Potsticker Perfection
- Don’t Thaw Them: This is the most important rule. Cooking potstickers from frozen is essential for the best texture. Thawing them makes the wrappers gummy and prone to tearing. The direct heat on the frozen dumpling is what creates the perfect crust while the inside steams.
- Use a Non-Stick Skillet: While you can use a well-seasoned cast iron or stainless steel pan, a good quality non-stick skillet makes the process foolproof. It guarantees an easy release, ensuring your beautiful, crispy bottoms stay attached to the potstickers and don’t get left behind in the pan.
- Control Your Heat: The initial sear needs medium-high heat to get a quick, crisp crust. But once you add the water and cover the pan, you must reduce the heat to medium. If the heat is too high during the steaming phase, the water will evaporate too quickly before the filling has a chance to cook through.
- Customize Your Dipping Sauce: The sauce recipe provided is a fantastic starting point, but feel free to make it your own!
- More Heat: Add more chili sauce, a dash of chili oil, or a pinch of red pepper flakes.
- More Sweetness: Add a little more honey or a touch of mirin.
- More Funk: A tiny drop of fish sauce can add incredible umami depth.
- Citrus Kick: A squeeze of fresh lime juice can brighten everything up.
- Don’t Be Afraid of the “Lace”: Sometimes, if your potstickers contain a bit of starch on the outside, the evaporating water will leave behind a thin, crispy, lattice-like crust connecting the dumplings. This is known as “potsticker lace” and is considered a delicious bonus by many connoisseurs! To encourage it, you can add a teaspoon of cornstarch to the water before pouring it into the pan.
Frequently Asked Questions (FAQ)
Q1: My potstickers always stick to the pan. What am I doing wrong?
This is the most common issue and usually has two causes. First, you might not be using a non-stick pan. A non-stick surface is the best defense against sticking. Second, you may not be using enough oil, or your pan wasn’t hot enough when you added the potstickers. Ensure the pan and oil are properly heated before adding the dumplings, which creates an instant sear that helps prevent sticking.
Q2: Can I make the dipping sauce ahead of time?
Absolutely! The dipping sauce actually gets better as it sits. You can make it up to 3 days in advance and store it in an airtight container in the refrigerator. Just give it a good stir before serving, as the ingredients may settle.
Q3: Why are my potstickers soggy instead of crispy?
Sogginess is usually the result of too much water or not allowing the water to fully evaporate. Make sure you’re using the correct amount of water (just enough to come about ¼ of the way up the potstickers). The most crucial step is the final fry after the lid comes off. You must wait until you hear the sizzling sound again, which signals that all the water is gone and the dumplings are frying in the oil. Give them that extra minute or two to crisp back up.
Q4: Can I cook these in the microwave?
While you technically can heat frozen potstickers in the microwave, it is not recommended. The result will be a uniformly soft, often rubbery or gummy dumpling with none of the signature crispy texture. Microwaving essentially just steams them in their own moisture, leading to a very disappointing outcome. For a delicious experience, stick to the pan-fry, air-fry, or steaming methods.
Q5: What’s the difference between potstickers, dumplings, and gyoza?
This is a great question! “Dumpling” is a very broad category for a piece of dough wrapped around a filling. A “potsticker” is a specific type of Chinese dumpling (called jiaozi) that is pan-fried and then steamed. The name comes from the way they stick to the pot (or wok) to form the crust. “Gyoza” are the Japanese version of potstickers. They are very similar but are often smaller, have a thinner wrapper, and a filling that is more finely textured, often with a more pronounced garlic flavor. The cooking method, however, is virtually identical.
Frozen Potstickers with Dipping Sauce recipe
Ingredients
For the Frozen Potstickers:
-
Frozen Potstickers: 1 bag (approx. 16-20 ounces or 20-25 potstickers)
-
Neutral Oil: 2 tablespoons (such as canola, vegetable, grapeseed, or avocado oil)
-
Water: ½ to ⅔ cup, cool or room temperature
For the Ultimate Dipping Sauce:
-
Low-Sodium Soy Sauce: ¼ cup (or Tamari for a gluten-free option)
-
Rice Vinegar: 2 tablespoons (unseasoned is best)
-
Toasted Sesame Oil: 1 teaspoon
-
Freshly Grated Ginger: 1 teaspoon
-
Freshly Minced Garlic: 1 clove
-
Honey or Maple Syrup: ½ teaspoon (optional, to balance the acidity)
-
Chili Garlic Sauce or Sriracha: ½ to 1 teaspoon (or more, to taste)
-
Optional Garnishes for Sauce: Finely sliced scallions (green parts only), toasted sesame seeds.
Instructions
Part 1: Prepare the Dipping Sauce
-
Combine Ingredients: In a small bowl, whisk together the low-sodium soy sauce, rice vinegar, toasted sesame oil, grated ginger, minced garlic, optional honey, and chili garlic sauce.
-
Let it Mingle: Set the sauce aside while you cook the potstickers. This gives the flavors of the garlic and ginger time to infuse into the sauce, making it even more delicious. If you have time, making it 30 minutes ahead is even better.
Part 2: Cook the Frozen Potstickers to Perfection
-
Heat the Pan and Oil: Place a large, 10 or 12-inch non-stick skillet with a tight-fitting lid over medium-high heat. Add the 2 tablespoons of neutral oil and swirl to coat the bottom of the pan evenly. The oil is ready when it shimmers slightly. A non-stick pan is highly recommended to prevent any possibility of sticking.
-
Arrange the Potstickers: Carefully place the frozen potstickers in a single layer in the hot pan, flat-side down. You can arrange them in a circular pattern or in rows. Do not thaw them first! They must be cooked from frozen. You should hear a satisfying sizzle as they hit the pan. Don’t overcrowd the pan; leave a little space between each potsticker. If necessary, cook in two batches.
-
Pan-Fry for the Crust: Let the potstickers fry, undisturbed, for 2-3 minutes. The goal is to get a beautiful, deep golden-brown crust on the bottom. You can lift one gently with tongs to check the color.
-
Add Water and Steam: Have your lid ready. Carefully pour the ½ cup of water into the hot pan. It will sizzle, bubble, and steam aggressively, so be cautious. Immediately cover the pan with the tight-fitting lid to trap the steam.
-
Steam to Cook Through: Reduce the heat to medium and let the potstickers steam for 6-8 minutes, or until most of the water has been absorbed/evaporated. You will hear the loud sizzling subside as the water cooks off. This step cooks the filling and softens the wrapper.
-
The Final Crisp: Once you hear the sizzling sound return, it means the water is gone. Remove the lid. There might be a starchy film on the bottom of the pan—this is normal and will contribute to the crust. Let the potstickers continue to cook for another 1-2 minutes to allow the bottoms to re-crisp and get even deeper in color.
-
Serve Immediately: Use a spatula to remove the potstickers from the pan and transfer them to a serving platter, crispy side up. Serve immediately with the prepared dipping sauce.
Nutrition
- Serving Size: one normal portion
- Calories: 350-450 kcal