Ingredients
For the No-Spread Sugar Cookies (The Canvas):
-
Unsalted Butter: 1 cup (2 sticks or 226g), softened to room temperature
-
Granulated Sugar: 1 cup (200g)
-
Large Egg: 1, at room temperature
-
Vanilla Extract: 2 teaspoons
-
All-Purpose Flour: 3 cups (360g), plus more for rolling
-
Baking Powder: 1/2 teaspoon
-
Salt: 1/4 teaspoon
For the Royal Icing (The Background):
-
Powdered Sugar: 4 cups (480g), sifted
-
Meringue Powder: 3 tablespoons
-
Warm Water: 6-8 tablespoons (adjust for consistency)
-
Clear Vanilla Extract: 1 teaspoon (optional, for flavor)
For the Edible “Blood” (The Spatter):
-
Red Gel Food Coloring: 2 teaspoons (a good quality, no-taste red is best)
-
Light Corn Syrup: 2 tablespoons
-
Water: 1 teaspoon
-
Unsweetened Cocoa Powder: 1/8 teaspoon (this is the secret ingredient for a realistic color)
Instructions
Part 1: Making and Chilling the Sugar Cookie Dough
-
Cream Butter and Sugar: In the bowl of a stand mixer fitted with the paddle attachment, or in a large bowl with a hand mixer, beat the softened butter and granulated sugar together on medium-high speed until light and fluffy, about 3-4 minutes.
-
Add Wet Ingredients: Add the room temperature egg and vanilla extract. Beat on medium speed until fully combined, scraping down the sides of the bowl as needed.
-
Combine Dry Ingredients: In a separate medium bowl, whisk together the all-purpose flour, baking powder, and salt.
-
Combine Wet and Dry: With the mixer on low speed, gradually add the dry ingredients to the wet ingredients. Mix until just combined. Be careful not to overmix, as this can lead to tough cookies. The dough will be thick and slightly crumbly.
-
Chill the Dough: Divide the dough in half, form each half into a flat disk, and wrap tightly in plastic wrap. Refrigerate for at least 2 hours, or preferably overnight. This step is crucial for preventing the cookies from spreading.
Part 2: Rolling and Baking the Cookies
-
Preheat and Prepare: Preheat your oven to 350°F (175°C). Line two large baking sheets with parchment paper.
-
Roll the Dough: Lightly flour your work surface and rolling pin. Take one disk of dough from the refrigerator. Roll it out to approximately 1/4-inch thickness.
-
Cut Out Shapes: Use a round cookie cutter (about 2.5-3 inches in diameter) to cut out your cookies. Place the cutouts on the prepared baking sheets, about 1-2 inches apart. You can re-roll the scraps once.
-
Optional Chill: For extra insurance against spreading, place the entire baking sheet of cut-out cookies into the freezer for 10-15 minutes before baking.
-
Bake: Bake for 10-12 minutes, or until the edges are just beginning to turn a light golden brown. The centers should still look pale.
-
Cool: Let the cookies cool on the baking sheet for 5 minutes before transferring them to a wire rack to cool completely. It is essential that the cookies are 100% cool before you begin icing them.
Part 3: Preparing and Applying the Royal Icing
-
Mix Icing Ingredients: In a large, clean, grease-free bowl, whisk together the sifted powdered sugar and meringue powder.
-
Add Water: Add 6 tablespoons of warm water and the clear vanilla extract (if using). Using a stand mixer with the whisk attachment or a hand mixer, beat on low speed until combined, then increase to high speed and beat for about 5-7 minutes, until the icing is glossy and forms stiff peaks.
-
Achieve Flood Consistency: This is the most important step for the icing. You want a “flood” consistency. To test this, add a tiny bit more water, a teaspoon at a time, mixing well after each addition. Drag a knife through the surface of the icing. It should take about 15-20 seconds for the line to disappear completely. If it’s too thick, add a bit more water. If it’s too thin, add a bit more sifted powdered sugar.
-
Ice the Cookies: Transfer the icing to a piping bag or a squeeze bottle. Outline the edge of each completely cooled cookie, then “flood” the inside by filling it in. Use a toothpick or scribe tool to guide the icing into the corners and pop any air bubbles.
-
Let it Dry: Place the iced cookies on a flat surface and let them dry completely. This can take anywhere from 8 hours to a full 24 hours, depending on the humidity in your home. The surface must be rock hard before you can apply the blood spatter.
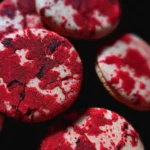
Part 4: The Fun Part – Creating the Blood Spatter Effect
-
Prepare Your Workspace: This part can get messy! Protect your work surface by laying down a large sheet of parchment paper, wax paper, or a disposable tablecloth.
-
Mix the Edible Blood: In a small bowl, whisk together the red gel food coloring, corn syrup, water, and the secret ingredient, cocoa powder. Mix until it’s completely smooth and has the consistency of thin paint.
-
Set Up Your Cookies: Arrange your completely dry, iced cookies on the protected surface.
-
Spatter! There are two main techniques for this:
-
The Flick Technique: Dip a food-safe paintbrush or a clean, new toothbrush into the edible blood mixture. Hold the brush over the cookies and use your thumb to flick the bristles, sending a fine spray of “blood” over the cookies. Vary the distance and the force of your flick to create different patterns of fine mist and larger drops.
-
The Tap Technique: Dip the brush in the blood mixture. Hold it in one hand over the cookies and use your other hand to firmly tap the handle of the brush. This will create larger, more distinct drops and drips.
-
-
Create a Story: Use a combination of both techniques. Add a few deliberate, larger drips by letting the mixture fall directly from the tip of your brush. Think about creating a “story” on each cookie for a more realistic and varied effect.
-
Let the “Blood” Dry: Allow the blood spatter to dry completely. This will take at least 2-4 hours. The corn syrup will keep it slightly glossy, even when dry.
Nutrition
- Serving Size: one normal portion
- Calories: 180-220 kcal