


I still remember the first time I made these Blood Spatter Cookies for our annual Halloween party. I was a little hesitant, wondering if they’d be too gruesome for some of the younger kids and, let’s be honest, some of the more squeamish adults. I laid them out on a dark platter, scattered amongst some fake cobwebs and plastic spiders, and waited. The first reaction was a collective gasp, followed by nervous laughter. But once the bravest person—my nephew, of course—took a bite, the tide turned. His eyes widened, not in horror, but in delight. “These are just really good sugar cookies!” he exclaimed. Soon, the entire platter was gone. They became the talk of the party, the perfect blend of macabre fun and genuinely delicious flavor. They aren’t just a gimmick; they are a buttery, sweet, and perfectly crisp sugar cookie with a smooth royal icing that provides the perfect canvas for the “crime scene.” This recipe has since become a non-negotiable tradition in our house, a wonderfully creepy project that gets everyone excited for the spooky season.
Why This Blood Spatter Cookie Recipe is a Killer Choice
Before we dive into the forensic details of creating these masterpieces, let’s talk about why this specific recipe is destined to become your go-to for all things spooky. It’s more than just a novelty; it’s a well-crafted treat that delivers on all fronts.
- Visually Stunning: Let’s face it, these cookies are showstoppers. They are the ultimate centerpiece for a Halloween party, a true-crime marathon night, or a Dexter-themed viewing. The stark contrast of the bright red “blood” against the pure white icing is dramatic and incredibly effective.
- Surprisingly Easy: While they look complex and professionally made, the process is straightforward. The cookie dough is a classic, no-fail recipe, the royal icing is simple to whip up, and the spattering technique is a fun, almost therapeutic, activity that even kids can help with (with proper supervision, of course!).
- Deliciously Deceptive: Beneath the gruesome exterior lies a truly delicious cookie. We use a classic butter sugar cookie recipe that results in a cookie that is soft in the center with slightly crisp edges. It’s sweet, buttery, and holds its shape perfectly, making it the ideal base.
- Completely Customizable: This recipe is a fantastic starting point. You can change the shape of the cookies, add different flavor extracts to the cookie or the “blood,” and even experiment with different “crime scene” evidence like broken “glass” made from melted sugar.
Anatomy of a Perfect Crime Scene: The Key Components
Understanding the role of each component is crucial to achieving the best results. A perfect Blood Spatter Cookie is a symphony of three distinct parts working in harmony.
The Cookie Base: A Canvas for Your Creation
The foundation of this recipe is a sturdy, flavorful sugar cookie. We opt for a classic recipe that doesn’t spread too much during baking. This is critical. If your cookies spread, you lose the defined shape and the flat surface needed for perfect icing. The flavor is a simple, classic vanilla and butter combination, which complements the sweetness of the icing without competing with it. The pale, uniform color of the baked cookie also ensures that the white icing on top looks as bright and stark as possible.
The Icing: The Stark White Background
For these cookies, royal icing is non-negotiable. While buttercream is delicious, it doesn’t dry hard and smooth. Royal icing, made with powdered sugar, meringue powder (or egg whites), and water, dries to a completely hard, matte finish. This creates the perfect, pristine white “canvas” that makes the red spatter pop. The hard surface also ensures that your spatter design won’t smudge or bleed once it’s set, making the cookies easy to stack, store, and transport.
The “Blood”: Creating a Realistic (and Delicious) Spatter
The star of the show is the edible blood. Our recipe for this is simple but incredibly effective. It uses a combination of red gel food coloring for a deep, vibrant color, a touch of corn syrup to give it that slightly viscous, glossy look of real blood, and a tiny, almost imperceptible amount of cocoa powder. The cocoa powder is a secret weapon; it deepens the red color, moving it from a bright, cartoony red to a more realistic, darker, arterial shade. It also adds a very subtle hint of chocolate flavor that pairs beautifully with the vanilla cookie.
Blood Spatter Cookies Recipe: The Complete Ingredients List
Gather your evidence! Having all your ingredients measured and ready to go will make the baking process smooth and enjoyable.
For the No-Spread Sugar Cookies (The Canvas):
- Unsalted Butter: 1 cup (2 sticks or 226g), softened to room temperature
- Granulated Sugar: 1 cup (200g)
- Large Egg: 1, at room temperature
- Vanilla Extract: 2 teaspoons
- All-Purpose Flour: 3 cups (360g), plus more for rolling
- Baking Powder: 1/2 teaspoon
- Salt: 1/4 teaspoon
For the Royal Icing (The Background):
- Powdered Sugar: 4 cups (480g), sifted
- Meringue Powder: 3 tablespoons
- Warm Water: 6-8 tablespoons (adjust for consistency)
- Clear Vanilla Extract: 1 teaspoon (optional, for flavor)
For the Edible “Blood” (The Spatter):
- Red Gel Food Coloring: 2 teaspoons (a good quality, no-taste red is best)
- Light Corn Syrup: 2 tablespoons
- Water: 1 teaspoon
- Unsweetened Cocoa Powder: 1/8 teaspoon (this is the secret ingredient for a realistic color)
Step-by-Step Instructions: Committing the Perfect Bake
Follow these instructions carefully to create your gruesomely gorgeous treats. We’ll break it down into four manageable parts.
Part 1: Making and Chilling the Sugar Cookie Dough
- Cream Butter and Sugar: In the bowl of a stand mixer fitted with the paddle attachment, or in a large bowl with a hand mixer, beat the softened butter and granulated sugar together on medium-high speed until light and fluffy, about 3-4 minutes.
- Add Wet Ingredients: Add the room temperature egg and vanilla extract. Beat on medium speed until fully combined, scraping down the sides of the bowl as needed.
- Combine Dry Ingredients: In a separate medium bowl, whisk together the all-purpose flour, baking powder, and salt.
- Combine Wet and Dry: With the mixer on low speed, gradually add the dry ingredients to the wet ingredients. Mix until just combined. Be careful not to overmix, as this can lead to tough cookies. The dough will be thick and slightly crumbly.
- Chill the Dough: Divide the dough in half, form each half into a flat disk, and wrap tightly in plastic wrap. Refrigerate for at least 2 hours, or preferably overnight. This step is crucial for preventing the cookies from spreading.
Part 2: Rolling and Baking the Cookies
- Preheat and Prepare: Preheat your oven to 350°F (175°C). Line two large baking sheets with parchment paper.
- Roll the Dough: Lightly flour your work surface and rolling pin. Take one disk of dough from the refrigerator. Roll it out to approximately 1/4-inch thickness.
- Cut Out Shapes: Use a round cookie cutter (about 2.5-3 inches in diameter) to cut out your cookies. Place the cutouts on the prepared baking sheets, about 1-2 inches apart. You can re-roll the scraps once.
- Optional Chill: For extra insurance against spreading, place the entire baking sheet of cut-out cookies into the freezer for 10-15 minutes before baking.
- Bake: Bake for 10-12 minutes, or until the edges are just beginning to turn a light golden brown. The centers should still look pale.
- Cool: Let the cookies cool on the baking sheet for 5 minutes before transferring them to a wire rack to cool completely. It is essential that the cookies are 100% cool before you begin icing them.
Part 3: Preparing and Applying the Royal Icing
- Mix Icing Ingredients: In a large, clean, grease-free bowl, whisk together the sifted powdered sugar and meringue powder.
- Add Water: Add 6 tablespoons of warm water and the clear vanilla extract (if using). Using a stand mixer with the whisk attachment or a hand mixer, beat on low speed until combined, then increase to high speed and beat for about 5-7 minutes, until the icing is glossy and forms stiff peaks.
- Achieve Flood Consistency: This is the most important step for the icing. You want a “flood” consistency. To test this, add a tiny bit more water, a teaspoon at a time, mixing well after each addition. Drag a knife through the surface of the icing. It should take about 15-20 seconds for the line to disappear completely. If it’s too thick, add a bit more water. If it’s too thin, add a bit more sifted powdered sugar.
- Ice the Cookies: Transfer the icing to a piping bag or a squeeze bottle. Outline the edge of each completely cooled cookie, then “flood” the inside by filling it in. Use a toothpick or scribe tool to guide the icing into the corners and pop any air bubbles.
- Let it Dry: Place the iced cookies on a flat surface and let them dry completely. This can take anywhere from 8 hours to a full 24 hours, depending on the humidity in your home. The surface must be rock hard before you can apply the blood spatter.
Part 4: The Fun Part – Creating the Blood Spatter Effect
- Prepare Your Workspace: This part can get messy! Protect your work surface by laying down a large sheet of parchment paper, wax paper, or a disposable tablecloth.
- Mix the Edible Blood: In a small bowl, whisk together the red gel food coloring, corn syrup, water, and the secret ingredient, cocoa powder. Mix until it’s completely smooth and has the consistency of thin paint.
- Set Up Your Cookies: Arrange your completely dry, iced cookies on the protected surface.
- Spatter! There are two main techniques for this:
- The Flick Technique: Dip a food-safe paintbrush or a clean, new toothbrush into the edible blood mixture. Hold the brush over the cookies and use your thumb to flick the bristles, sending a fine spray of “blood” over the cookies. Vary the distance and the force of your flick to create different patterns of fine mist and larger drops.
- The Tap Technique: Dip the brush in the blood mixture. Hold it in one hand over the cookies and use your other hand to firmly tap the handle of the brush. This will create larger, more distinct drops and drips.
- Create a Story: Use a combination of both techniques. Add a few deliberate, larger drips by letting the mixture fall directly from the tip of your brush. Think about creating a “story” on each cookie for a more realistic and varied effect.
- Let the “Blood” Dry: Allow the blood spatter to dry completely. This will take at least 2-4 hours. The corn syrup will keep it slightly glossy, even when dry.
Nutrition Facts
- Servings: This recipe makes approximately 24-30 cookies.
- Calories per serving (1 cookie): Approximately 180-220 kcal.
Disclaimer: The nutritional information provided is an estimate and can vary based on the specific ingredients and brands used, as well as the exact size of your cookies.
Preparation and Cook Time Breakdown
- Dough Preparation: 20 minutes
- Dough Chilling Time: 2 hours (minimum) to overnight
- Baking Time: 10-12 minutes per batch
- Icing and Drying Time: 30 minutes for icing, 8-24 hours for drying
- Decorating Time: 20 minutes
- Total Active Time: Approximately 1 hour 10 minutes
- Total Time (including chilling and drying): Approximately 12-26 hours
How to Serve Your Gruesomely Good Cookies
The presentation is half the fun! Don’t just place them on a plate. Create a scene that enhances their spooky charm.
- The Classic Halloween Party Platter:
- Arrange the cookies on a dark or black platter to make the white and red pop.
- Scatter plastic spiders, fake cobwebs, and maybe a few candy bones around the cookies.
- Place them as the centerpiece of your dessert table.
- A “Forensic Evidence” Display:
- Place each cookie in its own small, clear cellophane bag.
- Seal the bag and attach a manila “evidence tag” to it. You can write fun things on the tag like “Case File #1031,” “Evidence A,” or “Exhibit B.”
- These make fantastic and memorable party favors for guests to take home.
- For a True-Crime Watch Party:
- Serve the cookies on a metal tray, similar to what might be used in a morgue or lab.
- Place small beakers filled with red punch or juice nearby for thematic effect.
- In a Themed Dessert Box:
- If you’re gifting these cookies, create a “crime scene” dessert box.
- Line a box with black tissue paper and place the cookies inside.
- Add other red and white treats like red velvet cake balls, white chocolate-covered pretzels, and red licorice to complete the theme.
Additional Tips for Flawless Blood Spatter Cookies
Follow these five expert tips to ensure your baking investigation goes off without a hitch.
- Achieve the Perfect Blood Color: Don’t skimp on the food coloring. Use a high-quality gel food coloring, not the liquid kind found in standard grocery store multipacks. Gel colors are more concentrated, so you get a deep, rich red without adding too much liquid, which would thin out your “blood.” The 1/8 teaspoon of cocoa powder is a non-negotiable step for realism; it cuts the artificial brightness of the red and adds a dark, brownish undertone that mimics real, dried blood.
- Master the Spatter Technique: Practice makes perfect. Before you start spattering your pristine white cookies, do a few practice flicks on a piece of parchment paper or a paper plate. This will help you get a feel for how much “blood” to load onto your brush and how different flicking motions and distances create different patterns. A mix of fine mist (from further away) and larger drops (from closer or by tapping) looks most effective.
- The Importance of Chilling Your Dough: We can’t stress this enough. Chilling the dough solidifies the butter. When the cold butter hits the hot oven, it melts slowly, which helps the cookies hold their sharp, defined shape. Skipping or rushing the chilling step is the number one cause of cookies that spread into sad, undefined blobs. The extra chill in the freezer right before baking is a pro-level trick that guarantees perfect shapes every time.
- Getting the Icing Consistency Just Right: The “15-20 second rule” for your royal icing is your guide to success. If the icing is too thick, it will be difficult to spread evenly and will leave lumps. If it’s too thin, it can run off the sides of the cookie or take forever to dry, sometimes absorbing into the cookie itself. Take your time adjusting the consistency with tiny amounts of water or powdered sugar until it’s perfect.
- Storage and Make-Ahead Magic: These cookies are perfect for making in advance. You can bake the cookies and store them in an airtight container at room temperature for up to a week. You can also freeze the un-iced baked cookies for up to 3 months. The fully decorated cookies should be stored in a single layer in an airtight container at room temperature for up to two weeks. Do not refrigerate decorated cookies, as the condensation can cause the colors to bleed.
Frequently Asked Questions (FAQ)
Here are answers to some of the most common questions about making this Blood Spatter Cookies recipe.
1. Can I make these cookies ahead of time?
Absolutely! This recipe is ideal for making in stages. You can make the dough up to 3 days in advance and keep it wrapped in the refrigerator. The baked, un-iced cookies can be stored in an airtight container for a week or frozen for several months. The fully decorated cookies, once completely dry, will stay fresh in an airtight container at room temperature for at least a week, making them perfect to prepare before a big party.
2. What is the best type of red food coloring to use?
For the most vibrant and realistic color, you must use a gel-based food coloring. Brands like AmeriColor (Super Red), Chefmaster (Tulip Red), or Wilton (No-Taste Red) are excellent choices. Liquid food coloring is not concentrated enough and will water down your “blood” mixture, making it runny and pink instead of a deep red.
3. Are these cookies safe for kids to eat and help make?
Yes, they are completely safe and edible! All the ingredients, including the “blood,” are standard baking components. Making them can be a super fun activity for older kids, but the spattering part can be very messy. We recommend setting up a “spatter station” in an easy-to-clean area (or even outside!) and having them wear an apron or old clothes. It’s a fantastic, hands-on project for the spooky season.
4. How do I properly store leftover Blood Spatter Cookies?
Once the icing and the blood spatter are 100% dry to the touch (this is crucial!), store the cookies in a single layer in an airtight container. If you need to stack them, place a sheet of parchment paper between the layers. Keep them at room temperature. Avoid refrigerating them, as the moisture and condensation in the fridge can make the icing soft and cause the red color to bleed.
5. Can I use a different type of icing, like buttercream or a simple glaze?
While you technically can, we strongly advise against it for this specific design. Buttercream frosting does not dry hard, so the spatter effect would sink in and smudge easily. A simple powdered sugar glaze (sugar and milk) also doesn’t provide the same opaque, stark white background and won’t dry as hard as royal icing. For the signature look and durability of these cookies, royal icing made with meringue powder is truly the best and only way to go.
There you have it—a complete guide to creating the most talked-about treat of the season. Grab your apron, embrace the macabre, and get ready to bake. These Blood Spatter Cookies are a testament to the fact that sometimes, the most gruesome-looking things are the absolute sweetest. Happy haunting, and happy baking
Print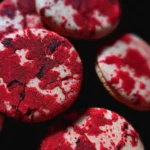
Blood Spatter Cookies recipe
Ingredients
For the No-Spread Sugar Cookies (The Canvas):
-
Unsalted Butter: 1 cup (2 sticks or 226g), softened to room temperature
-
Granulated Sugar: 1 cup (200g)
-
Large Egg: 1, at room temperature
-
Vanilla Extract: 2 teaspoons
-
All-Purpose Flour: 3 cups (360g), plus more for rolling
-
Baking Powder: 1/2 teaspoon
-
Salt: 1/4 teaspoon
For the Royal Icing (The Background):
-
Powdered Sugar: 4 cups (480g), sifted
-
Meringue Powder: 3 tablespoons
-
Warm Water: 6-8 tablespoons (adjust for consistency)
-
Clear Vanilla Extract: 1 teaspoon (optional, for flavor)
For the Edible “Blood” (The Spatter):
-
Red Gel Food Coloring: 2 teaspoons (a good quality, no-taste red is best)
-
Light Corn Syrup: 2 tablespoons
-
Water: 1 teaspoon
-
Unsweetened Cocoa Powder: 1/8 teaspoon (this is the secret ingredient for a realistic color)
Instructions
Part 1: Making and Chilling the Sugar Cookie Dough
-
Cream Butter and Sugar: In the bowl of a stand mixer fitted with the paddle attachment, or in a large bowl with a hand mixer, beat the softened butter and granulated sugar together on medium-high speed until light and fluffy, about 3-4 minutes.
-
Add Wet Ingredients: Add the room temperature egg and vanilla extract. Beat on medium speed until fully combined, scraping down the sides of the bowl as needed.
-
Combine Dry Ingredients: In a separate medium bowl, whisk together the all-purpose flour, baking powder, and salt.
-
Combine Wet and Dry: With the mixer on low speed, gradually add the dry ingredients to the wet ingredients. Mix until just combined. Be careful not to overmix, as this can lead to tough cookies. The dough will be thick and slightly crumbly.
-
Chill the Dough: Divide the dough in half, form each half into a flat disk, and wrap tightly in plastic wrap. Refrigerate for at least 2 hours, or preferably overnight. This step is crucial for preventing the cookies from spreading.
Part 2: Rolling and Baking the Cookies
-
Preheat and Prepare: Preheat your oven to 350°F (175°C). Line two large baking sheets with parchment paper.
-
Roll the Dough: Lightly flour your work surface and rolling pin. Take one disk of dough from the refrigerator. Roll it out to approximately 1/4-inch thickness.
-
Cut Out Shapes: Use a round cookie cutter (about 2.5-3 inches in diameter) to cut out your cookies. Place the cutouts on the prepared baking sheets, about 1-2 inches apart. You can re-roll the scraps once.
-
Optional Chill: For extra insurance against spreading, place the entire baking sheet of cut-out cookies into the freezer for 10-15 minutes before baking.
-
Bake: Bake for 10-12 minutes, or until the edges are just beginning to turn a light golden brown. The centers should still look pale.
-
Cool: Let the cookies cool on the baking sheet for 5 minutes before transferring them to a wire rack to cool completely. It is essential that the cookies are 100% cool before you begin icing them.
Part 3: Preparing and Applying the Royal Icing
-
Mix Icing Ingredients: In a large, clean, grease-free bowl, whisk together the sifted powdered sugar and meringue powder.
-
Add Water: Add 6 tablespoons of warm water and the clear vanilla extract (if using). Using a stand mixer with the whisk attachment or a hand mixer, beat on low speed until combined, then increase to high speed and beat for about 5-7 minutes, until the icing is glossy and forms stiff peaks.
-
Achieve Flood Consistency: This is the most important step for the icing. You want a “flood” consistency. To test this, add a tiny bit more water, a teaspoon at a time, mixing well after each addition. Drag a knife through the surface of the icing. It should take about 15-20 seconds for the line to disappear completely. If it’s too thick, add a bit more water. If it’s too thin, add a bit more sifted powdered sugar.
-
Ice the Cookies: Transfer the icing to a piping bag or a squeeze bottle. Outline the edge of each completely cooled cookie, then “flood” the inside by filling it in. Use a toothpick or scribe tool to guide the icing into the corners and pop any air bubbles.
-
Let it Dry: Place the iced cookies on a flat surface and let them dry completely. This can take anywhere from 8 hours to a full 24 hours, depending on the humidity in your home. The surface must be rock hard before you can apply the blood spatter.
Part 4: The Fun Part – Creating the Blood Spatter Effect
-
Prepare Your Workspace: This part can get messy! Protect your work surface by laying down a large sheet of parchment paper, wax paper, or a disposable tablecloth.
-
Mix the Edible Blood: In a small bowl, whisk together the red gel food coloring, corn syrup, water, and the secret ingredient, cocoa powder. Mix until it’s completely smooth and has the consistency of thin paint.
-
Set Up Your Cookies: Arrange your completely dry, iced cookies on the protected surface.
-
Spatter! There are two main techniques for this:
-
The Flick Technique: Dip a food-safe paintbrush or a clean, new toothbrush into the edible blood mixture. Hold the brush over the cookies and use your thumb to flick the bristles, sending a fine spray of “blood” over the cookies. Vary the distance and the force of your flick to create different patterns of fine mist and larger drops.
-
The Tap Technique: Dip the brush in the blood mixture. Hold it in one hand over the cookies and use your other hand to firmly tap the handle of the brush. This will create larger, more distinct drops and drips.
-
-
Create a Story: Use a combination of both techniques. Add a few deliberate, larger drips by letting the mixture fall directly from the tip of your brush. Think about creating a “story” on each cookie for a more realistic and varied effect.
-
Let the “Blood” Dry: Allow the blood spatter to dry completely. This will take at least 2-4 hours. The corn syrup will keep it slightly glossy, even when dry.
Nutrition
- Serving Size: one normal portion
- Calories: 180-220 kcal


