
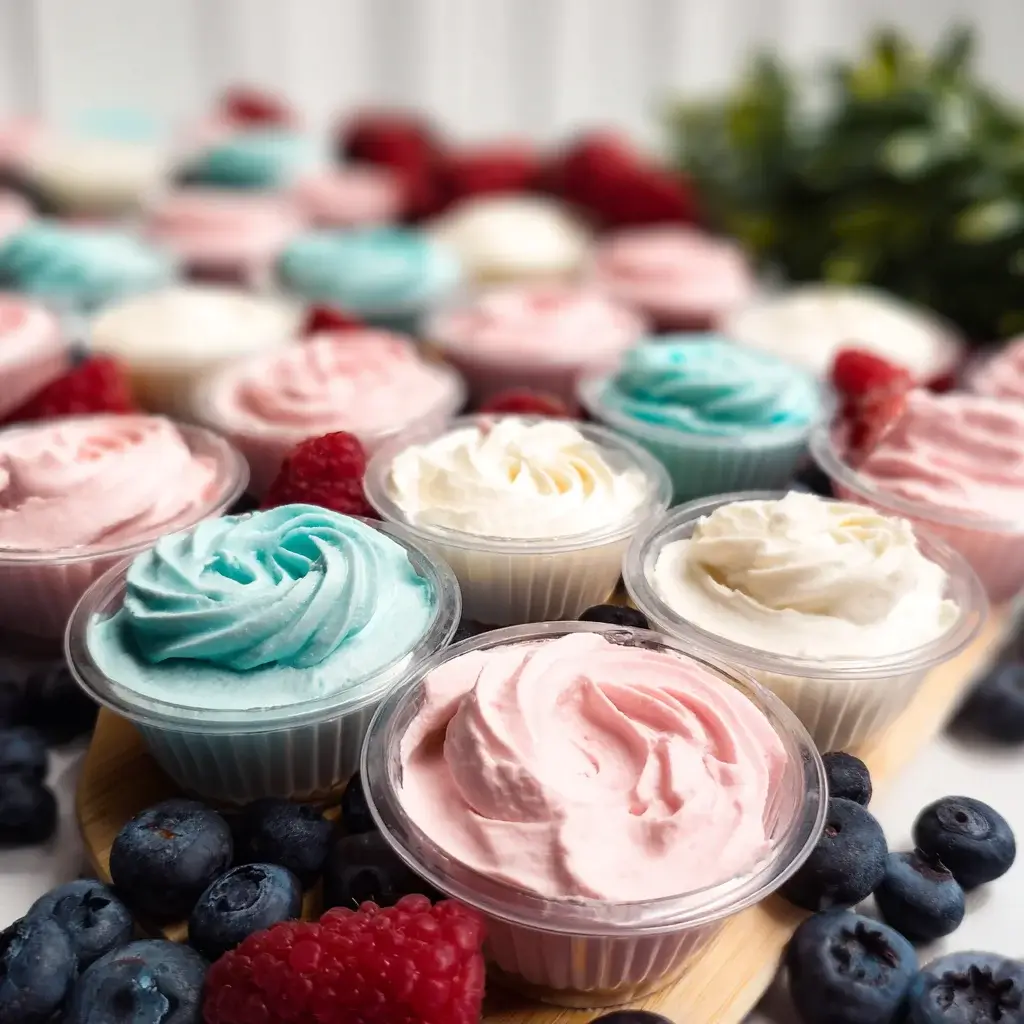

I remember the exact moment the idea for these Vegetarian Frozen Yogurt Cups was born. It was the middle of a sweltering summer afternoon, and my family was in the throes of a classic snack-time standoff. The kids were clamoring for ice cream bars, and I was desperately trying to steer them toward something—anything—with a bit more nutritional value. The freezer felt like a battleground of compromises. That’s when I looked at the tub of Greek yogurt, the bag of granola, and the carton of fresh berries on the counter. A lightbulb went off. Twenty minutes later, I had a muffin tin filled with these beautiful, layered creations, ready for the freezer. The next day, when I offered them up, the initial skepticism from the kids melted away with the first bite. They loved the crunchy crust, the creamy, cold yogurt, and the juicy burst of fruit. For me, it was a total victory. I had created a treat that was not only incredibly delicious and refreshing but also packed with protein, easy to make, and endlessly customizable. These frozen yogurt cups are no longer just a recipe in our house; they are our go-to healthy dessert, our favorite post-workout snack, and the quickest, most impressive treat to whip up for guests. They are simple, wholesome, and a delicious solution to satisfying that frozen treat craving, guilt-free.
Complete Vegetarian Frozen Yogurt Cups Ingredients
This recipe is wonderfully versatile, built on a simple three-part structure: a crunchy crust, a creamy yogurt filling, and fresh, vibrant toppings. The quantities below will yield 12 standard-sized cups.
For the Crunchy Granola Crust:
- Rolled Oats or Granola: 1 ½ cups. You can use your favorite store-bought granola for convenience and flavor. For a homemade, healthier crust, use old-fashioned rolled oats. For a gluten-free version, ensure your oats or granola are certified gluten-free.
- Melted Coconut Oil or Butter: ¼ cup (55g). This acts as the binder, holding the crust together when it freezes. Unsalted butter can be used for a richer flavor, while coconut oil keeps it dairy-free.
- Maple Syrup or Honey: 2 tablespoons. This adds a touch of sweetness and also helps bind the crust ingredients. Use maple syrup for a vegan-friendly option.
- Optional additions: 1 tablespoon of chia seeds or ground flax seeds for an extra boost of fiber and omega-3s. A pinch of cinnamon can also add a lovely warmth.
For the Creamy Yogurt Filling:
- Plain Greek Yogurt: 3 cups. This is the star of the show. Full-fat (5% or whole milk) Greek yogurt is highly recommended. Its high fat and protein content and lower water content result in a much creamier, less icy frozen texture. Plain, unsweetened yogurt allows you to control the sweetness and flavor.
- Maple Syrup or Honey: ¼ cup to ⅓ cup, or to taste. Frozen treats taste less sweet than their room-temperature counterparts, so make sure the mixture is slightly sweeter than you’d normally prefer. Adjust the amount based on your preference.
- Pure Vanilla Extract: 1 ½ teaspoons. This enhances the flavor of the yogurt and gives it a classic, dessert-like quality.
- A pinch of Salt: Just a tiny pinch helps to balance the sweetness and bring out the other flavors.
For the Fruit Toppings & Variations:
This is where you can let your creativity shine!
- Fresh Berries: 1 cup of mixed fresh berries, such as blueberries, sliced strawberries, raspberries, or blackberries.
- Tropical Fruits: Diced mango, pineapple, kiwi, or passionfruit pulp.
- Other Ideas:
- Thinly sliced peaches or plums.
- A swirl of peanut butter, almond butter, or seed butter.
- A swirl of fruit jam or compote.
- Mini chocolate chips or cacao nibs.
- Toasted coconut flakes.
- A sprinkle of chopped nuts or seeds (pecans, walnuts, pistachios, pumpkin seeds).
Step-by-Step Instructions
Making these frozen yogurt cups is a simple, no-bake process. Follow these stages for perfect results every time.
Stage 1: Prepare the Muffin Tin
- Line the Tin: Place 12 silicone or paper liners in a standard-sized muffin tin. Silicone liners are highly recommended as they make removing the frozen cups incredibly easy and are reusable. If using paper liners, choose a high-quality, greaseproof variety to minimize sticking.
Stage 2: Make and Form the Crust
- Combine Dry Ingredients: In a medium bowl, add the granola or rolled oats. If you are using any optional additions like chia seeds, flax seeds, or cinnamon, stir them in now.
- Add Wet Ingredients: Pour the melted coconut oil (or butter) and the maple syrup (or honey) over the dry ingredients.
- Mix Thoroughly: Stir with a spatula or spoon until all the oats or granola are evenly coated and the mixture is slightly sticky and clumpy.
- Press into Liners: Spoon approximately 1 to 1.5 tablespoons of the crust mixture into the bottom of each prepared muffin liner. Use the back of the spoon or your fingers to press the mixture down firmly and evenly, creating a compact base layer. A flat-bottomed shot glass or spice jar works perfectly for this task.
- Pre-Freeze the Crust: Place the muffin tin in the freezer for 10-15 minutes while you prepare the yogurt filling. This helps the crust set up and prevents it from mixing with the yogurt layer.
Stage 3: Create the Yogurt Filling
- Combine Ingredients: In a large bowl, combine the Greek yogurt, your desired amount of maple syrup or honey, the vanilla extract, and a tiny pinch of salt.
- Whisk Until Smooth: Whisk everything together until the mixture is completely smooth, creamy, and uniform in consistency. Make sure there are no lumps of yogurt or streaks of sweetener.
- Taste and Adjust: Taste the mixture. It should be pleasantly sweet. Remember, the sweetness will be slightly muted once frozen, so it’s better for it to be a touch sweeter than you think it needs to be. Add more sweetener if desired.
Stage 4: Assemble and Freeze the Cups
- Fill the Cups: Remove the muffin tin with the chilled crusts from the freezer. Spoon or pour the yogurt filling evenly over each crust, filling each liner almost to the top. Use a small spatula to smooth the tops.
- Add Toppings: Now for the fun part. Gently press your desired toppings into the surface of the yogurt. You can arrange berries in a pattern, add a swirl of nut butter with a toothpick, or simply sprinkle on chocolate chips and coconut flakes.
- Freeze Until Solid: Carefully place the entire muffin tin back into the freezer. Let the cups freeze until they are completely solid. This will take at least 4 hours, but for the best results, freeze them overnight.
Stage 5: Unmolding and Storing
- Remove from Tin: Once fully frozen, remove the muffin tin from the freezer. Gently pull on the edges of the liners to release the cups. If they are difficult to remove, let the tin sit at room temperature for 3-5 minutes to soften just slightly.
- Store for Later: Enjoy a cup immediately! Transfer the remaining frozen yogurt cups to a freezer-safe airtight container or a large zip-top bag. It’s a good idea to place a small piece of parchment paper between layers to prevent them from sticking together. They can be stored in the freezer for up to 1 month.
Nutrition Facts
- Servings: This recipe makes 12 frozen yogurt cups.
- Calories per Serving: Approximately 150-220 calories.
Important Disclaimer: The nutritional information provided is a rough estimate. The final calorie count will vary significantly depending on the specific ingredients you use, such as the type of yogurt (full-fat vs. low-fat), the choice of sweetener, the composition of your granola, and the amount and type of toppings.
Preparation Time
- Active Prep Time: 20 minutes
- Inactive Freezing Time: 4 hours (minimum)
- Total Time: Approximately 4 hours and 20 minutes
How to Serve
These versatile cups are more than just a dessert. Here are several fantastic ways to serve and enjoy them.
- As a Quick and Healthy Breakfast:
- Grab one straight from the freezer on a busy morning for a refreshing, protein-packed start to your day.
- Let it sit on the counter for 5-10 minutes to soften slightly, making it easier to eat with a spoon.
- It’s a complete, portable breakfast with carbs from the crust, protein from the yogurt, and vitamins from the fruit.
- A Refreshing Afternoon Snack:
- Beat the afternoon slump with this cool and revitalizing treat. It’s a perfect alternative to sugary snacks or ice cream.
- It’s especially great as a post-workout snack, helping to replenish energy and provide protein for muscle recovery.
- A Light and Elegant Dessert:
- Serve them after dinner as a light, guilt-free dessert.
- For a more elegant presentation, remove the liner and place the cup on a small dessert plate.
- Garnish with a fresh mint leaf, an extra drizzle of honey, or a sprinkle of dark chocolate shavings right before serving.
- For Parties and Gatherings:
- Arrange a variety of flavors on a chilled platter for a beautiful and healthy addition to a brunch, baby shower, or summer party.
- Create a “Frozen Yogurt Cup Bar” by offering plain frozen yogurt cups and setting out small bowls of fresh toppings (diced fruit, nuts, chocolate sauce, sprinkles) so guests can customize their own.
Additional Tips
Follow these five tips to elevate your frozen yogurt cups from good to absolutely perfect.
- The Key to Creaminess: Fat is Your Friend: The most common issue with homemade frozen yogurt is an icy texture. The secret to avoiding this is using full-fat (5% or whole milk) Greek yogurt. The higher fat content freezes less solidly than water, resulting in a much creamier, smoother texture that’s closer to ice cream. Using a liquid sweetener like maple syrup or honey also helps, as sugar lowers the freezing point of the mixture.
- Effortless Removal Every Single Time: While paper liners work, silicone muffin liners are a game-changer for this recipe. They peel away from the frozen cups cleanly and effortlessly, without any tearing or sticking. If you don’t have silicone liners, let the muffin tin sit at room temperature for 3-5 minutes before attempting to remove the cups. This slight thaw allows them to release from the liners more easily.
- Think Beyond Berries: Explore Flavor Universes: Don’t limit yourself to the classic berry topping. Think of the yogurt base as a blank canvas. Create sophisticated flavor combinations like a Piña Colada cup (pineapple chunks, toasted coconut, and a drop of coconut extract in the yogurt), a Chocolate Peanut Butter cup (a swirl of peanut butter and mini chocolate chips), or a Key Lime Pie cup (lime zest and juice in the yogurt with a graham cracker crust).
- Perfecting the Crust-to-Yogurt Ratio: For the best eating experience, aim for a crust that is about ¼ to ½ inch thick. This provides a satisfying crunch without overpowering the creamy yogurt. Press the crust down firmly using the bottom of a small glass or a spice jar to create a dense, even layer that won’t crumble apart when you take a bite.
- Smart Storage for Lasting Freshness: To prevent your beautiful cups from developing freezer burn or sticking together, proper storage is essential. Once they are fully frozen and removed from the muffin tin, transfer them immediately to a freezer-safe, airtight container or a heavy-duty zip-top bag. Placing a small square of parchment or wax paper between each cup or each layer will ensure they don’t freeze into one giant clump, making it easy to grab one at a time.
FAQ Section
1. Q: Why are my frozen yogurt cups hard as a rock?
A: This typically happens for two reasons: the type of yogurt used and serving them too cold. If you use low-fat or regular yogurt (which has a high water content), it will freeze into a very hard, icy block. Using full-fat Greek yogurt is the best way to prevent this. Secondly, like any frozen treat, they need a few minutes to temper after coming out of the freezer. Let a cup sit at room temperature for 5-10 minutes before eating. It will soften to the perfect, creamy consistency.
2. Q: Can I make these dairy-free or vegan?
A: Absolutely! This recipe is very easy to adapt. For a dairy-free and vegan version, use a thick, full-fat plant-based yogurt, with coconut yogurt being the best option for its creamy texture. Use maple syrup instead of honey as your sweetener, and ensure your granola and any toppings (like chocolate chips) are certified vegan. Use melted coconut oil in the crust.
3. Q: Can I make these without a muffin tin?
A: Yes, you can. If you don’t have a muffin tin, you can use individual silicone baking cups arranged on a small baking sheet or tray. You could also use small, freezer-safe glass jars or ramekins to create individual “parfaits,” though they won’t be portable “cups.” Simply layer the crust, yogurt, and toppings and freeze.
4. Q: How do I prevent the toppings from getting freezer burn?
A: While fresh fruit toppings are delicious, some delicate fruits like raspberries can become icy over time. To minimize this, you can swirl the fruit into the yogurt mixture before pouring it into the molds, rather than just placing it on top. Alternatively, for longer storage, use toppings that freeze well, such as chocolate chips, nuts, seeds, or toasted coconut, and add a few fresh berries right before serving.
5. Q: Can I use regular sugar instead of maple syrup or honey in the yogurt?
A: It is not recommended. Granulated sugar does not dissolve as easily in cold yogurt and can result in a gritty texture. Liquid sweeteners like maple syrup, honey, or agave nectar blend seamlessly into the yogurt for a smooth consistency. Furthermore, the sugar in these liquid sweeteners helps to lower the freezing point of the mixture, contributing to a softer, less icy final product.
Print
Vegetarian Frozen Yogurt Cups recipe
Ingredients
For the Crunchy Granola Crust:
-
Rolled Oats or Granola: 1 ½ cups. You can use your favorite store-bought granola for convenience and flavor. For a homemade, healthier crust, use old-fashioned rolled oats. For a gluten-free version, ensure your oats or granola are certified gluten-free.
-
Melted Coconut Oil or Butter: ¼ cup (55g). This acts as the binder, holding the crust together when it freezes. Unsalted butter can be used for a richer flavor, while coconut oil keeps it dairy-free.
-
Maple Syrup or Honey: 2 tablespoons. This adds a touch of sweetness and also helps bind the crust ingredients. Use maple syrup for a vegan-friendly option.
-
Optional additions: 1 tablespoon of chia seeds or ground flax seeds for an extra boost of fiber and omega-3s. A pinch of cinnamon can also add a lovely warmth.
For the Creamy Yogurt Filling:
-
Plain Greek Yogurt: 3 cups. This is the star of the show. Full-fat (5% or whole milk) Greek yogurt is highly recommended. Its high fat and protein content and lower water content result in a much creamier, less icy frozen texture. Plain, unsweetened yogurt allows you to control the sweetness and flavor.
-
Maple Syrup or Honey: ¼ cup to ⅓ cup, or to taste. Frozen treats taste less sweet than their room-temperature counterparts, so make sure the mixture is slightly sweeter than you’d normally prefer. Adjust the amount based on your preference.
-
Pure Vanilla Extract: 1 ½ teaspoons. This enhances the flavor of the yogurt and gives it a classic, dessert-like quality.
-
A pinch of Salt: Just a tiny pinch helps to balance the sweetness and bring out the other flavors.
For the Fruit Toppings & Variations:
This is where you can let your creativity shine!
-
Fresh Berries: 1 cup of mixed fresh berries, such as blueberries, sliced strawberries, raspberries, or blackberries.
-
Tropical Fruits: Diced mango, pineapple, kiwi, or passionfruit pulp.
-
Other Ideas:
-
Thinly sliced peaches or plums.
-
A swirl of peanut butter, almond butter, or seed butter.
-
A swirl of fruit jam or compote.
-
Mini chocolate chips or cacao nibs.
-
Toasted coconut flakes.
-
A sprinkle of chopped nuts or seeds (pecans, walnuts, pistachios, pumpkin seeds).
-
Instructions
Stage 1: Prepare the Muffin Tin
-
Line the Tin: Place 12 silicone or paper liners in a standard-sized muffin tin. Silicone liners are highly recommended as they make removing the frozen cups incredibly easy and are reusable. If using paper liners, choose a high-quality, greaseproof variety to minimize sticking.
Stage 2: Make and Form the Crust
-
Combine Dry Ingredients: In a medium bowl, add the granola or rolled oats. If you are using any optional additions like chia seeds, flax seeds, or cinnamon, stir them in now.
-
Add Wet Ingredients: Pour the melted coconut oil (or butter) and the maple syrup (or honey) over the dry ingredients.
-
Mix Thoroughly: Stir with a spatula or spoon until all the oats or granola are evenly coated and the mixture is slightly sticky and clumpy.
-
Press into Liners: Spoon approximately 1 to 1.5 tablespoons of the crust mixture into the bottom of each prepared muffin liner. Use the back of the spoon or your fingers to press the mixture down firmly and evenly, creating a compact base layer. A flat-bottomed shot glass or spice jar works perfectly for this task.
-
Pre-Freeze the Crust: Place the muffin tin in the freezer for 10-15 minutes while you prepare the yogurt filling. This helps the crust set up and prevents it from mixing with the yogurt layer.
Stage 3: Create the Yogurt Filling
-
Combine Ingredients: In a large bowl, combine the Greek yogurt, your desired amount of maple syrup or honey, the vanilla extract, and a tiny pinch of salt.
-
Whisk Until Smooth: Whisk everything together until the mixture is completely smooth, creamy, and uniform in consistency. Make sure there are no lumps of yogurt or streaks of sweetener.
-
Taste and Adjust: Taste the mixture. It should be pleasantly sweet. Remember, the sweetness will be slightly muted once frozen, so it’s better for it to be a touch sweeter than you think it needs to be. Add more sweetener if desired.
Stage 4: Assemble and Freeze the Cups
-
Fill the Cups: Remove the muffin tin with the chilled crusts from the freezer. Spoon or pour the yogurt filling evenly over each crust, filling each liner almost to the top. Use a small spatula to smooth the tops.
-
Add Toppings: Now for the fun part. Gently press your desired toppings into the surface of the yogurt. You can arrange berries in a pattern, add a swirl of nut butter with a toothpick, or simply sprinkle on chocolate chips and coconut flakes.
-
Freeze Until Solid: Carefully place the entire muffin tin back into the freezer. Let the cups freeze until they are completely solid. This will take at least 4 hours, but for the best results, freeze them overnight.
Stage 5: Unmolding and Storing
-
Remove from Tin: Once fully frozen, remove the muffin tin from the freezer. Gently pull on the edges of the liners to release the cups. If they are difficult to remove, let the tin sit at room temperature for 3-5 minutes to soften just slightly.
-
Store for Later: Enjoy a cup immediately! Transfer the remaining frozen yogurt cups to a freezer-safe airtight container or a large zip-top bag. It’s a good idea to place a small piece of parchment paper between layers to prevent them from sticking together. They can be stored in the freezer for up to 1 month.
Nutrition
- Serving Size: one normal portion
- Calories: 150-220


