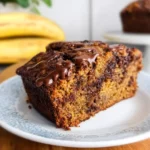
Ingredients
For the Dry Ingredients:
-
All-Purpose Flour: 2 ½ cups (300g). This provides the structural foundation of the cake. While some recipes call for cake flour for a finer crumb, all-purpose flour works beautifully here, giving a tender yet sturdy texture that can stand up to the moist banana and chocolate. Always measure by weight if possible for accuracy, or spoon and level the flour if using volume measurements to avoid a dense cake.
-
Unsweetened Cocoa Powder (Natural or Dutch-Processed): ½ cup (45g). This is crucial for the chocolate flavor.
-
Natural Cocoa Powder: Lighter in color, with a sharper, more acidic chocolate flavor. It reacts with baking soda to create lift.
-
Dutch-Processed Cocoa Powder: Darker, less acidic, and has a milder, smoother chocolate flavor. It requires baking powder for leavening, as it does not react with baking soda in the same way. For this recipe, either can be used, but if using natural cocoa, the baking soda’s reaction with its acidity will contribute to rise. If using Dutch-processed, ensure your baking powder is fresh. I often prefer Dutch-processed for its rich color and less bitter flavor in cakes.
-
-
Baking Soda: 1 teaspoon. This leavening agent reacts with acidic ingredients (like the natural acidity in bananas and sometimes cocoa powder) to produce carbon dioxide, creating lift and a tender crumb.
-
Baking Powder: 1 teaspoon. A second leavening agent, often double-acting, meaning it reacts once when wet and again with heat, providing additional lift and lightness to the cake.
-
Salt: 1 teaspoon. A crucial flavor enhancer. It doesn’t make the cake taste salty, but rather balances the sweetness, deepens the chocolate notes, and makes all the other flavors “pop.” Don’t skip it!
For the Wet Ingredients:
-
Unsalted Butter, Softened: 1 cup (226g or 2 sticks). Using unsalted butter allows you to control the total sodium in the recipe. It needs to be at room temperature (soft enough to indent with a finger, but not melted) for proper creaming with the sugars, which incorporates air and creates a light, tender cake texture.
-
Granulated Sugar: 1 cup (200g). Provides sweetness and contributes to the cake’s moistness and tender crumb.
-
Light Brown Sugar, Packed: ½ cup (100g). Adds a deeper, caramel-like sweetness and extra moisture due to the molasses content, complementing the banana and chocolate flavors beautifully.
-
Large Eggs, Room Temperature: 2 eggs. Eggs provide structure, moisture, and help bind the ingredients together. Using room temperature eggs ensures they emulsify better with the butter and sugar, leading to a smoother batter and a finer crumb.
-
Very Ripe Bananas, Mashed: 1 ½ cups (approximately 3-4 large bananas). The ripeness of the bananas is non-negotiable for this recipe! They should be heavily speckled with brown or almost entirely black. Overripe bananas are sweeter, more flavorful, and much softer, making them easier to mash and incorporate, and contributing significant moisture to the cake. Avoid using firm, yellow bananas.
-
Milk (Any Kind): ¼ cup (60ml). Whole milk or 2% milk works best for richness, but any dairy or non-dairy milk (almond, soy, oat) can be used. It adds moisture and helps to create a tender crumb.
-
Pure Vanilla Extract: 1 ½ teaspoons. A fundamental flavor enhancer that complements and deepens both the banana and chocolate notes. Don’t use artificial vanilla; the real deal makes a noticeable difference.
For the Chocolate Infusion:
-
Semi-Sweet Chocolate Chips or Chunks: 1 cup (170g). These add bursts of melted chocolate throughout the cake. You can use milk chocolate for a sweeter cake or dark chocolate for a more intense, slightly bitter contrast. Quality matters here – use chocolate you enjoy eating on its own.
Optional Enhancements:
-
Hot Coffee or Espresso Powder: 1-2 teaspoons, dissolved in the milk or a tiny bit of hot water. Coffee doesn’t make the cake taste like coffee; instead, it remarkably deepens and intensifies the chocolate flavor. It’s an optional but highly recommended secret ingredient for any chocolate cake.
-
Chopped Nuts: ½ cup (e.g., walnuts, pecans). For added crunch and a nutty complement to the banana and chocolate. Fold them in with the chocolate chips.
Instructions
Stage 1: Preparation – Setting the Stage for Success
-
Preheat Your Oven: Position an oven rack in the middle of your oven. Preheat the oven to 350°F (175°C). It’s crucial for the oven to be fully preheated before the cake goes in, as inconsistent heat can affect the rise and texture. If you have an oven thermometer, now is the time to use it to verify accuracy.
-
Prepare Your Cake Pans: Take your two 9-inch round cake pans. Lightly grease the bottoms and sides of each pan with non-stick baking spray or softened butter. Then, dust the greased pans lightly with flour, tapping out any excess. For an extra layer of non-stick assurance (highly recommended!), cut two circles of parchment paper to fit the bottoms of the pans and place them inside. This ensures your cake layers release effortlessly.
-
Mash the Bananas: In a medium bowl, mash the very ripe bananas using a fork or a potato masher until they are mostly smooth with a few small lumps remaining. Avoid making them completely pureed, as a little texture is nice. Set aside.
-
Combine Dry Ingredients: In a separate medium bowl, whisk together the all-purpose flour, unsweetened cocoa powder, baking soda, baking powder, and salt. Whisk for at least 30 seconds to ensure the leavening agents and cocoa are evenly distributed throughout the flour. This prevents pockets of unmixed ingredients and promotes even rising.
Stage 2: Building the Wet Batter – Creaming and Emulsifying
-
Cream Butter and Sugars: In a large mixing bowl (or the bowl of your stand mixer fitted with the paddle attachment), add the softened unsalted butter, granulated sugar, and packed light brown sugar. Beat on medium speed for 3-5 minutes, or until the mixture is light, fluffy, and pale in color. This process, known as creaming, incorporates air into the butter, which is essential for the cake’s light and tender texture. Scrape down the sides of the bowl occasionally to ensure everything is evenly combined.
-
Incorporate Eggs: Add the room temperature eggs to the creamed butter and sugar mixture, one at a time. Beat well after each addition, ensuring the egg is fully incorporated before adding the next. This helps to create a stable emulsion. The mixture might look slightly curdled after the first egg, but it will smooth out as you continue to beat.
-
Add Mashed Bananas and Vanilla: Reduce the mixer speed to low. Add the mashed bananas and pure vanilla extract to the bowl. Mix just until combined and no streaks of banana remain. Avoid overmixing at this stage.
Stage 3: Combining Wet and Dry – The Delicate Balance
-
Alternate Dry and Wet Ingredients: With the mixer still on low speed (or by hand with a spatula), begin adding the dry ingredients mixture alternately with the milk.
-
Start by adding about one-third of the dry ingredients to the wet mixture. Mix until just combined.
-
Next, pour in half of the milk. Mix until just combined.
-
Add another one-third of the dry ingredients. Mix until just combined.
-
Add the remaining milk. Mix until just combined.
-
Finish with the final one-third of the dry ingredients. Mix until just combined.
-
Crucial Step: Mix only until no streaks of flour are visible. Overmixing at this stage will develop the gluten in the flour too much, resulting in a tough, dense cake. Use a rubber spatula to give the batter a final gentle fold by hand to ensure everything from the bottom and sides is incorporated.
-
-
Fold in Chocolate Chips: Gently fold in the semi-sweet chocolate chips (and any optional chopped nuts) using your rubber spatula. Distribute them evenly throughout the batter.
Stage 4: Baking and Cooling – The Patience Game
-
Divide Batter Evenly: Divide the cake batter evenly between your two prepared 9-inch round cake pans. A kitchen scale can be helpful for precise division if you want perfectly even layers, otherwise, eyeball it. Smooth the tops of the batter with your spatula.
-
Bake: Place the cake pans in the preheated oven. Bake for 30-35 minutes, or until a wooden skewer or toothpick inserted into the center of the cakes comes out with only moist crumbs attached, or completely clean. Avoid opening the oven door too frequently during the initial baking time, as this can cause the cakes to sink.
-
Cool in Pans: Once baked, remove the cakes from the oven. Let them cool in their pans on a wire cooling rack for 10-15 minutes. This crucial step allows the cakes to set and firm up before being removed.
-
Invert and Cool Completely: After the initial cooling, carefully invert the cakes onto the wire cooling rack. Gently peel off the parchment paper (if used). Let the cakes cool completely at room temperature. This can take 1-2 hours. Do not attempt to frost warm cakes, as the frosting will melt and slide off. Patience is key for a beautiful final product!
Nutrition
- Serving Size: one normal portion
- Calories: 450-550