
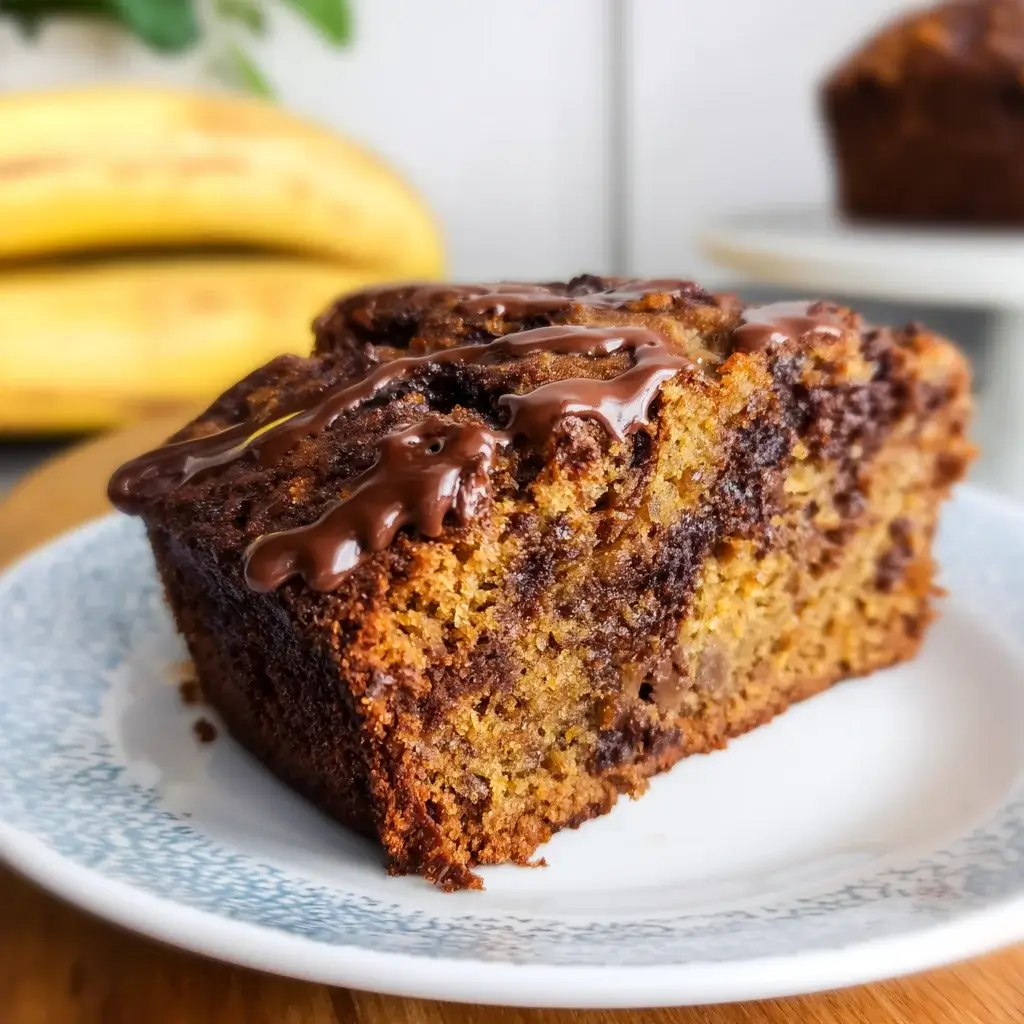

The aroma of freshly baked goods often holds a special place in our memories, and for me, that scent is synonymous with a perfectly baked Banana Chocolate Cake. This isn’t just any cake; it’s a testament to the magic that happens when humble, forgotten bananas meet the rich allure of chocolate. My journey with this recipe began, as many great recipes do, with a pile of stubbornly overripe bananas on the counter – the kind that are too speckled for a snack but scream for a purpose. Initially, I thought of a simple banana bread, but my family, especially my two young daughters, were on a chocolate kick. Could I combine the two without creating a dense, overly sweet mess? The first attempt was a timid inclusion of a few chocolate chips. It was good, but not great. Over several iterations, experimenting with cocoa powder, different types of chocolate, and the precise balance of sweetness, I finally landed on this recipe. The day I pulled the perfected cake from the oven, its rich chocolatey scent mingled beautifully with the sweet, caramel-like perfume of ripe bananas, I knew I had found a winner. The cake itself was a marvel of texture: incredibly moist and tender, with pockets of melted chocolate that burst with flavor, and just the right amount of banana essence permeating every bite. My husband, usually reserved in his praise for desserts, declared it “addictive,” while my daughters, eyes wide, immediately dubbed it “the best cake ever.” It became an instant family legend, a staple for birthdays, a comforting treat on rainy afternoons, and the most requested item for potlucks. Beyond its deliciousness, this cake represents a sustainable solution, transforming fruit that might otherwise go to waste into something truly extraordinary. It’s a dessert that feels both indulgent and wholesome, satisfying every craving without overwhelming the palate. This recipe is a celebration of simple ingredients, a love letter to the perfect pairing of banana and chocolate, and a guaranteed way to fill your home with warmth, laughter, and an irresistible aroma.
Complete Vegetarian Banana Chocolate Cake Ingredients
Crafting the perfect Vegetarian Banana Chocolate Cake begins with understanding each ingredient’s role. From the ripeness of your bananas to the specific type of cocoa, every component contributes to the cake’s ultimate flavor, texture, and moistness. Below is a comprehensive list, accompanied by insights into selection and purpose.
For the Dry Ingredients:
- All-Purpose Flour: 2 ½ cups (300g). This provides the structural foundation of the cake. While some recipes call for cake flour for a finer crumb, all-purpose flour works beautifully here, giving a tender yet sturdy texture that can stand up to the moist banana and chocolate. Always measure by weight if possible for accuracy, or spoon and level the flour if using volume measurements to avoid a dense cake.
- Unsweetened Cocoa Powder (Natural or Dutch-Processed): ½ cup (45g). This is crucial for the chocolate flavor.
- Natural Cocoa Powder: Lighter in color, with a sharper, more acidic chocolate flavor. It reacts with baking soda to create lift.
- Dutch-Processed Cocoa Powder: Darker, less acidic, and has a milder, smoother chocolate flavor. It requires baking powder for leavening, as it does not react with baking soda in the same way. For this recipe, either can be used, but if using natural cocoa, the baking soda’s reaction with its acidity will contribute to rise. If using Dutch-processed, ensure your baking powder is fresh. I often prefer Dutch-processed for its rich color and less bitter flavor in cakes.
- Baking Soda: 1 teaspoon. This leavening agent reacts with acidic ingredients (like the natural acidity in bananas and sometimes cocoa powder) to produce carbon dioxide, creating lift and a tender crumb.
- Baking Powder: 1 teaspoon. A second leavening agent, often double-acting, meaning it reacts once when wet and again with heat, providing additional lift and lightness to the cake.
- Salt: 1 teaspoon. A crucial flavor enhancer. It doesn’t make the cake taste salty, but rather balances the sweetness, deepens the chocolate notes, and makes all the other flavors “pop.” Don’t skip it!
For the Wet Ingredients:
- Unsalted Butter, Softened: 1 cup (226g or 2 sticks). Using unsalted butter allows you to control the total sodium in the recipe. It needs to be at room temperature (soft enough to indent with a finger, but not melted) for proper creaming with the sugars, which incorporates air and creates a light, tender cake texture.
- Granulated Sugar: 1 cup (200g). Provides sweetness and contributes to the cake’s moistness and tender crumb.
- Light Brown Sugar, Packed: ½ cup (100g). Adds a deeper, caramel-like sweetness and extra moisture due to the molasses content, complementing the banana and chocolate flavors beautifully.
- Large Eggs, Room Temperature: 2 eggs. Eggs provide structure, moisture, and help bind the ingredients together. Using room temperature eggs ensures they emulsify better with the butter and sugar, leading to a smoother batter and a finer crumb.
- Very Ripe Bananas, Mashed: 1 ½ cups (approximately 3-4 large bananas). The ripeness of the bananas is non-negotiable for this recipe! They should be heavily speckled with brown or almost entirely black. Overripe bananas are sweeter, more flavorful, and much softer, making them easier to mash and incorporate, and contributing significant moisture to the cake. Avoid using firm, yellow bananas.
- Milk (Any Kind): ¼ cup (60ml). Whole milk or 2% milk works best for richness, but any dairy or non-dairy milk (almond, soy, oat) can be used. It adds moisture and helps to create a tender crumb.
- Pure Vanilla Extract: 1 ½ teaspoons. A fundamental flavor enhancer that complements and deepens both the banana and chocolate notes. Don’t use artificial vanilla; the real deal makes a noticeable difference.
For the Chocolate Infusion:
- Semi-Sweet Chocolate Chips or Chunks: 1 cup (170g). These add bursts of melted chocolate throughout the cake. You can use milk chocolate for a sweeter cake or dark chocolate for a more intense, slightly bitter contrast. Quality matters here – use chocolate you enjoy eating on its own.
Optional Enhancements:
- Hot Coffee or Espresso Powder: 1-2 teaspoons, dissolved in the milk or a tiny bit of hot water. Coffee doesn’t make the cake taste like coffee; instead, it remarkably deepens and intensifies the chocolate flavor. It’s an optional but highly recommended secret ingredient for any chocolate cake.
- Chopped Nuts: ½ cup (e.g., walnuts, pecans). For added crunch and a nutty complement to the banana and chocolate. Fold them in with the chocolate chips.
Essential Tools You’ll Need:
Having the right tools ready makes the baking process smoother and more enjoyable.
- Two 9-inch Round Cake Pans: Essential for baking the layers evenly.
- Parchment Paper: To line the bottoms of the cake pans, ensuring easy release.
- Non-Stick Baking Spray or Butter/Flour for Greasing: To prevent sticking.
- Large Mixing Bowl: For combining wet ingredients.
- Medium Mixing Bowl: For whisking dry ingredients.
- Stand Mixer with Paddle Attachment or Hand Mixer: For creaming butter and sugar, and mixing the batter. A whisk can work, but will require more arm strength.
- Rubber Spatula: For scraping down the bowl and folding ingredients.
- Whisk: For dry ingredients.
- Measuring Cups and Spoons: For accurate ingredient measurements.
- Oven Thermometer: To ensure your oven is at the correct temperature (oven temperatures can vary significantly from the dial setting).
- Wire Cooling Racks: For cooling the cakes completely.
Instructions
Follow these detailed, step-by-step instructions to ensure your Vegetarian Banana Chocolate Cake turns out perfectly moist, rich, and utterly delicious. Precision and careful technique are key to a successful bake.
Stage 1: Preparation – Setting the Stage for Success
- Preheat Your Oven: Position an oven rack in the middle of your oven. Preheat the oven to 350°F (175°C). It’s crucial for the oven to be fully preheated before the cake goes in, as inconsistent heat can affect the rise and texture. If you have an oven thermometer, now is the time to use it to verify accuracy.
- Prepare Your Cake Pans: Take your two 9-inch round cake pans. Lightly grease the bottoms and sides of each pan with non-stick baking spray or softened butter. Then, dust the greased pans lightly with flour, tapping out any excess. For an extra layer of non-stick assurance (highly recommended!), cut two circles of parchment paper to fit the bottoms of the pans and place them inside. This ensures your cake layers release effortlessly.
- Mash the Bananas: In a medium bowl, mash the very ripe bananas using a fork or a potato masher until they are mostly smooth with a few small lumps remaining. Avoid making them completely pureed, as a little texture is nice. Set aside.
- Combine Dry Ingredients: In a separate medium bowl, whisk together the all-purpose flour, unsweetened cocoa powder, baking soda, baking powder, and salt. Whisk for at least 30 seconds to ensure the leavening agents and cocoa are evenly distributed throughout the flour. This prevents pockets of unmixed ingredients and promotes even rising.
Stage 2: Building the Wet Batter – Creaming and Emulsifying
- Cream Butter and Sugars: In a large mixing bowl (or the bowl of your stand mixer fitted with the paddle attachment), add the softened unsalted butter, granulated sugar, and packed light brown sugar. Beat on medium speed for 3-5 minutes, or until the mixture is light, fluffy, and pale in color. This process, known as creaming, incorporates air into the butter, which is essential for the cake’s light and tender texture. Scrape down the sides of the bowl occasionally to ensure everything is evenly combined.
- Incorporate Eggs: Add the room temperature eggs to the creamed butter and sugar mixture, one at a time. Beat well after each addition, ensuring the egg is fully incorporated before adding the next. This helps to create a stable emulsion. The mixture might look slightly curdled after the first egg, but it will smooth out as you continue to beat.
- Add Mashed Bananas and Vanilla: Reduce the mixer speed to low. Add the mashed bananas and pure vanilla extract to the bowl. Mix just until combined and no streaks of banana remain. Avoid overmixing at this stage.
Stage 3: Combining Wet and Dry – The Delicate Balance
- Alternate Dry and Wet Ingredients: With the mixer still on low speed (or by hand with a spatula), begin adding the dry ingredients mixture alternately with the milk.
- Start by adding about one-third of the dry ingredients to the wet mixture. Mix until just combined.
- Next, pour in half of the milk. Mix until just combined.
- Add another one-third of the dry ingredients. Mix until just combined.
- Add the remaining milk. Mix until just combined.
- Finish with the final one-third of the dry ingredients. Mix until just combined.
- Crucial Step: Mix only until no streaks of flour are visible. Overmixing at this stage will develop the gluten in the flour too much, resulting in a tough, dense cake. Use a rubber spatula to give the batter a final gentle fold by hand to ensure everything from the bottom and sides is incorporated.
- Fold in Chocolate Chips: Gently fold in the semi-sweet chocolate chips (and any optional chopped nuts) using your rubber spatula. Distribute them evenly throughout the batter.
Stage 4: Baking and Cooling – The Patience Game
- Divide Batter Evenly: Divide the cake batter evenly between your two prepared 9-inch round cake pans. A kitchen scale can be helpful for precise division if you want perfectly even layers, otherwise, eyeball it. Smooth the tops of the batter with your spatula.
- Bake: Place the cake pans in the preheated oven. Bake for 30-35 minutes, or until a wooden skewer or toothpick inserted into the center of the cakes comes out with only moist crumbs attached, or completely clean. Avoid opening the oven door too frequently during the initial baking time, as this can cause the cakes to sink.
- Cool in Pans: Once baked, remove the cakes from the oven. Let them cool in their pans on a wire cooling rack for 10-15 minutes. This crucial step allows the cakes to set and firm up before being removed.
- Invert and Cool Completely: After the initial cooling, carefully invert the cakes onto the wire cooling rack. Gently peel off the parchment paper (if used). Let the cakes cool completely at room temperature. This can take 1-2 hours. Do not attempt to frost warm cakes, as the frosting will melt and slide off. Patience is key for a beautiful final product!
Nutrition Facts
- Servings: This recipe yields one two-layer 9-inch round cake, which provides approximately 12-16 servings.
- Calories per Serving (approx. 1/12th of cake): Approximately 450-550 calories.
Please Note: This nutritional information is an estimate. The exact calorie count and nutritional breakdown will vary significantly based on the specific brands of ingredients used (e.g., fat content of butter/milk, sugar content of chocolate chips), the precise measurements, and the size of your servings. If you add optional ingredients like nuts or frosting, the calorie count will also increase. This calculation is for the cake itself, without any additional frosting.
Preparation Time
- Active Preparation Time: 30 minutes (includes mashing bananas, mixing dry and wet ingredients, folding in chocolate chips, and dividing batter).
- Baking Time: 30-35 minutes.
- Cooling Time: 10-15 minutes in pans, followed by 1-2 hours on wire racks.
- Total Time (without frosting): Approximately 2 hours and 30 minutes to 3 hours.
How to Serve
This Vegetarian Banana Chocolate Cake is incredibly versatile and can be enjoyed in a multitude of ways, from a simple slice to an elaborate dessert centerpiece.
- Warm and Indulgent:
- Serve a warm slice (gently reheated for 10-15 seconds in the microwave if desired) alongside a scoop of vanilla bean ice cream or a dollop of freshly whipped cream. The contrast of the warm cake with the cold ice cream is heavenly, and the ice cream slowly melts into the cake, creating a luscious sauce.
- A drizzle of caramel sauce or chocolate syrup can elevate this experience even further.
- Classic Dessert Presentation:
- Once completely cooled, frost the cake with your favorite chocolate ganache, cream cheese frosting, or a classic buttercream. A chocolate cream cheese frosting is particularly divine with the banana notes.
- Garnish with fresh banana slices, chocolate shavings, a dusting of cocoa powder, or a sprinkle of chopped nuts for an elegant finish.
- Morning or Afternoon Treat:
- Enjoy a slice, unfrosted or lightly glazed, with a cup of hot coffee, tea, or a glass of cold milk. Its moist, flavorful profile makes it an excellent accompaniment to a quiet moment or as a delightful pick-me-up.
- It’s a surprisingly satisfying option for a brunch spread, alongside fresh fruit and other pastries.
- Individual Portions:
- If baked in a Bundt pan or as cupcakes (adjusting baking times accordingly), these become perfect individual servings.
- For cupcakes, you can core them and fill them with a banana cream filling before frosting.
- Holiday or Special Occasion Centerpiece:
- Decorate elaborately for birthdays, anniversaries, or seasonal gatherings. The robust flavor of this cake stands up well to decorative elements and can be a showstopper.
- For a rustic charm, leave it unfrosted and simply dust with powdered sugar, arranging a few banana chips or chocolate curls on top.
Additional Tips
Mastering this Vegetarian Banana Chocolate Cake is about understanding the nuances of baking. These five tips delve deeper into the science and art behind achieving perfection.
- The Unsung Hero: The Overripe Banana: This isn’t just a suggestion; it’s a fundamental requirement for the cake’s success. As bananas ripen, their starches convert into sugars, making them incredibly sweet and imparting a deep, almost caramel-like flavor. More importantly, they become extremely soft and moist. Using firm, yellow bananas will result in a less flavorful, drier cake. If your bananas aren’t quite ready, you can quick-ripen them:
- Oven Method: Place unpeeled bananas on a baking sheet and bake at 300°F (150°C) for 15-30 minutes, or until the skins are completely black and shiny. Let them cool before mashing. The sugars will caramelize, intensifying their sweetness.
- Paper Bag Method: Place bananas in a paper bag with an apple or tomato, fold to seal, and leave at room temperature overnight or for a day. The ethylene gas released by the fruit accelerates ripening.
- Always ensure your bananas are at room temperature before mashing, as cold bananas can affect the batter’s temperature.
- The Delicate Art of Mixing: A Tender Crumb’s Secret: Overmixing is the arch-nemesis of a tender cake. When you combine flour with liquid and stir, you develop gluten, the protein network that gives baked goods their structure. While some gluten is necessary, too much makes the cake tough and chewy, rather than light and moist.
- Dry Ingredients: Whisk thoroughly to ensure even distribution of leavening agents and cocoa powder.
- Wet Ingredients (Creaming): Beat butter and sugars until light and fluffy to incorporate air – this is where you build volume.
- Adding Eggs: Beat well after each addition to create a stable emulsion.
- Combining Wet and Dry: This is the critical stage. Once flour is introduced, mix only until no streaks of dry ingredients are visible. Use the lowest speed on your mixer, or gently fold by hand with a spatula. A few tiny lumps are far better than an overmixed batter. Scrape down the bowl frequently to ensure everything is incorporated without excessive mixing.
- The Room Temperature Rule: Foundations of a Flawless Batter: It might seem like a small detail, but using room temperature ingredients (butter, eggs, milk, bananas) profoundly impacts the final cake’s texture.
- Butter: Softened butter creams beautifully with sugar, creating air pockets that expand during baking, contributing to a light and airy texture. Cold butter won’t cream properly, and melted butter will result in a dense, greasy cake.
- Eggs: Room temperature eggs emulsify much more effectively with the creamed butter and sugar, creating a smoother, more homogeneous batter. Cold eggs can cause the butter mixture to seize and curdle.
- Milk/Bananas: Cold liquids can firm up the butter in the batter, making it harder to mix evenly and potentially affecting the emulsion. Room temperature ingredients blend seamlessly, yielding a consistent batter and a fine, even crumb. Plan ahead by taking these ingredients out of the refrigerator 30-60 minutes before you start baking.
- Tailoring Your Chocolate Experience: Beyond the Chip: While semi-sweet chocolate chips are a classic choice, don’t be afraid to experiment to customize your cake’s chocolate profile.
- Chocolate Type: For a sweeter cake, try milk chocolate chips. For a more intense, sophisticated, and slightly bitter contrast to the sweet banana, use dark chocolate chips or chopped dark chocolate. White chocolate chips can also add a creamy, sweet element and a different visual appeal.
- Chocolate Chunks: Chopping a chocolate bar into irregular chunks will create larger pockets of melted chocolate, offering a more varied texture and intense burst of flavor than uniform chips.
- Cocoa Powder Variation: Experiment with different brands or types of unsweetened cocoa powder. High-quality Dutched cocoa will give a darker color and richer, less acidic chocolate flavor.
- Espresso Powder: Adding 1-2 teaspoons of instant espresso powder (dissolved in the milk or a tiny bit of hot water) is a secret weapon. It doesn’t make the cake taste like coffee, but it significantly deepens and enhances the chocolate flavor, making it richer and more complex.
- Smart Storage for Extended Freshness: Proper storage is crucial to enjoying your cake for days.
- Unfrosted Cake Layers: Once completely cooled, wrap each cake layer tightly in plastic wrap. You can store them at room temperature for up to 2 days, or in the refrigerator for up to 5 days. For longer storage, freeze the wrapped layers for up to 2-3 months. Thaw at room temperature before frosting.
- Frosted Cake: Store frosted cake in an airtight cake dome or container at room temperature for 2-3 days. If your frosting is perishable (like cream cheese frosting), refrigerate the cake. Bring refrigerated cake to room temperature for 30-60 minutes before serving for the best flavor and texture.
- Individual Slices: Cut the cake into individual slices, wrap each slice tightly in plastic wrap, and then place them in an airtight container or freezer bag. Freeze for up to 1-2 months. This allows you to thaw just one slice at a time for a spontaneous treat.
FAQ Section
1. Q: Can I make this Banana Chocolate Cake gluten-free?
A: Yes, you absolutely can! To make this cake gluten-free, substitute the all-purpose flour with a high-quality gluten-free all-purpose flour blend that contains xanthan gum. Many brands are available, and some are specifically designed for baking. When using a gluten-free blend, it’s often beneficial to let the batter rest for 10-15 minutes before baking. This allows the flours to fully hydrate, which can improve the texture and prevent a gritty mouthfeel. Follow the rest of the instructions as written. The baking time may be slightly different, so keep an eye on the cake and rely on the toothpick test for doneness.
2. Q: What if I don’t have very ripe bananas? Can I still make the cake?
A: While very ripe bananas (heavily speckled to almost black) are ideal for their sweetness, flavor, and moisture content, you have a few options if yours aren’t quite there:
* Oven Method for Quick Ripening: Place unpeeled yellow bananas on a baking sheet and bake at 300°F (150°C) for 15-30 minutes, or until their skins turn completely black and shiny. Let them cool before peeling and mashing. This process caramelizes their sugars, intensifying their flavor.
* Do Not Use Unripe Bananas: Avoid using firm, green, or yellow bananas. They lack the necessary sweetness and moisture, which will result in a dry, less flavorful cake with a tougher texture. It’s truly worth the extra effort or wait for properly ripe bananas.
3. Q: Can I bake this recipe as muffins or a Bundt cake instead of layers?
A: Yes, this recipe is incredibly versatile and works well in different forms!
* Muffins: Line a muffin tin with paper liners. Fill each liner about two-thirds full. Bake at 375°F (190°C) for 18-22 minutes, or until a toothpick inserted into the center comes out clean. This recipe should yield about 18-24 muffins.
* Bundt Cake: Prepare a 10-12 cup Bundt pan by generously greasing and flouring it. Pour all the batter into the prepared pan. Bake at 350°F (175°C) for approximately 55-65 minutes, or until a wooden skewer inserted into the deepest part of the cake comes out clean. Cool in the pan for 15-20 minutes before inverting onto a wire rack to cool completely. Adjust baking times as needed and always rely on the toothpick test for doneness.
4. Q: My cake stuck to the pan, even after greasing. What went wrong, and how can I prevent it?
A: Cake sticking to the pan is a common frustration, often due to a combination of factors:
* Inadequate Greasing/Flouring: Ensure you generously grease all surfaces of the pan (bottom and sides) and thoroughly dust with flour, tapping out any excess. For chocolate cakes, you can dust with cocoa powder instead of flour to avoid white residue.
* Parchment Paper is Key: Using a circle of parchment paper cut to fit the bottom of the pan is the most foolproof method to prevent sticking. Place it over the greased bottom.
* Premature Removal: Removing the cake from the pan too soon after baking can cause it to tear. Let it cool in the pan on a wire rack for the recommended 10-15 minutes. This allows the cake’s structure to set and gently pull away from the pan sides as it cools slightly.
* Overbaking: An overbaked cake can dry out and adhere more firmly to the pan. Ensure you bake just until the toothpick test indicates doneness.
5. Q: My Banana Chocolate Cake turned out dry. What could be the cause?
A: A dry cake is disappointing, but it’s usually preventable. Here are the most common culprits:
* Overbaking: This is the most frequent cause. Even a few minutes too long in the oven can strip a cake of its moisture. Rely on the toothpick test (moist crumbs, not wet batter) and start checking a few minutes before the recipe’s minimum bake time.
* Incorrect Flour Measurement: Too much flour can make a cake dry. Always spoon and level flour (don’t scoop directly from the bag) or, ideally, weigh it with a kitchen scale for precise measurement.
* Not Enough Ripe Bananas: As mentioned, underripe bananas lack the moisture and sweetness necessary to keep the cake moist.
* Overmixing the Batter: Overmixing develops gluten, which can lead to a tough, dry, and dense cake texture. Mix only until the ingredients are just combined.
* Old or Improperly Stored Cake: While moist when fresh, even the best cakes can dry out if not stored properly. Ensure it’s wrapped tightly or in an airtight container at room temperature.

Vegetarian Banana Chocolate Cake recipe
Ingredients
For the Dry Ingredients:
-
All-Purpose Flour: 2 ½ cups (300g). This provides the structural foundation of the cake. While some recipes call for cake flour for a finer crumb, all-purpose flour works beautifully here, giving a tender yet sturdy texture that can stand up to the moist banana and chocolate. Always measure by weight if possible for accuracy, or spoon and level the flour if using volume measurements to avoid a dense cake.
-
Unsweetened Cocoa Powder (Natural or Dutch-Processed): ½ cup (45g). This is crucial for the chocolate flavor.
-
Natural Cocoa Powder: Lighter in color, with a sharper, more acidic chocolate flavor. It reacts with baking soda to create lift.
-
Dutch-Processed Cocoa Powder: Darker, less acidic, and has a milder, smoother chocolate flavor. It requires baking powder for leavening, as it does not react with baking soda in the same way. For this recipe, either can be used, but if using natural cocoa, the baking soda’s reaction with its acidity will contribute to rise. If using Dutch-processed, ensure your baking powder is fresh. I often prefer Dutch-processed for its rich color and less bitter flavor in cakes.
-
-
Baking Soda: 1 teaspoon. This leavening agent reacts with acidic ingredients (like the natural acidity in bananas and sometimes cocoa powder) to produce carbon dioxide, creating lift and a tender crumb.
-
Baking Powder: 1 teaspoon. A second leavening agent, often double-acting, meaning it reacts once when wet and again with heat, providing additional lift and lightness to the cake.
-
Salt: 1 teaspoon. A crucial flavor enhancer. It doesn’t make the cake taste salty, but rather balances the sweetness, deepens the chocolate notes, and makes all the other flavors “pop.” Don’t skip it!
For the Wet Ingredients:
-
Unsalted Butter, Softened: 1 cup (226g or 2 sticks). Using unsalted butter allows you to control the total sodium in the recipe. It needs to be at room temperature (soft enough to indent with a finger, but not melted) for proper creaming with the sugars, which incorporates air and creates a light, tender cake texture.
-
Granulated Sugar: 1 cup (200g). Provides sweetness and contributes to the cake’s moistness and tender crumb.
-
Light Brown Sugar, Packed: ½ cup (100g). Adds a deeper, caramel-like sweetness and extra moisture due to the molasses content, complementing the banana and chocolate flavors beautifully.
-
Large Eggs, Room Temperature: 2 eggs. Eggs provide structure, moisture, and help bind the ingredients together. Using room temperature eggs ensures they emulsify better with the butter and sugar, leading to a smoother batter and a finer crumb.
-
Very Ripe Bananas, Mashed: 1 ½ cups (approximately 3-4 large bananas). The ripeness of the bananas is non-negotiable for this recipe! They should be heavily speckled with brown or almost entirely black. Overripe bananas are sweeter, more flavorful, and much softer, making them easier to mash and incorporate, and contributing significant moisture to the cake. Avoid using firm, yellow bananas.
-
Milk (Any Kind): ¼ cup (60ml). Whole milk or 2% milk works best for richness, but any dairy or non-dairy milk (almond, soy, oat) can be used. It adds moisture and helps to create a tender crumb.
-
Pure Vanilla Extract: 1 ½ teaspoons. A fundamental flavor enhancer that complements and deepens both the banana and chocolate notes. Don’t use artificial vanilla; the real deal makes a noticeable difference.
For the Chocolate Infusion:
-
Semi-Sweet Chocolate Chips or Chunks: 1 cup (170g). These add bursts of melted chocolate throughout the cake. You can use milk chocolate for a sweeter cake or dark chocolate for a more intense, slightly bitter contrast. Quality matters here – use chocolate you enjoy eating on its own.
Optional Enhancements:
-
Hot Coffee or Espresso Powder: 1-2 teaspoons, dissolved in the milk or a tiny bit of hot water. Coffee doesn’t make the cake taste like coffee; instead, it remarkably deepens and intensifies the chocolate flavor. It’s an optional but highly recommended secret ingredient for any chocolate cake.
-
Chopped Nuts: ½ cup (e.g., walnuts, pecans). For added crunch and a nutty complement to the banana and chocolate. Fold them in with the chocolate chips.
Instructions
Stage 1: Preparation – Setting the Stage for Success
-
Preheat Your Oven: Position an oven rack in the middle of your oven. Preheat the oven to 350°F (175°C). It’s crucial for the oven to be fully preheated before the cake goes in, as inconsistent heat can affect the rise and texture. If you have an oven thermometer, now is the time to use it to verify accuracy.
-
Prepare Your Cake Pans: Take your two 9-inch round cake pans. Lightly grease the bottoms and sides of each pan with non-stick baking spray or softened butter. Then, dust the greased pans lightly with flour, tapping out any excess. For an extra layer of non-stick assurance (highly recommended!), cut two circles of parchment paper to fit the bottoms of the pans and place them inside. This ensures your cake layers release effortlessly.
-
Mash the Bananas: In a medium bowl, mash the very ripe bananas using a fork or a potato masher until they are mostly smooth with a few small lumps remaining. Avoid making them completely pureed, as a little texture is nice. Set aside.
-
Combine Dry Ingredients: In a separate medium bowl, whisk together the all-purpose flour, unsweetened cocoa powder, baking soda, baking powder, and salt. Whisk for at least 30 seconds to ensure the leavening agents and cocoa are evenly distributed throughout the flour. This prevents pockets of unmixed ingredients and promotes even rising.
Stage 2: Building the Wet Batter – Creaming and Emulsifying
-
Cream Butter and Sugars: In a large mixing bowl (or the bowl of your stand mixer fitted with the paddle attachment), add the softened unsalted butter, granulated sugar, and packed light brown sugar. Beat on medium speed for 3-5 minutes, or until the mixture is light, fluffy, and pale in color. This process, known as creaming, incorporates air into the butter, which is essential for the cake’s light and tender texture. Scrape down the sides of the bowl occasionally to ensure everything is evenly combined.
-
Incorporate Eggs: Add the room temperature eggs to the creamed butter and sugar mixture, one at a time. Beat well after each addition, ensuring the egg is fully incorporated before adding the next. This helps to create a stable emulsion. The mixture might look slightly curdled after the first egg, but it will smooth out as you continue to beat.
-
Add Mashed Bananas and Vanilla: Reduce the mixer speed to low. Add the mashed bananas and pure vanilla extract to the bowl. Mix just until combined and no streaks of banana remain. Avoid overmixing at this stage.
Stage 3: Combining Wet and Dry – The Delicate Balance
-
Alternate Dry and Wet Ingredients: With the mixer still on low speed (or by hand with a spatula), begin adding the dry ingredients mixture alternately with the milk.
-
Start by adding about one-third of the dry ingredients to the wet mixture. Mix until just combined.
-
Next, pour in half of the milk. Mix until just combined.
-
Add another one-third of the dry ingredients. Mix until just combined.
-
Add the remaining milk. Mix until just combined.
-
Finish with the final one-third of the dry ingredients. Mix until just combined.
-
Crucial Step: Mix only until no streaks of flour are visible. Overmixing at this stage will develop the gluten in the flour too much, resulting in a tough, dense cake. Use a rubber spatula to give the batter a final gentle fold by hand to ensure everything from the bottom and sides is incorporated.
-
-
Fold in Chocolate Chips: Gently fold in the semi-sweet chocolate chips (and any optional chopped nuts) using your rubber spatula. Distribute them evenly throughout the batter.
Stage 4: Baking and Cooling – The Patience Game
-
Divide Batter Evenly: Divide the cake batter evenly between your two prepared 9-inch round cake pans. A kitchen scale can be helpful for precise division if you want perfectly even layers, otherwise, eyeball it. Smooth the tops of the batter with your spatula.
-
Bake: Place the cake pans in the preheated oven. Bake for 30-35 minutes, or until a wooden skewer or toothpick inserted into the center of the cakes comes out with only moist crumbs attached, or completely clean. Avoid opening the oven door too frequently during the initial baking time, as this can cause the cakes to sink.
-
Cool in Pans: Once baked, remove the cakes from the oven. Let them cool in their pans on a wire cooling rack for 10-15 minutes. This crucial step allows the cakes to set and firm up before being removed.
-
Invert and Cool Completely: After the initial cooling, carefully invert the cakes onto the wire cooling rack. Gently peel off the parchment paper (if used). Let the cakes cool completely at room temperature. This can take 1-2 hours. Do not attempt to frost warm cakes, as the frosting will melt and slide off. Patience is key for a beautiful final product!
Nutrition
- Serving Size: one normal portion
- Calories: 450-550


