

I first encountered Chow Chow relish at a bustling family reunion deep in the heart of the South. Amidst tables laden with fried chicken, collard greens, and cornbread, there was this vibrant, chunky condiment that everyone seemed to be spooning generously onto their plates. I was hesitant at first – its mix of colors and textures was unfamiliar. But one bite, alongside a savory piece of pork, and I was utterly hooked. It was tangy, sweet, crunchy, and had this delightful, warming spice that lingered pleasantly. When I found out it was homemade “Spicy Chow Chow,” I knew I had to learn how to make it. My own attempts to recreate that magic have led to this recipe, a version that my family now clamors for. It’s a star at our barbecues, a secret weapon for enlivening simple beans and rice, and honestly, I’ve even caught my husband eating it straight from the jar with a fork. It’s that good – a true taste of tradition with a fiery kick!
What Exactly is Spicy Chow Chow Relish? A Southern Staple Explained
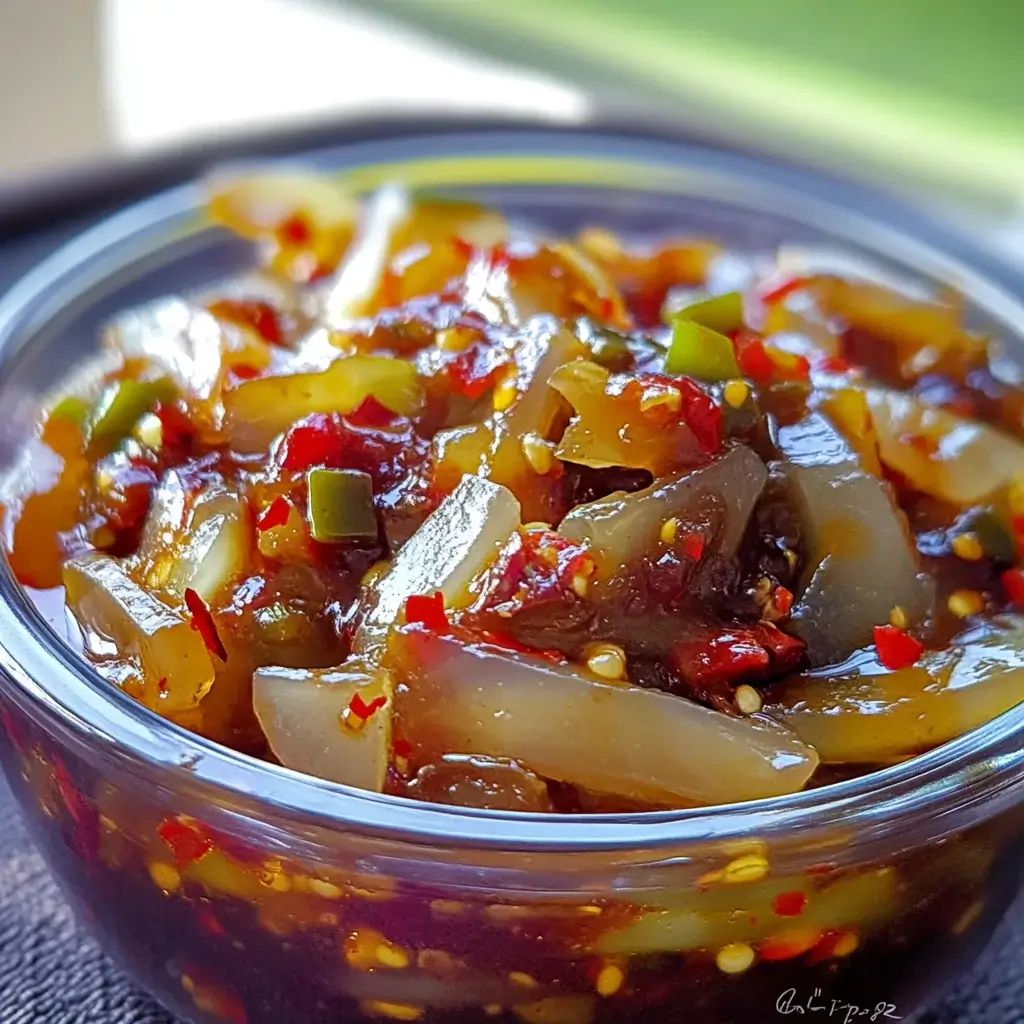
Spicy Chow Chow Relish is a quintessential American condiment, particularly beloved in the Southern United States, though variations can be found across the country. At its core, Chow Chow is a pickled relish made from a medley of finely chopped or diced vegetables. While recipes vary widely by region and even by family, common base ingredients include green tomatoes, cabbage, bell peppers (often a mix of green and red for color), and onions. What sets “Spicy” Chow Chow apart is the inclusion of hot peppers – like jalapeños, serranos, or even habaneros – which infuse the relish with a pleasant heat that complements its inherent sweet and tangy notes.
The name “Chow Chow” itself is a bit of a mystery, with theories ranging from Chinese immigrant influences (referring to “cha” or mixed food) to French culinary terms. Regardless of its etymological origins, Chow Chow has a rich history as a way to preserve the end-of-season garden bounty, transforming vegetables that might otherwise go to waste into a flavorful condiment that can last through the winter months. It’s a testament to resourceful cooking, turning simple ingredients into something truly special. The “spicy” element adds a modern or personal twist to this classic, catering to palates that enjoy a bit more excitement.
Why You’ll Adore This Spicy Chow Chow Relish Recipe
This isn’t just another relish recipe; it’s an invitation to create a condiment that’s bursting with personality and flavor. Here’s why you’re going to fall head-over-heels for this Spicy Chow Chow:
- Incredible Flavor Profile: It’s a symphony of tastes – tangy from the vinegar, sweet from the sugar, savory from the vegetables, and, of course, a delightful kick of spice from the hot peppers. The complex flavors develop and meld over time, making each bite an experience.
- Amazing Texture: The combination of tender-crisp vegetables provides a wonderful textural contrast that makes it far more interesting than smooth relishes. It’s chunky, satisfying, and adds a pleasant crunch.
- Remarkably Versatile: This isn’t just for hot dogs (though it’s fantastic on them!). Use it to elevate beans, greens, sandwiches, burgers, eggs, charcuterie boards, or serve it as a side with grilled meats and fish.
- Preserves Your Harvest: It’s an excellent way to use up an abundance of green tomatoes, cabbage, and peppers from your garden or local farmers’ market.
- Customizable Heat: You are in complete control of the spice level. Add more or fewer hot peppers, or choose different varieties to tailor the heat to your exact preference.
- Homemade Goodness: There’s nothing quite like the satisfaction of making something delicious from scratch. Plus, you control the ingredients, avoiding artificial preservatives or excessive sodium often found in store-bought versions.
- Perfect for Gifting: A jar of homemade Spicy Chow Chow makes a thoughtful and unique gift for friends, family, and neighbors, especially during the holidays or as a hostess gift.
Gather Your Garden’s Bounty: Ingredients for Spicy Chow Chow Relish
This recipe makes a generous batch, approximately 6-8 pint jars, perfect for sharing or stocking your pantry.
- Green Tomatoes: 4 cups, finely diced (about 2 lbs or 6-8 medium)
- Cabbage: 4 cups, finely shredded or chopped (about 1 small head)
- Onions: 2 cups, finely diced (about 2 large)
- Bell Peppers: 2 cups, finely diced (a mix of red and green for color, about 2 large)
- Spicy Peppers: ½ to 1 cup, finely minced (e.g., jalapeños, serranos; adjust to your spice preference; remove seeds and membranes for less heat)
- Canning or Pickling Salt: ¼ cup (do NOT use iodized table salt, as it can make the brine cloudy and affect flavor)
- Apple Cider Vinegar (5% acidity): 3 cups
- Granulated Sugar: 2 ½ cups (can adjust slightly to taste, but sugar is important for preservation and flavor balance)
- Mustard Seeds (Yellow): 2 tablespoons
- Celery Seeds: 1 tablespoon
- Turmeric Powder: 1 teaspoon (for color and earthy flavor)
- Ground Ginger: ½ teaspoon (optional, for a hint of warmth)
- Red Pepper Flakes: ½ teaspoon (optional, for extra visual spice and heat)
Equipment Note: If you plan to can the relish for shelf stability, you will also need canning jars with new lids and bands, a large pot for a boiling water bath, a jar lifter, funnel, and headspace tool/bubble remover.
Crafting the Crunch: Step-by-Step Instructions
Making Spicy Chow Chow is a two-part process: preparing the vegetables and then cooking and pickling them. Allow time for the vegetables to salt and drain overnight or for several hours.
Part 1: Preparing and Salting the Vegetables (Crucial Step!)
- Chop the Vegetables: Wash all your vegetables thoroughly. Finely dice the green tomatoes, onions, and bell peppers. Finely shred or chop the cabbage. Mince the spicy peppers (wear gloves when handling hot peppers to avoid skin irritation!). Aim for a relatively uniform size so the relish cooks evenly and has a pleasant texture. A food processor can be used for chopping, but pulse carefully to avoid turning the vegetables into mush – you want distinct pieces.
- Salt the Vegetables: In a very large non-reactive bowl (glass, stainless steel, or ceramic), combine all the chopped green tomatoes, cabbage, onions, bell peppers, and spicy peppers.
- Add Salt: Sprinkle the ¼ cup of canning or pickling salt over the vegetables and toss gently but thoroughly to ensure the salt is evenly distributed.
- Rest and Drain: Cover the bowl with plastic wrap or a clean kitchen towel and let it sit at room temperature for at least 4-6 hours, or preferably overnight in the refrigerator. The salt will draw out excess moisture from the vegetables, which is essential for a crisp relish and proper preservation.
- Drain Thoroughly: After the resting period, you’ll notice a significant amount of liquid has accumulated in the bowl. Transfer the vegetables to a colander and rinse them very well under cold running water to remove the excess salt. Let them drain in the colander for at least 30 minutes, pressing gently to remove as much water as possible. Some people even wrap the vegetables in a cheesecloth or a clean kitchen towel and squeeze out more liquid. This step is vital for the final texture.
Part 2: Cooking and Canning the Relish
- Prepare Canning Jars (If Canning): If you are canning the relish for shelf-stability, wash your jars, lids, and bands in hot, soapy water. Rinse well. Keep the jars hot (e.g., in a simmering water bath, a low oven, or the dishwasher on a sanitize cycle) until ready to fill. Place the lids in a small saucepan with water and bring to a simmer (do not boil). Keep them hot.
- Make the Pickling Brine: In a large, heavy-bottomed stainless steel or enamel pot (do not use aluminum or copper, as they can react with the vinegar), combine the apple cider vinegar, granulated sugar, mustard seeds, celery seeds, turmeric powder, ground ginger (if using), and red pepper flakes (if using).
- Dissolve Sugar: Bring the brine mixture to a boil over medium-high heat, stirring frequently until the sugar is completely dissolved.
- Add Drained Vegetables: Add the thoroughly drained and rinsed vegetables to the boiling brine. Stir well to combine.
- Cook the Relish: Return the mixture to a boil, then reduce the heat to medium-low and simmer, uncovered, for about 20-30 minutes, or until the vegetables are tender-crisp and the relish has thickened slightly. Stir occasionally to prevent sticking. The exact cooking time will depend on how finely your vegetables are chopped and your desired tenderness. Avoid overcooking, as you don’t want mushy relish. Taste carefully (it will be hot!) and adjust sugar or spice if needed, though it’s best to make major spice adjustments with the raw peppers.
- Fill the Jars (If Canning):
- Carefully ladle the hot relish into the prepared hot jars, leaving ½-inch headspace (the space between the top of the relish and the rim of the jar). A canning funnel is very helpful here.
- Remove any air bubbles by sliding a non-metallic utensil (like a bubble remover tool or a thin wooden skewer) around the inside of the jar.
- Wipe the jar rims clean with a damp cloth to ensure a good seal.
- Center the hot lids on the jars and screw on the bands until fingertip tight (not too tight, as air needs to escape during processing).
- Process in Boiling Water Bath (If Canning):
- Carefully place the filled jars onto a rack in a large pot with enough simmering water to cover the jars by at least 1-2 inches.
- Bring the water to a rolling boil. Once boiling, cover the pot and process pint jars for 10 minutes (adjust processing time based on your altitude if necessary).
- After processing, turn off the heat, remove the pot lid, and let the jars sit in the hot water for 5 minutes before removing.
- Carefully remove the jars using a jar lifter and place them upright on a towel-lined surface, leaving space between them to cool completely (12-24 hours). Do not disturb them during this time. You should hear the “pop” of the lids sealing.
- Check Seals and Store (If Canned): Once cooled, check the seals by pressing the center of each lid. If it doesn’t flex up and down, it’s sealed. If a jar hasn’t sealed, refrigerate it and use it within a few weeks. Label sealed jars and store them in a cool, dark, dry place for up to 1 year (or longer, though quality may diminish over time).
- For Refrigerator Relish (If Not Canning): If you choose not to process the relish in a boiling water bath, let the cooked relish cool slightly, then ladle it into clean jars or containers. Once completely cool, store it in the refrigerator. It will keep well for several weeks, often improving in flavor as it sits.
Nutritional Insights: A Look at Your Homemade Relish
While exact nutritional values depend on the specific quantities and types of vegetables used, Spicy Chow Chow Relish is generally a flavorful, low-calorie condiment.
- Servings: This recipe yields approximately 12-16 cups of relish. A typical serving size might be 2 tablespoons (about 1/16th of a pint jar).
- Calories per serving (approx. 2 tablespoons): 20-40 calories.
General Nutritional Highlights:
- Packed with vegetables, providing fiber, vitamins (like Vitamin C from peppers and tomatoes), and minerals.
- The spiciness from capsaicin in hot peppers can have metabolism-boosting properties for some.
- Vinegar can have benefits for blood sugar control.
- Sugar content is notable, as it’s a sweet pickle, but when used as a condiment, the per-serving amount is moderate.
- Homemade versions allow control over sodium if you carefully rinse the salted vegetables.
This relish is a fantastic way to add a burst of flavor and some extra veggies to your meals without a significant caloric load.
Timing Your Tang: Preparation & Processing Time
Creating this delicious relish involves several stages:
- Active Preparation Time (Chopping, Mixing): 45 minutes – 1 hour (depending on your chopping speed and whether you use a food processor)
- Vegetable Salting/Resting Time: 4-6 hours, or preferably overnight (8-12 hours)
- Draining Time: 30 minutes – 1 hour
- Cooking Time: 20-30 minutes
- Canning Process (Filling Jars & Water Bath): 30-40 minutes (if canning)
- Cooling & Sealing Time: 12-24 hours (if canning)
Total Hands-On Time: Approximately 1.5 – 2 hours (excluding resting, draining, and cooling)
Total Project Time (Start to Finish, including resting): Can range from 10 hours (with shorter rest) to over 24 hours (with overnight rest and canning).
While it’s not a quick 30-minute recipe, the largely hands-off resting time and the delicious, long-lasting results make it well worth the effort.
Serving Suggestions: Unleashing the Flavor of Spicy Chow Chow
Spicy Chow Chow Relish is incredibly versatile. Here are some fantastic ways to enjoy it:
- Classic Condiment:
- On hot dogs, bratwursts, and sausages.
- Mixed into or served alongside hamburgers.
- As a zesty topping for pulled pork or shredded chicken sandwiches.
- Southern Comfort Pairings:
- A generous spoonful alongside pinto beans, black-eyed peas, or navy beans.
- Served with collard greens, turnip greens, or mustard greens.
- A perfect accompaniment to a slice of warm cornbread.
- Breakfast & Brunch Booster:
- With scrambled eggs or omelets.
- On top of breakfast burritos or tacos.
- Alongside savory grits.
- Appetizer & Charcuterie Star:
- Serve in a small bowl on a cheese board or charcuterie platter.
- Mix with cream cheese for a quick and flavorful dip to serve with crackers.
- As a topping for deviled eggs.
- Meal Enhancer:
- Spoon over grilled or baked chicken, fish, or pork chops.
- Mix into tuna salad or chicken salad for an extra kick.
- Use as a flavorful layer in wraps or pita sandwiches.
- Stir into rice or quinoa bowls for added zest.
Mastering Your Make: 5 Essential Tips for Perfect Spicy Chow Chow
- Uniformity in Chopping: Aim for relatively uniform, small dice for your vegetables (about ¼ to ½ inch). This ensures even cooking and a pleasant, consistent texture in every bite. A food processor can help, but pulse carefully to avoid pureeing the vegetables.
- Don’t Skip the Salting & Draining: This is arguably the most crucial step for achieving the right texture. Salting draws out excess water, preventing a watery relish and helping the vegetables stay tender-crisp rather than becoming mushy during cooking and canning. Rinse thoroughly after salting to remove excess salt.
- Control the Spice: The “spicy” in Spicy Chow Chow is adjustable. For milder relish, use fewer hot peppers, choose less potent varieties (like jalapeños with seeds and membranes removed), or even substitute with more sweet bell peppers. For a fiery version, use hotter peppers like serranos or habaneros (with caution!), or leave some seeds in. Always wear gloves when handling hot peppers.
- Proper Canning is Key (If Preserving): If you’re canning for shelf stability, follow safe canning procedures meticulously. Use new lids, ensure proper headspace, remove air bubbles, wipe rims clean, and process for the correct time based on your altitude. This ensures a safe, long-lasting product. If you’re new to canning, consult a reliable source like the National Center for Home Food Preservation.
- Let Flavors Meld: While delicious right away (especially if made as a refrigerator relish), canned Chow Chow benefits from allowing the flavors to meld and mature for a few weeks in the jar before opening. The tanginess, sweetness, and spiciness will become more balanced and complex over time.
Flavor Variations: Customizing Your Chow Chow Creation
The beauty of homemade Chow Chow is its adaptability. Feel free to experiment!
- Pepper Power:
- Smoky Heat: Add a minced chipotle pepper in adobo sauce for a smoky kick.
- Fruity Heat: Incorporate habanero or Scotch bonnet peppers (use sparingly!) for intense, fruity heat.
- Mild & Colorful: Focus on a variety of sweet bell peppers (yellow, orange) if you want less spice but lots of color.
- Vegetable Ventures:
- Corn: Add a cup or two of fresh or frozen corn kernels (thawed if frozen) along with the other vegetables for sweetness and texture.
- Carrots: Include finely diced carrots for added color, sweetness, and a slightly different crunch.
- Cauliflower: Small, finely chopped cauliflower florets can add another layer of texture.
- Spice Rack Remix:
- Pickling Spice: Instead of individual spices, you can use 2-3 tablespoons of a pre-mixed pickling spice blend (tie it in a cheesecloth bag to easily remove before jarring if it contains whole cloves or cinnamon sticks).
- Coriander Seed: Adds a lemony, floral note.
- Allspice Berries: A few whole allspice berries (added to a spice bag) can provide warm, complex undertones.
- Sweetness & Acidity Adjustments:
- Less Sweet: You can slightly reduce the sugar, but be mindful that sugar plays a role in preservation and flavor balance.
- Different Vinegar: While apple cider vinegar is traditional, white distilled vinegar will give a sharper tang, or you could experiment with a blend. Ensure any vinegar used is at least 5% acidity for safe canning.
Your Spicy Chow Chow Questions Answered: FAQ
- Q: What if I don’t have green tomatoes? Can I use red ones?
- A: Green (unripe) tomatoes are traditional for Chow Chow because they are firm and hold their shape well during pickling, providing a tart flavor. Ripe red tomatoes are much softer and have higher water content, which would result in a mushier, more salsa-like consistency and a different flavor profile. If you can’t find green tomatoes, you could try using very firm, underripe red tomatoes, but the texture and taste won’t be quite the same as classic Chow Chow. Some recipes also use more cabbage to compensate if green tomatoes are scarce.
- Q: This recipe says “spicy,” but how spicy is it really? How can I adjust the heat?
- A: The spiciness is primarily determined by the amount and type of hot peppers used. With ½ to 1 cup of jalapeños (seeds and membranes mostly removed), this recipe will have a noticeable, pleasant warmth – a medium spice level for most.
- To make it MILDER: Use fewer hot peppers (e.g., ¼ cup), choose milder varieties like Anaheim or Poblano, or ensure all seeds and white membranes (where most capsaicin resides) are meticulously removed from the jalapeños. You can also increase the amount of sweet bell peppers.
- To make it HOTTER: Use more hot peppers, choose hotter varieties like serranos (2-3 times hotter than jalapeños) or even a small amount of habanero (use extreme caution!), or leave some seeds and membranes in your jalapeños. Adding more red pepper flakes will also increase heat.
- A: The spiciness is primarily determined by the amount and type of hot peppers used. With ½ to 1 cup of jalapeños (seeds and membranes mostly removed), this recipe will have a noticeable, pleasant warmth – a medium spice level for most.
- Q: How long will homemade Spicy Chow Chow last?
- A: If properly canned using a boiling water bath and stored in a cool, dark, dry place, sealed jars of Spicy Chow Chow can last for at least 1 year, and often up to 18 months or longer, with best quality within the first year. Once a jar is opened, it should be refrigerated and used within 3-4 weeks. If you make it as a refrigerator relish (without canning), it should be stored in the refrigerator from the start and will last for about 3-4 weeks, sometimes longer, as the vinegar and sugar act as preservatives.
- Q: Do I absolutely have to do the canning process (boiling water bath)?
- A: No, you don’t have to. If you skip the boiling water bath processing, your Spicy Chow Chow will be a “refrigerator pickle.” It must be stored in the refrigerator and will have a shorter shelf life (3-4 weeks, as mentioned above). The canning process sterilizes the jars and contents, creating a vacuum seal that makes the relish shelf-stable at room temperature for an extended period. If you plan to make a large batch or give it as gifts that won’t be immediately refrigerated, canning is highly recommended.
- Q: What are the best types of spicy peppers to use?
- A: This depends on your desired heat level and flavor preference:
- Jalapeños: The most common choice, offering a good balance of heat (2,500-8,000 Scoville Heat Units – SHU) and grassy flavor. Removing seeds and membranes reduces heat.
- Serranos: Noticeably hotter than jalapeños (10,000-23,000 SHU) with a brighter, crisper flavor. Use fewer than you would jalapeños.
- Cayenne Peppers: Slender and quite hot (30,000-50,000 SHU), often used dried as red pepper flakes but can be used fresh.
- Habaneros/Scotch Bonnets: Extremely hot (100,000-350,000+ SHU) with a fruity, floral note. Use very sparingly and with extreme caution (gloves are a must).
- Anaheim/Poblano: Much milder (500-2,500 SHU), if you want just a hint of spice or more pepper flavor without significant heat.
You can also use a mix of peppers to create a more complex heat profile.
- A: This depends on your desired heat level and flavor preference:
Beyond the Jar: The Enduring Charm of Spicy Chow Chow
Spicy Chow Chow Relish is more than just a condiment; it’s a taste of culinary heritage, a celebration of garden abundance, and a testament to the magic that happens when simple ingredients are treated with care. The process of making it – from chopping the fresh vegetables to watching the vibrant colors meld in the pot, to the satisfying pop of a sealing jar – is a rewarding experience in itself.
Whether you’re a seasoned canner or new to the world of preserving, this recipe offers a delicious way to add a handcrafted touch to your meals and share a unique, flavorful gift with others. So, roll up your sleeves, embrace the delightful tang and kick of this Southern classic, and get ready to discover your new favorite relish. Each jar holds not just a delicious condiment, but a story of tradition, resourcefulness, and the pure joy of homemade goodness. Enjoy every crunchy, spicy, sweet, and tangy bite!
Print
Spicy Chow Chow Relish recipe
Ingredients
-
- Green Tomatoes: 4 cups, finely diced (about 2 lbs or 6-8 medium)
-
- Cabbage: 4 cups, finely shredded or chopped (about 1 small head)
-
- Onions: 2 cups, finely diced (about 2 large)
-
- Bell Peppers: 2 cups, finely diced (a mix of red and green for color, about 2 large)
-
- Spicy Peppers: ½ to 1 cup, finely minced (e.g., jalapeños, serranos; adjust to your spice preference; remove seeds and membranes for less heat)
-
- Canning or Pickling Salt: ¼ cup (do NOT use iodized table salt, as it can make the brine cloudy and affect flavor)
-
- Apple Cider Vinegar (5% acidity): 3 cups
-
- Granulated Sugar: 2 ½ cups (can adjust slightly to taste, but sugar is important for preservation and flavor balance)
-
- Mustard Seeds (Yellow): 2 tablespoons
-
- Celery Seeds: 1 tablespoon
-
- Turmeric Powder: 1 teaspoon (for color and earthy flavor)
-
- Ground Ginger: ½ teaspoon (optional, for a hint of warmth)
-
- Red Pepper Flakes: ½ teaspoon (optional, for extra visual spice and heat)
Instructions
-
- Chop the Vegetables: Wash all your vegetables thoroughly. Finely dice the green tomatoes, onions, and bell peppers. Finely shred or chop the cabbage. Mince the spicy peppers (wear gloves when handling hot peppers to avoid skin irritation!). Aim for a relatively uniform size so the relish cooks evenly and has a pleasant texture. A food processor can be used for chopping, but pulse carefully to avoid turning the vegetables into mush – you want distinct pieces.
-
- Salt the Vegetables: In a very large non-reactive bowl (glass, stainless steel, or ceramic), combine all the chopped green tomatoes, cabbage, onions, bell peppers, and spicy peppers.
-
- Add Salt: Sprinkle the ¼ cup of canning or pickling salt over the vegetables and toss gently but thoroughly to ensure the salt is evenly distributed.
-
- Rest and Drain: Cover the bowl with plastic wrap or a clean kitchen towel and let it sit at room temperature for at least 4-6 hours, or preferably overnight in the refrigerator. The salt will draw out excess moisture from the vegetables, which is essential for a crisp relish and proper preservation.
-
- Drain Thoroughly: After the resting period, you’ll notice a significant amount of liquid has accumulated in the bowl. Transfer the vegetables to a colander and rinse them very well under cold running water to remove the excess salt. Let them drain in the colander for at least 30 minutes, pressing gently to remove as much water as possible. Some people even wrap the vegetables in a cheesecloth or a clean kitchen towel and squeeze out more liquid. This step is vital for the final texture.
Part 2: Cooking and Canning the Relish
-
- Prepare Canning Jars (If Canning): If you are canning the relish for shelf-stability, wash your jars, lids, and bands in hot, soapy water. Rinse well. Keep the jars hot (e.g., in a simmering water bath, a low oven, or the dishwasher on a sanitize cycle) until ready to fill. Place the lids in a small saucepan with water and bring to a simmer (do not boil). Keep them hot.
-
- Make the Pickling Brine: In a large, heavy-bottomed stainless steel or enamel pot (do not use aluminum or copper, as they can react with the vinegar), combine the apple cider vinegar, granulated sugar, mustard seeds, celery seeds, turmeric powder, ground ginger (if using), and red pepper flakes (if using).
-
- Dissolve Sugar: Bring the brine mixture to a boil over medium-high heat, stirring frequently until the sugar is completely dissolved.
-
- Add Drained Vegetables: Add the thoroughly drained and rinsed vegetables to the boiling brine. Stir well to combine.
-
- Cook the Relish: Return the mixture to a boil, then reduce the heat to medium-low and simmer, uncovered, for about 20-30 minutes, or until the vegetables are tender-crisp and the relish has thickened slightly. Stir occasionally to prevent sticking. The exact cooking time will depend on how finely your vegetables are chopped and your desired tenderness. Avoid overcooking, as you don’t want mushy relish. Taste carefully (it will be hot!) and adjust sugar or spice if needed, though it’s best to make major spice adjustments with the raw peppers.
-
- Fill the Jars (If Canning):
-
- Carefully ladle the hot relish into the prepared hot jars, leaving ½-inch headspace (the space between the top of the relish and the rim of the jar). A canning funnel is very helpful here.
-
- Remove any air bubbles by sliding a non-metallic utensil (like a bubble remover tool or a thin wooden skewer) around the inside of the jar.
-
- Wipe the jar rims clean with a damp cloth to ensure a good seal.
-
- Center the hot lids on the jars and screw on the bands until fingertip tight (not too tight, as air needs to escape during processing).
-
- Fill the Jars (If Canning):
-
- Process in Boiling Water Bath (If Canning):
-
- Carefully place the filled jars onto a rack in a large pot with enough simmering water to cover the jars by at least 1-2 inches.
-
- Bring the water to a rolling boil. Once boiling, cover the pot and process pint jars for 10 minutes (adjust processing time based on your altitude if necessary).
-
- After processing, turn off the heat, remove the pot lid, and let the jars sit in the hot water for 5 minutes before removing.
-
- Carefully remove the jars using a jar lifter and place them upright on a towel-lined surface, leaving space between them to cool completely (12-24 hours). Do not disturb them during this time. You should hear the “pop” of the lids sealing.
-
- Process in Boiling Water Bath (If Canning):
-
- Check Seals and Store (If Canned): Once cooled, check the seals by pressing the center of each lid. If it doesn’t flex up and down, it’s sealed. If a jar hasn’t sealed, refrigerate it and use it within a few weeks. Label sealed jars and store them in a cool, dark, dry place for up to 1 year (or longer, though quality may diminish over time).
-
- For Refrigerator Relish (If Not Canning): If you choose not to process the relish in a boiling water bath, let the cooked relish cool slightly, then ladle it into clean jars or containers. Once completely cool, store it in the refrigerator. It will keep well for several weeks, often improving in flavor as it sits.
Nutrition
- Serving Size: one normal portion
- Calories: 20-40


