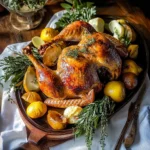
Ingredients
-
- Whole Turkey: The centerpiece of the dish, the size and quality of your turkey are paramount.
-
- Size Considerations: Choose a turkey size appropriate for the number of people you are serving. For spatchcocking, turkeys in the 12-18 pound range are ideal for most home ovens. Larger turkeys can be spatchcocked, but may require a very large baking sheet and careful maneuvering.
-
- Fresh vs. Frozen: Fresh turkeys are often preferred for their texture, but high-quality frozen turkeys, properly thawed, can also yield excellent results. If using a frozen turkey, ensure it is completely thawed before spatchcocking.
-
- Organic and Heritage Breeds: Consider organic or heritage breed turkeys for enhanced flavor and ethical sourcing. These turkeys often have richer flavor and better texture compared to conventionally raised birds.
-
- Whole Turkey: The centerpiece of the dish, the size and quality of your turkey are paramount.
-
- Aromatics: These ingredients infuse the turkey with depth and complexity, creating layers of flavor beyond just the taste of roasted turkey.
-
- Onion: Quartered onions, placed under the turkey, release savory aromas and add moisture to the roasting pan drippings. Yellow or white onions work well.
-
- Garlic: Whole or smashed garlic cloves contribute pungent and savory notes. Roasted garlic also becomes sweet and mellow, adding another dimension of flavor.
-
- Fresh Herbs: Rosemary, thyme, sage, and parsley are classic turkey herbs. Use sprigs of fresh herbs tucked under the skin, in the cavity, or scattered around the roasting pan. Their fragrant oils infuse the turkey as it cooks.
-
- Citrus Fruits: Lemon, orange, or grapefruit wedges add brightness and acidity. They can be placed in the cavity or squeezed over the turkey. Lemon is particularly effective at cutting through richness and adding freshness.
-
- Aromatics: These ingredients infuse the turkey with depth and complexity, creating layers of flavor beyond just the taste of roasted turkey.
-
- Butter or Oil: Fat is essential for crispy skin and moist meat.
-
- Butter: Unsalted butter, melted or softened, is a classic choice. It adds richness, flavor, and helps achieve golden-brown skin. You can also use clarified butter or ghee for a higher smoke point and even crispier skin.
-
- Olive Oil: A good quality olive oil is a healthier alternative to butter and still promotes crispy skin. It imparts a subtle fruity flavor.
-
- Combination: A blend of butter and olive oil can offer the benefits of both – richness from butter and a higher smoke point and healthier profile from olive oil.
-
- Butter or Oil: Fat is essential for crispy skin and moist meat.
-
- Seasonings: Salt, pepper, and other spices are crucial for enhancing the turkey’s natural flavor and creating a well-seasoned bird.
-
- Salt: Kosher salt or sea salt is preferred for its larger crystals and pure flavor. Salt is essential for drawing out moisture and enhancing the turkey’s natural taste.
-
- Black Pepper: Freshly ground black pepper provides a pungent and aromatic counterpoint to the salt.
-
- Spices (Optional): Paprika (smoked or sweet), garlic powder, onion powder, poultry seasoning, cayenne pepper (for a touch of heat) can be used to create custom flavor profiles.
-
- Seasonings: Salt, pepper, and other spices are crucial for enhancing the turkey’s natural flavor and creating a well-seasoned bird.
-
- Optional: Brine or Marinade Ingredients: Brining or marinating can further enhance the juiciness and flavor of the turkey.
-
- Brine: A saltwater solution, often with added sugar, herbs, and spices, used to soak the turkey before roasting. Brining helps the turkey retain moisture during cooking.
-
- Marinade: A flavorful liquid mixture, often containing oil, acid (like lemon juice or vinegar), herbs, and spices, used to soak the turkey. Marinades add flavor and can tenderize the meat.
-
- Optional: Brine or Marinade Ingredients: Brining or marinating can further enhance the juiciness and flavor of the turkey.
Instructions
1. Gather Your Tools and Prepare Your Workspace:
-
- Sharp Kitchen Shears or Poultry Shears: These are essential for cutting through the turkey’s backbone. Sharp shears will make the process much easier and safer.
-
- Large Cutting Board: Use a sturdy, non-slip cutting board that is large enough to accommodate the turkey.
-
- Paper Towels: For patting the turkey dry and maintaining a clean workspace.
-
- Optional: Kitchen Knife (Chef’s Knife): A sharp chef’s knife can be helpful for certain steps, especially if you choose to remove the breastbone.
-
- Clean Sink or Bowl: For washing your hands frequently during the process.
2. Safety First: Sanitize and Wash Hands:
-
- Before handling the turkey, thoroughly wash your hands with soap and water.
-
- Sanitize your cutting board and any utensils that will come into contact with the raw turkey.
-
- Wash your hands again after handling the raw turkey and before touching any other ingredients or surfaces.
3. Remove Giblets and Neck (If Present):
-
- Locate the neck and giblets (usually in a bag inside the turkey cavity at either end).
-
- Remove and discard or reserve for making gravy or stock.
4. Position the Turkey Breast-Side Down:
-
- Place the turkey breast-side down on your cutting board, with the legs facing towards you.
5. Locate the Backbone:
-
- Feel for the backbone running along the center of the turkey’s back. It’s the bony ridge that runs from the neck cavity to the tail.
6. Cut Along One Side of the Backbone:
-
- Using your sharp kitchen shears, start at the tail end of the turkey.
-
- Position the shears just to one side of the backbone and begin cutting through the ribs and cartilage along the entire length of the backbone, working towards the neck cavity. Use firm, steady cuts. You may need to use short, powerful snips rather than trying to cut in one long motion.
7. Cut Along the Other Side of the Backbone:
-
- Once you’ve cut along one side of the backbone, reposition your shears to the other side of the backbone.
-
- Cut along the other side of the backbone, mirroring your first cut, until you have completely removed the backbone. You may need to cut through some tougher joints.
8. Remove the Backbone:
-
- Carefully lift out the backbone. You can discard it or save it to make turkey stock.
9. Open the Turkey Like a Book:
-
- With the backbone removed, open the turkey like a book, spreading the two halves apart.
10. Flatten the Turkey (Optional – but Recommended):
-
- To flatten the turkey further for more even cooking, you can press down firmly on the breastbone to break it.
-
- Place your hands on either side of the breastbone and press down firmly until you hear a crack. This will help the turkey lie flatter. Alternatively, you can make a shallow cut along the breastbone cartilage to help it flatten.
11. Optional: Remove the Breastbone (For Even Flatter Cooking):
-
- For an even flatter turkey that cooks incredibly quickly, you can remove the breastbone entirely. This step is optional but can be beneficial for very large turkeys or for grilling.
-
- To remove the breastbone, run a sharp boning knife or chef’s knife along both sides of the breastbone, separating it from the breast meat. Carefully lift out the breastbone.
12. Pat the Turkey Dry:
-
- Use paper towels to thoroughly pat the entire turkey, inside and out, dry. Dry skin is crucial for achieving crispy skin during roasting.
13. Season the Turkey Generously:
-
- Season the turkey liberally inside and out with salt, freshly ground black pepper, and any other desired spices or herbs. Don’t be shy with the seasoning – a well-seasoned turkey is essential for flavor.
-
- Lift the skin and season underneath the skin as well, especially over the breast meat.
14. Prepare for Roasting (or Grilling):
-
- Your spatchcock turkey is now ready to be roasted or grilled! Proceed with your chosen roasting or grilling method.
Nutrition
- Serving Size: one normal portion
- Calories: 170-200
- Sodium: 60-80 mg
- Fat: 3-5 grams
- Saturated Fat: 1-1.5 grams
- Protein: 30-35 grams
- Cholesterol: 80-90 mg