
There are certain treats that, for me, are pure comfort and nostalgia rolled into one. Sesame Balls, or Jian Dui as I first knew them, are high on that list. I remember the first time I successfully made them at home. The kitchen filled with the warm, nutty aroma of toasting sesame seeds and frying dough. The real magic, though, was watching those little balls of dough slowly puff up in the hot oil, transforming into golden, hollow spheres. My family gathered around, intrigued by the process. The moment of truth – the first bite! That delightful shattering crunch of the sesame seed crust, followed by the soft, chewy mochi-like layer, and then the sweet, earthy surprise of the red bean paste filling… it was pure joy. They weren’t just delicious; they were a culinary adventure, a little triumph. Since then, these delightful orbs have become a much-requested treat for special occasions, particularly Lunar New Year, and a reminder that sometimes the most satisfying foods are born from simple ingredients and a touch of patience.
The Irresistible Charm of Sesame Balls (Jian Dui / Matuan)
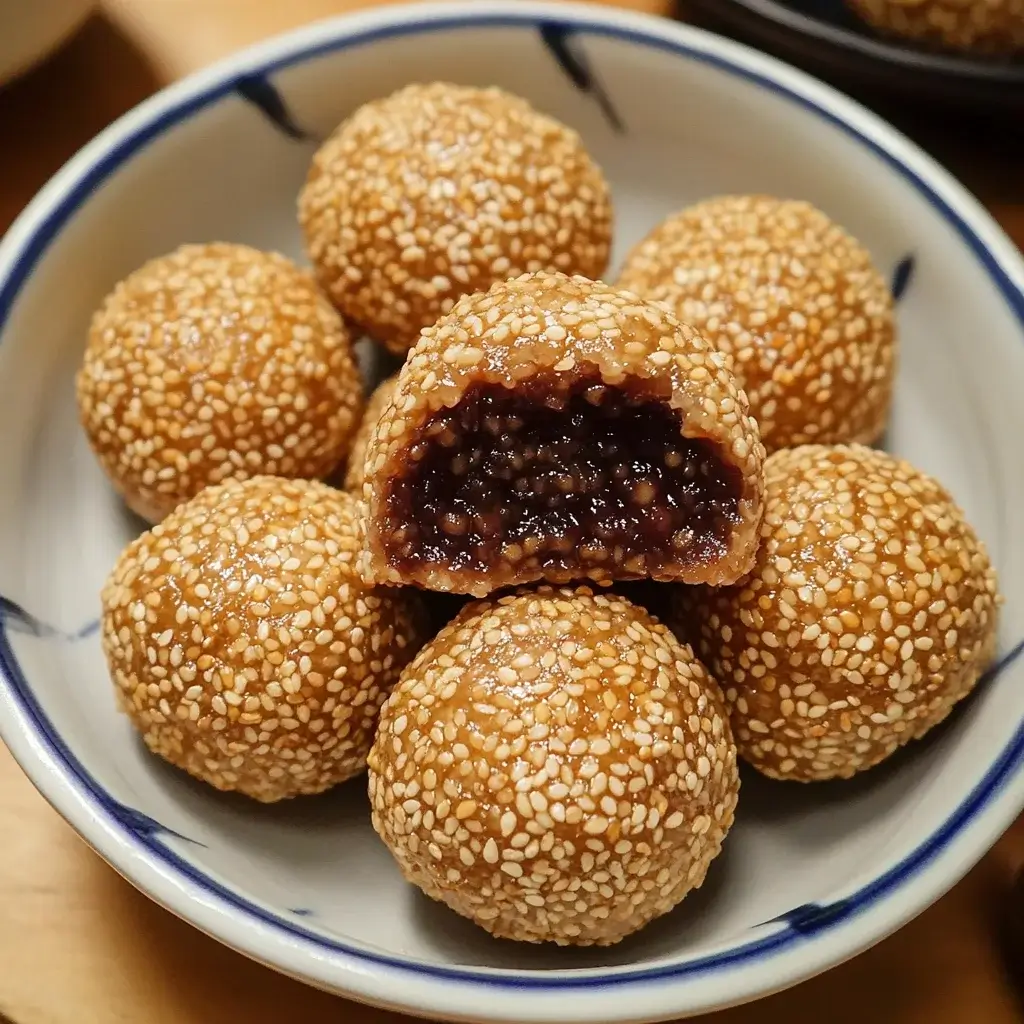
Sesame Balls, known as Jian Dui (煎堆) in Cantonese and Matuan (麻糰) in Mandarin, are a beloved deep-fried Chinese pastry. These delightful spheres are a staple in dim sum restaurants, Asian bakeries, and are especially popular during celebrations like Lunar New Year, where their round shape and golden color symbolize wealth, completeness, and good fortune.
What makes sesame balls so universally adored? It’s a masterful play of textures and flavours. The exterior is a crisp, golden-brown shell generously coated in nutty sesame seeds, offering a satisfying crunch with every bite. Beneath this lies a soft, delightfully chewy, and slightly sticky layer made from glutinous rice flour – akin to the texture of Japanese mochi. And at the very heart of the ball is a sweet, smooth filling, most traditionally red bean paste (anko), though other variations like lotus seed paste or even black sesame paste exist.
The magic of a well-made sesame ball also lies in its structure. During the frying process, if done correctly, the dough expands significantly, creating a partially hollow interior around the filling. This makes them surprisingly light despite being deep-fried. The aroma of toasted sesame seeds combined with the subtle sweetness of the dough and filling is simply intoxicating.
While they might seem like a complex treat reserved for restaurant chefs, making sesame balls at home is a thoroughly rewarding experience. It requires some patience and attention to detail, particularly during the frying stage, but the result is a batch of fresh, warm, and incredibly delicious pastries that are far superior to any store-bought version. This recipe will guide you through creating these iconic treats, bringing a touch of authentic Asian culinary tradition to your kitchen.
Essential Ingredients for Perfect Sesame Balls
Crafting authentic sesame balls relies on a few key ingredients, many of which are readily available at Asian supermarkets or well-stocked grocery stores. Precision in measurement, especially for the dough, is helpful.
Yields: Approximately 12-15 sesame balls
Prep time: 45 minutes (plus time for red bean paste to chill, if making balls)
Cook time: 20-25 minutes (frying in batches)
Ingredients:
For the Dough:
- 1 ½ cups (210g) glutinous rice flour (also known as sweet rice flour or mochiko flour – ensure it’s not regular rice flour)
- ¼ cup (50g) granulated sugar
- ½ cup (120ml) hot water (just off the boil, approximately 180-200°F or 82-93°C)
- 1 tablespoon neutral-flavoured cooking oil (such as canola, vegetable, or light olive oil)
For the Filling:
- ¾ cup (approx. 200-220g) store-bought or homemade sweet red bean paste (anko) (smooth or chunky, to your preference)
For Coating & Frying:
- ½ cup white sesame seeds (untoasted)
- 4-5 cups neutral-flavoured cooking oil, for deep frying (such as peanut, canola, corn, or vegetable oil)
Important Notes on Ingredients:
- Glutinous Rice Flour: This is the star ingredient and cannot be substituted with regular rice flour. It’s what gives the sesame balls their characteristic chewy, mochi-like texture. Despite its name, it does not contain gluten.
- Hot Water: Using hot water to make the dough helps to partially gelatinize the glutinous rice flour, making the dough more pliable, easier to work with, and contributing to the desired texture.
- Red Bean Paste (Anko): You can find this in cans or packages at Asian grocery stores. Smooth red bean paste is common, but some prefer the texture of chunky paste. If it’s very soft, chilling it can make it easier to roll into balls. You can also make your own for ultimate control over sweetness.
- Sesame Seeds: White sesame seeds are traditional. Ensure they are raw (untoasted) as they will toast during the frying process.
- Frying Oil: Choose an oil with a high smoke point and neutral flavour.
Step-by-Step to Crafting Golden Sesame Ball Perfection
Making sesame balls involves a few distinct stages: preparing the filling, making the dough, assembling, and finally, the crucial frying process. Follow these steps carefully for the best results.
1. Prepare the Red Bean Paste Filling:
* If your red bean paste is very soft, it helps to chill it in the refrigerator for about 30 minutes to an hour to firm it up.
* Once firm enough to handle, divide the red bean paste into 12-15 equal portions (about 1 to 1.5 teaspoons or 12-15g each). Roll each portion into a small ball.
* Place the red bean paste balls on a plate lined with parchment paper and, if time allows, chill them again while you prepare the dough. This makes them easier to encase in the dough.
2. Make the Glutinous Rice Flour Dough:
* In a large heatproof bowl, combine the glutinous rice flour and granulated sugar. Whisk them together.
* Gradually pour the hot water into the flour mixture while stirring continuously with chopsticks or a heatproof spatula. The mixture will look shaggy and lumpy at first.
* Add the 1 tablespoon of cooking oil to the dough.
* Once the dough is cool enough to handle (it will still be warm), turn it out onto a clean, lightly floured work surface (or use a silicone mat).
* Knead the dough for 5-7 minutes, or until it becomes smooth, pliable, and no longer sticky. If it’s too dry and crumbly, add a tiny bit more hot water (a teaspoon at a time). If it’s too sticky, add a tiny bit more glutinous rice flour. The consistency should be similar to soft playdough.
* Cover the dough with a damp cloth or plastic wrap to prevent it from drying out while you work.
3. Assemble the Sesame Balls:
* Divide the dough into 12-15 equal pieces, roughly the same size or slightly larger than your red bean paste balls (about 20-25g each). Roll each piece of dough into a smooth ball. Keep the dough pieces covered as you work.
* Take one ball of dough and flatten it into a small disc (about 2-2.5 inches in diameter) with your palms or fingers. Make the center slightly thicker than the edges.
* Place one red bean paste ball in the center of the dough disc.
* Carefully bring the edges of the dough up and around the filling, pinching them together tightly to seal the filling completely. Ensure there are no gaps or holes, as this can cause the balls to burst during frying.
* Gently roll the filled ball between your palms to make it smooth and round.
* Repeat with the remaining dough and filling.
4. Coat with Sesame Seeds:
* Pour the white sesame seeds into a shallow bowl or plate.
* Lightly dampen the surface of each filled dough ball with a tiny bit of water (you can just wet your hands and roll the ball between them). This helps the sesame seeds adhere better.
* Roll each ball in the sesame seeds, pressing gently so the seeds stick firmly to the entire surface. Ensure an even coating.
5. Deep Fry the Sesame Balls (The Crucial Step):
* Pour the frying oil into a deep, heavy-bottomed pot or Dutch oven to a depth of at least 2-3 inches.
* Heat the oil over medium-low to low heat. This is important. The initial temperature should be around 250-275°F (120-135°C). If you don’t have a thermometer, a small piece of dough dropped in should sink and then slowly rise with very gentle bubbles. If the oil is too hot initially, the sesame balls will brown too quickly on the outside, may burst, and won’t puff up properly or cook through.
* Carefully place 3-4 sesame balls into the oil at a time, ensuring not to overcrowd the pot. They will sink to the bottom initially.
* After 2-3 minutes, as they begin to float, use a slotted spoon or spider to gently roll them around in the oil and gently press them against the side or bottom of the pot. This gentle pressing action is key to helping them expand and become hollow. Be careful not to press too hard, especially at the beginning, or they might rupture.
* Continue to fry for about 8-12 minutes, gradually increasing the heat to medium towards the last few minutes of frying. Keep rolling and gently pressing the balls as they cook. You will see them start to puff up and expand significantly.
* Once the sesame balls are nicely puffed, golden brown, and float confidently, increase the heat to medium-high (around 350°F or 175°C) for the last 1-2 minutes. This helps to crisp up the exterior and expel excess oil.
* Using a slotted spoon or spider, remove the golden sesame balls from the oil and transfer them to a wire rack lined with paper towels to drain off any excess oil.
* Repeat the frying process with the remaining sesame balls, ensuring the oil temperature is back down to low before adding the next batch.
6. Serve:
* Sesame balls are best served warm, shortly after frying, when they are at their crispiest and chewiest.
Nutritional Snapshot: Understanding Your Indulgence
Sesame balls are a delightful treat, and while they are deep-fried and contain sugar, understanding their general nutritional makeup can be useful. The exact values will vary based on the size of the balls, the amount of oil absorbed, and the specific red bean paste used.
- Servings: Approximately 12-15 balls (assuming 1-2 balls per serving)
- Calories per ball (approximate): 150-250 kcal (This is a broad estimate. Smaller balls will have fewer calories).
Key Components and Their Contributions:
- Glutinous Rice Flour: Primarily carbohydrates, providing energy. It’s naturally gluten-free.
- Sugar: Adds sweetness and contributes to carbohydrates and calories.
- Red Bean Paste: Contains carbohydrates (from beans and added sugar), some plant-based protein, and dietary fiber from the azuki beans.
- Sesame Seeds: A good source of healthy fats (monounsaturated and polyunsaturated), protein, fiber, calcium, iron, and magnesium. They also contribute to the calorie count.
- Frying Oil: The deep-frying process means the balls will absorb some oil, contributing significantly to the fat content (and thus calories). The type of fat depends on the oil used.
Considerations:
- High in Calories and Fat: Due to being deep-fried and containing sugar and oil, sesame balls are calorie-dense and relatively high in fat.
- Sugar Content: Both the dough and the red bean paste filling contribute to the sugar content.
- Portion Control: Enjoyed as an occasional treat in moderation, they can certainly be part of a balanced lifestyle.
- Gluten-Free (Naturally): The primary flour (glutinous rice flour) is gluten-free. However, if celiac disease or severe gluten sensitivity is a concern, ensure all ingredients (like oil, sugar, red bean paste) are certified gluten-free and there’s no cross-contamination during preparation.
Sesame balls are an indulgence, meant to be savored for their unique textures and flavours.
Time Investment: From Dough to Delightful Bite
Making sesame balls from scratch is a multi-step process, but much of it is straightforward assembly. The frying stage requires the most attention.
- Preparation Time:
- Preparing red bean paste balls (if needed) & chilling: 10 minutes + 30-60 minutes chilling (can be done ahead)
- Making the dough: 15-20 minutes
- Dividing dough, filling, and rolling in sesame seeds: 20-30 minutes
- Total Active Prep Time (excluding chilling): Approximately 35-50 minutes
- Frying Time:
- Frying in batches (e.g., 3-4 batches, 8-12 minutes per batch): 20-35 minutes (depending on pot size and number of balls per batch)
- Total Estimated Time: Approximately 1 hour to 1.5 hours (active time), plus chilling time for the red bean paste if you opt for that.
Streamlining the Process:
- Red Bean Paste: Use good quality store-bought red bean paste to save time. You can pre-roll the paste into balls a day ahead and keep them chilled.
- Teamwork: If you have an extra pair of hands, one person can roll and fill while the other fries (carefully managing the oil temperature).
While not a quick 5-minute dessert, the process is enjoyable, and the reward of fresh, homemade sesame balls is well worth the effort.
How to Best Serve and Enjoy Your Sesame Balls
Sesame balls are a versatile treat, perfect for various occasions and best enjoyed in specific ways to maximize their delightful qualities.
- Temperature is Key:
- Warm is Best: Sesame balls are undeniably at their peak when served warm, shortly after frying (allow them to cool slightly so you don’t burn your mouth!). This is when the exterior is crispiest, the mochi-like layer is softest and chewiest, and the filling is pleasantly warm.
- Serving Occasions:
- Dim Sum Spread: They are a classic item on any dim sum menu. Serve them alongside other savory and sweet dim sum delights like siu mai, har gow, and egg tarts.
- Dessert: A perfect sweet ending to any Asian-inspired meal.
- Snack Time: A delightful afternoon snack, especially with a cup of tea.
- Celebrations: Essential for Lunar New Year gatherings, symbolizing prosperity and family unity. Also great for parties and potlucks.
- Beverage Pairings:
- Chinese Tea: The classic accompaniment. The warmth and slight bitterness of teas like Oolong, Pu-erh, Jasmine, or Chrysanthemum tea beautifully cut through the richness of the fried pastry and complement its sweetness.
- Green Tea: Japanese sencha or even a simple bagged green tea works well.
- Unsweetened Coffee: For those who prefer coffee, a simple black coffee can be a good contrast.
- Presentation:
- Serve them simply on a plate or in a bowl.
- For a more traditional presentation at larger gatherings, they can be piled attractively on a platter.
- No special sauces or accompaniments are typically needed; they are delicious on their own.
- Reheating (if necessary):
- While best fresh, leftover sesame balls can be reheated. They will lose some of their initial crispness but can still be enjoyable.
- Oven or Toaster Oven: Reheat at around 300-325°F (150-160°C) for 5-8 minutes, or until warmed through and slightly re-crisped.
- Air Fryer: An air fryer is excellent for reheating, usually at around 300°F (150°C) for 3-5 minutes.
- Avoid microwaving, as it tends to make them overly chewy and tough, and the exterior will lose its crispness.
The joy of a sesame ball is in its fresh, warm state, so try to enjoy them as soon as possible after making them!
Additional Pro Tips for Sesame Ball Success
Mastering the art of homemade sesame balls comes with a few key insights. Keep these tips in mind for a flawless batch every time.
- Use HOT Water for the Dough:
- This is crucial for the texture. Hot water (just off the boil) partially cooks or gelatinizes the glutinous rice flour. This process makes the dough more pliable, less prone to cracking when you wrap the filling, and contributes to the desired soft, chewy interior and the ability of the ball to puff up nicely during frying. Cold or lukewarm water will result in a dough that is harder to work with and a less satisfactory final texture.
- Don’t Overfill and Seal Securely:
- While it’s tempting to put a generous amount of red bean paste, overfilling can make it difficult to seal the dough properly. If the seams aren’t tightly sealed, the balls are more likely to burst open during frying as the interior heats up and expands. Aim for a good balance of dough to filling, and pinch the seams very firmly.
- Ensure Sesame Seeds Adhere Well:
- For that beautiful, even coating of sesame seeds, lightly moisten the surface of the filled dough balls before rolling them in the seeds. Just a very thin film of water is needed (e.g., from slightly damp hands). Then, press the seeds gently but firmly onto the dough so they embed slightly. This prevents too many seeds from falling off during the frying process.
- Master the Frying Temperature and Technique:
- This is arguably the most critical part. Start with low oil temperature (250-275°F / 120-135°C). This allows the dough to cook through slowly and begin to puff without the exterior browning too quickly. As the balls float and start to expand, gently press them against the side or bottom of the pot – this encourages them to become hollow and expand further. Gradually increase the heat towards the end to achieve that perfect golden-brown crispness. Rushing this process with high heat from the start will lead to burnt exteriors, raw interiors, and poor puffing.
- Drain Excess Oil Properly:
- Once the sesame balls are perfectly golden and puffed, remove them from the oil and immediately place them on a wire rack set over paper towels. The wire rack allows air to circulate around the balls, helping them stay crispy and preventing the bottoms from becoming soggy. The paper towels will catch any dripping oil. Don’t let them sit directly on paper towels for too long, as they can stick or absorb oil back if the paper becomes saturated.
By paying attention to these details, especially the dough hydration and frying technique, you’ll be well on your way to creating sesame balls that are as beautiful to look at as they are delicious to eat.
Your Sesame Ball Questions Answered: FAQ
Making sesame balls for the first time can bring up a few questions. Here are answers to some of the most common ones to help you troubleshoot and succeed.
Q1: Why aren’t my sesame balls puffing up or becoming hollow?
- A: This is a common issue with several potential causes:
- Oil Temperature Too High Initially: If the oil is too hot when you add the balls, the crust forms too quickly, preventing the interior steam from expanding the dough. Start with low heat.
- Dough Too Dry: If the dough doesn’t have enough moisture, it won’t create enough steam to puff. Ensure your dough is pliable and smooth.
- Not Pressing During Frying: The gentle, repeated pressing of the balls against the pot during the initial stages of frying is crucial. This action helps to stretch the dough and encourage the formation of the hollow cavity.
- Insufficient Frying Time: They need adequate time in the oil at the correct temperatures to cook through and expand.
Q2: Why do my sesame balls burst or leak filling during frying?
- A: Bursting is frustrating! Here’s why it might happen:
- Seams Not Sealed Properly: Ensure the dough is completely sealed around the filling with no gaps.
- Too Much Filling: Overfilling stretches the dough too thin, making it prone to tearing.
- Oil Temperature Too Hot Initially: As mentioned above, this can cause rapid expansion and bursting before the dough has a chance to set.
- Trapped Air: Try to expel any trapped air when sealing the dough around the filling.
- Filling Too Wet: Very wet filling can create excess steam and pressure.
Q3: Can I make sesame balls ahead of time? How do I store and reheat them?
- A: Sesame balls are best enjoyed fresh and warm on the day they are made for optimal crispness and chewiness.
- Storing: If you have leftovers, let them cool completely, then store them in an airtight container at room temperature for up to 1-2 days. They will lose their crispness.
- Reheating: To re-crisp, reheat them in an oven or toaster oven at around 300-325°F (150-160°C) for 5-8 minutes, or in an air fryer at 300°F (150°C) for 3-5 minutes. Avoid microwaving, as it makes them tough and leathery.
- Making Ahead (Unfried): You can assemble the uncooked sesame balls, coat them with sesame seeds, and then freeze them on a baking sheet until solid. Transfer to a freezer bag for up to a month. Fry directly from frozen, adding a few extra minutes to the cooking time, starting at a very low oil temperature.
Q4: Can I bake sesame balls instead of deep-frying them?
- A: While you can bake them, the result will be very different from traditional deep-fried sesame balls.
- Texture: Baked versions will not puff up as dramatically, won’t be hollow, and will lack that signature shatteringly crisp exterior. They tend to be denser and more bread-like or cookie-like in texture, depending on the recipe adjustments.
- Appearance: They won’t achieve the same uniform golden-brown color.
If you’re looking for the authentic Jian Dui experience, deep-frying is essential. If you want a healthier, different type of sesame-red bean treat, baked versions can be explored, but manage expectations.
Q5: Can I use other fillings besides red bean paste?
- A: Absolutely! While red bean paste is the most traditional and common filling, other sweet pastes work wonderfully:
- Lotus Seed Paste: Another popular choice, often found in mooncakes. It has a smooth, rich, and distinctively sweet flavour.
- Black Sesame Paste: Offers a deep, nutty, and aromatic flavour.
- Mung Bean Paste: Lighter in colour and flavour than red bean paste, often slightly less sweet.
- Taro Paste: Sweet and earthy.
- Sweetened Peanut Paste: For a nutty, crunchy filling.
Ensure any alternative filling is thick enough to be rolled into balls and encased in the dough. The process for making the sesame balls remains the same.

Sesame Balls with Red Bean Paste recipe
Ingredients
-
- 1 ½ cups (210g) glutinous rice flour (also known as sweet rice flour or mochiko flour – ensure it’s not regular rice flour)
-
- ¼ cup (50g) granulated sugar
-
- ½ cup (120ml) hot water (just off the boil, approximately 180-200°F or 82-93°C)
-
- 1 tablespoon neutral-flavoured cooking oil (such as canola, vegetable, or light olive oil)
For the Filling:
-
- ¾ cup (approx. 200-220g) store-bought or homemade sweet red bean paste (anko) (smooth or chunky, to your preference)
For Coating & Frying:
-
- ½ cup white sesame seeds (untoasted)
-
- 4–5 cups neutral-flavoured cooking oil, for deep frying (such as peanut, canola, corn, or vegetable oil)
Instructions
1. Prepare the Red Bean Paste Filling:
* If your red bean paste is very soft, it helps to chill it in the refrigerator for about 30 minutes to an hour to firm it up.
* Once firm enough to handle, divide the red bean paste into 12-15 equal portions (about 1 to 1.5 teaspoons or 12-15g each). Roll each portion into a small ball.
* Place the red bean paste balls on a plate lined with parchment paper and, if time allows, chill them again while you prepare the dough. This makes them easier to encase in the dough.
2. Make the Glutinous Rice Flour Dough:
* In a large heatproof bowl, combine the glutinous rice flour and granulated sugar. Whisk them together.
* Gradually pour the hot water into the flour mixture while stirring continuously with chopsticks or a heatproof spatula. The mixture will look shaggy and lumpy at first.
* Add the 1 tablespoon of cooking oil to the dough.
* Once the dough is cool enough to handle (it will still be warm), turn it out onto a clean, lightly floured work surface (or use a silicone mat).
* Knead the dough for 5-7 minutes, or until it becomes smooth, pliable, and no longer sticky. If it’s too dry and crumbly, add a tiny bit more hot water (a teaspoon at a time). If it’s too sticky, add a tiny bit more glutinous rice flour. The consistency should be similar to soft playdough.
* Cover the dough with a damp cloth or plastic wrap to prevent it from drying out while you work.
3. Assemble the Sesame Balls:
* Divide the dough into 12-15 equal pieces, roughly the same size or slightly larger than your red bean paste balls (about 20-25g each). Roll each piece of dough into a smooth ball. Keep the dough pieces covered as you work.
* Take one ball of dough and flatten it into a small disc (about 2-2.5 inches in diameter) with your palms or fingers. Make the center slightly thicker than the edges.
* Place one red bean paste ball in the center of the dough disc.
* Carefully bring the edges of the dough up and around the filling, pinching them together tightly to seal the filling completely. Ensure there are no gaps or holes, as this can cause the balls to burst during frying.
* Gently roll the filled ball between your palms to make it smooth and round.
* Repeat with the remaining dough and filling.
4. Coat with Sesame Seeds:
* Pour the white sesame seeds into a shallow bowl or plate.
* Lightly dampen the surface of each filled dough ball with a tiny bit of water (you can just wet your hands and roll the ball between them). This helps the sesame seeds adhere better.
* Roll each ball in the sesame seeds, pressing gently so the seeds stick firmly to the entire surface. Ensure an even coating.
5. Deep Fry the Sesame Balls (The Crucial Step):
* Pour the frying oil into a deep, heavy-bottomed pot or Dutch oven to a depth of at least 2-3 inches.
* Heat the oil over medium-low to low heat. This is important. The initial temperature should be around 250-275°F (120-135°C). If you don’t have a thermometer, a small piece of dough dropped in should sink and then slowly rise with very gentle bubbles. If the oil is too hot initially, the sesame balls will brown too quickly on the outside, may burst, and won’t puff up properly or cook through.
* Carefully place 3-4 sesame balls into the oil at a time, ensuring not to overcrowd the pot. They will sink to the bottom initially.
* After 2-3 minutes, as they begin to float, use a slotted spoon or spider to gently roll them around in the oil and gently press them against the side or bottom of the pot. This gentle pressing action is key to helping them expand and become hollow. Be careful not to press too hard, especially at the beginning, or they might rupture.
* Continue to fry for about 8-12 minutes, gradually increasing the heat to medium towards the last few minutes of frying. Keep rolling and gently pressing the balls as they cook. You will see them start to puff up and expand significantly.
* Once the sesame balls are nicely puffed, golden brown, and float confidently, increase the heat to medium-high (around 350°F or 175°C) for the last 1-2 minutes. This helps to crisp up the exterior and expel excess oil.
* Using a slotted spoon or spider, remove the golden sesame balls from the oil and transfer them to a wire rack lined with paper towels to drain off any excess oil.
* Repeat the frying process with the remaining sesame balls, ensuring the oil temperature is back down to low before adding the next batch.
6. Serve:
* Sesame balls are best served warm, shortly after frying, when they are at their crispiest and chewiest.
Nutrition
- Serving Size: one normal portion
- Calories: 150-250