


The air in our house starts to buzz with a special kind of energy as soon as October arrives. The decorations come out of the attic, scary movie marathons become a nightly ritual, and my kitchen transforms into a mad scientist’s laboratory. For years, our Halloween treat-making was limited to ghost-shaped cookies and pumpkin spice everything. But a few years ago, my kids asked if we could make something “truly magical,” something a real witch might brew in her cauldron. That’s when I stumbled upon the idea of making our own gummies. The first attempt was a revelation. As my kids watched the simple fruit juice and gelatin transform from a liquid potion into jiggly, spooky shapes, their eyes were wide with wonder. They were convinced I was performing actual magic. That first batch of glowing green and spooky purple gummies, shimmering with a touch of edible glitter, vanished in an afternoon. Now, making these Witch’s Brew Gummies is our most cherished Halloween tradition. It’s more than a recipe; it’s a delightful, edible science experiment that fills our home with laughter and creates the most enchanting, delicious memories.
The Ultimate Witch’s Brew Gummies Recipe
Step into the world of culinary magic with the ultimate recipe for homemade Witch’s Brew Gummies! This isn’t just a treat; it’s an experience. We’re moving beyond the standard store-bought candy and creating something truly special from scratch. These gummies are bursting with real fruit flavor, have a delightfully chewy texture, and can be customized with an infinite array of spooky colors and shapes. This comprehensive guide will walk you through every step of the potion-making process, from selecting your magical elixirs (fruit juices) to mastering the ancient art of blooming gelatin. Whether you’re a seasoned kitchen witch or a novice spell-caster, you’ll find this recipe incredibly simple, forgiving, and outrageously fun. Prepare to fill your cauldron, enchant your guests, and create the most bewitching treats on the block this Halloween.
Why Brew Your Own Gummies?
Before we gather our ingredients, let’s explore what makes this homemade recipe so much better than anything you can buy in a bag.
- You Control the Ingredients: You decide what goes in. Use 100% fruit juice, choose natural sweeteners like honey or maple syrup, and avoid the high-fructose corn syrup, artificial flavors, and preservatives found in most commercial candies.
- Incredible Flavor: The taste of gummies made with real fruit juice is incomparably better than artificially flavored alternatives. You get a pure, vibrant fruit taste that is both refreshing and satisfying.
- Endless Creativity: This recipe is a blank canvas. You can create any flavor combination, mix any color you can imagine, and use a variety of spooky silicone molds to bring your ghoulish creations to life.
- The Perfect Halloween Activity: Making these gummies is an incredibly fun project for the whole family. Kids love getting involved in mixing the “potions” and seeing the magical transformation as the gummies set.
Complete with the Ingredients Amount
Every powerful potion begins with precisely measured ingredients. Here is your scroll of components needed to brew the perfect batch of Witch’s Brew Gummies.
The “Potion” Base (The Liquid Elixir):
- Fruit Juice: 1 ½ cups (360ml) of your choice.
- Why it Matters: This forms the flavor foundation of your gummies. For the best taste and fewer added sugars, always opt for 100% fruit juice.
- Color & Flavor Suggestions:
- Spooky Purple: White grape juice or apple juice as a base, colored with purple or a mix of red and blue food coloring.
- Ghastly Green: White grape juice or apple juice, colored with green food coloring. Green juice blends also work.
- Bloody Red: Cranberry, pomegranate, or cherry juice.
- Pumpkin Orange: Orange or mango juice.
- Important Note on Juice: Avoid using fresh pineapple, kiwi, mango, ginger, papaya, or guava juice. These fruits contain an enzyme called bromelain (or similar enzymes) that breaks down the proteins in gelatin, preventing your gummies from setting. Canned or pasteurized versions of these juices are fine, as the heating process deactivates the enzyme.
The “Binding Spell” (The Gelling Agent):
- Unflavored Gelatin: 4 packets (1 ounce or 28g total) of powdered gelatin.
- The Magic Ingredient: This is the key to that classic gummy texture. Unflavored gelatin allows the pure fruit juice flavor to shine through. Knox is a widely available and reliable brand.
- The Science: Gelatin is made of collagen. When bloomed in cold liquid and then gently heated, the protein strands unwind. As they cool, they tangle together to form a semi-solid, jiggly matrix, trapping the liquid within it—this is what creates the gummy!
The “Sweetener & Spellbinder”:
- Sweetener: ¼ to ⅓ cup (60-80ml) of honey, maple syrup, or agave nectar.
- Function: This balances the tartness of the juice and adds to the overall flavor profile. Liquid sweeteners incorporate more smoothly than granulated sugar. You can adjust the amount based on the sweetness of your juice and your personal preference.
- Fresh Lemon Juice: 1 tablespoon (15ml).
- The Potion Activator: Don’t skip this! A small amount of acid like lemon juice works wonders. It brightens and intensifies the fruit flavors, preventing the gummies from tasting flat or overly sweet.
The “Magical Colors & Effects”:
- Gel Food Coloring: A few drops, as needed.
- Why Gel?: Gel-based food colorings are highly concentrated and won’t water down your gummy mixture, resulting in much more vibrant and intense colors than liquid food coloring.
- Edible Glitter or Luster Dust: ¼ teaspoon (optional, for a magical shimmer).
- The Final Touch: This is what truly makes your gummies look like a “Witch’s Brew.” A tiny amount stirred into the liquid mixture before pouring will create a beautiful, enchanting sparkle within the finished gummy.
Essential Witchcraft Tools (Equipment):
- Silicone Molds: Halloween-themed shapes like skulls, cauldrons, pumpkins, bats, or gummy worms are perfect.
- Baking Sheet: To place the molds on for stability.
- Medium Saucepan
- Whisk
- Liquid Measuring Cup with a Spout or a Food-Grade Dropper/Turkey Baster: For easy, mess-free filling of the molds.
Instructions: Brewing Your Potion Step-by-Step
Follow these incantations carefully to ensure a successful brew. Read through all the steps before you begin.
Phase 1: Preparing Your Alchemical Lab (Mise en Place)
- Set Up Your Molds: Arrange your clean, dry silicone molds on a large baking sheet. This is a crucial step! The filled molds will be flimsy, and the baking sheet makes it easy to transport them to the refrigerator without spilling your precious potion.
- Measure Your Ingredients: Have all your ingredients measured and ready to go. The process moves fairly quickly once you start heating, so you’ll want everything within arm’s reach.
Phase 2: The First Incantation (Blooming the Gelatin)
This is the most critical secret to perfectly smooth, non-lumpy gummies.
- Pour Cold Juice: Pour ½ cup of the cold fruit juice into your medium saucepan (off the heat).
- Sprinkle the Gelatin: Sprinkle the 4 packets of unflavored gelatin evenly over the surface of the cold juice. Do not dump it in one clump.
- Let it Bloom: Let the mixture sit undisturbed for 5-10 minutes. During this time, the gelatin granules will absorb the liquid and “bloom,” swelling up and becoming thick and wrinkly, almost like applesauce. This process ensures that the gelatin will dissolve smoothly without any lumps.
Phase 3: Stirring the Cauldron (Heating the Brew)
- Add Remaining Ingredients: Once the gelatin has bloomed, add the remaining 1 cup of fruit juice, your chosen sweetener (honey or maple syrup), and the tablespoon of lemon juice to the saucepan.
- Heat Gently: Place the saucepan over medium-low heat. Whisk the mixture continuously and gently as it heats up. The thick, bloomed gelatin will begin to melt and dissolve into the liquid.
- Crucial Step – Do NOT Boil: Continue heating and whisking until the gelatin and sweetener are completely dissolved and the mixture is smooth and liquid. This should only take about 5 minutes. It is critically important that you never let the mixture come to a boil. Boiling can weaken the gelatin’s protein structure, which can result in gummies that don’t set properly.
- Remove from Heat: Once the mixture is fully liquid and smooth (you shouldn’t see any gelatin granules), remove the saucepan from the heat.
Phase 4: Adding the Magic (Coloring and Filling)
- Skim the Foam: You may notice a thin layer of foam on the surface. For crystal-clear gummies, you can gently skim this off with a spoon.
- Divide and Conquer (for multiple colors): If you want to make gummies in different colors, carefully pour the hot liquid into separate heat-safe bowls or measuring cups.
- Add Color and Shimmer: Add a drop or two of gel food coloring to your mixture and stir until combined. If using edible glitter, stir it in now. Remember that the color will look more vibrant in the finished gummy, so start with less and add more if needed.
- Fill the Molds: This is where a dropper or a small spouted measuring cup comes in handy. Carefully and quickly fill each cavity of your silicone molds. The liquid is hot, so be careful. Work efficiently, as the mixture will begin to set as it cools.
Phase 5: The Setting Spell (Chilling)
- Transfer to Refrigerator: Carefully transfer the baking sheet with the filled molds into the refrigerator.
- Chill Until Firm: Let the gummies chill until they are completely firm. This will take at least 2-3 hours, but can be left for longer. The exact time will depend on the size and depth of your molds.
- Unmold Your Creations: Once fully set, the gummies should be firm to the touch and pull away from the sides of the mold easily. Gently push from the bottom of the silicone mold to pop each gummy out.
Nutrition Facts
Please note that these values are an approximation and can vary significantly based on the type of juice, sweetener used, and the size of your gummies.
- Servings: Approximately 60-80 small gummies
- Calories per serving (assuming 5 gummies per serving): Approximately 30-50 kcal
Preparation Time
- Prep Time (Blooming & Mixing): 15 minutes
- Cook Time (Heating): 5-10 minutes
- Inactive Chill Time: 2-3 hours
- Total Time: Approximately 2.5 to 3.5 hours
How to Serve Your Magical Concoctions
The presentation of your Witch’s Brew Gummies is part of the enchantment! Here are some spellbinding ideas.
- The Witch’s Cabinet Display:
- Fill several small, clear glass jars or vials with different colored gummies.
- Create spooky, old-fashioned labels with names like “Frog’s Breath,” “Essence of Nightshade,” or “Liquid Luck.”
- Arrange them on a shelf or tray as part of your Halloween decor for guests to pick from.
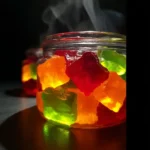
- Bubbling Cauldron Centerpiece:
- Find a small, food-safe black cauldron bowl.
- Fill it to the brim with your homemade gummies.
- For a dramatic effect, you can place a small piece of dry ice in a separate container at the bottom of the cauldron (with water) to create a safe, spooky fog that wafts over the gummies. (Note: Handle dry ice with extreme care and never let it come into direct contact with food or skin).
- Bewitching Party Favors:
- Portion the gummies into small cellophane bags.
- Tie each bag with black, orange, or purple ribbon.
- Attach a small, spooky charm or a custom “Thank you for coming to my brew-ha-ha!” tag.
- Eerie Cocktail and Mocktail Garnishes:
- Skewer a few gummies on a cocktail pick and rest it across the rim of a glass.
- Drop a few shimmery gummies directly into a clear beverage like sparkling cider, lemon-lime soda, or a gin and tonic. They will sink to the bottom and look like magical gems.
Additional Tips for Potion Perfection
Here are five expert secrets to ensure your gummy-making magic is flawless.
- Master Your Gummy Texture: The texture is customizable! For a firmer, chewier gummy (more like a gumdrop), use slightly less juice (e.g., 1 ¼ cups) or add an extra ½ packet of gelatin. For a softer, more Jell-O-like texture, use the recipe as is or add an extra tablespoon or two of juice.
- Create Mystical Layered Gummies: For a true “potion” look, you can layer colors. Pour your first color into the molds, filling them about halfway. Place them in the refrigerator for 20-30 minutes, just until the surface is slightly set but still tacky. Gently pour your second color on top and then return to the fridge to set completely.
- Brew a Sour Potion: For a tangy, sour twist, create a magical dusting. In a small bowl, mix ¼ cup of granulated sugar with 1-2 teaspoons of citric acid (found in the canning aisle or online). Once your gummies are unmolded, lightly dampen them with a tiny bit of water (a spray bottle works well) and then toss them in the sour sugar mixture until evenly coated.
- Ensure a Clean Release: Silicone molds are naturally non-stick, but if you’re worried or using a more intricate mold, you can very lightly coat the inside of the molds with a neutral oil like coconut oil, wiping out any excess with a paper towel before filling. This will guarantee your gummies pop out perfectly every time.
- Proper Storage for Lasting Enchantment: Homemade gummies are preservative-free and will get sticky if left at room temperature, especially in humid climates. Store them in an airtight container in the refrigerator. They will stay fresh for up to two weeks. To prevent them from sticking together in the container, you can lightly dust them with a very small amount of cornstarch or arrowroot powder before storing.
Witch’s Brew Gummies: Your Magical Questions Answered (FAQ)
1. Why didn’t my gummies set? They are still liquid!
This is the most common issue and almost always comes down to one of two things. First, the gelatin mixture was boiled. Boiling destroys gelatin’s ability to set, so gentle heating is crucial. Second, you may have used a type of fresh fruit juice (like pineapple or kiwi) that contains enzymes that break down gelatin. Always use pasteurized juices if you want to use these flavors.
2. Can I use regular Jell-O mix instead of unflavored gelatin?
While you can make gummy-like treats with Jell-O, it is not recommended for this recipe. Jell-O packets already contain sugar, artificial flavorings, and color. This recipe is designed to give you control over those elements, using real fruit juice for flavor and allowing you to customize the sweetness and color from scratch for a superior-tasting and more “gourmet” gummy.
3. My gummies are much harder than I expected. What did I do wrong?
You likely didn’t do anything wrong, but simply have a higher gelatin-to-liquid ratio. This can happen if some of your liquid evaporated during the heating process, or if your measurements were slightly off. This results in a very firm, chewy gummy, which some people prefer! For a softer gummy next time, ensure your measurements are precise and heat the mixture as briefly as possible, or add an extra tablespoon or two of juice.
4. Can I make a sugar-free version of these gummies?
Yes, you can. You can simply omit the sweetener altogether if you are using a very sweet 100% fruit juice. Alternatively, you can use a sugar-free liquid sweetener like liquid stevia or monk fruit. Add the sweetener to taste, as the level of sweetness varies greatly between brands.
5. How do I get my gummies to be crystal clear instead of cloudy?
Cloudiness usually comes from two sources: tiny air bubbles introduced during whisking, and impurities in the juice. To achieve clearer gummies, first let the hot mixture rest for a minute or two after removing it from the heat to allow bubbles to rise. Gently skim any foam from the surface with a spoon. Second, use a very clear juice like white grape or apple juice. The clearer your base liquid, the clearer your final “potion” will be.
Witch’s Brew Gummies recipe
Ingredients
The “Potion” Base (The Liquid Elixir):
-
Fruit Juice: 1 ½ cups (360ml) of your choice.
-
Why it Matters: This forms the flavor foundation of your gummies. For the best taste and fewer added sugars, always opt for 100% fruit juice.
-
Color & Flavor Suggestions:
-
Spooky Purple: White grape juice or apple juice as a base, colored with purple or a mix of red and blue food coloring.
-
Ghastly Green: White grape juice or apple juice, colored with green food coloring. Green juice blends also work.
-
Bloody Red: Cranberry, pomegranate, or cherry juice.
-
Pumpkin Orange: Orange or mango juice.
-
-
Important Note on Juice: Avoid using fresh pineapple, kiwi, mango, ginger, papaya, or guava juice. These fruits contain an enzyme called bromelain (or similar enzymes) that breaks down the proteins in gelatin, preventing your gummies from setting. Canned or pasteurized versions of these juices are fine, as the heating process deactivates the enzyme.
-
The “Binding Spell” (The Gelling Agent):
-
Unflavored Gelatin: 4 packets (1 ounce or 28g total) of powdered gelatin.
-
The Magic Ingredient: This is the key to that classic gummy texture. Unflavored gelatin allows the pure fruit juice flavor to shine through. Knox is a widely available and reliable brand.
-
The Science: Gelatin is made of collagen. When bloomed in cold liquid and then gently heated, the protein strands unwind. As they cool, they tangle together to form a semi-solid, jiggly matrix, trapping the liquid within it—this is what creates the gummy!
-
The “Sweetener & Spellbinder”:
-
Sweetener: ¼ to ⅓ cup (60-80ml) of honey, maple syrup, or agave nectar.
-
Function: This balances the tartness of the juice and adds to the overall flavor profile. Liquid sweeteners incorporate more smoothly than granulated sugar. You can adjust the amount based on the sweetness of your juice and your personal preference.
-
-
Fresh Lemon Juice: 1 tablespoon (15ml).
-
The Potion Activator: Don’t skip this! A small amount of acid like lemon juice works wonders. It brightens and intensifies the fruit flavors, preventing the gummies from tasting flat or overly sweet.
-
The “Magical Colors & Effects”:
-
Gel Food Coloring: A few drops, as needed.
-
Why Gel?: Gel-based food colorings are highly concentrated and won’t water down your gummy mixture, resulting in much more vibrant and intense colors than liquid food coloring.
-
-
Edible Glitter or Luster Dust: ¼ teaspoon (optional, for a magical shimmer).
-
The Final Touch: This is what truly makes your gummies look like a “Witch’s Brew.” A tiny amount stirred into the liquid mixture before pouring will create a beautiful, enchanting sparkle within the finished gummy.
-
Instructions
Phase 1: Preparing Your Alchemical Lab (Mise en Place)
-
Set Up Your Molds: Arrange your clean, dry silicone molds on a large baking sheet. This is a crucial step! The filled molds will be flimsy, and the baking sheet makes it easy to transport them to the refrigerator without spilling your precious potion.
-
Measure Your Ingredients: Have all your ingredients measured and ready to go. The process moves fairly quickly once you start heating, so you’ll want everything within arm’s reach.
Phase 2: The First Incantation (Blooming the Gelatin)
This is the most critical secret to perfectly smooth, non-lumpy gummies.
-
Pour Cold Juice: Pour ½ cup of the cold fruit juice into your medium saucepan (off the heat).
-
Sprinkle the Gelatin: Sprinkle the 4 packets of unflavored gelatin evenly over the surface of the cold juice. Do not dump it in one clump.
-
Let it Bloom: Let the mixture sit undisturbed for 5-10 minutes. During this time, the gelatin granules will absorb the liquid and “bloom,” swelling up and becoming thick and wrinkly, almost like applesauce. This process ensures that the gelatin will dissolve smoothly without any lumps.
Phase 3: Stirring the Cauldron (Heating the Brew)
-
Add Remaining Ingredients: Once the gelatin has bloomed, add the remaining 1 cup of fruit juice, your chosen sweetener (honey or maple syrup), and the tablespoon of lemon juice to the saucepan.
-
Heat Gently: Place the saucepan over medium-low heat. Whisk the mixture continuously and gently as it heats up. The thick, bloomed gelatin will begin to melt and dissolve into the liquid.
-
Crucial Step – Do NOT Boil: Continue heating and whisking until the gelatin and sweetener are completely dissolved and the mixture is smooth and liquid. This should only take about 5 minutes. It is critically important that you never let the mixture come to a boil. Boiling can weaken the gelatin’s protein structure, which can result in gummies that don’t set properly.
-
Remove from Heat: Once the mixture is fully liquid and smooth (you shouldn’t see any gelatin granules), remove the saucepan from the heat.
Phase 4: Adding the Magic (Coloring and Filling)
-
Skim the Foam: You may notice a thin layer of foam on the surface. For crystal-clear gummies, you can gently skim this off with a spoon.
-
Divide and Conquer (for multiple colors): If you want to make gummies in different colors, carefully pour the hot liquid into separate heat-safe bowls or measuring cups.
-
Add Color and Shimmer: Add a drop or two of gel food coloring to your mixture and stir until combined. If using edible glitter, stir it in now. Remember that the color will look more vibrant in the finished gummy, so start with less and add more if needed.
-
Fill the Molds: This is where a dropper or a small spouted measuring cup comes in handy. Carefully and quickly fill each cavity of your silicone molds. The liquid is hot, so be careful. Work efficiently, as the mixture will begin to set as it cools.
Phase 5: The Setting Spell (Chilling)
-
Transfer to Refrigerator: Carefully transfer the baking sheet with the filled molds into the refrigerator.
-
Chill Until Firm: Let the gummies chill until they are completely firm. This will take at least 2-3 hours, but can be left for longer. The exact time will depend on the size and depth of your molds.
-
Unmold Your Creations: Once fully set, the gummies should be firm to the touch and pull away from the sides of the mold easily. Gently push from the bottom of the silicone mold to pop each gummy out.
Nutrition
- Serving Size: one normal portion
- Calories: 30-50


