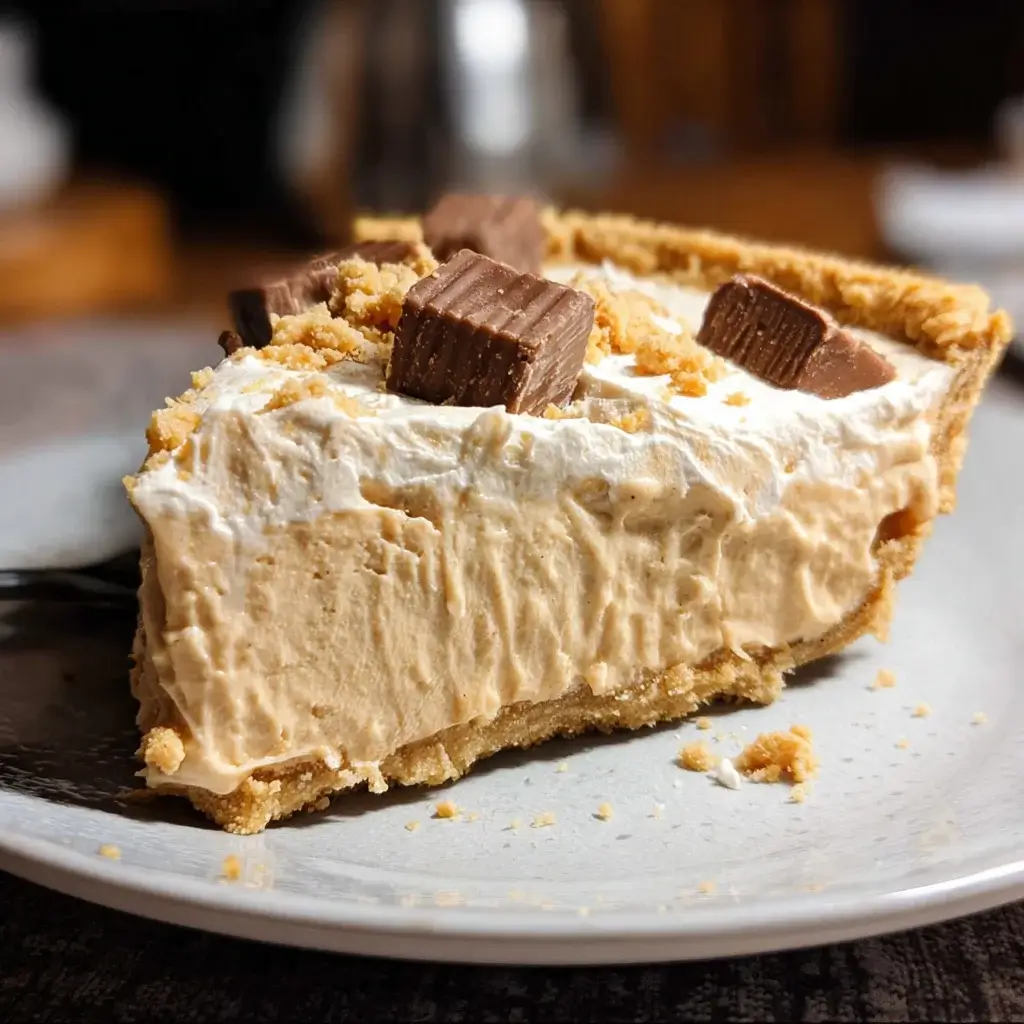

There are certain flavors that act as a time machine, and for me, the rich, creamy taste of peanut butter pie is a direct portal to my grandmother’s kitchen. I can still picture her standing at the counter, a floral apron tied around her waist, her hands moving with the practiced ease of someone who has made this recipe a thousand times. This wasn’t a fancy, complicated dessert. It was an old-fashioned pie, born from simple ingredients and a deep understanding of what true comfort tastes like. It was the star of every family potluck, the requested birthday treat, and the quiet hero of many Sunday dinners. The magic was in its texture—an impossibly smooth, cloud-like filling that was sweet but not cloying, intensely peanut-buttery, and perfectly balanced by the salty crunch of the graham cracker crust and the light airiness of the whipped topping.
The first time I attempted to make it on my own, I was nervous, feeling the weight of this beloved family tradition. I called my grandmother for the “recipe,” which, of course, wasn’t written down anywhere. It was a list of ingredients recited from memory, with instructions like “beat it ’til it looks right” and “chill it for a good long while.” That first pie, while not quite as perfect as hers, was a revelation. As I took the first bite, I wasn’t just tasting peanut butter and cream; I was tasting memories. I was tasting the laughter of family gatherings and the quiet comfort of her home. Now, this pie is a tradition in my own household. My children’s eyes light up when they see it sitting in the refrigerator, its tall swirls of whipped cream promising a truly special treat. It’s the pie I make when we need a little dose of happiness, a reminder that the most profound and satisfying things in life are often the simplest. This recipe is more than just a set of instructions; it’s a piece of my family’s history, a legacy of love served one slice at a time.
Complete with the ingredients amount
This Old-Fashioned Peanut Butter Pie is a symphony of three distinct yet harmonious layers: a crunchy, buttery crust; a rich, velvety filling; and a light, airy topping. Using high-quality, full-fat ingredients is the key to achieving the authentic, decadent texture and flavor that defines this classic dessert.
For the Graham Cracker Crust:
The crust is the foundational crunch that provides the perfect textural contrast to the creamy filling. While a store-bought crust works in a pinch, the flavor of a homemade one is unparalleled.
- Graham Cracker Crumbs: 1 ½ cups (from about 10-12 full graham cracker sheets). You can make your own by pulsing the crackers in a food processor or placing them in a zip-top bag and crushing them with a rolling pin.
- Granulated Sugar: ¼ cup. This adds a touch of sweetness and helps the crust caramelize slightly if you choose to bake it.
- Unsalted Butter: 6 tablespoons (¾ stick), melted. The butter is the binder that holds the crust together.
Alternative Crust Option: For a decadent chocolate-peanut butter combination, substitute the graham cracker crumbs with 1 ½ cups of chocolate cookie crumbs (from about 15-18 Oreos, filling and all).
For the Creamy Peanut Butter Filling:
This is the heart and soul of the pie. The ingredients are simple, but their synergy is what creates the magic.
- Cream Cheese: 8 ounces (one full block), softened to room temperature. This is a non-negotiable step. The cream cheese must be at room temperature to achieve a perfectly smooth, lump-free filling. Use full-fat, block-style cream cheese for the best texture and setting power.
- Creamy Peanut Butter: 1 cup. For an old-fashioned pie, it is essential to use a standard commercial creamy peanut butter like Jif, Skippy, or a similar brand. Do not use natural-style peanut butter where the oil separates, as it will prevent the pie from setting properly and can result in a greasy texture.
- Powdered Sugar (Confectioners’ Sugar): 1 cup, sifted if lumpy. Powdered sugar dissolves completely, ensuring a smooth, grit-free filling.
- Whole Milk or Heavy Cream: 2 tablespoons. This is used to thin the filling just enough to make it light and spreadable without compromising its ability to set.
- Vanilla Extract: 1 teaspoon. Pure vanilla extract enhances all the other flavors in the pie.
For the Whipped Topping and Garnish:
The topping provides a light, airy contrast to the rich filling.
- Heavy Whipping Cream: 1 cup, very cold.
- Powdered Sugar: ¼ cup.
- Vanilla Extract: ½ teaspoon.
Quick Topping Option: You can substitute the homemade whipped cream with an 8-ounce container of frozen whipped topping (like Cool Whip), thawed.
- Optional Garnishes:
- Chopped roasted, salted peanuts
- Chocolate shavings or mini chocolate chips
- Melted chocolate for drizzling
- Crumbled peanut butter cups
Instructions
This is a no-bake pie in its truest form, relying on chilling to set rather than baking. The process is simple, but patience during the chilling phase is paramount.
Step 1: Prepare the Crust
In a medium bowl, combine the graham cracker crumbs and granulated sugar. Stir with a fork to mix them evenly. Pour the 6 tablespoons of melted butter over the crumb mixture. Continue to mix with the fork until all the crumbs are moistened and the texture resembles wet sand.
Pour the buttery crumb mixture into a 9-inch pie plate. Using the bottom of a flat measuring cup or your fingers, press the crumbs firmly and evenly onto the bottom and up the sides of the pie plate. Pay special attention to creating a solid, compacted base and a neat, even rim.
For a no-bake pie, simply place the prepared crust in the refrigerator to chill for at least 30 minutes while you prepare the filling. This helps the butter solidify and the crust to firm up. For a crispier crust, you can bake it in a preheated oven at 350°F (175°C) for 8-10 minutes. If you bake it, allow it to cool completely before adding the filling.
Step 2: Prepare the Creamy Peanut Butter Filling
In the bowl of a stand mixer fitted with the paddle attachment, or in a large bowl using a handheld electric mixer, place the 8 ounces of softened cream cheese. Beat the cream cheese on medium speed for about 1-2 minutes until it is completely smooth and free of any lumps. This initial step is crucial for a velvety final texture. Scrape down the sides and bottom of the bowl with a rubber spatula.
Add the 1 cup of creamy peanut butter to the bowl with the creamed cheese. Beat on medium speed until the two are fully combined and the mixture is smooth and uniform in color, about another 1-2 minutes. Scrape the bowl down again.
Turn the mixer to low speed and gradually add the 1 cup of powdered sugar. Starting on low prevents a sugar cloud from dusting your kitchen. Once the sugar is mostly incorporated, increase the speed to medium-high and beat for 2-3 minutes. The mixture will become noticeably lighter in color and much fluffier in texture.
Add the 2 tablespoons of milk (or heavy cream) and the 1 teaspoon of vanilla extract. Continue to beat on medium-high for another minute until everything is well combined and the filling is light, airy, and has the consistency of a thick mousse.
Step 3: Assemble and Chill the Pie
Retrieve your chilled or cooled pie crust. Spoon the peanut butter filling into the crust. Using a spatula or the back of a spoon, spread the filling evenly, creating a smooth, slightly domed top.
Cover the pie loosely with plastic wrap or a pie cover. It is now time for the most important step: chilling. Place the pie in the refrigerator for a minimum of 4 to 6 hours. For the absolute best results and a firm, clean slice, it is highly recommended to chill the pie overnight. Do not rush this step. The chilling process allows the fats in the cream cheese and peanut butter to solidify, which is what gives the pie its structure.
Step 4: Add the Topping and Serve
Just before you are ready to serve the pie, prepare the homemade whipped cream. In a chilled mixing bowl, combine the 1 cup of cold heavy whipping cream, ¼ cup of powdered sugar, and ½ teaspoon of vanilla extract. Using an electric mixer, beat the cream on medium-high speed until stiff peaks form. Stiff peaks mean that when you lift the beaters out of the cream, the peak that forms holds its shape and doesn’t slump over.
Remove the chilled pie from the refrigerator. You can either spread the whipped cream evenly over the top of the pie, creating beautiful swirls with the back of a spoon, or you can transfer the whipped cream to a piping bag and pipe decorative stars or rosettes around the edge.
If using, sprinkle your desired garnishes over the whipped cream. Chopped peanuts, chocolate shavings, or a drizzle of melted chocolate all make wonderful additions. Slice the pie with a sharp knife, wiping the blade clean between each cut for the neatest slices. Serve immediately.
Nutrition Facts (Servings and calories per serving)
This Old-Fashioned Peanut Butter Pie is a rich and decadent dessert, meant to be savored as a special treat. The nutritional information is an estimate and can vary based on the specific ingredients used (e.g., store-bought vs. homemade crust, full-fat vs. other dairy).
- Servings: One 9-inch pie yields approximately 8 generous servings.
- Calories per serving: Each slice of this pie contains approximately 550 to 700 calories. The high calorie count is attributed to the high-fat content from the cream cheese, peanut butter, and butter, as well as the sugar in the filling and crust.
This dessert is high in fat and carbohydrates. The peanut butter provides a source of plant-based protein and healthy fats, while the dairy components contribute additional protein and calcium.
Preparation time
While the hands-on time for this pie is remarkably short, the passive chilling time is essential and makes up the bulk of the total preparation duration.
- Active Preparation Time: 15-20 minutes. This includes crushing the graham crackers, making the crust, and mixing the filling.
- Chilling Time: 4 to 8 hours, or preferably overnight. This is the crucial, non-negotiable time required for the pie to set properly.
- Total Time: Approximately 4 hours and 20 minutes to 8 hours and 20 minutes. Due to the long chilling time, this is the perfect make-ahead dessert.
How to Serve
Serving this pie correctly enhances the experience, showcasing its perfect texture and rich flavor.
- Serve Chilled: This pie must be served cold, directly from the refrigerator. Its structure relies on the ingredients being firm and chilled. If left at room temperature for too long, it will soften considerably.
- A Perfect Slice: For clean, beautiful slices, use a long, sharp knife. Dip the knife in hot water and wipe it clean before each cut. This will prevent the filling from dragging and smearing.
- Garnish Generously: Garnishes add visual appeal and textural contrast.
- Crunch: A sprinkle of salty, roasted peanuts or chopped peanut butter cups provides a welcome crunch against the creamy filling.
- Chocolate: A drizzle of melted dark chocolate sauce or a scattering of dark chocolate shavings cuts through the richness and complements the peanut butter perfectly.
- Caramel: A lattice of caramel sauce can add another layer of sweet, buttery flavor.
- Perfect Pairings:
- Glass of Milk: A tall, cold glass of milk is the quintessential, classic pairing.
- Coffee or Espresso: A hot cup of strong coffee or a shot of espresso provides a robust, slightly bitter counterpoint to the pie’s sweetness.
- Go A La Mode: For an truly indulgent experience, serve a slice with a small scoop of high-quality vanilla bean or rich chocolate ice cream on the side.
Additional tips (5 tips)
These five tips will help you move from making a good peanut butter pie to making an absolutely unforgettable one.
- Room Temperature is a Rule, Not a Suggestion: The single most important step for a smooth, velvety filling is ensuring your block of cream cheese is fully softened to room temperature. Cold cream cheese will not blend smoothly, resulting in small, unappetizing lumps throughout your filling, no matter how much you beat it. Take it out of the fridge at least an hour before you begin.
- Use the Right Kind of Peanut Butter: This is crucial for the pie’s structure. You must use a standard, commercially processed creamy peanut butter (like Jif or Skippy). These contain emulsifiers that keep the oil blended. Natural peanut butter, where the oil separates, is wonderful for many things, but it will make your pie filling greasy and prevent it from setting up into a firm, sliceable pie.
- Respect the Chilling Time: There is no shortcut for chilling. The pie sets up as the fats in the filling solidify in the cold. Rushing this step will result in a soft, pudding-like consistency rather than a firm, sliceable pie. Chilling overnight is always the best option for the firmest set and deepest flavor.
- The Perfect Make-Ahead Dessert: Embrace the long chilling time and use it to your advantage. This pie is an ideal dessert for dinner parties or holidays because it must be made ahead of time. You can prepare it entirely the day before, leaving you free on the day of your event. Just add the whipped topping and garnishes right before serving.
- Get Creative with Your Crust: While a graham cracker crust is classic, feel free to experiment to create your own signature version. A crust made from crushed Nutter Butter cookies will amplify the peanut butter flavor. A pretzel crust provides an incredible sweet and salty crunch that is absolutely addictive. Or, for the ultimate chocolate lover, a dark chocolate Oreo crust is pure decadence.
FAQ section (5 Q/A)
Here are answers to some of the most common questions about making this classic dessert.
Q1: Can I freeze this Old-Fashioned Peanut Butter Pie?
A1: Yes, this pie freezes beautifully! To freeze, prepare the pie completely through the filling stage, but do not add the whipped topping. Cover it tightly with a layer of plastic wrap and then a layer of aluminum foil to protect it from freezer burn. It can be frozen for up to one month. To serve, thaw it in the refrigerator overnight. Add the fresh whipped topping and garnishes just before slicing and serving.
Q2: My filling seems a little runny. What did I do wrong?
A2: A runny filling is usually caused by one of three things. First, you may not have used full-fat, block-style cream cheese. Whipped or low-fat versions contain more water and stabilizers and will not set as firmly. Second, you may not have chilled the pie for long enough. It truly needs at least 4-6 hours, and preferably longer, for the fats to solidify. Finally, ensure you used a standard commercial peanut butter, as natural peanut butter can cause the filling to be oily and soft.
Q3: Can I use crunchy peanut butter instead of creamy?
A3: You certainly can! If you love the texture of chopped peanuts in your desserts, using crunchy peanut butter is a great option. It will not affect the way the pie sets. The filling will have the same creamy base, but with the added texture of the peanut pieces distributed throughout.
Q4: Do I have to use an electric mixer?
A4: While an electric mixer (either stand or handheld) is highly recommended for achieving the lightest, fluffiest texture, you can make this pie by hand with some determination and elbow grease. The most important part will be ensuring the room temperature cream cheese is beaten completely smooth with a whisk before incorporating the other ingredients. The final filling may be slightly denser than one beaten with an electric mixer, but it will still be delicious.
Q5: How do I store leftovers?
A5: Leftover pie should be stored, covered, in the refrigerator. It will keep well for 3 to 4 days. The whipped topping may start to weep or deflate slightly after the second day, but the flavor of the pie will remain excellent. Due to the dairy-based filling, this pie should not be left out at room temperature for more than an hour or two.
Print
Old-Fashioned Peanut Butter Pie recipe
Ingredients
For the Creamy Peanut Butter Filling:
This is the heart and soul of the pie. The ingredients are simple, but their synergy is what creates the magic.
-
Cream Cheese: 8 ounces (one full block), softened to room temperature. This is a non-negotiable step. The cream cheese must be at room temperature to achieve a perfectly smooth, lump-free filling. Use full-fat, block-style cream cheese for the best texture and setting power.
-
Creamy Peanut Butter: 1 cup. For an old-fashioned pie, it is essential to use a standard commercial creamy peanut butter like Jif, Skippy, or a similar brand. Do not use natural-style peanut butter where the oil separates, as it will prevent the pie from setting properly and can result in a greasy texture.
-
Powdered Sugar (Confectioners’ Sugar): 1 cup, sifted if lumpy. Powdered sugar dissolves completely, ensuring a smooth, grit-free filling.
-
Whole Milk or Heavy Cream: 2 tablespoons. This is used to thin the filling just enough to make it light and spreadable without compromising its ability to set.
-
Vanilla Extract: 1 teaspoon. Pure vanilla extract enhances all the other flavors in the pie.
For the Whipped Topping and Garnish:
The topping provides a light, airy contrast to the rich filling.
-
Heavy Whipping Cream: 1 cup, very cold.
-
Powdered Sugar: ¼ cup.
-
Vanilla Extract: ½ teaspoon.
Quick Topping Option: You can substitute the homemade whipped cream with an 8-ounce container of frozen whipped topping (like Cool Whip), thawed.
-
Optional Garnishes:
-
Chopped roasted, salted peanuts
-
Chocolate shavings or mini chocolate chips
-
Melted chocolate for drizzling
-
Crumbled peanut butter cups
-
Instructions
In a medium bowl, combine the graham cracker crumbs and granulated sugar. Stir with a fork to mix them evenly. Pour the 6 tablespoons of melted butter over the crumb mixture. Continue to mix with the fork until all the crumbs are moistened and the texture resembles wet sand.
Pour the buttery crumb mixture into a 9-inch pie plate. Using the bottom of a flat measuring cup or your fingers, press the crumbs firmly and evenly onto the bottom and up the sides of the pie plate. Pay special attention to creating a solid, compacted base and a neat, even rim.
For a no-bake pie, simply place the prepared crust in the refrigerator to chill for at least 30 minutes while you prepare the filling. This helps the butter solidify and the crust to firm up. For a crispier crust, you can bake it in a preheated oven at 350°F (175°C) for 8-10 minutes. If you bake it, allow it to cool completely before adding the filling.
In the bowl of a stand mixer fitted with the paddle attachment, or in a large bowl using a handheld electric mixer, place the 8 ounces of softened cream cheese. Beat the cream cheese on medium speed for about 1-2 minutes until it is completely smooth and free of any lumps. This initial step is crucial for a velvety final texture. Scrape down the sides and bottom of the bowl with a rubber spatula.
Add the 1 cup of creamy peanut butter to the bowl with the creamed cheese. Beat on medium speed until the two are fully combined and the mixture is smooth and uniform in color, about another 1-2 minutes. Scrape the bowl down again.
Turn the mixer to low speed and gradually add the 1 cup of powdered sugar. Starting on low prevents a sugar cloud from dusting your kitchen. Once the sugar is mostly incorporated, increase the speed to medium-high and beat for 2-3 minutes. The mixture will become noticeably lighter in color and much fluffier in texture.
Add the 2 tablespoons of milk (or heavy cream) and the 1 teaspoon of vanilla extract. Continue to beat on medium-high for another minute until everything is well combined and the filling is light, airy, and has the consistency of a thick mousse.
Retrieve your chilled or cooled pie crust. Spoon the peanut butter filling into the crust. Using a spatula or the back of a spoon, spread the filling evenly, creating a smooth, slightly domed top.
Cover the pie loosely with plastic wrap or a pie cover. It is now time for the most important step: chilling. Place the pie in the refrigerator for a minimum of 4 to 6 hours. For the absolute best results and a firm, clean slice, it is highly recommended to chill the pie overnight. Do not rush this step. The chilling process allows the fats in the cream cheese and peanut butter to solidify, which is what gives the pie its structure.
Just before you are ready to serve the pie, prepare the homemade whipped cream. In a chilled mixing bowl, combine the 1 cup of cold heavy whipping cream, ¼ cup of powdered sugar, and ½ teaspoon of vanilla extract. Using an electric mixer, beat the cream on medium-high speed until stiff peaks form. Stiff peaks mean that when you lift the beaters out of the cream, the peak that forms holds its shape and doesn’t slump over.
Nutrition
- Serving Size: one normal portion
- Calories: 550 to 700