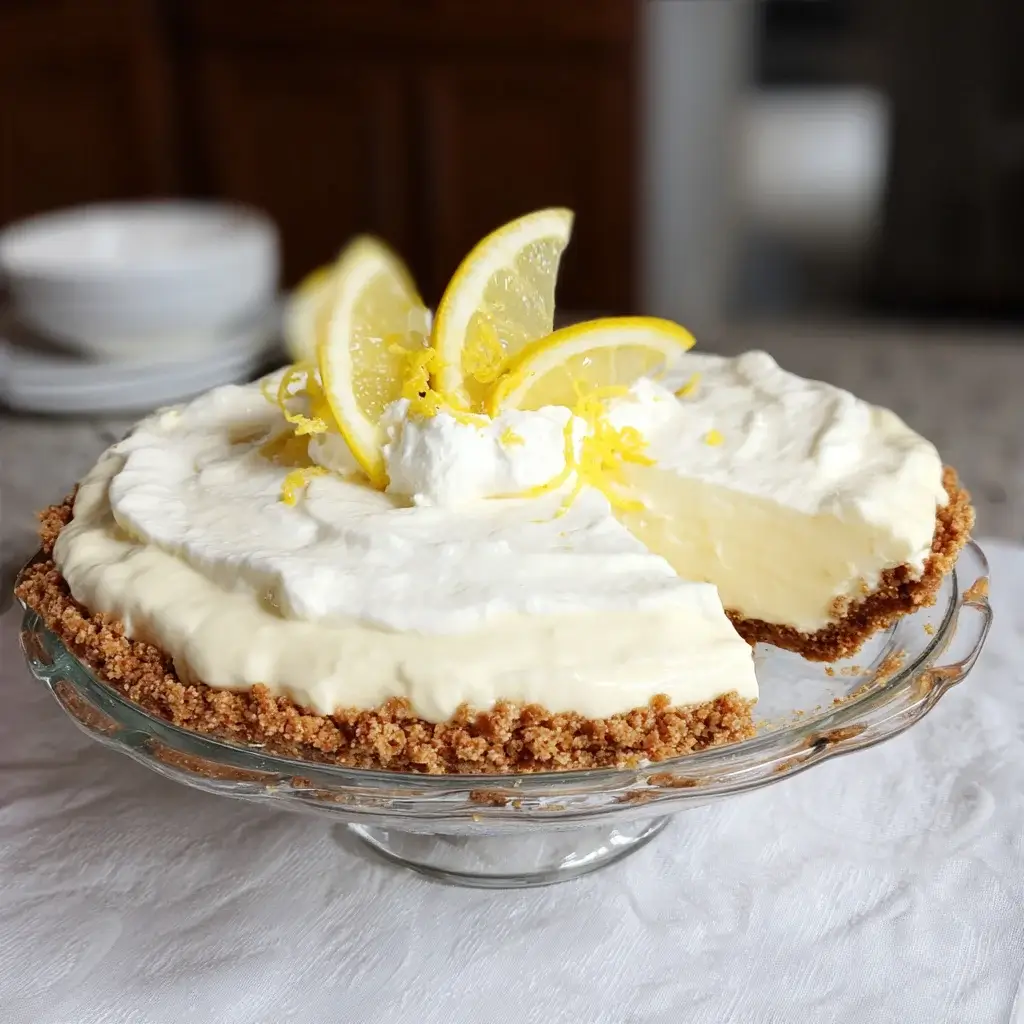

The Ultimate No-Bake Sugar-Free Lemon Mousse Pie
This recipe creates a stunningly delicious and elegant dessert that is secretly low-carb, keto-friendly, gluten-free, and completely free of refined sugar. The result is a light-as-air mousse with a bold lemon flavor, nestled in a crisp, buttery almond flour crust.
Yields: 8-10 servings
Prep time: 25 minutes
Chill time: 4-6 hours (or overnight)
Ingredients:
- For the Buttery Almond Flour Crust:
- 1 ½ cups (168g) finely ground almond flour
- ⅓ cup (65g) powdered erythritol or other powdered sugar-free sweetener
- 5 tablespoons (70g) unsalted butter, melted
- ½ teaspoon vanilla extract
- A pinch of salt
- For the Silky Lemon Mousse Filling:
- 1 (8 oz / 226g) package of full-fat block cream cheese, softened to room temperature (this is crucial)
- ¾ cup (145g) powdered erythritol or other powdered sugar-free sweetener, plus more to taste
- Zest of 2 large lemons (about 2 tablespoons)
- ⅓ cup (80ml) fresh-squeezed lemon juice (from the 2 lemons)
- 1 teaspoon unflavored gelatin powder
- 2 tablespoons cold water
- 1 ½ cups (360ml) cold heavy whipping cream
- 1 teaspoon vanilla extract
- Optional: 2-3 drops of yellow food coloring for a more vibrant color
Instructions:
Part 1: Make the No-Bake Crust
- Combine Dry Ingredients: In a medium bowl, whisk together the almond flour, powdered erythritol, and salt until well combined.
- Add Wet Ingredients: Pour the melted butter and vanilla extract into the dry ingredients. Stir with a spatula until the mixture comes together and has the texture of damp sand.
- Press into Pan: Tip the crust mixture into a 9-inch pie plate. Using the back of a measuring cup or your fingers, firmly press the mixture evenly across the bottom and up the sides of the pie plate. Ensure the base and walls are compact and even.
- Chill the Crust: Place the pie crust in the freezer to set for at least 20-30 minutes while you prepare the filling. This step is essential for a firm crust that holds its shape.
Part 2: Create the Lemon Mousse Filling
- Bloom the Gelatin: In a small, microwave-safe bowl, sprinkle the unflavored gelatin over the 2 tablespoons of cold water. Let it sit for 5 minutes to “bloom” and absorb the water. It will become thick and gelatinous.
- Beat the Cream Cheese and Sweetener: In a large mixing bowl, use an electric hand mixer or a stand mixer with the paddle attachment to beat the softened cream cheese on medium speed until it’s completely smooth and free of lumps. Add the powdered erythritol and beat again until light and fluffy, scraping down the sides of the bowl as needed.
- Add the Lemon Flavor: Add the lemon zest and vanilla extract to the cream cheese mixture and beat to combine.
- Dissolve the Gelatin: Microwave the bloomed gelatin for 10-15 seconds, just until it melts into a clear liquid. Be careful not to let it boil.
- Temper and Combine: With the mixer on low speed, slowly stream the fresh lemon juice into the cream cheese mixture. Once the juice is incorporated, slowly pour in the melted gelatin. Mix until just combined. If using, add the yellow food coloring now. The mixture may look a bit thin at this point; this is normal. Set this bowl aside.
- Whip the Cream: In a separate, clean, chilled bowl, use the electric mixer (with clean beaters) to whip the cold heavy whipping cream on medium-high speed until it forms stiff peaks. This means when you lift the beaters out, the cream holds its shape firmly. Be careful not to over-whip, or it will turn into butter.
- Fold Gently: Take about one-third of the whipped cream and gently fold it into the lemon cream cheese mixture using a rubber spatula. This lightens the base. Then, add the remaining whipped cream and continue to fold gently until the mixture is uniform in color and no streaks remain. The key is to be gentle to maintain the airy texture.
- Assemble the Pie: Retrieve the chilled crust from the freezer. Pour the lemon mousse filling into the crust and spread it evenly with the spatula.
- Chill to Set: Cover the pie loosely with plastic wrap (try not to let it touch the surface of the mousse) and refrigerate for at least 4-6 hours, or preferably overnight. The chilling time is crucial for the mousse to set completely.
Nutrition Facts
- Servings: 8 slices
- Calories per serving: Approximately 350-420 kcal
- Net Carbs per serving: Approximately 5-7g (This is an estimate and depends heavily on the specific brands of almond flour and sweetener used).
Preparation Time
- Total Time: 4 hours 25 minutes
- Active Preparation: 25 minutes
- Chilling Time: Minimum 4 hours
How to Serve This Cloud of Sunshine
This pie is a showstopper on its own, but a few simple garnishes can elevate it to a professional-level dessert.
- The Simple & Elegant Way:
- Serve a clean slice on a chilled plate. The vibrant yellow color is beautiful all by itself.
- Add a single, fresh raspberry or a small mint sprig to the center of each slice for a pop of color.
- The Decadent Toppings (All Sugar-Free):
- Whipped Cream Dollops: Make a small batch of sugar-free whipped cream (heavy cream, powdered erythritol, and vanilla) and pipe or spoon dollops around the edge of the pie or on each slice.
- Lemon Zest & Slices: Before serving, finely grate a little extra lemon zest over the top. For a dramatic look, place a very thin, twisted slice of lemon on each dollop of whipped cream.
- Toasted Coconut Flakes: The nutty flavor of toasted unsweetened coconut flakes is a fantastic complement to the tangy lemon.
- Fresh Berries: A small handful of fresh blueberries or raspberries scattered over the top adds a beautiful color contrast and a burst of fruity flavor.
- Perfect Pairings:
- Coffee or Tea: A strong cup of black coffee or a delicate herbal tea like chamomile or mint provides a wonderful contrast.
- After-Dinner Drink: A small glass of a dry sparkling wine or a light digestif complements the pie’s elegant profile.
The Science Behind a Perfect Sugar-Free Mousse
Understanding the “why” behind the ingredients and techniques will make you a more confident baker.
The Sweetener: Conquering Sugar-Free Baking
Creating a sugar-free dessert that doesn’t taste like one is an art.
- Erythritol: This is the star of the recipe. It’s a sugar alcohol that has almost zero calories and doesn’t spike blood sugar. Using the powdered form is essential, as granulated erythritol can have a gritty texture and a tendency to recrystallize in cold applications. Some people notice a slight “cooling” sensation with erythritol, but it’s usually minimal in a creamy dessert like this.
- Other Options: You can use other 1:1 sugar substitutes like a monk fruit-erythritol blend or Allulose. Be cautious with pure Stevia, as it is intensely sweet, has a distinct aftertaste, and provides no bulk, which can alter the texture.
The Mousse Texture: A Three-Part Harmony
The magical, airy texture of this mousse relies on the interplay of three key components.
- The Base (Cream Cheese): Full-fat block cream cheese provides the tangy flavor, richness, and structural foundation. It must be at room temperature to be beaten smooth. If it’s too cold, you’ll end up with a lumpy, unpleasant texture that is impossible to fix.
- The Stabilizer (Gelatin): Gelatin is the secret ingredient that ensures your pie sets up beautifully and holds its shape when sliced. “Blooming” the gelatin in cold water first allows the granules to soften and absorb liquid, which helps them dissolve evenly when heated, preventing lumps.
- The Aerator (Whipped Cream): Whipping cold heavy cream incorporates thousands of tiny air bubbles. Gently folding this whipped cream into the lemon base is what transforms it from a simple lemon cream into a light, ethereal mousse. The key is to keep the cream cold and to fold, not stir, to avoid deflating those precious air bubbles.
Additional Tips for Pie Perfection
- Use Fresh Lemon Juice. Always. The flavor difference between fresh-squeezed lemon juice and the bottled variety is night and day. Bottled juice has a dull, often metallic taste, while fresh juice provides the bright, vibrant, and complex acidity this pie needs. The zest is equally important, as it contains the aromatic lemon oils where most of the “lemon” flavor resides.
- Room Temperature is Your Friend (For Cream Cheese): I cannot stress this enough. Take your cream cheese out of the refrigerator at least 1-2 hours before you begin. If you try to beat cold cream cheese, it will form tiny, stubborn lumps that will mar the silky texture of your final mousse.
- Chill Your Tools for Whipped Cream: For the highest, most stable whipped cream, place your mixing bowl and the beaters from your electric mixer in the freezer for 10-15 minutes before you start. Heavy cream whips up best when it and everything it touches is very cold.
- The Art of the Gentle Fold: When combining the whipped cream with the lemon base, use a large rubber spatula. Cut down through the center of the mixture, scrape along the bottom of the bowl, and bring it back up the side, turning the bowl as you go. This motion gently combines the ingredients without knocking all the air out of the whipped cream.
- Patience is the Final Ingredient: No-bake does not mean no-time. The 4-6 hour chilling period is non-negotiable. This is when the gelatin works its magic, firming up the mousse to a sliceable consistency. Cutting into it too early will result in a delicious but soupy mess. Trust the process and let it set completely.
Frequently Asked Questions (FAQ)
1. My mousse didn’t set properly and is runny. What went wrong?
This is the most common issue and usually has one of three causes. First, you may not have chilled it long enough. This pie truly needs a minimum of 4 hours, and overnight is even better. Second, the gelatin may not have been properly bloomed or dissolved, meaning it couldn’t do its job. Third, your whipped cream might have been under-whipped (soft peaks instead of stiff peaks), so it didn’t provide enough structure.
2. Can I make this pie dairy-free?
Yes, you can make a dairy-free version, though the texture and taste will be slightly different. Use a high-quality, dairy-free cream cheese substitute. For the heavy cream, use the solid cream skimmed from the top of two cans of full-fat coconut milk that have been chilled overnight. Use a plant-based butter substitute in the crust. The flavor will have a slight coconut note, which pairs beautifully with lemon.
3. Why is my almond flour crust crumbly and not holding together?
This usually means the ratio of butter to almond flour was slightly off, or it wasn’t pressed into the pan firmly enough. Make sure to use your fingers or a flat-bottomed glass to really compact the crust mixture against the bottom and sides of the pie plate. Also, ensure you are using melted butter, not just softened butter, as it helps bind the flour as it cools and solidifies.
4. I have granulated erythritol. Can I use it instead of powdered?
You can, but you must turn it into powder first. Granulated erythritol will not dissolve properly in the cold cream cheese mixture and will result in a very unpleasant gritty texture. To make your own powdered sweetener, simply blend the granulated version in a high-speed blender or coffee grinder until it becomes a fine powder. Let the dust settle before opening the lid!
5. How should I store the leftover pie?
Store any leftover pie covered in the refrigerator. It will keep well for up to 4 days. The crust may soften slightly after the first day, but the flavor will remain delicious. I do not recommend freezing the finished pie, as the texture of the mousse can become icy and separate upon thawing.
No-Bake Sugar-Free Lemon Mousse Pie Recipe
Ingredients
Ingredients:
-
For the Buttery Almond Flour Crust:
-
1 ½ cups (168g) finely ground almond flour
-
⅓ cup (65g) powdered erythritol or other powdered sugar-free sweetener
-
5 tablespoons (70g) unsalted butter, melted
-
½ teaspoon vanilla extract
-
A pinch of salt
-
-
For the Silky Lemon Mousse Filling:
-
1 (8 oz / 226g) package of full-fat block cream cheese, softened to room temperature (this is crucial)
-
¾ cup (145g) powdered erythritol or other powdered sugar-free sweetener, plus more to taste
-
Zest of 2 large lemons (about 2 tablespoons)
-
⅓ cup (80ml) fresh-squeezed lemon juice (from the 2 lemons)
-
1 teaspoon unflavored gelatin powder
-
2 tablespoons cold water
-
1 ½ cups (360ml) cold heavy whipping cream
-
1 teaspoon vanilla extract
-
Optional: 2-3 drops of yellow food coloring for a more vibrant color
-
Instructions
Part 1: Make the No-Bake Crust
-
Combine Dry Ingredients: In a medium bowl, whisk together the almond flour, powdered erythritol, and salt until well combined.
-
Add Wet Ingredients: Pour the melted butter and vanilla extract into the dry ingredients. Stir with a spatula until the mixture comes together and has the texture of damp sand.
-
Press into Pan: Tip the crust mixture into a 9-inch pie plate. Using the back of a measuring cup or your fingers, firmly press the mixture evenly across the bottom and up the sides of the pie plate. Ensure the base and walls are compact and even.
-
Chill the Crust: Place the pie crust in the freezer to set for at least 20-30 minutes while you prepare the filling. This step is essential for a firm crust that holds its shape.
Part 2: Create the Lemon Mousse Filling
-
Bloom the Gelatin: In a small, microwave-safe bowl, sprinkle the unflavored gelatin over the 2 tablespoons of cold water. Let it sit for 5 minutes to “bloom” and absorb the water. It will become thick and gelatinous.
-
Beat the Cream Cheese and Sweetener: In a large mixing bowl, use an electric hand mixer or a stand mixer with the paddle attachment to beat the softened cream cheese on medium speed until it’s completely smooth and free of lumps. Add the powdered erythritol and beat again until light and fluffy, scraping down the sides of the bowl as needed.
-
Add the Lemon Flavor: Add the lemon zest and vanilla extract to the cream cheese mixture and beat to combine.
-
Dissolve the Gelatin: Microwave the bloomed gelatin for 10-15 seconds, just until it melts into a clear liquid. Be careful not to let it boil.
-
Temper and Combine: With the mixer on low speed, slowly stream the fresh lemon juice into the cream cheese mixture. Once the juice is incorporated, slowly pour in the melted gelatin. Mix until just combined. If using, add the yellow food coloring now. The mixture may look a bit thin at this point; this is normal. Set this bowl aside.
-
Whip the Cream: In a separate, clean, chilled bowl, use the electric mixer (with clean beaters) to whip the cold heavy whipping cream on medium-high speed until it forms stiff peaks. This means when you lift the beaters out, the cream holds its shape firmly. Be careful not to over-whip, or it will turn into butter.
-
Fold Gently: Take about one-third of the whipped cream and gently fold it into the lemon cream cheese mixture using a rubber spatula. This lightens the base. Then, add the remaining whipped cream and continue to fold gently until the mixture is uniform in color and no streaks remain. The key is to be gentle to maintain the airy texture.
-
Assemble the Pie: Retrieve the chilled crust from the freezer. Pour the lemon mousse filling into the crust and spread it evenly with the spatula.
-
Chill to Set: Cover the pie loosely with plastic wrap (try not to let it touch the surface of the mousse) and refrigerate for at least 4-6 hours, or preferably overnight. The chilling time is crucial for the mousse to set completely
Nutrition
- Serving Size: one normal portion
- Calories: 350-420 kcal