


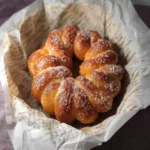
There’s a certain magic to the simplicity of a freshly made donut, and for me, that magic is most potent in the form of a Korean Twisted Donut, or Kkwabaegi (꽈배기). My first memory of this treat isn’t from a trendy bakery, but from a bustling underground market in Seoul, where the sweet, yeasty smell of frying dough cut through the city’s energy. I watched an ajumma (a middle-aged Korean woman) expertly roll, twist, and drop loops of dough into a giant vat of hot oil. The donuts emerged, puffy and golden, and were immediately plunged into a waiting bowl of cinnamon-sugar. The first bite was a textural revelation. It wasn’t dense and cakey like an American donut, nor was it ethereally light like a glazed ring. It was soft, airy, and unbelievably chewy, with a satisfying, springy quality that made each bite an event. I’ve been chasing that perfect texture ever since. This recipe is the culmination of that chase. It has become a weekend tradition in my home, a recipe my family eagerly awaits. The process of making the soft dough, the fun of twisting each unique shape, and the final reward of a warm, sugary, chewy donut is a joy that I am so excited to share.
Why This Kkwabaegi Recipe is a Must-Try
Before we dive into the process, let’s talk about what makes these Korean Twisted Donuts so special and why this particular recipe will become a treasured part of your baking repertoire. This is more than just fried dough; it’s a unique culinary experience that stands apart from any other donut you’ve ever had.
- The Unforgettable Chewy Texture: This is the number one reason Kkwabaegi are so beloved. The secret lies in the use of both high-protein bread flour and glutinous sweet rice flour (mochiko). This combination creates a donut that is wonderfully light and airy on the inside but possesses a substantial, satisfying, almost mochi-like chew that is incredibly addictive.
- Subtly Sweet and Perfectly Balanced: Unlike many Western donuts that can be overwhelmingly sweet from heavy glazes or fillings, Kkwabaegi have a beautifully balanced flavor. The dough itself is only lightly sweetened, allowing the pure, yeasty flavor to shine through. The final coating of cinnamon-sugar adds the perfect touch of sweetness and warmth without overpowering the donut itself.
- A Taste of Korean Street Food Culture: Making Kkwabaegi is like bringing a piece of authentic Korean street food culture into your own kitchen. These donuts are a nostalgic, beloved snack for Koreans of all ages, found everywhere from bustling city markets to humble neighborhood bakeries. This recipe allows you to recreate that authentic taste and experience.
- Surprisingly Simple and Forgiving Dough: If you’re new to working with yeasted dough, this is a fantastic recipe to start with. The dough is soft, supple, and easy to handle. It’s enriched with butter and milk, making it forgiving and less prone to drying out. The shaping process is rustic and fun—no need for perfect, uniform shapes!
- Incredibly Fun to Make: There is a simple, tactile joy in rolling out the ropes of dough and twisting them into their signature shape. It’s a wonderful recipe to make with kids or friends, as everyone can get involved in the twisting process. The reward of eating a warm donut you shaped yourself is immensely satisfying.
The Science of the Chew: A Deep Dive into the Ingredients
The magic of Kkwabaegi lies in a few key ingredients that work in harmony. Understanding their role is the key to achieving that perfect, chewy texture.
The Flour Foundation: A Tale of Two Flours
- Bread Flour: We use bread flour instead of all-purpose flour for one crucial reason: protein content. Bread flour has a higher protein content, which, when kneaded, develops strong gluten strands. These strands create the structure and the signature chewiness of the donut. Using all-purpose flour will result in a softer, less chewy donut.
- Glutinous Sweet Rice Flour (Mochiko): This is the secret weapon. It is crucial to use glutinous sweet rice flour (often sold under the brand name Mochiko), not regular rice flour. Despite its name, it contains no gluten. Instead, it is very high in amylopectin starch, which becomes sticky and elastic when cooked. This is what gives the donut its unique, slightly springy, mochi-like quality and contributes to a wonderfully moist interior.
The Enriching Agents: For Flavor and Tenderness
- Whole Milk: Using whole milk provides fat and moisture, which results in a softer, more tender crumb and a richer flavor than if you were to use water or lower-fat milk. The milk should be lukewarm to properly activate the yeast.
- Unsalted Butter: Butter adds wonderful flavor and richness. The fat in the butter also coats the gluten strands, shortening them slightly, which tenderizes the dough and ensures the final product isn’t tough, but perfectly soft and chewy.
The Leavening and Flavor
- Instant Yeast: We use instant yeast for its reliability and ease of use; it can be mixed directly with the dry ingredients. It’s the powerhouse that creates the carbon dioxide bubbles, making the donuts rise and giving them their light, airy structure.
- The Coating: A simple mixture of granulated sugar and cinnamon is the classic choice. The warmth of the cinnamon is the perfect complement to the yeasty, buttery flavor of the donut.
Korean Twisted Donuts (Kkwabaegi): The Complete Recipe
This recipe will yield about a dozen incredibly chewy, soft, and delicious donuts.
Ingredients
- 2 ½ cups (320g) bread flour
- 1/2 cup (80g) glutinous sweet rice flour (Mochiko)
- 1/4 cup (50g) granulated sugar
- 1 teaspoon salt
- 2 ¼ teaspoons (7g, or 1 packet) instant yeast
- 1 cup (240ml) whole milk, lukewarm (around 110°F / 43°C)
- 1 large egg, at room temperature
- 4 tablespoons (57g) unsalted butter, softened to room temperature
- 6-8 cups neutral oil, for frying (e.g., canola, vegetable, or peanut oil)
For the Cinnamon-Sugar Coating:
- 1 cup (200g) granulated sugar
- 2 teaspoons ground cinnamon
Step-by-Step Instructions
The process is straightforward and can be broken down into four main stages: making the dough, proofing, shaping, and frying.
Part 1: Making and Kneading the Dough
- Combine Dry Ingredients: In the bowl of a stand mixer fitted with the dough hook, whisk together the bread flour, sweet rice flour, granulated sugar, salt, and instant yeast.
- Add Wet Ingredients: In a separate small bowl, whisk together the lukewarm milk and the egg. Pour this wet mixture into the dry ingredients.
- Mix and Knead: Turn the mixer on low speed and mix until a shaggy dough forms. Add the softened butter, one tablespoon at a time, waiting until each piece is incorporated before adding the next. Once all the butter is added, increase the speed to medium and knead for 8-10 minutes. The dough should become smooth, elastic, and pull away from the sides of the bowl. It will be soft and slightly tacky. (You can also do this by hand on a lightly floured surface; it will take about 15-20 minutes of kneading).
Part 2: The First Proof (The Rise)
- Form and Rest: Lightly grease a large bowl with oil. Form the dough into a smooth ball and place it in the bowl, turning it once to coat it lightly with oil.
- Let it Rise: Cover the bowl with plastic wrap or a damp kitchen towel. Place it in a warm, draft-free spot and let it rise for 1 to 1.5 hours, or until it has doubled in size.
Part 3: Shaping the Twists
- Degas and Divide: Gently punch down the risen dough to release the air. Transfer it to a lightly floured surface and divide it into 12 equal pieces (each should be about 55-60g).
- Roll into Ropes: Roll each piece of dough into a long rope, about 10-12 inches long. Let the ropes rest for 5 minutes; this allows the gluten to relax, making them easier to twist.
- Create the Twist: Take one rope of dough. Fold it in half. Hold the looped end with one hand and use your other hand to twist the two strands together a few times. Finally, take the two loose ends and pass them through the loop, gently pinching to seal. Place the shaped donut on a parchment-lined baking sheet. Repeat with the remaining dough, spacing them a few inches apart.
Part 4: The Second Proof and Frying to Perfection
- The Final Rest: Cover the shaped donuts loosely with plastic wrap and let them rest in a warm place for another 30-45 minutes, or until they look visibly puffy.
- Heat the Oil: While the donuts are proofing, pour the oil into a large, heavy-bottomed pot or Dutch oven. The oil should be at least 2-3 inches deep. Heat the oil over medium heat to 350°F (175°C). Use a candy or deep-fry thermometer for accuracy.
- Fry in Batches: Carefully place 2-3 donuts at a time into the hot oil. Do not overcrowd the pot. Fry for 1-2 minutes per side, or until they are a deep golden brown.
- Drain and Coat: Use a spider strainer or slotted spoon to remove the donuts from the oil and place them on a wire rack to drain for about 30 seconds. While they are still hot, toss them generously in the prepared cinnamon-sugar mixture until fully coated.
- Serve: These are best enjoyed warm and fresh!
Essential Recipe Information
Preparation Time
- Active Time: 30 minutes
- Proofing Time: Approximately 2 hours
- Cook Time: 15 minutes
- Total Time: Approximately 2 hours 45 minutes
Nutrition Facts
- Servings: 12 donuts
- Calories per serving (1 donut): Approximately 350-400 calories
Disclaimer: This is an estimate and will vary based on the amount of oil absorbed during frying and the amount of sugar coating.
How to Serve Your Kkwabaegi
While incredible on their own, here are a few ways to serve and enjoy your freshly made Korean Twisted Donuts.
- The Classic Cinnamon-Sugar Coat:
- This is the most traditional and beloved coating. Simply mix the granulated sugar and cinnamon in a wide, shallow bowl or dish, making it easy to toss the warm donuts.
- Simple Sugar Dusting:
- For a cleaner, simpler sweetness, you can skip the cinnamon and toss the warm donuts in plain granulated sugar. The crystals will sparkle beautifully on the golden-brown crust.
- A Light Glaze:
- For a modern twist, you can skip the sugar coating and opt for a simple glaze. Whisk together 1 cup of powdered sugar with 2-3 tablespoons of milk and a splash of vanilla extract until smooth. Drizzle over the completely cooled donuts.
- Perfect Pairings:
- Coffee: A hot cup of black coffee or an Americano is the perfect bitter counterpoint to the sweet, rich donut.
- Milk: A cold glass of milk and a warm Kkwabaegi is a combination that brings pure, simple joy, perfect for kids and adults alike.
- Tea: Enjoy with a cup of Korean barley tea (boricha) for a truly authentic experience.
Additional Tips for Donut Domination
Follow these five tips to ensure your Kkwabaegi turn out perfectly puffy, chewy, and delicious every single time.
- Monitor Your Temperatures Closely: Yeast and hot oil both require specific temperature ranges to work their magic. Use a thermometer! Your milk for the yeast should be lukewarm (105-115°F), not hot, or it will kill the yeast. Your frying oil must be maintained at 350°F. If the oil is too cool, the donuts will absorb too much oil and become greasy. If it’s too hot, the outside will burn before the inside is cooked through.
- Don’t Underestimate the Kneading: Kneading is what develops the gluten that is essential for the chewy texture. Knead the dough until it is very smooth and elastic. You should be able to perform the “windowpane test”: take a small piece of dough and gently stretch it between your fingers. It should stretch thin enough to be translucent without tearing.
- The Second Proof is Crucial: Don’t skip the second proof after shaping the donuts. This final rest allows the yeast to work again, making the donuts light, airy, and puffy when they hit the hot oil. An under-proofed donut will be dense and heavy.
- Don’t Overcrowd the Pot: Frying in small batches of 2-3 donuts at a time is key. Adding too many donuts at once will cause the oil temperature to drop dramatically. This leads to longer cooking times and donuts that are saturated with oil instead of being light and crispy on the outside.
- Coat the Donuts While They Are Still Warm: The magic of a perfect sugar coating happens when the donut is still warm from the fryer. The residual heat and tiny bit of oil on the surface will help the cinnamon-sugar mixture adhere perfectly. If you wait until they are completely cool, the sugar won’t stick nearly as well.
Frequently Asked Questions (FAQ)
1. Can I make these donuts in an air fryer?
You can, but it’s important to manage expectations. An air-fried Kkwabaegi will not have the same texture as a deep-fried one. It will be more like a soft, baked breadstick. To try it, lightly brush the proofed donuts with melted butter and air fry at 350°F (175°C) for 6-8 minutes, flipping halfway through, until golden brown.
2. My dough didn’t rise. What went wrong?
This is a common yeast dough issue. The most likely culprits are: 1) Your yeast was expired or “dead.” 2) The milk was too hot and killed the yeast. 3) The room where you were proofing the dough was too cold. Yeast loves a warm, cozy environment to thrive.
3. What is the best way to store leftover Kkwabaegi?
Like most donuts, Kkwabaegi are best eaten on the day they are made, preferably while still warm. If you have leftovers, store them in an airtight container at room temperature for up to 2 days. You can refresh them by warming them in a microwave for 10-15 seconds to soften them up again.
4. Can I prepare the dough in advance?
Yes. You can do the first proof in the refrigerator for a slower rise. After kneading, place the dough in a greased bowl, cover it, and refrigerate for up to 24 hours. The cold will slow down the yeast’s activity. When you’re ready to proceed, let the dough sit at room temperature for about 30-60 minutes to take the chill off before shaping, proofing, and frying as directed.
5. I can’t find glutinous sweet rice flour. Can I use regular rice flour?
Unfortunately, no. Regular rice flour and glutinous sweet rice flour are not interchangeable. They have very different starch properties. Regular rice flour will result in a dry, gritty texture. If you want that signature chewiness, you must use glutinous sweet rice flour (Mochiko). It is available at most Asian markets and online.
Korean Twisted Donut recipe
Ingredients
-
2 ½ cups (320g) bread flour
-
1/2 cup (80g) glutinous sweet rice flour (Mochiko)
-
1/4 cup (50g) granulated sugar
-
1 teaspoon salt
-
2 ¼ teaspoons (7g, or 1 packet) instant yeast
-
1 cup (240ml) whole milk, lukewarm (around 110°F / 43°C)
-
1 large egg, at room temperature
-
4 tablespoons (57g) unsalted butter, softened to room temperature
-
6-8 cups neutral oil, for frying (e.g., canola, vegetable, or peanut oil)
For the Cinnamon-Sugar Coating:
-
1 cup (200g) granulated sugar
-
2 teaspoons ground cinnamon
Instructions
Part 1: Making and Kneading the Dough
-
Combine Dry Ingredients: In the bowl of a stand mixer fitted with the dough hook, whisk together the bread flour, sweet rice flour, granulated sugar, salt, and instant yeast.
-
Add Wet Ingredients: In a separate small bowl, whisk together the lukewarm milk and the egg. Pour this wet mixture into the dry ingredients.
-
Mix and Knead: Turn the mixer on low speed and mix until a shaggy dough forms. Add the softened butter, one tablespoon at a time, waiting until each piece is incorporated before adding the next. Once all the butter is added, increase the speed to medium and knead for 8-10 minutes. The dough should become smooth, elastic, and pull away from the sides of the bowl. It will be soft and slightly tacky. (You can also do this by hand on a lightly floured surface; it will take about 15-20 minutes of kneading).
Part 2: The First Proof (The Rise)
-
Form and Rest: Lightly grease a large bowl with oil. Form the dough into a smooth ball and place it in the bowl, turning it once to coat it lightly with oil.
-
Let it Rise: Cover the bowl with plastic wrap or a damp kitchen towel. Place it in a warm, draft-free spot and let it rise for 1 to 1.5 hours, or until it has doubled in size.
Part 3: Shaping the Twists
-
Degas and Divide: Gently punch down the risen dough to release the air. Transfer it to a lightly floured surface and divide it into 12 equal pieces (each should be about 55-60g).
-
Roll into Ropes: Roll each piece of dough into a long rope, about 10-12 inches long. Let the ropes rest for 5 minutes; this allows the gluten to relax, making them easier to twist.
-
Create the Twist: Take one rope of dough. Fold it in half. Hold the looped end with one hand and use your other hand to twist the two strands together a few times. Finally, take the two loose ends and pass them through the loop, gently pinching to seal. Place the shaped donut on a parchment-lined baking sheet. Repeat with the remaining dough, spacing them a few inches apart.
Part 4: The Second Proof and Frying to Perfection
-
The Final Rest: Cover the shaped donuts loosely with plastic wrap and let them rest in a warm place for another 30-45 minutes, or until they look visibly puffy.
-
Heat the Oil: While the donuts are proofing, pour the oil into a large, heavy-bottomed pot or Dutch oven. The oil should be at least 2-3 inches deep. Heat the oil over medium heat to 350°F (175°C). Use a candy or deep-fry thermometer for accuracy.
-
Fry in Batches: Carefully place 2-3 donuts at a time into the hot oil. Do not overcrowd the pot. Fry for 1-2 minutes per side, or until they are a deep golden brown.
-
Drain and Coat: Use a spider strainer or slotted spoon to remove the donuts from the oil and place them on a wire rack to drain for about 30 seconds. While they are still hot, toss them generously in the prepared cinnamon-sugar mixture until fully coated.
-
Serve: These are best enjoyed warm and fresh!
Nutrition
- Serving Size: one normal portion
- Calories: 350-400


