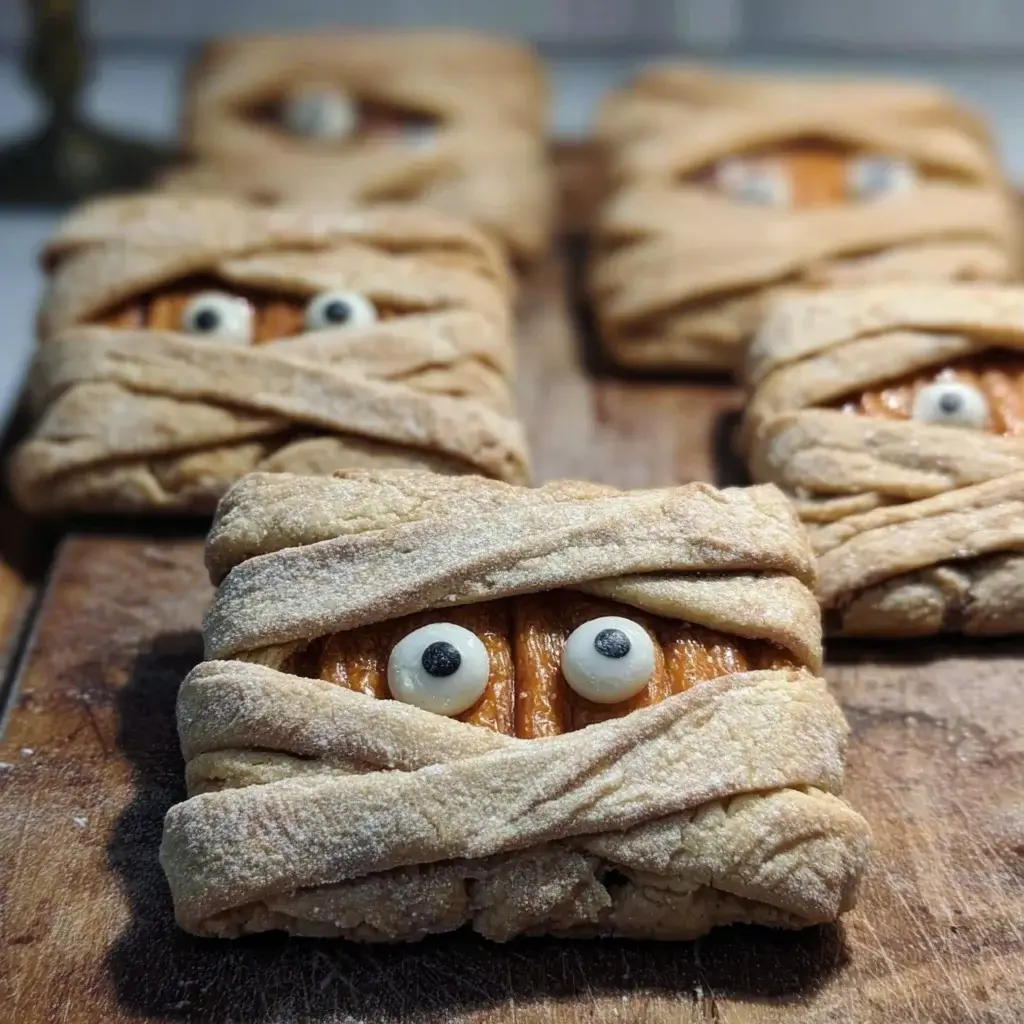

There’s a specific kind of magic that fills the kitchen in October. It’s a mix of crisp autumn air drifting through an open window and the warm, comforting scent of spices baking in the oven. For our family, the official start of the Halloween season isn’t marked by the first pumpkin spice latte, but by the day we make our Mummy Pumpkin Cookies. I still remember the first time I baked these with my kids. Their little hands, dusted with flour, carefully dropping mounds of the vibrant orange dough onto the baking sheet. The real fun, however, began after the cookies cooled. Their giggles of delight as they drizzled the “mummy bandages” of cream cheese frosting back and forth, and the serious concentration it took to place the candy eyeballs just right, was priceless. The result was a tray of the most adorable, slightly chaotic, and utterly delicious mummies I had ever seen. These cookies are more than just a treat; they are a tradition, an activity, and the perfect embodiment of fall. They are incredibly soft and cake-like, bursting with pumpkin and spice, and topped with a tangy cream cheese frosting that perfectly cuts through the sweetness. They are, without a doubt, our favorite way to bake up some spooky spirit.
Why These Mummy Pumpkin Cookies Will Haunt Your Dreams (In a Good Way!)
This isn’t just another cookie recipe; it’s a full-blown Halloween experience. From the irresistible flavor to the fun-filled decorating process, here’s why you and your family will fall head over heels for these spooky sweets.
- The Perfect Texture: Forget dry, crumbly cookies. These are the epitome of a soft-baked cookie. Thanks to the pumpkin puree, they have a moist, pillowy, almost cake-like texture that melts in your mouth. Each bite is a soft, comforting cloud of deliciousness.
- A Symphony of Fall Flavors: The heart of this cookie is the perfect balance of sweet pumpkin and warm, aromatic spices. We’re talking cinnamon, nutmeg, ginger, and cloves all working in harmony. Paired with the tangy, rich cream cheese frosting, it creates a flavor profile that is complex, comforting, and quintessentially autumn.
- An Adorable, Festive Design: Let’s be honest, they are ridiculously cute! The “mummy wrap” design is incredibly simple to achieve but looks impressively festive. They are the perfect centerpiece for a Halloween party dessert table or a spook-tacular addition to a school bake sale.
- A Fun Activity for All Ages: This is the ideal recipe to get kids involved in the kitchen. They can help mix the dough, scoop the cookies, and, of course, take charge of the decorating. Drizzling the frosting and placing the candy eyes is a low-mess, high-fun activity that lets everyone’s creativity shine.
- No-Chill Dough for Quick Gratification: Many cookie recipes require you to chill the dough for hours, which can be a real test of patience, especially with excited little helpers. This recipe uses a “drop cookie” style dough that requires no chilling. You can go from mixing bowl to oven to cooling rack in under 30 minutes, meaning you get to the fun decorating part that much faster!
Gather Your Potion Ingredients: A Complete List
Before you begin your baking adventure, gather all the necessary components. Using high-quality ingredients and ensuring they are at the correct temperature will guarantee the best results.
For the Soft Pumpkin Cookies (Yields approx. 24-30 cookies):
- 2 ½ cups (300g) all-purpose flour
- 1 teaspoon baking soda
- 1 teaspoon baking powder
- 1 ½ teaspoons ground cinnamon
- 1 teaspoon ground ginger
- ½ teaspoon ground nutmeg
- ¼ teaspoon ground cloves
- ½ teaspoon salt
- ½ cup (113g) unsalted butter, softened to room temperature
- 1 cup (200g) granulated sugar
- ½ cup (100g) packed light brown sugar
- 1 cup (245g) pumpkin puree (100% pure pumpkin, not pumpkin pie filling)
- 1 large egg, at room temperature
- 1 teaspoon pure vanilla extract
For the Tangy Cream Cheese Frosting and Decoration:
- 4 oz (113g) full-fat block cream cheese, softened to room temperature
- ¼ cup (57g) unsalted butter, softened to room temperature
- 1 ½ – 2 cups (180-240g) powdered sugar, sifted
- ½ teaspoon pure vanilla extract
- A pinch of salt
- Candy eyeballs (small size works best)
The Spellbook: Step-by-Step Baking Instructions
Follow these detailed instructions carefully to conjure up the most perfect batch of Mummy Pumpkin Cookies. We’ll break the process into two main parts: baking the cookies and then bringing them to life with decoration.
Part 1: Baking the Soft Pumpkin Cookies
- Preheat and Prepare: Preheat your oven to 350°F (175°C). Line two large baking sheets with parchment paper or silicone baking mats. This prevents sticking and ensures even baking.
- Combine Dry Ingredients: In a medium bowl, whisk together the all-purpose flour, baking soda, baking powder, cinnamon, ginger, nutmeg, cloves, and salt. Whisking thoroughly ensures the leavening agents and spices are evenly distributed, which is key to a consistent cookie. Set this bowl aside.
- Cream Butter and Sugars: In the bowl of a stand mixer fitted with the paddle attachment, or in a large bowl with a hand mixer, beat the softened butter, granulated sugar, and brown sugar on medium-high speed until the mixture is light, pale, and fluffy. This should take about 2-3 minutes. This step incorporates air into the dough, which is crucial for a soft texture.
- Add Wet Ingredients: Add the pumpkin puree, room temperature egg, and vanilla extract to the creamed butter and sugar mixture. Beat on medium speed until everything is well combined. The mixture might look slightly curdled or separated at this point due to the high water content of the pumpkin – this is completely normal.
- Combine Wet and Dry: Reduce the mixer speed to low and gradually add the dry ingredient mixture to the wet ingredients. Mix only until the flour is just combined. Be careful not to overmix! Overmixing develops the gluten in the flour, which can lead to tough, dense cookies instead of soft, cake-like ones.
- Scoop and Bake: Using a medium cookie scoop (about 1.5 tablespoons) or two spoons, drop rounded mounds of dough onto the prepared baking sheets, leaving about 2 inches of space between each cookie. They will spread slightly, but not a huge amount.
- Bake to Perfection: Bake for 12-15 minutes, or until the edges are set and a toothpick inserted into the center of a cookie comes out clean or with moist crumbs attached. The tops should look puffy and feel firm to a light touch.
- Cool Completely: Let the cookies cool on the baking sheets for 5 minutes before transferring them to a wire rack to cool completely. It is essential that the cookies are 100% cool before you attempt to frost them, otherwise the frosting will melt right off.
Part 2: Decorating Your Mummies
This is where the real fun begins!
- Prepare the Frosting: While the cookies are cooling, make the cream cheese frosting. In a clean mixing bowl, beat the softened cream cheese and softened butter together on medium-high speed until smooth and creamy, with no lumps.
- Add Sugar and Flavor: Reduce the mixer speed to low and gradually add the sifted powdered sugar. Start with 1 ½ cups. Once incorporated, add the vanilla extract and a pinch of salt. Increase the speed to medium-high and beat until the frosting is light and fluffy. If the frosting is too thin, add more powdered sugar, a tablespoon at a time, until it reaches a good piping consistency. It should be thick enough to hold its shape but not so stiff that it’s hard to pipe.
- Set Up for Decorating: Transfer the frosting to a piping bag fitted with a small, flat tip (like a basketweave tip, Wilton #44) or a small round tip. If you don’t have a piping bag, you can use a zip-top plastic bag and snip a tiny corner off.
- Apply the “Glue”: For each cookie, dab a tiny bit of frosting onto the back of two candy eyeballs and press them gently onto the cookie, usually towards the top third. This little bit of frosting acts as glue to hold them in place.
- Create the Bandages: Now, pipe the frosting back and forth over the cookie in random, overlapping lines to create the look of mummy bandages. Go across, diagonally, and vary the spacing. Leave a little space around the eyes so they can peek through. There’s no right or wrong way to do this – have fun and make each mummy unique!
- Let Them Set: Allow the frosting to set for about 30 minutes before stacking or serving the cookies. This will help the design stay intact.
Nutrition Facts
- Servings: Approximately 2 dozen (24) cookies
- Calories per serving (1 cookie): Approximately 180-210 kcal
Disclaimer: The nutritional information provided is an estimate and can vary based on the specific ingredients used, the exact size of the cookies, and the amount of frosting applied.
Preparation Time
- Prep Time: 20 minutes
- Cook Time: 15 minutes (per batch)
- Decorating Time: 20 minutes
- Total Time: Approximately 1 hour (plus cooling time)
How to Serve and Present Your Mummy Cookies
Your adorable mummies deserve a grand entrance! Here are some fun and festive ways to serve them at your Halloween gathering.
- The Mummy’s Tomb Platter: Arrange the cookies on a dark-colored or black serving platter. Crumble some chocolate wafer cookies (like Oreos with the filling removed) around them to look like “dirt,” creating a spooky graveyard or tomb scene.
- Paired with a Witch’s Brew: These cookies are the perfect accompaniment to a warm autumn beverage. Serve them alongside:
- Hot or cold apple cider
- A warm mug of hot chocolate
- A pumpkin spice latte for the adults
- A simple glass of cold milk for the kids
- Halloween Dessert Board: Create an epic dessert charcuterie board. Place your mummy cookies as the centerpiece and surround them with other Halloween treats like candy corn, gummy worms, chocolate spiders, orange and black M&Ms, and small bowls of caramel or chocolate dip.
- Individual Party Favors: Wrap two or three cookies in a clear cellophane bag tied with a festive orange and black ribbon. They make fantastic, homemade party favors for guests to take home.
Additional Tips for Perfect Pumpkin Mummies
Unlock the secrets to flawless Halloween cookies with these five expert tips.
- Measure Your Flour Correctly: The most common baking mistake is using too much flour, which leads to dry, dense cookies. Instead of scooping directly from the bag, use the “spoon and level” method. Use a spoon to fluff up the flour in its container, then spoon it into your measuring cup until it’s overflowing. Use the back of a knife to level it off. This ensures a much more accurate measurement and guarantees a soft, cakey texture.
- Use 100% Pure Pumpkin, Not Pie Filling: This is crucial! Pumpkin pie filling comes pre-sweetened and pre-spiced, which will throw off the flavor and sugar content of your cookies. Make sure the can says “100% Pure Pumpkin” or “Pumpkin Puree.”
- Room Temperature is a Non-Negotiable: For the cookie dough and the frosting, having your butter, egg, and cream cheese at true room temperature is vital. Cold ingredients don’t emulsify properly, which can lead to a lumpy frosting or a dense cookie crumb. Take them out of the fridge at least an hour before you begin baking.
- Don’t Skimp on the Spices: The blend of cinnamon, ginger, nutmeg, and cloves is what gives these cookies their signature warm, cozy flavor. If you’re in a pinch, you can substitute the individual spices with 2 ½ to 3 teaspoons of a pre-made pumpkin pie spice blend.
- Achieve the Perfect Frosting Drizzle: If you don’t have a piping bag, a small zip-top bag works great. For clean, defined “bandage” lines, make sure your snip in the corner is very small. You can always make it bigger if needed. For a flatter, more ribbon-like effect, use scissors to snip a tiny horizontal slit instead of just cutting the corner off.
Frequently Asked Questions (FAQ)
Here are answers to some of the most common questions about making these Mummy Pumpkin Cookies.
1. My cookies spread too much and are flat. What went wrong?
Flat cookies are usually caused by a few things. The most likely culprit is butter that was too soft or melted. It should be at room temperature but still hold its shape. Another reason could be an imbalance in the wet-to-dry ingredients (often from inaccurately measured flour). Finally, baking on a hot or warm baking sheet can cause the butter in the dough to melt too quickly, leading to spread. Always let your baking sheets cool completely between batches.
2. Can I make the cookie dough ahead of time?
Yes, you can! Although this is a no-chill recipe, the dough can be made ahead and refrigerated. Prepare the dough as directed, then cover the bowl tightly with plastic wrap and store it in the refrigerator for up to 3 days. When you’re ready to bake, the dough will be firm, so you may need to let it sit at room temperature for about 20-30 minutes to make it easier to scoop.
3. I don’t have all the individual spices. Can I just use pumpkin pie spice?
Absolutely. Pumpkin pie spice is simply a blend of the spices listed in the recipe. As a general substitution, you can replace the cinnamon, ginger, nutmeg, and cloves with 2 ½ teaspoons of pumpkin pie spice. You can add another ½ teaspoon if you like a very spice-forward cookie.
4. How should I store the finished cookies?
Because of the cream cheese frosting, these cookies should be stored in the refrigerator. Place them in a single layer in an airtight container. If you need to stack them, place a sheet of parchment paper between the layers to prevent the mummies from sticking to each other. They will stay fresh and soft in the fridge for up to 5 days. They taste best when brought to room temperature for about 15 minutes before serving.
5. Can I freeze these cookies?
Yes, these cookies freeze beautifully! You have two options:
- Freeze Unfrosted Cookies: Bake the cookies as directed and let them cool completely. Place them in a freezer-safe bag or container and freeze for up to 3 months. When you’re ready to decorate, thaw them at room temperature, then make the frosting and decorate as usual. This is the best method for preserving the texture.
- Freeze Frosted Cookies: Decorate the cookies and place them on a baking sheet in a single layer. “Flash freeze” them for about an hour until the frosting is solid. Then, you can carefully stack them in a freezer-safe container with parchment paper between the layers. They will keep for up to 2 months. Thaw in the refrigerator or on the counter before serving.

Mummy Pumpkin Cookies recipe
Ingredients
For the Soft Pumpkin Cookies (Yields approx. 24-30 cookies):
-
2 ½ cups (300g) all-purpose flour
-
1 teaspoon baking soda
-
1 teaspoon baking powder
-
1 ½ teaspoons ground cinnamon
-
1 teaspoon ground ginger
-
½ teaspoon ground nutmeg
-
¼ teaspoon ground cloves
-
½ teaspoon salt
-
½ cup (113g) unsalted butter, softened to room temperature
-
1 cup (200g) granulated sugar
-
½ cup (100g) packed light brown sugar
-
1 cup (245g) pumpkin puree (100% pure pumpkin, not pumpkin pie filling)
-
1 large egg, at room temperature
-
1 teaspoon pure vanilla extract
For the Tangy Cream Cheese Frosting and Decoration:
-
4 oz (113g) full-fat block cream cheese, softened to room temperature
-
¼ cup (57g) unsalted butter, softened to room temperature
-
1 ½ – 2 cups (180-240g) powdered sugar, sifted
-
½ teaspoon pure vanilla extract
-
A pinch of salt
-
Candy eyeballs (small size works best)
Instructions
Part 1: Baking the Soft Pumpkin Cookies
-
Preheat and Prepare: Preheat your oven to 350°F (175°C). Line two large baking sheets with parchment paper or silicone baking mats. This prevents sticking and ensures even baking.
-
Combine Dry Ingredients: In a medium bowl, whisk together the all-purpose flour, baking soda, baking powder, cinnamon, ginger, nutmeg, cloves, and salt. Whisking thoroughly ensures the leavening agents and spices are evenly distributed, which is key to a consistent cookie. Set this bowl aside.
-
Cream Butter and Sugars: In the bowl of a stand mixer fitted with the paddle attachment, or in a large bowl with a hand mixer, beat the softened butter, granulated sugar, and brown sugar on medium-high speed until the mixture is light, pale, and fluffy. This should take about 2-3 minutes. This step incorporates air into the dough, which is crucial for a soft texture.
-
Add Wet Ingredients: Add the pumpkin puree, room temperature egg, and vanilla extract to the creamed butter and sugar mixture. Beat on medium speed until everything is well combined. The mixture might look slightly curdled or separated at this point due to the high water content of the pumpkin – this is completely normal.
-
Combine Wet and Dry: Reduce the mixer speed to low and gradually add the dry ingredient mixture to the wet ingredients. Mix only until the flour is just combined. Be careful not to overmix! Overmixing develops the gluten in the flour, which can lead to tough, dense cookies instead of soft, cake-like ones.
-
Scoop and Bake: Using a medium cookie scoop (about 1.5 tablespoons) or two spoons, drop rounded mounds of dough onto the prepared baking sheets, leaving about 2 inches of space between each cookie. They will spread slightly, but not a huge amount.
-
Bake to Perfection: Bake for 12-15 minutes, or until the edges are set and a toothpick inserted into the center of a cookie comes out clean or with moist crumbs attached. The tops should look puffy and feel firm to a light touch.
-
Cool Completely: Let the cookies cool on the baking sheets for 5 minutes before transferring them to a wire rack to cool completely. It is essential that the cookies are 100% cool before you attempt to frost them, otherwise the frosting will melt right off.
Part 2: Decorating Your Mummies
This is where the real fun begins!
-
Prepare the Frosting: While the cookies are cooling, make the cream cheese frosting. In a clean mixing bowl, beat the softened cream cheese and softened butter together on medium-high speed until smooth and creamy, with no lumps.
-
Add Sugar and Flavor: Reduce the mixer speed to low and gradually add the sifted powdered sugar. Start with 1 ½ cups. Once incorporated, add the vanilla extract and a pinch of salt. Increase the speed to medium-high and beat until the frosting is light and fluffy. If the frosting is too thin, add more powdered sugar, a tablespoon at a time, until it reaches a good piping consistency. It should be thick enough to hold its shape but not so stiff that it’s hard to pipe.
-
Set Up for Decorating: Transfer the frosting to a piping bag fitted with a small, flat tip (like a basketweave tip, Wilton #44) or a small round tip. If you don’t have a piping bag, you can use a zip-top plastic bag and snip a tiny corner off.
-
Apply the “Glue”: For each cookie, dab a tiny bit of frosting onto the back of two candy eyeballs and press them gently onto the cookie, usually towards the top third. This little bit of frosting acts as glue to hold them in place.
-
Create the Bandages: Now, pipe the frosting back and forth over the cookie in random, overlapping lines to create the look of mummy bandages. Go across, diagonally, and vary the spacing. Leave a little space around the eyes so they can peek through. There’s no right or wrong way to do this – have fun and make each mummy unique!
-
Let Them Set: Allow the frosting to set for about 30 minutes before stacking or serving the cookies. This will help the design stay intact.
Nutrition
- Serving Size: one normal portion
- Calories: 180-210 kcal