Ingredients
Scale
-
- 2 ½ cups (300g) all-purpose flour, spooned and leveled
-
- 2 tablespoons high-quality culinary grade matcha powder (sifted)
-
- 1 ½ teaspoons baking powder
-
- ½ teaspoon baking soda
-
- ½ teaspoon salt
-
- 1 cup (227g) unsalted butter, softened to room temperature
-
- 1 ¾ cups (350g) granulated sugar
-
- 4 large eggs, at room temperature
-
- 1 teaspoon vanilla extract
-
- 1 cup (240ml) buttermilk, at room temperature (see notes for substitute)
-
- Optional: 1-2 drops of green food coloring (if you desire a more intense green, though good matcha often suffices)
For the Vanilla Bean Frosting:
-
- 1 ½ cups (340g) unsalted butter, softened to room temperature
-
- 3–4 cups (360-480g) powdered sugar, sifted
-
- 1 vanilla bean, seeds scraped (or 2 teaspoons high-quality vanilla extract/paste)
-
- 2–4 tablespoons heavy cream or milk, at room temperature
-
- Pinch of salt
Instructions
-
- Preheat and Prepare Pans: Preheat your oven to 350°F (175°C). Grease and flour two 8-inch round cake pans. Alternatively, line the bottoms with parchment paper circles and grease the sides.
-
- Sift Dry Ingredients: In a medium bowl, whisk together the all-purpose flour, sifted matcha powder, baking powder, baking soda, and salt. Set aside.
-
- Cream Butter and Sugar: In a large bowl using a stand mixer fitted with a paddle attachment, or a hand mixer, beat the softened butter on medium speed until creamy, about 1-2 minutes. Gradually add the granulated sugar and continue to beat on medium-high speed for 3-5 minutes, or until light and fluffy. Scrape down the sides and bottom of the bowl as needed.
-
- Add Eggs and Vanilla: Add the eggs one at a time, beating well after each addition until fully incorporated. Beat in the vanilla extract (and green food coloring, if using). The mixture might look slightly curdled at this stage; this is okay.
-
- Alternate Dry and Wet Ingredients: With the mixer on low speed, add the dry ingredients in three additions, alternating with the buttermilk in two additions, beginning and ending with the dry ingredients. (Dry -> Buttermilk -> Dry -> Buttermilk -> Dry). Mix until just combined after each addition. Be careful not to overmix, as this can lead to a tough cake. Scrape down the sides and bottom of the bowl to ensure everything is incorporated.
-
- Divide Batter and Bake: Evenly divide the batter between the two prepared cake pans. Smooth the tops with an offset spatula.
-
- Bake for 30-35 minutes, or until a wooden skewer or toothpick inserted into the center of the cakes comes out clean or with a few moist crumbs attached. The tops should spring back when lightly touched.
-
- Cool Cakes: Let the cakes cool in their pans on a wire rack for 10-15 minutes. Then, carefully invert the cakes onto the wire rack, remove the parchment paper (if used), and let them cool completely before frosting (at least 1-2 hours). Level the tops of the cakes with a serrated knife if they have domed significantly.
Part 2: Making the Vanilla Bean Frosting
-
- Beat Butter: In a large bowl using a stand mixer with the paddle attachment or a hand mixer, beat the softened butter on medium speed until very pale and creamy, about 3-5 minutes. This step is crucial for a light and fluffy frosting.
-
- Add Vanilla and Salt: Add the scraped vanilla bean seeds (or vanilla extract/paste) and pinch of salt. Beat to combine.
-
- Gradually Add Powdered Sugar: With the mixer on low speed, gradually add the sifted powdered sugar, one cup at a time, mixing until smooth after each addition. Once all the sugar is incorporated, increase the speed to medium-high and beat for another 2-3 minutes until light and fluffy.
-
- Adjust Consistency: Add the heavy cream or milk, 1 tablespoon at a time, beating until the frosting reaches your desired spreading consistency. It should be smooth, creamy, and spreadable but still hold its shape. If it’s too thick, add a bit more cream/milk; if too thin, add a bit more powdered sugar.
Part 3: Assembling the Matcha Cake
-
- Level Cakes (if needed): If your cake layers have domed, use a long serrated knife to carefully trim the tops so they are flat. This ensures a stable, even layer cake.
-
- First Layer: Place one cake layer, top-side down (flat side up), onto a cake stand or serving plate.
-
- Frost First Layer: Spread about 1 to 1 ½ cups of the vanilla bean frosting evenly over the top of the first cake layer using an offset spatula.
-
- Add Second Layer: Carefully place the second cake layer, top-side down, on top of the frosting. Gently press down to secure it.
-
- Crumb Coat (Optional but Recommended): Apply a thin, even layer of frosting over the entire cake (top and sides). This is called a crumb coat and it traps any loose crumbs, making the final coat of frosting smoother. Refrigerate the crumb-coated cake for 20-30 minutes to allow the frosting to set.
-
- Final Frosting: Once the crumb coat is set, apply the remaining frosting to the top and sides of the cake, using an offset spatula or a bench scraper for smooth sides. You can create swirls on top or keep it sleek and smooth.
-
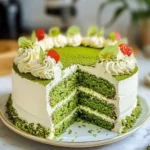
- Garnish (Optional): Garnish the cake as desired. A light dusting of matcha powder, fresh berries, white chocolate shavings, or edible flowers all look beautiful.
-
- Chill (Optional): For cleaner slices, you can chill the frosted cake in the refrigerator for at least 30 minutes before slicing and serving. However, cake is generally best enjoyed at room temperature for optimal flavour and texture.
Nutrition
- Serving Size: one normal portion
- Calories: 450-650