


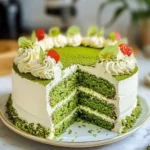
The first time I encountered a truly exceptional Matcha Cake, it was a revelation. I’d always been a fan of matcha lattes, drawn to that unique, slightly grassy, and umami-rich flavour. But in a cake? I was intrigued. The slice that arrived was a vision: a soft, tender crumb of the most beautiful, vibrant green, layered with a subtly sweet cream cheese frosting that perfectly complemented the earthy notes of the green tea. The aroma alone was intoxicating – a delicate blend of sweet vanilla and fresh matcha. My family, initially a little skeptical of a “green cake,” were instant converts from the first bite. It wasn’t just the stunning color; it was the sophisticated flavour profile, a delightful departure from overly sweet, conventional cakes. Since then, matcha cake has become a cherished favorite in our household, a go-to for special occasions or simply when we crave something uniquely delicious and visually stunning. It’s a cake that always sparks conversation and leaves everyone wanting just one more slice.
Unveiling the Magic: What Makes Matcha Cake So Special?
Matcha, a finely ground powder of specially grown and processed green tea leaves, has been a cornerstone of Japanese tea ceremonies for centuries. Its journey into the culinary world, particularly in desserts, has been a global phenomenon, and matcha cake stands as one of its most beloved ambassadors. But what exactly makes this verdant confection so captivating?
Firstly, it’s the unique flavour profile. Matcha imparts a complex taste that is simultaneously earthy, grassy, slightly bitter (in a pleasant way, akin to dark chocolate or coffee), and subtly sweet, with a lingering umami richness. When balanced correctly in a cake, these notes create a sophisticated flavour that is less saccharine than many traditional cakes, appealing to a more mature palate while still delighting those with a sweet tooth.
Secondly, the vibrant, natural color is undeniably alluring. The intense green hue, ranging from a delicate jade to a deep emerald depending on the quality and quantity of matcha used, makes for a visually stunning dessert without the need for artificial food coloring. This natural beauty adds an element of elegance and intrigue.
Thirdly, matcha is renowned for its health benefits. Rich in antioxidants, particularly catechins like EGCG (epigallocatechin gallate), L-theanine (an amino acid known for promoting relaxation and focus), and chlorophyll, matcha brings more than just flavour and color to the table. While a slice of cake isn’t a health food, the inclusion of matcha adds a perceived (and to some extent, actual) nutritional boost that many find appealing.
The versatility of matcha cake is another part of its charm. It can take many forms: a light and airy chiffon cake, a moist and tender layer cake, a delicate sponge for roll cakes (Swiss rolls), or even dense, fudgy brownies. The frosting pairings are equally varied, from classic vanilla buttercream or cream cheese frosting to white chocolate ganache, whipped cream, or even a red bean (azuki) paste filling – a traditional Japanese complement.
Baking with matcha does require some understanding. The quality of the matcha powder is paramount. Culinary grade matcha is typically recommended for baking, as it has a stronger, more robust flavour designed to stand up to other ingredients, and it’s more cost-effective than ceremonial grade, which is intended for drinking. Sifting the matcha powder is also crucial to prevent clumps and ensure an even distribution of colour and flavour.
Ultimately, matcha cake is special because it offers a harmonious blend of tradition and modernity, health and indulgence, visual appeal and complex flavour. It’s a dessert that tells a story, inviting you to savor a taste of Japanese culture in a delightful, sweet form.
The Ultimate Matcha Layer Cake with Vanilla Bean Frosting
This recipe yields a moist, tender matcha layer cake with a delicate green tea flavour, perfectly complemented by a smooth and luxurious vanilla bean frosting.
Yields: 10-12 servings (one 2-layer 8-inch cake)
Prep time: 30 minutes
Bake time: 30-35 minutes
Cooling time: 2 hours (minimum)
Frosting & Assembly time: 30 minutes
Ingredients:
For the Matcha Cake Layers:
- 2 ½ cups (300g) all-purpose flour, spooned and leveled
- 2 tablespoons high-quality culinary grade matcha powder (sifted)
- 1 ½ teaspoons baking powder
- ½ teaspoon baking soda
- ½ teaspoon salt
- 1 cup (227g) unsalted butter, softened to room temperature
- 1 ¾ cups (350g) granulated sugar
- 4 large eggs, at room temperature
- 1 teaspoon vanilla extract
- 1 cup (240ml) buttermilk, at room temperature (see notes for substitute)
- Optional: 1-2 drops of green food coloring (if you desire a more intense green, though good matcha often suffices)
For the Vanilla Bean Frosting:
- 1 ½ cups (340g) unsalted butter, softened to room temperature
- 3-4 cups (360-480g) powdered sugar, sifted
- 1 vanilla bean, seeds scraped (or 2 teaspoons high-quality vanilla extract/paste)
- 2-4 tablespoons heavy cream or milk, at room temperature
- Pinch of salt
Notes on Ingredients:
- Matcha Powder: Use good quality culinary grade matcha. The color should be vibrant green. Sift it with the flour or just before adding to the wet ingredients to prevent clumps.
- Buttermilk: If you don’t have buttermilk, you can make a substitute: for 1 cup of buttermilk, mix 1 tablespoon of white vinegar or lemon juice into 1 cup of regular milk. Let it sit for 5-10 minutes until it curdles slightly.
- Room Temperature Ingredients: This is crucial for proper emulsification and a smooth batter, leading to a tender cake.
Step-by-Step Guide to Baking Your Dream Matcha Cake
Follow these instructions carefully for a perfectly baked and assembled matcha cake.
Part 1: Making the Matcha Cake Layers
- Preheat and Prepare Pans: Preheat your oven to 350°F (175°C). Grease and flour two 8-inch round cake pans. Alternatively, line the bottoms with parchment paper circles and grease the sides.
- Sift Dry Ingredients: In a medium bowl, whisk together the all-purpose flour, sifted matcha powder, baking powder, baking soda, and salt. Set aside.
- Cream Butter and Sugar: In a large bowl using a stand mixer fitted with a paddle attachment, or a hand mixer, beat the softened butter on medium speed until creamy, about 1-2 minutes. Gradually add the granulated sugar and continue to beat on medium-high speed for 3-5 minutes, or until light and fluffy. Scrape down the sides and bottom of the bowl as needed.
- Add Eggs and Vanilla: Add the eggs one at a time, beating well after each addition until fully incorporated. Beat in the vanilla extract (and green food coloring, if using). The mixture might look slightly curdled at this stage; this is okay.
- Alternate Dry and Wet Ingredients: With the mixer on low speed, add the dry ingredients in three additions, alternating with the buttermilk in two additions, beginning and ending with the dry ingredients. (Dry -> Buttermilk -> Dry -> Buttermilk -> Dry). Mix until just combined after each addition. Be careful not to overmix, as this can lead to a tough cake. Scrape down the sides and bottom of the bowl to ensure everything is incorporated.
- Divide Batter and Bake: Evenly divide the batter between the two prepared cake pans. Smooth the tops with an offset spatula.
- Bake for 30-35 minutes, or until a wooden skewer or toothpick inserted into the center of the cakes comes out clean or with a few moist crumbs attached. The tops should spring back when lightly touched.
- Cool Cakes: Let the cakes cool in their pans on a wire rack for 10-15 minutes. Then, carefully invert the cakes onto the wire rack, remove the parchment paper (if used), and let them cool completely before frosting (at least 1-2 hours). Level the tops of the cakes with a serrated knife if they have domed significantly.
Part 2: Making the Vanilla Bean Frosting
- Beat Butter: In a large bowl using a stand mixer with the paddle attachment or a hand mixer, beat the softened butter on medium speed until very pale and creamy, about 3-5 minutes. This step is crucial for a light and fluffy frosting.
- Add Vanilla and Salt: Add the scraped vanilla bean seeds (or vanilla extract/paste) and pinch of salt. Beat to combine.
- Gradually Add Powdered Sugar: With the mixer on low speed, gradually add the sifted powdered sugar, one cup at a time, mixing until smooth after each addition. Once all the sugar is incorporated, increase the speed to medium-high and beat for another 2-3 minutes until light and fluffy.
- Adjust Consistency: Add the heavy cream or milk, 1 tablespoon at a time, beating until the frosting reaches your desired spreading consistency. It should be smooth, creamy, and spreadable but still hold its shape. If it’s too thick, add a bit more cream/milk; if too thin, add a bit more powdered sugar.
Part 3: Assembling the Matcha Cake
- Level Cakes (if needed): If your cake layers have domed, use a long serrated knife to carefully trim the tops so they are flat. This ensures a stable, even layer cake.
- First Layer: Place one cake layer, top-side down (flat side up), onto a cake stand or serving plate.
- Frost First Layer: Spread about 1 to 1 ½ cups of the vanilla bean frosting evenly over the top of the first cake layer using an offset spatula.
- Add Second Layer: Carefully place the second cake layer, top-side down, on top of the frosting. Gently press down to secure it.
- Crumb Coat (Optional but Recommended): Apply a thin, even layer of frosting over the entire cake (top and sides). This is called a crumb coat and it traps any loose crumbs, making the final coat of frosting smoother. Refrigerate the crumb-coated cake for 20-30 minutes to allow the frosting to set.
- Final Frosting: Once the crumb coat is set, apply the remaining frosting to the top and sides of the cake, using an offset spatula or a bench scraper for smooth sides. You can create swirls on top or keep it sleek and smooth.
- Garnish (Optional): Garnish the cake as desired. A light dusting of matcha powder, fresh berries, white chocolate shavings, or edible flowers all look beautiful.
- Chill (Optional): For cleaner slices, you can chill the frosted cake in the refrigerator for at least 30 minutes before slicing and serving. However, cake is generally best enjoyed at room temperature for optimal flavour and texture.
Nutritional Insights: A Slice of Matcha Cake
While matcha cake is an indulgent treat, understanding its general nutritional profile can be helpful. The exact values will vary based on specific ingredients, portion sizes, and frosting thickness.
- Servings: 10-12 slices (from an 8-inch, 2-layer cake)
- Calories per serving (approximate): 450-650 kcal (This is a broad estimate. A thinner frosting layer or smaller slice will reduce calories).
Key Components and Their Contributions:
- Matcha Powder:
- Rich in antioxidants (catechins, especially EGCG).
- Contains L-theanine, which may promote calm alertness.
- Source of chlorophyll.
- Adds minimal calories but significant flavour and potential health compounds.
- Flour & Sugar: The primary sources of carbohydrates and calories in the cake layers. Sugar provides sweetness and contributes to the cake’s structure and moisture.
- Butter & Eggs: Provide fat (from butter) and protein (from eggs), contributing to richness, tenderness, structure, and flavour. Butter is a significant source of calories and saturated fat.
- Buttermilk: Adds moisture and a slight tang, contributing to a tender crumb. Lower in fat than whole milk.
- Frosting: Primarily composed of butter and powdered sugar, making it high in calories, sugar, and fat. Vanilla bean adds flavour without significant calories.
Considerations:
- Sugar Content: Like most cakes, matcha cake is high in sugar.
- Fat Content: The butter in both the cake and frosting contributes significantly to the fat content, including saturated fat.
- Portion Control: Enjoying a moderate slice is key if you are mindful of calorie and sugar intake.
- Allergens: This recipe contains common allergens: wheat (flour), dairy (butter, buttermilk, cream), and eggs.
While matcha itself offers health benefits, matcha cake should be enjoyed as a dessert – a delightful treat for special occasions or a moment of indulgence. The unique compounds in matcha do add a little something extra compared to standard cakes.
Time Commitment: From Whisk to Wonderful
Baking a layer cake is a multi-step process. Here’s a breakdown of the time involved for this Matcha Cake:
- Active Preparation Time (Cake Batter & Frosting):
- Preparing cake batter: 20-25 minutes
- Making frosting: 10-15 minutes
- Total Active Prep: Approximately 30-40 minutes
- Baking Time: 30-35 minutes
- Cooling Time:
- Initial cooling in pans: 10-15 minutes
- Complete cooling on wire rack: At least 2 hours (can be longer)
- Chilling crumb coat (if doing): 20-30 minutes
- Assembly and Frosting Time:
- Leveling, stacking, crumb coating (if doing), and final frosting: 20-30 minutes
- Total Estimated Time: Approximately 3.5 to 4.5 hours (This includes passive cooling time. Active hands-on time is closer to 1-1.5 hours spread out).
Tips for Time Management:
- Bake Layers Ahead: Cake layers can be baked a day in advance. Once completely cooled, wrap them tightly in plastic wrap and store at room temperature or in the refrigerator.
- Make Frosting Ahead: Buttercream frosting can be made up to 3-4 days in advance and stored in an airtight container in the refrigerator. Let it come to room temperature and re-whip it briefly before using to restore its fluffy texture.
- Spread it Out: You don’t have to do everything in one day. Bake the layers one day, make the frosting and assemble the next.
Patience during the cooling process is key to a well-structured and beautifully frosted cake.
Serving Suggestions: Elevating Your Matcha Cake Experience
A beautifully baked Matcha Cake deserves a delightful presentation and thoughtful pairings. Here are some ideas:
- Garnishes for Visual Appeal & Flavour:
- Dusting of Matcha: A light sieve of matcha powder over the top or around the edges adds a touch of elegance and reinforces the flavour.
- Fresh Berries: Strawberries, raspberries, blueberries, or blackberries provide a beautiful color contrast and a tartness that complements the matcha.
- White Chocolate: Shavings, curls, or a white chocolate ganache drip can add sweetness and visual appeal. White chocolate pairs exceptionally well with matcha.
- Edible Flowers: Pansies, violas, or borage flowers can add a delicate, sophisticated touch for special occasions.
- Candied Ginger: Thin slivers of candied ginger can offer a spicy-sweet counterpoint.
- Black Sesame Seeds: Toasted black sesame seeds can add a nutty flavour and visual contrast, a classic Japanese pairing.
- Plating Ideas:
- Serve slices on individual dessert plates.
- A small dollop of unsweetened or lightly sweetened whipped cream alongside can be lovely.
- A drizzle of fruit coulis (raspberry or strawberry) around the slice adds color and tang.
- Beverage Pairings:
- Traditional Japanese Teas:
- Sencha: A classic Japanese green tea with a refreshing, slightly grassy flavour.
- Hojicha: A roasted green tea with a nutty, toasty flavour that complements the cake beautifully.
- Genmaicha: Green tea with roasted brown rice, offering a savory, nutty note.
- Other Teas:
- A simple cup of black tea (like Earl Grey or English Breakfast) works well.
- Herbal teas like mint or ginger tea can be refreshing.
- Coffee: A light to medium roast coffee or a latte can be a good pairing.
- Milk: A simple glass of cold milk is always a comforting choice with cake.
- Sake or Plum Wine (Umeshu): For an adult pairing, a slightly sweet sake or a fruity umeshu can be delightful.
- Traditional Japanese Teas:
- Serving Temperature:
- Matcha cake is generally best served at room temperature. If refrigerated, allow it to sit out for at least 30-60 minutes before serving to allow the cake and frosting to soften for the best flavour and texture.
Remember, the best way to serve matcha cake is with a smile, ready to share its unique charm!
Pro Tips for Perfecting Your Matcha Masterpiece
Baking with matcha can be incredibly rewarding. These tips will help you achieve the best possible results for your Matcha Cake:
- Invest in High-Quality Culinary Grade Matcha:
- This is the most crucial tip. The quality of your matcha powder will directly impact the color, flavour, and overall success of your cake. Look for culinary grade matcha, which is designed for baking and cooking. It should have a vibrant, bright green color (not dull, yellowish, or brownish) and a fresh, grassy aroma. Poor quality or old matcha can result in a disappointingly dull-colored cake with a bitter or muddy taste. Store matcha in an airtight container in a cool, dark place (or the freezer for long-term storage) to maintain its freshness.
- Always Sift Your Matcha Powder:
- Matcha powder is incredibly fine and prone to clumping. Sifting it (either on its own or with the other dry ingredients like flour) is essential to ensure it incorporates smoothly into the batter. This prevents unsightly dark green specks or pockets of bitter matcha in your finished cake and ensures an even, beautiful green color throughout the crumb.
- Do Not Overbake the Cake Layers:
- Matcha cake, like many cakes, can become dry if overbaked. Start checking for doneness a few minutes before the recipe suggests. A wooden skewer or toothpick inserted into the center should come out clean or with a few moist crumbs attached. The top should spring back when lightly pressed. Overbaking can also dull the vibrant green color of the matcha.
- Ensure All Ingredients are at Room Temperature:
- This is a golden rule for most baking, but especially important for cakes. Butter, eggs, and buttermilk (or milk) should all be at room temperature (around 68-72°F or 20-22°C). Room temperature butter creams better with sugar, creating more air pockets for a lighter cake. Room temperature eggs and liquids incorporate more easily into the batter, leading to a smoother, more uniform emulsion and a tenderer crumb.
- Don’t Be Afraid to Pair Matcha with Complementary Flavours:
- While this recipe uses a classic vanilla bean frosting, matcha pairs wonderfully with a variety of other flavours. Consider these for future experimentation or in fillings/garnishes:
- White Chocolate: A classic and beloved pairing; its sweetness balances matcha’s earthiness.
- Red Bean Paste (Anko): A traditional Japanese pairing, often used as a filling.
- Citrus: Lemon, yuzu, or orange zest/juice can brighten the matcha flavour.
- Berries: Raspberries, strawberries, and blueberries provide a tart contrast.
- Black Sesame: Adds a nutty, toasty depth.
- Coconut: Coconut milk or shredded coconut can add tropical notes.
- While this recipe uses a classic vanilla bean frosting, matcha pairs wonderfully with a variety of other flavours. Consider these for future experimentation or in fillings/garnishes:
By keeping these tips in mind, you’ll be well on your way to baking a Matcha Cake that is not only visually stunning but also incredibly delicious and perfectly textured.
Your Matcha Cake Conundrums Solved: FAQ
Baking a Matcha Cake can sometimes bring up questions. Here are answers to some frequently asked ones to guide you.
Q1: What should matcha cake taste like? Is it very bitter?
- A: A well-made matcha cake should have a unique and balanced flavour profile. You’ll taste the inherent earthiness and slight grassiness of the matcha, often described as “umami.” There’s a subtle bitterness, but it should be pleasant and complex, similar to the bitterness in good quality dark chocolate or coffee, rather than acrid. This is beautifully balanced by the sweetness from the sugar in the cake and frosting. It should not be overwhelmingly bitter; if it is, it could be due to using too much matcha, low-quality matcha, or over-extraction if matcha tea was used directly. The overall taste is often described as sophisticated, refreshing, and not overly sweet.
Q2: Why did my matcha cake turn out brownish or a dull green instead of vibrant green?
- A: Several factors can affect the color of your matcha cake:
- Quality of Matcha: Low-quality or old matcha powder will result in a duller, sometimes yellowish or brownish-green color. Fresh, high-quality culinary grade matcha is key for vibrancy.
- Amount of Matcha: Using too little matcha might result in a pale green.
- Overbaking: Baking the cake for too long can cause the green color to fade and brown.
- Ingredients’ Acidity/Alkalinity: The pH of your batter can sometimes affect color, though this is less common with matcha than with some other natural colorants.
- Exposure to Light/Air: Matcha is sensitive to light and air, which degrade its color and flavour. Ensure your matcha is stored correctly.
Q3: Can I use ceremonial grade matcha for baking instead of culinary grade?
- A: You can, but it’s generally not recommended for a few reasons:
- Cost: Ceremonial grade matcha is significantly more expensive because it’s made from the youngest, most tender tea leaves and is intended for drinking in traditional tea ceremonies.
- Flavour Profile: Ceremonial grade has a more delicate, nuanced flavour that can get lost or overshadowed by other ingredients in a cake (like sugar, butter, and flour).
- Strength: Culinary grade matcha often has a more robust, slightly more bitter flavour profile that is specifically designed to stand up well in recipes with other strong flavours and during the baking process.
Save your ceremonial grade matcha for enjoying as a traditional tea, and use a good quality culinary grade for your baking adventures.
Q4: How should I store leftover matcha cake?
- A: Store leftover matcha cake in an airtight container.
- Room Temperature: If your frosting is a stable buttercream (like the one in this recipe) and your room isn’t too warm, it can be stored at room temperature for 1-2 days.
- Refrigerator: For longer storage (up to 4-5 days), or if it contains a less stable frosting (like fresh whipped cream or cream cheese frosting in a very warm environment), store it in the refrigerator.
- Serving after Refrigeration: Allow refrigerated cake to come to room temperature for about 30-60 minutes before serving for the best flavour and texture, as cold cake can taste dry and the frosting can be hard.
- Freezing: You can freeze unfrosted cake layers (well-wrapped in plastic wrap and then foil) for up to 2-3 months. Thaw overnight in the refrigerator before frosting. Frosted cake can also be frozen, though some frostings freeze better than others. Freeze slices on a tray until firm, then wrap individually.
Q5: Can I make this matcha cake recipe gluten-free or vegan?
- A: Yes, with some modifications, though results may vary:
- Gluten-Free: Substitute the all-purpose flour with a good-quality gluten-free all-purpose flour blend that contains xanthan gum (or add xanthan gum if it doesn’t). The texture might be slightly different, but it can be very successful.
- Vegan: This requires more substitutions:
- Butter: Use a high-quality vegan butter substitute in both the cake and frosting.
- Eggs: Use a vegan egg replacer (like flax eggs, chia eggs, commercial egg replacer, or applesauce/mashed banana, though the latter will affect flavour). Results will vary depending on the replacer.
- Buttermilk: Use a plant-based milk (like almond, soy, or oat milk) and add 1 tablespoon of lemon juice or apple cider vinegar per cup of milk to create a vegan “buttermilk.”
- Frosting: Vegan butter and plant-based milk can be used to create a vegan buttercream.
It’s often best to look for recipes specifically developed to be gluten-free or vegan, as the chemistry of baking can be quite different with these substitutions, but experimentation can be rewarding!
Matcha Cake recipe
Ingredients
-
- 2 ½ cups (300g) all-purpose flour, spooned and leveled
-
- 2 tablespoons high-quality culinary grade matcha powder (sifted)
-
- 1 ½ teaspoons baking powder
-
- ½ teaspoon baking soda
-
- ½ teaspoon salt
-
- 1 cup (227g) unsalted butter, softened to room temperature
-
- 1 ¾ cups (350g) granulated sugar
-
- 4 large eggs, at room temperature
-
- 1 teaspoon vanilla extract
-
- 1 cup (240ml) buttermilk, at room temperature (see notes for substitute)
-
- Optional: 1-2 drops of green food coloring (if you desire a more intense green, though good matcha often suffices)
For the Vanilla Bean Frosting:
-
- 1 ½ cups (340g) unsalted butter, softened to room temperature
-
- 3–4 cups (360-480g) powdered sugar, sifted
-
- 1 vanilla bean, seeds scraped (or 2 teaspoons high-quality vanilla extract/paste)
-
- 2–4 tablespoons heavy cream or milk, at room temperature
-
- Pinch of salt
Instructions
-
- Preheat and Prepare Pans: Preheat your oven to 350°F (175°C). Grease and flour two 8-inch round cake pans. Alternatively, line the bottoms with parchment paper circles and grease the sides.
-
- Sift Dry Ingredients: In a medium bowl, whisk together the all-purpose flour, sifted matcha powder, baking powder, baking soda, and salt. Set aside.
-
- Cream Butter and Sugar: In a large bowl using a stand mixer fitted with a paddle attachment, or a hand mixer, beat the softened butter on medium speed until creamy, about 1-2 minutes. Gradually add the granulated sugar and continue to beat on medium-high speed for 3-5 minutes, or until light and fluffy. Scrape down the sides and bottom of the bowl as needed.
-
- Add Eggs and Vanilla: Add the eggs one at a time, beating well after each addition until fully incorporated. Beat in the vanilla extract (and green food coloring, if using). The mixture might look slightly curdled at this stage; this is okay.
-
- Alternate Dry and Wet Ingredients: With the mixer on low speed, add the dry ingredients in three additions, alternating with the buttermilk in two additions, beginning and ending with the dry ingredients. (Dry -> Buttermilk -> Dry -> Buttermilk -> Dry). Mix until just combined after each addition. Be careful not to overmix, as this can lead to a tough cake. Scrape down the sides and bottom of the bowl to ensure everything is incorporated.
-
- Divide Batter and Bake: Evenly divide the batter between the two prepared cake pans. Smooth the tops with an offset spatula.
-
- Bake for 30-35 minutes, or until a wooden skewer or toothpick inserted into the center of the cakes comes out clean or with a few moist crumbs attached. The tops should spring back when lightly touched.
-
- Cool Cakes: Let the cakes cool in their pans on a wire rack for 10-15 minutes. Then, carefully invert the cakes onto the wire rack, remove the parchment paper (if used), and let them cool completely before frosting (at least 1-2 hours). Level the tops of the cakes with a serrated knife if they have domed significantly.
Part 2: Making the Vanilla Bean Frosting
-
- Beat Butter: In a large bowl using a stand mixer with the paddle attachment or a hand mixer, beat the softened butter on medium speed until very pale and creamy, about 3-5 minutes. This step is crucial for a light and fluffy frosting.
-
- Add Vanilla and Salt: Add the scraped vanilla bean seeds (or vanilla extract/paste) and pinch of salt. Beat to combine.
-
- Gradually Add Powdered Sugar: With the mixer on low speed, gradually add the sifted powdered sugar, one cup at a time, mixing until smooth after each addition. Once all the sugar is incorporated, increase the speed to medium-high and beat for another 2-3 minutes until light and fluffy.
-
- Adjust Consistency: Add the heavy cream or milk, 1 tablespoon at a time, beating until the frosting reaches your desired spreading consistency. It should be smooth, creamy, and spreadable but still hold its shape. If it’s too thick, add a bit more cream/milk; if too thin, add a bit more powdered sugar.
Part 3: Assembling the Matcha Cake
-
- Level Cakes (if needed): If your cake layers have domed, use a long serrated knife to carefully trim the tops so they are flat. This ensures a stable, even layer cake.
-
- First Layer: Place one cake layer, top-side down (flat side up), onto a cake stand or serving plate.
-
- Frost First Layer: Spread about 1 to 1 ½ cups of the vanilla bean frosting evenly over the top of the first cake layer using an offset spatula.
-
- Add Second Layer: Carefully place the second cake layer, top-side down, on top of the frosting. Gently press down to secure it.
-
- Crumb Coat (Optional but Recommended): Apply a thin, even layer of frosting over the entire cake (top and sides). This is called a crumb coat and it traps any loose crumbs, making the final coat of frosting smoother. Refrigerate the crumb-coated cake for 20-30 minutes to allow the frosting to set.
-
- Final Frosting: Once the crumb coat is set, apply the remaining frosting to the top and sides of the cake, using an offset spatula or a bench scraper for smooth sides. You can create swirls on top or keep it sleek and smooth.
-
- Garnish (Optional): Garnish the cake as desired. A light dusting of matcha powder, fresh berries, white chocolate shavings, or edible flowers all look beautiful.
-
- Chill (Optional): For cleaner slices, you can chill the frosted cake in the refrigerator for at least 30 minutes before slicing and serving. However, cake is generally best enjoyed at room temperature for optimal flavour and texture.
Nutrition
- Serving Size: one normal portion
- Calories: 450-650


