
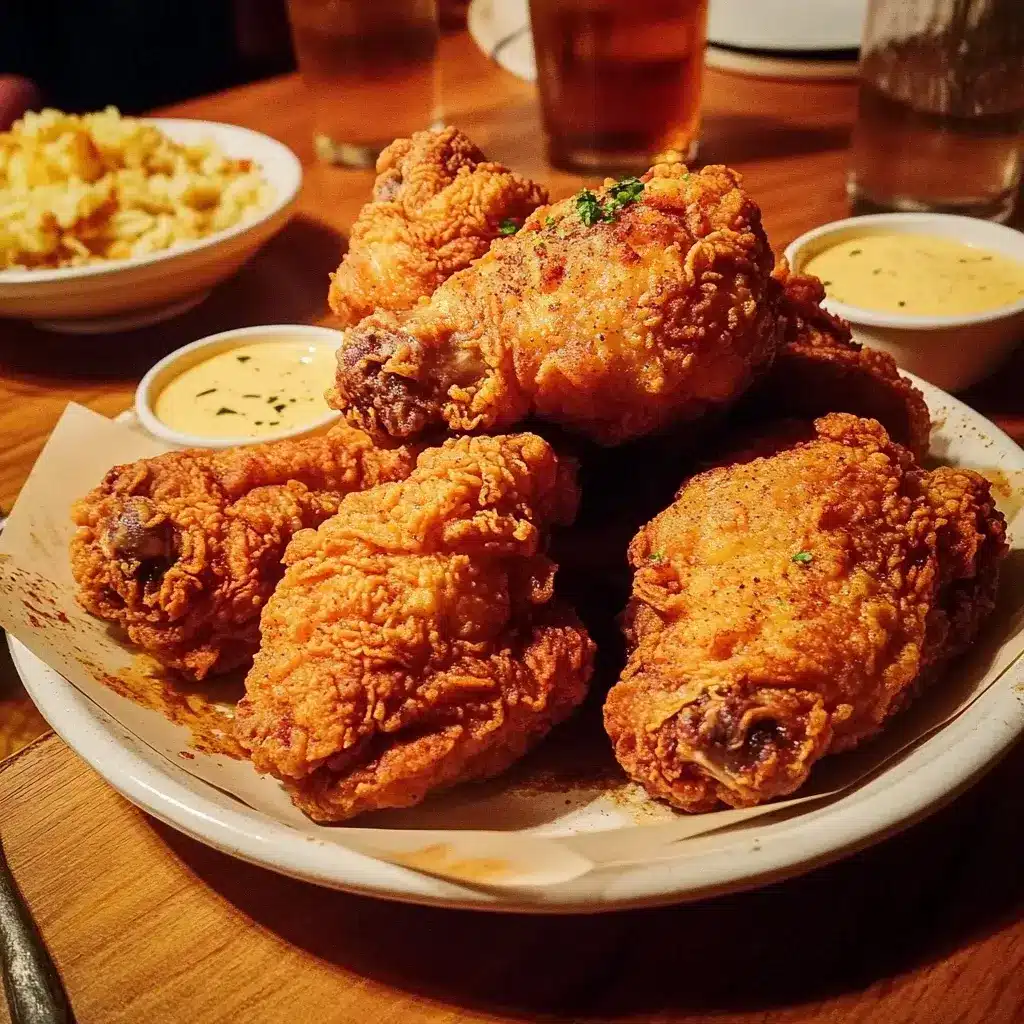

There are certain smells that instantly transport you back to childhood, to a simpler time filled with warmth and uncomplicated joy. For me, and I suspect for many, the aroma of “Mama’s Fried Chicken” sizzling in a cast iron skillet is high on that list. It wasn’t just food; it was an event, a promise of crispy, golden skin yielding to incredibly juicy, flavorful meat. My Mama didn’t have a written recipe – it was all by feel, by sight, by the subtle cues of the bubbling oil and the color of the crust. Trying to replicate it felt like chasing a delicious ghost. But after years of observing, asking (often vague) questions, and a fair bit of trial and error, I believe I’ve captured the essence, the very soul, of her legendary fried chicken. The first time my own family tasted this version, the silence around the dinner table, punctuated only by contented crunches and satisfied sighs, told me everything. My son looked up, a piece of drumstick halfway to his mouth, and said, “This is it. This tastes like Grandma’s.” That, my friends, was the highest praise, the ultimate validation. This recipe isn’t just about ingredients and steps; it’s about love, tradition, and the magic that happens when simple things are done with care.
Complete Ingredients for Mama’s Fried Chicken
This recipe honors the simplicity of traditional Southern fried chicken, focusing on quality ingredients and techniques that have stood the test of time. The “secret” isn’t in exotic spices, but in the method and the love.
For the Chicken & Brine (The Flavor Foundation):
- Whole Chicken: 1 (about 3.5 – 4 lbs), cut into 8 or 9 pieces (2 breasts, 2 thighs, 2 drumsticks, 2 wings, and optionally the back, or buy pre-cut bone-in, skin-on chicken pieces). Using a whole chicken ensures a variety of textures and flavors. Bone-in, skin-on is non-negotiable for true fried chicken.
- Buttermilk: 2 cups. This is crucial for tenderizing the chicken and helping the flour coating adhere. Full-fat buttermilk is preferred.
- Hot Sauce (e.g., Tabasco or Frank’s RedHot): 1-2 tablespoons (optional, but adds a subtle tang and depth, not necessarily overt heat). Mama always added a dash!
- Salt: 1 tablespoon, for the brine.
- Black Pepper: 1 teaspoon, freshly ground, for the brine.
For the Seasoned Flour Dredge (The Crispy Coat):
- All-Purpose Flour: 2.5 cups. The backbone of our crispy crust.
- Cornstarch: 1/2 cup. This is a key ingredient for achieving an extra-crispy texture that stays crispy longer.
- Salt: 2 tablespoons (or to taste – remember the brine also has salt). Kosher salt is excellent here.
- Black Pepper: 1 tablespoon, freshly ground. Don’t skimp on the pepper.
- Paprika: 2 teaspoons (sweet or smoked). Adds color and a mild, sweet, or smoky flavor.
- Garlic Powder: 1 teaspoon. For a savory, aromatic undertone.
- Onion Powder: 1 teaspoon. Complements the garlic powder beautifully.
- Cayenne Pepper: 1/2 teaspoon (optional, or adjust to your heat preference). Adds a gentle warmth.
For Frying (The Golden Magic):
- Frying Oil: Approximately 4-6 cups (such as peanut oil, vegetable oil, canola oil, or shortening/lard). The amount will depend on the size of your frying vessel. Peanut oil has a high smoke point and neutral flavor, making it a popular choice. Lard or shortening imparts a traditional, rich flavor. Mama often used a combination.
- Important Note: You’ll need enough oil to come about halfway up the sides of the chicken pieces when they are in the pan, or enough for them to float if deep frying.
Equipment Essentials:
- Large Bowl: For brining the chicken.
- Shallow Dish or Large Ziplock Bag: For the seasoned flour dredge.
- Heavy-Bottomed Skillet (Cast Iron Skillet is Ideal): A 10 or 12-inch cast iron skillet is the traditional and arguably best choice for even heat distribution and retention, leading to perfectly fried chicken. A heavy Dutch oven also works well.
- Tongs: For safely handling the chicken.
- Deep-Fry Thermometer or Instant-Read Thermometer: Crucial for maintaining the correct oil temperature.
- Wire Rack set over a Baking Sheet: For draining the fried chicken and allowing air to circulate, keeping it crispy.
Mama always said, “Good ingredients make good food.” For her fried chicken, this meant fresh chicken, real buttermilk, and simple, good-quality seasonings.
Step-by-Step Instructions for Perfecting Mama’s Fried Chicken
This process, from brining to frying, is a labor of love. Each step contributes to the final, glorious result. Patience is a virtue here!
Phase 1: Brining the Chicken (Building Flavor & Tenderness) – Minimum 4 hours, ideally overnight
- Prepare the Chicken: If you’ve bought a whole chicken, cut it into 8 or 9 pieces (2 breast halves, 2 thighs, 2 drumsticks, 2 wings, and optionally, the back cut into pieces for flavor or reserved for stock). Pat the chicken pieces dry with paper towels.
- Make the Buttermilk Brine: In a large bowl, whisk together the buttermilk, 1 tablespoon of salt, 1 teaspoon of black pepper, and the optional hot sauce until well combined.
- Brine the Chicken: Add the chicken pieces to the buttermilk brine, ensuring each piece is fully submerged. If necessary, add a little more buttermilk. Cover the bowl tightly with plastic wrap.
- Refrigerate: Place the brining chicken in the refrigerator for at least 4 hours, but preferably overnight (up to 24 hours). The longer it brines, the more tender and flavorful it will be. This step is crucial for juicy results.
Phase 2: Dredging the Chicken (Creating the Crispy Crust) – About 30 minutes before frying
- Prepare the Dredging Station: In a large shallow dish (like a pie plate or a casserole dish) or a large, sturdy ziplock bag, whisk together the all-purpose flour, cornstarch, 2 tablespoons of salt, 1 tablespoon of black pepper, paprika, garlic powder, onion powder, and optional cayenne pepper until thoroughly combined. This is your seasoned flour dredge.
- Remove Chicken from Brine: Take the chicken pieces out of the buttermilk brine one at a time, allowing any excess buttermilk to drip off. Do not rinse the chicken. The buttermilk clinging to the chicken will help the flour adhere. Place the chicken pieces on a separate plate or wire rack.
- First Dredge: Working with one piece of chicken at a time, place it in the seasoned flour mixture. Turn to coat all sides thoroughly, pressing the flour gently onto the chicken to help it stick. Shake off any excess flour.
- Optional “Wet” Step for Thicker Crust (Mama’s Trick): For an even thicker, shaggier crust, you can briefly dip the flour-coated chicken piece back into the remaining buttermilk brine (or a separate small bowl of buttermilk if your brine is too depleted), then immediately dredge it again in the seasoned flour. This double dredge creates more nooks and crannies for ultimate crispiness.
- Rest the Coated Chicken: Place the coated chicken pieces on a clean wire rack set over a baking sheet. Let the chicken sit at room temperature for at least 20-30 minutes before frying. This resting period allows the coating to hydrate and adhere better to the chicken, preventing it from falling off during frying. The coating will look slightly pasty – this is good!
Phase 3: Frying the Chicken (Achieving Golden Perfection)
- Prepare for Frying: Set up your wire rack over a baking sheet near the stove for draining the cooked chicken.
- Heat the Oil: Pour your chosen frying oil into your heavy-bottomed skillet or Dutch oven to a depth of about 1 to 1.5 inches (enough so the chicken will be about halfway submerged, or fully submerged if you’re truly deep-frying in a larger vessel). Attach a deep-fry thermometer to the side of the pan, ensuring the tip is submerged in oil but not touching the bottom. Heat the oil over medium-high heat until it reaches 325-350°F (160-175°C). Mama often used a “test” piece of bread or a pinch of flour – if it sizzled vigorously and turned golden quickly, the oil was ready, but a thermometer is more precise.
- Fry in Batches: Carefully place a few pieces of chicken into the hot oil using tongs, skin-side down first if pan-frying. Do NOT overcrowd the pan! Overcrowding will lower the oil temperature significantly, resulting in greasy, unevenly cooked chicken. Leave ample space between pieces. You’ll likely need to fry in 2-3 batches depending on the size of your pan and chicken pieces.
- Maintain Oil Temperature: Adjust the heat as needed to maintain a consistent oil temperature between 300-325°F (150-160°C) once the chicken is added. If the oil gets too hot, the crust will burn before the chicken is cooked through. If it’s too cool, the chicken will absorb too much oil and become greasy.
- Cook and Turn:
- For pan-frying (oil halfway up): Fry for about 6-8 minutes on the first side, until the crust is a deep golden brown and crispy. Using tongs, carefully flip the chicken pieces and cook for another 6-8 minutes on the second side.
- Larger pieces like breasts and thighs will take longer than smaller pieces like wings. Breasts may take 10-12 minutes per side, while wings might be done in 5-6 minutes per side.
- Check for Doneness: The chicken is cooked through when the internal temperature reaches 165°F (74°C) in the thickest part of each piece (avoiding the bone). The juices should run clear when pierced with a knife. The crust should be beautifully golden brown and very crispy.
- Drain and Season Immediately: As each batch of chicken is cooked, remove it from the oil using tongs, allowing any excess oil to drip back into the pan. Immediately place the chicken on the prepared wire rack to drain. While the chicken is still hot, sprinkle it lightly with a tiny pinch more salt if desired (Mama always did this!). This helps the final seasoning stick.
- Repeat with Remaining Chicken: Allow the oil to return to 325-350°F before adding the next batch of chicken. Skim out any loose bits of browned coating from the oil between batches using a fine-mesh sieve to prevent them from burning and imparting a bitter taste to subsequent batches.
Serve Mama’s Fried Chicken hot and watch the smiles appear!
Nutritional Information (Approximate)
Fried chicken is an indulgent treat, and its nutritional profile reflects that. The following information is an approximation and can vary significantly based on the size of the chicken pieces, the amount of oil absorbed, the type of oil used, and whether the skin is consumed.
- Servings: This recipe yields 8-9 pieces of chicken, typically serving 4-6 people.
- Calories per Serving (Approximate, for one mixed piece like a thigh or breast portion): 350-500 calories.
- A drumstick might be closer to 250-350 calories.
- A breast piece could be 400-600 calories.
Breakdown Considerations:
- Protein: Chicken is an excellent source of high-quality protein. A single piece will provide a significant amount.
- Fat: This is where fried chicken gets its indulgent reputation. Fat comes from the chicken skin, the frying oil absorbed by the coating, and any lard/shortening used. The amount of fat absorbed can vary.
- Saturated Fat: Will be higher if using lard or shortening.
- Carbohydrates: Primarily from the flour and cornstarch in the dredge.
- Sodium: Comes from the salt in the brine, the seasoned flour, and any final seasoning. Using low-sodium hot sauce or adjusting salt levels can help manage this.
- Cholesterol: Present in the chicken, particularly the skin and dark meat.
Making it Slightly “Lighter” (though it’s still fried chicken!):
- Remove Skin After Frying (if you must): Though the crispy skin is a highlight, removing it before eating will significantly reduce fat and calories.
- Use a Lighter Frying Oil: Oils like canola or vegetable oil might be perceived as slightly “lighter” than lard, though fat content is similar.
- Blot Excess Oil: While draining on a wire rack is best for crispiness, you can gently blot pieces with a paper towel if concerned about surface oil, though this may compromise some crispiness.
- Portion Control: Enjoy one or two pieces alongside healthier side dishes.
Mama’s Fried Chicken is a dish to be savored for its flavor and tradition. Enjoy it as part of a balanced lifestyle, perhaps reserved for special occasions or comforting Sunday dinners.
Preparation and Cook Time
Making truly great fried chicken is a process, with much of the time being inactive (brining and resting).
- Preparation Time (Active): Approximately 30-40 minutes.
- This includes:
- Cutting the chicken (if starting with a whole chicken) (10-15 minutes).
- Making the buttermilk brine (5 minutes).
- Making the seasoned flour dredge (5 minutes).
- Dredging the chicken (10-15 minutes).
- This includes:
- Inactive Preparation Time:
- Brining: Minimum 4 hours, ideally 8-24 hours (overnight).
- Resting Coated Chicken: 20-30 minutes at room temperature before frying.
- Cook Time (Frying): Approximately 30-45 minutes (in batches).
- Each batch typically takes 12-20 minutes to fry, depending on piece size.
- Heating oil initially: 5-10 minutes.
- Reheating oil between batches: 2-3 minutes per batch.
- Total Active Time (Excluding Brining/Resting): Approximately 1 hour to 1 hour 25 minutes.
- Total Time (Including Minimum 4-hour Brine & Resting): Approximately 5 hours 50 minutes to 6 hours 35 minutes. (Significantly longer if brining overnight).
Key Takeaway on Time:
While the hands-on cooking isn’t excessively long, the brining period is crucial for the best results, so plan accordingly. This isn’t a last-minute meal, but the anticipation is part of the joy!
How to Serve Mama’s Fried Chicken
Serving Mama’s Fried Chicken is all about embracing comfort and tradition. It’s the centerpiece of a hearty, satisfying meal.
Classic Pairings (Southern Comfort Staples):
- Mashed Potatoes and Gravy:
- Creamy mashed potatoes are a perfect canvas for the rich chicken.
- Make a quick gravy using some of the pan drippings (if you carefully pour off most oil and make a roux) or a classic country-style milk gravy.
- Coleslaw:
- A tangy, creamy, or vinegar-based coleslaw provides a refreshing, acidic contrast to the richness of the fried chicken.
- Biscuits:
- Fluffy, warm buttermilk biscuits are ideal for soaking up gravy or enjoying with a piece of chicken. Honey or jam on the side is a classic.
- Macaroni and Cheese:
- A baked, cheesy macaroni and cheese is another beloved Southern side that complements fried chicken beautifully.
- Corn on the Cob:
- Sweet, buttery corn on the cob, especially in summer.
- Collard Greens or Green Beans:
- Slow-cooked collard greens (perhaps with a ham hock) or Southern-style green beans (cooked with bacon or ham) add a savory vegetable element.
- Potato Salad:
- A creamy, mustard-based, or dill potato salad is a picnic and potluck favorite alongside fried chicken.
Presentation:
- Family-Style Platter: Arrange the golden-brown chicken pieces attractively on a large platter. Garnish with fresh parsley sprigs if desired.
- Picnic Basket: If taking it on the go, line a basket with a checkered cloth and pack the chicken once it has cooled slightly (though it’s best fresh and hot, it’s also delicious at room temperature for picnics).
- Individual Plates: Serve 2-3 pieces of chicken per person alongside their chosen sides.
Drink Pairings:
- Sweet Iced Tea: The quintessential Southern beverage.
- Lemonade: Freshly squeezed lemonade offers a tart counterpoint.
- Cold Beer: A crisp lager or pilsner cuts through the richness nicely.
- Unsweetened Iced Tea: For those who prefer it.
Occasions:
- Sunday Dinners: A classic choice for a family gathering.
- Picnics and Potlucks: Fried chicken travels relatively well (though best enjoyed fresh).
- Celebrations and Holidays: Often a feature at casual celebrations.
- Comfort Food Cravings: Anytime you need a taste of home.
No matter how you serve it, Mama’s Fried Chicken is meant to be shared and enjoyed with warmth and good company. Don’t forget the napkins!
Additional Tips for Fried Chicken Nirvana (Mama’s Wisdom)
Beyond the basic recipe, these five tips, gleaned from Mama’s years of frying perfection, will help you achieve truly exceptional results:
- Don’t Skip or Rush the Buttermilk Brine – Patience Pays Dividends:
- Mama’s Wisdom: “That chicken needs to soak up all that good buttermilk flavor and get tender. Don’t you rush it!”
- Why it matters: The buttermilk (an acidic ingredient) tenderizes the chicken by breaking down some of its proteins, resulting in incredibly juicy and succulent meat. The salt in the brine also helps the chicken retain moisture during cooking. A minimum of 4 hours is good, but overnight (8-24 hours) is significantly better. This step is foundational to flavorful, moist fried chicken.
- Oil Temperature is Your Best Friend (and Worst Enemy if Ignored):
- Mama’s Wisdom: “Listen to the oil, watch the bubbles. Too hot and it’ll burn ‘fore it’s cooked. Too cool and it’ll be a greasy mess.”
- Why it matters: Maintaining the correct oil temperature (ideally 300-325°F once chicken is added, preheated to 325-350°F) is critical. Use a deep-fry or instant-read thermometer.
- Too Hot: The crust will brown and potentially burn long before the inside of the chicken is cooked through.
- Too Cool: The chicken will absorb too much oil as it cooks slowly, leading to a greasy, soggy crust and oily meat.
Make small adjustments to your stove’s heat as you fry to keep the temperature consistent.
- The “Set” Time for the Coating is Not Optional for Crust Adhesion:
- Mama’s Wisdom: “Let that flour get friendly with the chicken ‘fore it hits the hot oil. It needs to stick.”
- Why it matters: After dredging the chicken in the seasoned flour, letting it rest on a wire rack at room temperature for 20-30 minutes allows the flour to hydrate and form a sort of “paste” with the moisture from the buttermilk. This helps the coating adhere much better during the frying process, reducing the chances of it falling off and leaving bald spots.
- Season at Every Stage – Layering Flavors is Key:
- Mama’s Wisdom: “A little bit of seasoning here, a little bit there. Makes all the difference.”
- Why it matters: Flavor isn’t just in the final crust.
- Brine: Salt, pepper, and hot sauce infuse the meat itself.
- Dredge: The seasoned flour creates a flavorful crust.
- Post-Fry: A very light sprinkle of salt on the hot, just-fried chicken enhances the overall taste and helps the seasoning stick. This layering approach ensures every bite is well-seasoned.
- Drain on a Wire Rack, Not Paper Towels, for Maximum Crispiness:
- Mama’s Wisdom: “Let the air get all around it. Nobody likes a soggy bottom.”
- Why it matters: Placing freshly fried chicken directly onto paper towels traps steam underneath the chicken. This steam will quickly soften that beautiful, crispy crust you worked so hard to achieve. Draining the chicken on a wire rack set over a baking sheet allows air to circulate freely around all sides of each piece, wicking away excess oil and keeping the bottom of the crust just as crispy as the top.
These nuggets of wisdom, passed down and proven true, are what elevate good fried chicken to “Mama’s Fried Chicken” status.
Frequently Asked Questions (FAQ) about Mama’s Fried Chicken
Here are answers to some common questions folks have when embarking on their fried chicken journey:
- Q: Can I use boneless, skinless chicken breasts for this recipe?
- A: While you can technically fry boneless, skinless chicken, it’s not traditional for “Mama’s Fried Chicken” and won’t yield the same classic results. Bone-in, skin-on chicken provides significantly more flavor and moisture. The bone helps conduct heat for even cooking, and the skin renders fat, basting the meat and creating that signature crispy exterior. If you use boneless, skinless breasts, they will cook much faster and can dry out easily. You’d need to adjust brining and cooking times significantly and might consider cutting them into smaller tender-like pieces.
- Q: What’s the best oil for frying chicken? Can I reuse it?
- A: The “best” oil often comes down to preference and tradition:
- Peanut Oil: High smoke point, neutral flavor, popular choice.
- Vegetable/Canola Oil: Affordable, neutral flavor, readily available.
- Lard or Shortening: Traditional fats that impart a distinct, rich flavor and excellent crispiness. Some people mix these with vegetable oil.
- Reusing Oil: Yes, you can reuse frying oil a few times if stored properly. Let it cool completely, then strain it through a fine-mesh sieve lined with cheesecloth or a coffee filter to remove any food particles. Store in an airtight container in a cool, dark place (or the refrigerator). Discard if it looks cloudy, foamy, smells off, or has a very dark color. Do not reuse oil that has been used to fry fish for chicken, as the flavor will transfer.
- A: The “best” oil often comes down to preference and tradition:
- Q: My chicken coating keeps falling off when I fry it. What am I doing wrong?
- A: This is a common frustration! Several factors can contribute:
- Not Patting Chicken Dry Enough (Before Brine): While less critical with a buttermilk brine, very wet chicken can dilute the brine slightly.
- Too Much Moisture After Brine: Ensure excess buttermilk drips off before dredging.
- Skipping the Resting Period: Letting the coated chicken rest for 20-30 minutes before frying is crucial. This allows the flour to hydrate and form a better bond with the chicken.
- Overcrowding the Pan: This lowers oil temperature and can cause pieces to stick together, dislodging the coating.
- Flipping/Moving Too Early or Too Aggressively: Let the crust set and brown on one side before attempting to move or flip it. Use gentle motions with your tongs.
- Oil Temperature Too Low: If the oil isn’t hot enough, the coating won’t crisp up quickly and set.
- A: This is a common frustration! Several factors can contribute:
- Q: Can I bake this chicken instead of frying it for a healthier version?
- A: Baking will not produce “fried” chicken in the traditional sense; you won’t get the same ultra-crispy, deeply golden crust. However, you can make a delicious “oven-fried” version. After brining and dredging as directed:
- Preheat your oven to 400-425°F (200-220°C).
- Place the coated chicken on a wire rack set on a baking sheet (this helps air circulate for crispier results).
- You can lightly spray the chicken with cooking oil for better browning.
- Bake for 40-55 minutes, or until the chicken is cooked through (165°F internal temp) and the coating is golden and crisp. You might want to flip it halfway through.
It will be tasty, but different from deep-fried.
- A: Baking will not produce “fried” chicken in the traditional sense; you won’t get the same ultra-crispy, deeply golden crust. However, you can make a delicious “oven-fried” version. After brining and dredging as directed:
- Q: How do I know when the chicken is perfectly cooked through without overcooking?
- A: The most reliable way is to use an instant-read meat thermometer. Insert the thermometer into the thickest part of each piece, avoiding the bone. The chicken is safely cooked and should still be juicy when it reaches an internal temperature of 165°F (74°C).
- Thighs and Drumsticks (Dark Meat): Many prefer dark meat cooked to a slightly higher internal temperature, around 170-175°F (77-79°C), as this allows the connective tissue to break down further, resulting in more tender meat.
- Visual Cues (Less Reliable): Juices should run clear when pierced, and there should be no pink meat near the bone. However, a thermometer is the only foolproof method to ensure both safety and optimal juiciness.
- A: The most reliable way is to use an instant-read meat thermometer. Insert the thermometer into the thickest part of each piece, avoiding the bone. The chicken is safely cooked and should still be juicy when it reaches an internal temperature of 165°F (74°C).
Armed with these answers and Mama’s wisdom, you’re well on your way to frying up a batch of unforgettable chicken!
Print
Mama’s Fried Chicken recipe
Ingredients
-
- Whole Chicken: 1 (about 3.5 – 4 lbs), cut into 8 or 9 pieces (2 breasts, 2 thighs, 2 drumsticks, 2 wings, and optionally the back, or buy pre-cut bone-in, skin-on chicken pieces). Using a whole chicken ensures a variety of textures and flavors. Bone-in, skin-on is non-negotiable for true fried chicken.
-
- Buttermilk: 2 cups. This is crucial for tenderizing the chicken and helping the flour coating adhere. Full-fat buttermilk is preferred.
-
- Hot Sauce (e.g., Tabasco or Frank’s RedHot): 1-2 tablespoons (optional, but adds a subtle tang and depth, not necessarily overt heat). Mama always added a dash!
-
- Salt: 1 tablespoon, for the brine.
-
- Black Pepper: 1 teaspoon, freshly ground, for the brine.
For the Seasoned Flour Dredge (The Crispy Coat):
-
- All-Purpose Flour: 2.5 cups. The backbone of our crispy crust.
-
- Cornstarch: 1/2 cup. This is a key ingredient for achieving an extra-crispy texture that stays crispy longer.
-
- Salt: 2 tablespoons (or to taste – remember the brine also has salt). Kosher salt is excellent here.
-
- Black Pepper: 1 tablespoon, freshly ground. Don’t skimp on the pepper.
-
- Paprika: 2 teaspoons (sweet or smoked). Adds color and a mild, sweet, or smoky flavor.
-
- Garlic Powder: 1 teaspoon. For a savory, aromatic undertone.
-
- Onion Powder: 1 teaspoon. Complements the garlic powder beautifully.
-
- Cayenne Pepper: 1/2 teaspoon (optional, or adjust to your heat preference). Adds a gentle warmth.
For Frying (The Golden Magic):
-
- Frying Oil: Approximately 4-6 cups (such as peanut oil, vegetable oil, canola oil, or shortening/lard). The amount will depend on the size of your frying vessel. Peanut oil has a high smoke point and neutral flavor, making it a popular choice. Lard or shortening imparts a traditional, rich flavor. Mama often used a combination.
-
- Important Note: You’ll need enough oil to come about halfway up the sides of the chicken pieces when they are in the pan, or enough for them to float if deep frying.
-
- Frying Oil: Approximately 4-6 cups (such as peanut oil, vegetable oil, canola oil, or shortening/lard). The amount will depend on the size of your frying vessel. Peanut oil has a high smoke point and neutral flavor, making it a popular choice. Lard or shortening imparts a traditional, rich flavor. Mama often used a combination.
Instructions
Phase 1: Brining the Chicken (Building Flavor & Tenderness) – Minimum 4 hours, ideally overnight
-
- Prepare the Chicken: If you’ve bought a whole chicken, cut it into 8 or 9 pieces (2 breast halves, 2 thighs, 2 drumsticks, 2 wings, and optionally, the back cut into pieces for flavor or reserved for stock). Pat the chicken pieces dry with paper towels.
-
- Make the Buttermilk Brine: In a large bowl, whisk together the buttermilk, 1 tablespoon of salt, 1 teaspoon of black pepper, and the optional hot sauce until well combined.
-
- Brine the Chicken: Add the chicken pieces to the buttermilk brine, ensuring each piece is fully submerged. If necessary, add a little more buttermilk. Cover the bowl tightly with plastic wrap.
-
- Refrigerate: Place the brining chicken in the refrigerator for at least 4 hours, but preferably overnight (up to 24 hours). The longer it brines, the more tender and flavorful it will be. This step is crucial for juicy results.
Phase 2: Dredging the Chicken (Creating the Crispy Crust) – About 30 minutes before frying
-
- Prepare the Dredging Station: In a large shallow dish (like a pie plate or a casserole dish) or a large, sturdy ziplock bag, whisk together the all-purpose flour, cornstarch, 2 tablespoons of salt, 1 tablespoon of black pepper, paprika, garlic powder, onion powder, and optional cayenne pepper until thoroughly combined. This is your seasoned flour dredge.
-
- Remove Chicken from Brine: Take the chicken pieces out of the buttermilk brine one at a time, allowing any excess buttermilk to drip off. Do not rinse the chicken. The buttermilk clinging to the chicken will help the flour adhere. Place the chicken pieces on a separate plate or wire rack.
-
- First Dredge: Working with one piece of chicken at a time, place it in the seasoned flour mixture. Turn to coat all sides thoroughly, pressing the flour gently onto the chicken to help it stick. Shake off any excess flour.
-
- Optional “Wet” Step for Thicker Crust (Mama’s Trick): For an even thicker, shaggier crust, you can briefly dip the flour-coated chicken piece back into the remaining buttermilk brine (or a separate small bowl of buttermilk if your brine is too depleted), then immediately dredge it again in the seasoned flour. This double dredge creates more nooks and crannies for ultimate crispiness.
-
- Rest the Coated Chicken: Place the coated chicken pieces on a clean wire rack set over a baking sheet. Let the chicken sit at room temperature for at least 20-30 minutes before frying. This resting period allows the coating to hydrate and adhere better to the chicken, preventing it from falling off during frying. The coating will look slightly pasty – this is good!
Phase 3: Frying the Chicken (Achieving Golden Perfection)
-
- Prepare for Frying: Set up your wire rack over a baking sheet near the stove for draining the cooked chicken.
-
- Heat the Oil: Pour your chosen frying oil into your heavy-bottomed skillet or Dutch oven to a depth of about 1 to 1.5 inches (enough so the chicken will be about halfway submerged, or fully submerged if you’re truly deep-frying in a larger vessel). Attach a deep-fry thermometer to the side of the pan, ensuring the tip is submerged in oil but not touching the bottom. Heat the oil over medium-high heat until it reaches 325-350°F (160-175°C). Mama often used a “test” piece of bread or a pinch of flour – if it sizzled vigorously and turned golden quickly, the oil was ready, but a thermometer is more precise.
-
- Fry in Batches: Carefully place a few pieces of chicken into the hot oil using tongs, skin-side down first if pan-frying. Do NOT overcrowd the pan! Overcrowding will lower the oil temperature significantly, resulting in greasy, unevenly cooked chicken. Leave ample space between pieces. You’ll likely need to fry in 2-3 batches depending on the size of your pan and chicken pieces.
-
- Maintain Oil Temperature: Adjust the heat as needed to maintain a consistent oil temperature between 300-325°F (150-160°C) once the chicken is added. If the oil gets too hot, the crust will burn before the chicken is cooked through. If it’s too cool, the chicken will absorb too much oil and become greasy.
-
- Cook and Turn:
-
- For pan-frying (oil halfway up): Fry for about 6-8 minutes on the first side, until the crust is a deep golden brown and crispy. Using tongs, carefully flip the chicken pieces and cook for another 6-8 minutes on the second side.
-
- Larger pieces like breasts and thighs will take longer than smaller pieces like wings. Breasts may take 10-12 minutes per side, while wings might be done in 5-6 minutes per side.
-
- Cook and Turn:
-
- Check for Doneness: The chicken is cooked through when the internal temperature reaches 165°F (74°C) in the thickest part of each piece (avoiding the bone). The juices should run clear when pierced with a knife. The crust should be beautifully golden brown and very crispy.
-
- Drain and Season Immediately: As each batch of chicken is cooked, remove it from the oil using tongs, allowing any excess oil to drip back into the pan. Immediately place the chicken on the prepared wire rack to drain. While the chicken is still hot, sprinkle it lightly with a tiny pinch more salt if desired (Mama always did this!). This helps the final seasoning stick.
-
- Repeat with Remaining Chicken: Allow the oil to return to 325-350°F before adding the next batch of chicken. Skim out any loose bits of browned coating from the oil between batches using a fine-mesh sieve to prevent them from burning and imparting a bitter taste to subsequent batches.
Nutrition
- Serving Size: one normal portion
- Calories: 350-500


