


The first time I made these Gluten-Free S’mores Bars, it was for a neighborhood potluck, and I wanted to bring something that screamed “summer fun” but was also accessible to my friends with gluten sensitivities. I’d always loved the idea of s’mores, but the campfire logistics weren’t always practical. These bars, with their buttery gluten-free graham cracker crust, a generous layer of rich, melted chocolate, and a pillowy, golden-toasted marshmallow topping, were an absolute revelation. They disappeared from the dessert table in record time! My kids now request them constantly, and I love how much easier they are to make (and eat!) than traditional s’mores, while still delivering all that nostalgic, gooey, chocolatey goodness. They are, quite simply, a perfect slice of happiness.
What Exactly Are Gluten-Free S’mores Bars?
Gluten-Free S’mores Bars are a delightful and convenient baked dessert that captures all the iconic flavors and textures of traditional campfire s’mores in an easy-to-slice, shareable bar form, all while being completely free of gluten. Think of them as a deconstructed and then artfully reconstructed s’more, perfect for any occasion, no campfire needed.
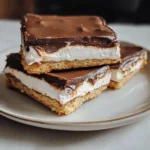
The foundation of these bars is typically a buttery, slightly sweet crust made from crushed gluten-free graham crackers mixed with melted butter and sometimes a touch of sugar. This crust provides the signature graham cracker flavor and a satisfyingly crumbly base. Layered on top of this crust is a generous spread of chocolate. This can be in the form of chocolate chips (milk, semi-sweet, or dark), chopped chocolate bars, or even a combination, which melts during baking into a luscious, gooey layer. The grand finale is the marshmallow topping. This is usually achieved by scattering mini marshmallows or arranging larger marshmallow halves over the chocolate layer. When baked, the marshmallows puff up, become wonderfully soft and gooey on the inside, and often achieve a beautifully toasted, golden-brown exterior, mimicking the effect of a perfectly toasted campfire marshmallow. The result is a multi-layered treat that offers the familiar and beloved taste of s’mores in a neater, more portable, and entirely gluten-free package.
Why You’ll Fall in Love with This Gluten-Free S’mores Bars Recipe
Prepare to be utterly charmed by this Gluten-Free S’mores Bars recipe; it’s a game-changer for s’mores enthusiasts and gluten-free bakers alike. Here’s why you’ll be smitten:
- All the S’mores Flavor, None of the Fuss: Enjoy the classic taste combination of graham crackers, chocolate, and toasted marshmallows without needing a campfire or dealing with sticky fingers from individual assembly.
- Perfectly Textured Layers: From the buttery, crumbly gluten-free graham cracker crust to the rich, melted chocolate layer and the soft, gooey, golden-toasted marshmallow topping, every bite is a symphony of delightful textures.
- Effortlessly Gluten-Free: These bars are so delicious and satisfying that no one will ever guess they’re gluten-free. They prove that gluten-free desserts can be just as indulgent and crowd-pleasing.
- Easy to Make and Share: This recipe is relatively simple to put together, baked in a single pan, and easily cut into squares, making it perfect for parties, potlucks, bake sales, or family treats.
- Visually Stunning: The contrast of the golden crust, the dark chocolate, and the beautifully toasted marshmallow topping makes these bars incredibly appealing. They look as good as they taste!
- Customizable to Your Liking: You can easily adjust the type of chocolate (milk, semi-sweet, dark), the amount of marshmallows, or even add a sprinkle of sea salt to enhance the flavors.
- Year-Round S’mores Enjoyment: Craving s’mores in the middle of winter? No problem! These bars bring that beloved summer flavor indoors, any time of year.
- Crowd-Pleaser Guaranteed: It’s hard to find someone who doesn’t love the taste of s’mores. These bars are a guaranteed hit with both kids and adults.
- Less Mess, More Yum: Compared to traditional s’mores, these bars are significantly neater to eat, making them a more practical option for many situations.
- A Nostalgic Treat Reimagined: They offer a comforting taste of nostalgia in a sophisticated yet fun new format.
Get ready to bake a batch of pure joy that will have everyone asking for the recipe!
Gluten-Free S’mores Bars: The Complete Recipe
This recipe is designed for a perfectly balanced s’mores experience, with a sturdy crust, plenty of chocolate, and a generous marshmallow topping.
Yields: 16-20 bars
Prep time: 20 minutes
Bake time: 20-25 minutes
Cooling time: At least 1 hour (longer for neater slices)
Ingredients:
- For the Gluten-Free Graham Cracker Crust:
- 2 cups (approx. 220-240g) gluten-free graham cracker crumbs (from about 20-24 full gluten-free graham cracker sheets)
- ¼ cup (50g) granulated sugar (optional, depending on the sweetness of your graham crackers)
- ½ cup (113g or 1 stick) unsalted butter, melted
- For the Chocolate Layer:
- 1 ½ cups (255g) semi-sweet chocolate chips (or milk chocolate chips, or chopped chocolate bars, or a mix)
- Optional: ½ cup additional chocolate chips if you like an extra thick chocolate layer.
- For the Marshmallow Topping:
- 1 bag (10 ounces or approx. 280g) mini marshmallows
- Alternatively: About 30-40 large marshmallows, can be cut in half if preferred for more even coverage.
Equipment:
- 9×13 inch baking pan
- Parchment paper
- Food processor (optional, for making graham cracker crumbs) or a ziplock bag and rolling pin
- Medium mixing bowl
- Spatula
- Measuring cups and spoons
Instructions: Crafting Your Perfect Gluten-Free S’mores Bars
Follow these simple steps to create a pan of irresistible s’mores deliciousness:
Step 1: Preheat Oven and Prepare Pan
- Preheat your oven to 350°F (175°C).
- Line a 9×13 inch baking pan with parchment paper, leaving an overhang on at least two opposite sides. This overhang will act as “handles” to easily lift the bars out of the pan once cooled, making slicing much neater. Lightly grease the parchment paper or spray with non-stick cooking spray if desired, though often not necessary with a buttery crust.
Step 2: Make the Gluten-Free Graham Cracker Crust
- Prepare Crumbs: If you don’t have pre-made gluten-free graham cracker crumbs, make them now. Place gluten-free graham cracker sheets into a food processor and pulse until they form fine crumbs. Alternatively, place them in a sturdy ziplock bag, seal it, and crush them with a rolling pin or the bottom of a heavy glass. You need 2 cups of crumbs.
- Combine Crust Ingredients: In a medium mixing bowl, combine the gluten-free graham cracker crumbs and the optional granulated sugar (use if your graham crackers are not very sweet or you prefer a sweeter crust).
- Add Butter: Pour the melted unsalted butter over the crumb mixture. Stir with a fork or spatula until all the crumbs are moistened and the mixture resembles wet sand.
- Press into Pan: Transfer the crumb mixture to the prepared 9×13 inch baking pan. Press the crumbs firmly and evenly into the bottom of the pan using the bottom of a measuring cup, a flat-bottomed glass, or your clean hands. Ensure an even layer.
- Pre-bake Crust (Optional but Recommended): For a crispier crust, pre-bake it for 8-10 minutes at 350°F (175°C), or until it’s lightly golden and fragrant. If you prefer a slightly softer crust, you can skip this pre-baking step.
Step 3: Add the Chocolate Layer
- Remove the pan from the oven if you pre-baked the crust.
- Sprinkle the chocolate chips (or chopped chocolate) evenly over the warm or unbaked crust. Spread them out to cover the entire surface.
Step 4: Add the Marshmallow Topping
- Scatter the mini marshmallows evenly over the chocolate layer, creating a generous, full blanket of marshmallows. If using large marshmallows, you can arrange them in neat rows or cut them in half horizontally for better coverage and easier melting. Try to cover the chocolate as completely as possible.
Step 5: Bake the Bars
- Return the pan to the preheated oven (or place it in if you didn’t pre-bake the crust).
- Bake for 12-18 minutes, or until the marshmallows are puffed up, soft, and beautifully golden brown on top. Keep a very close eye on them during the last few minutes, as marshmallows can go from perfectly toasted to burnt very quickly, especially under a broiler element if your oven has one on top. If they are browning too quickly before the chocolate is fully melted, you can loosely tent the pan with foil.
Step 6: Cool Completely (Crucial for Slicing!)
- Remove the pan from the oven and place it on a wire rack to cool completely. This is a very important step! The bars need to cool for at least 1-2 hours at room temperature, or even longer, for the chocolate to set and the marshmallows to firm up enough for clean slicing.
- For even neater slices, once mostly cool, you can chill the bars in the refrigerator for about 30-60 minutes before cutting.
Step 7: Slice and Serve
- Once the bars are completely cooled and set, use the parchment paper overhangs to carefully lift the entire slab out of the baking pan and onto a cutting board.
- Using a large, sharp knife, cut the slab into squares or rectangles. Wiping the knife clean with a damp, warm cloth between cuts can help make cleaner slices, especially if the marshmallow is still a bit sticky.
- Serve and enjoy your delicious homemade Gluten-Free S’mores Bars!
Nutrition Facts
- Servings: Approximately 16-20 bars (depending on how you slice them)
- Calories per serving (approximate): 180-250 calories per bar
Please note: Nutritional information is an estimate and can vary significantly based on specific brands of ingredients used (especially gluten-free graham crackers, chocolate, and marshmallows), the exact size of the bars, and whether optional sugar is added to the crust. These are indulgent treats.
These bars are:
- Gluten-Free (ensure all individual ingredients like graham crackers, chocolate, and marshmallows are certified gluten-free if needed for celiac disease).
- A delightful combination of textures and classic s’mores flavors.
- Best enjoyed as a treat within a balanced diet.
For more precise nutritional information, you would need to use a recipe nutrition calculator and input your specific ingredients and quantities.
Preparation Time
Understanding the time commitment for these delightful bars:
- Active Preparation Time: Approximately 20 minutes. This includes making crumbs, preparing the crust, and layering the ingredients.
- Baking Time (Crust Pre-bake + Main Bake): Approximately 20-28 minutes total in the oven.
- Cooling Time (Crucial): At least 1-2 hours at room temperature, longer if possible, or with a brief chill in the refrigerator for the neatest slices.
Total Time (from start to ready-to-slice, including minimum cooling): Approximately 2 to 3 hours.
Time-Saving Tip: Gluten-free graham cracker crumbs can be made ahead and stored in an airtight container. You can also assemble the bars (crust and chocolate layer) a few hours before you plan to add the marshmallows and bake, but it’s generally best to bake them relatively fresh for the optimal marshmallow texture.
How to Serve Gluten-Free S’mores Bars
These Gluten-Free S’mores Bars are wonderfully versatile. Here are some serving suggestions:
- As Is, At Room Temperature:
- Once cooled and sliced, they are perfect on their own. This is the simplest and most common way to enjoy them.
- Slightly Warmed (Carefully!):
- For an extra gooey experience, you can gently warm an individual bar in the microwave for just 5-10 seconds. Be extremely cautious, as the marshmallows and chocolate can become very hot very quickly.
- With a Scoop of Ice Cream:
- Serve a warm or room-temperature bar with a scoop of vanilla bean, chocolate, or even coffee-flavored ice cream for an incredibly decadent dessert.
- Drizzled with Extra Chocolate or Caramel:
- For an even more indulgent touch, drizzle a little melted chocolate (dark, milk, or white) or some caramel sauce over the sliced bars before serving.
- On a Dessert Buffet:
- Their neat, sliceable form makes them an excellent addition to any dessert table for parties, potlucks, or holiday gatherings.
- Picnic and Potluck Perfect:
- They travel relatively well once fully cooled and set, making them a great option to bring to outdoor events or share with friends. Transport them in a single layer in an airtight container.
- Alongside a Campfire (Ironically!):
- Bring a batch to your next campfire gathering for a less messy but equally thematic treat.
- With a Glass of Milk or Hot Beverage:
- Pair with a cold glass of milk (dairy or plant-based) or a warm cup of coffee, tea, or hot chocolate for a comforting experience.
No matter how you serve them, these bars are sure to evoke smiles and satisfy those s’mores cravings!
Additional Tips for the Best Gluten-Free S’mores Bars
- Choose Good Quality Gluten-Free Graham Crackers:
- The flavor of your graham crackers will significantly impact the crust. Use a brand of gluten-free graham crackers that you genuinely enjoy. Some popular brands include Schar, Kinnikinnick, or Pamela’s.
- Press the Crust Firmly:
- For a sturdy crust that holds together well, make sure to press the graham cracker crumb mixture firmly and evenly into the bottom of the pan. Using the flat bottom of a measuring cup or glass helps achieve this.
- Don’t Overbake the Marshmallows:
- Keep a very close eye on the marshmallows during the final stages of baking. They can go from perfectly golden and puffy to burnt in a matter of seconds, especially if your oven has a strong top heating element or if you’re using the broiler. If they are browning too quickly before the chocolate underneath has fully melted, you can loosely tent the pan with aluminum foil.
- Cool Completely for Clean Slices:
- This is perhaps the most crucial tip for presentation. Warm s’mores bars will be a gooey, delicious mess to cut. Allowing them to cool completely at room temperature (or even chilling briefly in the fridge) will help the chocolate set and the marshmallows firm up, resulting in much neater, cleaner slices.
- Parchment Paper Sling is Your Friend:
- Lining the pan with parchment paper, leaving an overhang on two sides, makes it incredibly easy to lift the entire cooled slab of bars out of the pan. This allows for easier and more precise cutting on a flat surface.
FAQ: Your Gluten-Free S’mores Bars Questions Answered
Q1: Can I use large marshmallows instead of mini ones?
A: Yes, you absolutely can. If using large marshmallows, you might want to cut them in half horizontally to get better coverage and a more even melted layer. You can arrange them in neat rows over the chocolate. Some people prefer the look and melt of large marshmallows.
Q2: How do I store Gluten-Free S’mores Bars?
A: Store the completely cooled and sliced bars in an airtight container at room temperature. They are best enjoyed within 2-3 days for optimal freshness and texture. If stacking, you might want to place parchment paper between layers to prevent the marshmallows from sticking.
Q3: Can I make these bars dairy-free as well?
A: Yes, with some careful substitutions, these can be made dairy-free:
* Butter: Replace the unsalted butter in the crust with a good quality dairy-free baking stick (e.g., Miyoko’s Kitchen Cultured Vegan Butter or Earth Balance Vegan Buttery Sticks) or melted coconut oil (this will impart a slight coconut flavor).
* Graham Crackers: Ensure your gluten-free graham crackers are also dairy-free (some brands may contain milk powder or butter).
* Chocolate Chips: Use dairy-free chocolate chips. Many brands offer excellent vegan chocolate chip options.
* Marshmallows: Most standard marshmallows are dairy-free (they typically use gelatin, not dairy), but always check the label. Dandies brand vegan marshmallows are a popular choice if you also need them to be gelatin-free/vegan.
Q4: My crust is too crumbly. What did I do wrong?
A: A too-crumbly crust can be due to a few things:
* Not Enough Butter: Ensure you’re using the correct amount of melted butter to bind the crumbs.
* Crumbs Too Coarse: If your graham cracker crumbs are too large, they won’t bind as well. Aim for fine crumbs.
* Not Pressed Firmly Enough: Really pack that crust down into the pan.
* Overbaking the Crust (if pre-baking): This can dry it out.
Q5: Can I add other mix-ins or toppings?
A: Absolutely! Feel free to get creative:
* Peanut Butter: Swirl some peanut butter into the melted chocolate layer or use peanut butter chips.
* Caramel: Drizzle caramel sauce over the chocolate layer before adding marshmallows.
* Nuts: Sprinkle some chopped peanuts or pecans over the chocolate.
* Sea Salt: A light sprinkle of flaky sea salt on top of the chocolate or marshmallows can enhance the flavors beautifully.
Just be mindful of keeping the additions gluten-free if needed.
Gluten Free S’mores Bars recipe
Ingredients
-
- For the Gluten-Free Graham Cracker Crust:
-
- 2 cups (approx. 220-240g) gluten-free graham cracker crumbs (from about 20–24 full gluten-free graham cracker sheets)
-
- ¼ cup (50g) granulated sugar (optional, depending on the sweetness of your graham crackers)
-
- ½ cup (113g or 1 stick) unsalted butter, melted
-
- For the Gluten-Free Graham Cracker Crust:
-
- For the Chocolate Layer:
-
- 1 ½ cups (255g) semi-sweet chocolate chips (or milk chocolate chips, or chopped chocolate bars, or a mix)
-
- Optional: ½ cup additional chocolate chips if you like an extra thick chocolate layer.
-
- For the Chocolate Layer:
- Alternatively: About 30-40 large marshmallows, can be cut in half if preferred for more even coverage.
- For the Marshmallow Topping:
-
- 1 bag (10 ounces or approx. 280g) mini marshmallows
- Alternatively: About 30-40 large marshmallows, can be cut in half if preferred for more even coverage.
-
- For the Marshmallow Topping:
-
- 1 bag (10 ounces or approx. 280g) mini marshmallows
- Alternatively: About 30-40 large marshmallows, can be cut in half if preferred for more even coverage.
-
- For the Marshmallow Topping:
-
- 1 bag (10 ounces or approx. 280g) mini marshmallows
- Alternatively: About 30-40 large marshmallows, can be cut in half if preferred for more even coverage.
-
- For the Marshmallow Topping:
-
- 1 bag (10 ounces or approx. 280g) mini marshmallows
- Alternatively: About 30-40 large marshmallows, can be cut in half if preferred for more even coverage.
-
Instructions
Step 1: Preheat Oven and Prepare Pan
-
- Preheat your oven to 350°F (175°C).
-
- Line a 9×13 inch baking pan with parchment paper, leaving an overhang on at least two opposite sides. This overhang will act as “handles” to easily lift the bars out of the pan once cooled, making slicing much neater. Lightly grease the parchment paper or spray with non-stick cooking spray if desired, though often not necessary with a buttery crust.
Step 2: Make the Gluten-Free Graham Cracker Crust
-
- Prepare Crumbs: If you don’t have pre-made gluten-free graham cracker crumbs, make them now. Place gluten-free graham cracker sheets into a food processor and pulse until they form fine crumbs. Alternatively, place them in a sturdy ziplock bag, seal it, and crush them with a rolling pin or the bottom of a heavy glass. You need 2 cups of crumbs.
-
- Combine Crust Ingredients: In a medium mixing bowl, combine the gluten-free graham cracker crumbs and the optional granulated sugar (use if your graham crackers are not very sweet or you prefer a sweeter crust).
-
- Add Butter: Pour the melted unsalted butter over the crumb mixture. Stir with a fork or spatula until all the crumbs are moistened and the mixture resembles wet sand.
-
- Press into Pan: Transfer the crumb mixture to the prepared 9×13 inch baking pan. Press the crumbs firmly and evenly into the bottom of the pan using the bottom of a measuring cup, a flat-bottomed glass, or your clean hands. Ensure an even layer.
-
- Pre-bake Crust (Optional but Recommended): For a crispier crust, pre-bake it for 8-10 minutes at 350°F (175°C), or until it’s lightly golden and fragrant. If you prefer a slightly softer crust, you can skip this pre-baking step.
Step 3: Add the Chocolate Layer
-
- Remove the pan from the oven if you pre-baked the crust.
-
- Sprinkle the chocolate chips (or chopped chocolate) evenly over the warm or unbaked crust. Spread them out to cover the entire surface.
Step 4: Add the Marshmallow Topping
-
- Scatter the mini marshmallows evenly over the chocolate layer, creating a generous, full blanket of marshmallows. If using large marshmallows, you can arrange them in neat rows or cut them in half horizontally for better coverage and easier melting. Try to cover the chocolate as completely as possible.
Step 5: Bake the Bars
-
- Return the pan to the preheated oven (or place it in if you didn’t pre-bake the crust).
-
- Bake for 12-18 minutes, or until the marshmallows are puffed up, soft, and beautifully golden brown on top. Keep a very close eye on them during the last few minutes, as marshmallows can go from perfectly toasted to burnt very quickly, especially under a broiler element if your oven has one on top. If they are browning too quickly before the chocolate is fully melted, you can loosely tent the pan with foil.
Step 6: Cool Completely (Crucial for Slicing!)
-
- Remove the pan from the oven and place it on a wire rack to cool completely. This is a very important step! The bars need to cool for at least 1-2 hours at room temperature, or even longer, for the chocolate to set and the marshmallows to firm up enough for clean slicing.
-
- For even neater slices, once mostly cool, you can chill the bars in the refrigerator for about 30-60 minutes before cutting.
Step 7: Slice and Serve
-
- Once the bars are completely cooled and set, use the parchment paper overhangs to carefully lift the entire slab out of the baking pan and onto a cutting board.
-
- Using a large, sharp knife, cut the slab into squares or rectangles. Wiping the knife clean with a damp, warm cloth between cuts can help make cleaner slices, especially if the marshmallow is still a bit sticky.
-
- Serve and enjoy your delicious homemade Gluten-Free S’mores Bars!
Nutrition
- Serving Size: one normal portion
- Calories: 180-250


