
There are certain foods that feel like a warm hug, and for me, rice pudding is at the top of that list. My grandmother used to make it on the stovetop, a slow-simmered pot of creamy comfort that she’d serve warm with a sprinkle of cinnamon. It was the ultimate comfort food. Years later, on a trip to Hawaii, I had a version of it that completely changed my perspective. It was a chilled coconut rice pudding served with chunks of fresh, sweet pineapple. The combination was a revelation—the familiar, creamy comfort of the pudding was suddenly alive with a bright, tropical sweetness. I knew I had to recreate that feeling at home. This recipe is the culmination of that memory, a fusion of my grandmother’s comforting classic and that unforgettable tropical dessert. It’s a gluten-free masterpiece that my whole family adores, a dish that can be served warm on a chilly evening or cold on a sunny afternoon. It’s a little bowl of sunshine, and it never fails to bring a smile to our faces.
The Perfect Gluten-Free Pineapple Rice Pudding: Creamy, Comforting, and Tropical
Rice pudding is a dessert with a global heritage, a humble yet beloved dish that speaks the universal language of comfort. Its beauty lies in its simplicity—rice, milk, and sugar transformed through slow cooking into a luscious, creamy concoction. However, achieving that perfect, velvety texture can be elusive. Too often, homemade versions end up either soupy or stodgy, lacking the luxurious mouthfeel that makes a good rice pudding so irresistible. Furthermore, adding fruit can be tricky, as the moisture and acidity can interfere with the texture.
This Gluten-Free Pineapple Rice Pudding recipe is designed to solve all of those problems. It’s a meticulously crafted guide to creating a pudding that is flawlessly creamy, perfectly sweet, and naturally gluten-free. The secret lies in using the right kind of rice, a specific cooking technique to release its starches, and enriching the base with egg yolks for a truly custardy finish. The addition of pineapple—either fresh or canned—cuts through the richness with a burst of tangy, tropical sunshine, elevating the humble pudding into something truly special. Whether you’re a seasoned rice pudding aficionado or a curious newcomer, this recipe will guide you to a dessert that is both nostalgically comforting and excitingly new.
The Anatomy of Creamy Rice Pudding: Your Ingredients List
Every ingredient in this recipe is chosen for a specific purpose, working in harmony to create the ultimate creamy texture and balanced flavor. Understanding their roles is the first step toward mastering this delicious gluten-free dessert.
- Arborio Rice: 1/2 cup (uncooked)
- Whole Milk (or full-fat canned coconut milk for dairy-free): 4 cups, divided
- Granulated Sugar (or Maple Syrup): 1/2 cup, plus 2 tablespoons, divided
- Fine Sea Salt: 1/4 teaspoon
- Large Egg Yolks: 2
- Pure Vanilla Extract: 1 1/2 teaspoons
- Unsalted Butter (or coconut oil for dairy-free): 1 tablespoon
- Ground Cinnamon: 1/4 teaspoon
- Pinch of Nutmeg: Optional
- Diced Pineapple (fresh or canned, drained): 1 cup
A Closer Look at the Key Ingredients
Arborio Rice: This is the hero of our recipe. Arborio is a short-grain Italian rice most famously used for risotto. Its high content of a starch called amylopectin is what makes it the perfect choice for rice pudding. As it cooks, this starch is released, thickening the milk and creating that signature creamy, velvety texture without needing a lot of cornstarch or other thickeners. While you can use other rice like long-grain white rice, it won’t produce the same luxurious creaminess. For the best results, stick with Arborio. Do not rinse the rice before cooking; we want to keep all that beautiful surface starch.
Whole Milk or Full-Fat Coconut Milk: The liquid base is crucial for richness. Whole dairy milk provides a classic, creamy flavor. However, for a truly spectacular and cohesive tropical flavor profile—and to make the recipe dairy-free—full-fat canned coconut milk is an exceptional choice. The coconut flavor is a natural partner to the pineapple, and its high fat content creates an incredibly rich and decadent pudding. You can also use other non-dairy milks like oat or almond milk, but they will result in a less creamy final product.
Sugar or Maple Syrup: This provides the sweetness. Granulated white sugar offers a clean, neutral sweetness that lets the pineapple and vanilla shine. For a more complex, slightly warmer flavor, pure maple syrup is a fantastic alternative. It pairs wonderfully with the cinnamon and nutmeg.
Egg Yolks: This is the secret to taking your rice pudding from simply “good” to “unforgettable.” Whisking egg yolks into the hot milk mixture (a technique called tempering) creates a rich, smooth custard base. It adds a beautiful golden color, a silky mouthfeel, and a depth of flavor that milk and sugar alone cannot achieve.
Pineapple: The star flavor! You have two main options here:
- Fresh Pineapple: Offers the best, brightest flavor and a slightly firmer texture. It’s well worth the effort of cutting it up yourself.
- Canned Pineapple: An excellent and convenient alternative. Be sure to buy pineapple chunks or tidbits packed in 100% juice, not heavy syrup. Drain the pineapple well before adding it to the pudding, but you can reserve the juice for other uses (like in a smoothie!).
Vanilla, Cinnamon, and Nutmeg: These are our warming spices. Pure vanilla extract provides that classic dessert aroma. Cinnamon adds warmth and a touch of spice that complements both the creamy base and the bright pineapple. A tiny pinch of nutmeg adds a subtle, fragrant complexity that rounds out all the flavors beautifully.
Step-by-Step Instructions to a Perfect Pineapple Rice Pudding
Patience is the key virtue when making rice pudding. The process is simple, but it requires gentle heat and a bit of stirring to coax the starches out of the rice and prevent scorching. Follow these steps for foolproof, creamy results.
Step 1: The Initial Simmer
In a medium, heavy-bottomed saucepan, combine the 1/2 cup of Arborio rice, 3 cups of the milk (reserving 1 cup for later), 1/2 cup of sugar, and 1/4 teaspoon of salt. Stir everything together. Bring the mixture to a simmer over medium heat, stirring occasionally to prevent the rice from sticking to the bottom.
Step 2: The Slow Cook
Once the mixture reaches a gentle simmer, reduce the heat to low. You want the pudding to be barely bubbling. Continue to cook, uncovered, for about 25-30 minutes. During this time, you need to stir it frequently—every 3-4 minutes is ideal. This agitation is crucial; it helps the rice release its starches and prevents a skin from forming on top. The mixture will gradually thicken as the rice absorbs the milk.
Step 3: Prepare the Custard Base
While the rice is simmering, prepare your egg yolk mixture. In a separate medium-sized bowl, whisk together the 2 large egg yolks and the remaining 2 tablespoons of sugar until the mixture is pale yellow and smooth. Set this aside.
Step 4: Temper the Eggs (The Most Important Step!)
After 25-30 minutes, the rice should be tender and the mixture should have thickened considerably. Now it’s time to temper the eggs. This process slowly acclimates the eggs to the heat, preventing them from scrambling.
Slowly ladle about half a cup of the hot rice mixture into the bowl with the whisked egg yolks, whisking constantly and vigorously as you pour. Once that is fully incorporated, add another half cup of the hot mixture, still whisking. Now, the egg mixture is warmed up. Slowly pour the warmed egg mixture back into the saucepan with the rest of the rice pudding, stirring constantly.
Step 5: The Final Thickening
Continue to cook the rice pudding over low heat for another 2-3 minutes, stirring constantly. The pudding will thicken noticeably into a rich, custard-like consistency. Be careful not to let it boil at this stage. Remove the saucepan from the heat.
Step 6: Finishing Touches
Stir in the remaining 1 cup of milk (this thins the pudding to the perfect consistency and helps cool it down slightly), the 1 1/2 teaspoons of vanilla extract, the 1 tablespoon of butter or coconut oil, and the 1/4 teaspoon of cinnamon and pinch of nutmeg (if using). Stir until the butter/oil has completely melted and everything is well combined.
Step 7: Add the Pineapple
Gently fold in the 1 cup of drained, diced pineapple. Stir just until it’s evenly distributed throughout the pudding.
Step 8: Cool and Serve
You can serve the pineapple rice pudding warm right away. Alternatively, for a chilled version, transfer the pudding to a bowl. To prevent a skin from forming, press a piece of plastic wrap directly onto the surface of the pudding. Chill in the refrigerator for at least 4 hours, or until completely cold. The pudding will thicken further as it chills.
A Look at the Nutrition Facts
This is a dessert, so it’s meant to be an indulgence. The nutritional information provided here is an estimate and can vary based on the specific ingredients used, particularly the type of milk and sweetener.
- Servings: 4-6
- Calories Per Serving: Approximately 350-480 kcal
The primary sources of calories are the carbohydrates from the rice and sugar, and the fats from the whole milk (or coconut milk) and egg yolks. This makes for a rich and satisfying dessert that is surprisingly filling. Using maple syrup instead of sugar or a lower-fat milk will slightly alter the calorie count.
Preparation and Cook Time Breakdown
While rice pudding requires some attention, the active time is manageable, and the results are well worth the effort.
- Preparation Time: 5 minutes
- Cook Time: 35-40 minutes
- Total Time: 40-45 minutes (plus chilling time, if serving cold)
This is a wonderful recipe for a lazy weekend afternoon or a quiet evening when you can enjoy the meditative process of stirring the pot and watching a few simple ingredients transform into something magical.
How to Serve Your Gluten-Free Pineapple Rice Pudding
This dessert is incredibly versatile and can be presented in many delightful ways. Here are some ideas to inspire you:
- Warm and Cozy: Serve it fresh off the stove in a warm bowl with an extra sprinkle of cinnamon on top for a comforting and cozy treat.
- Chilled and Tropical: For that true Hawaiian vibe, serve the pudding thoroughly chilled. It’s incredibly refreshing on a warm day.
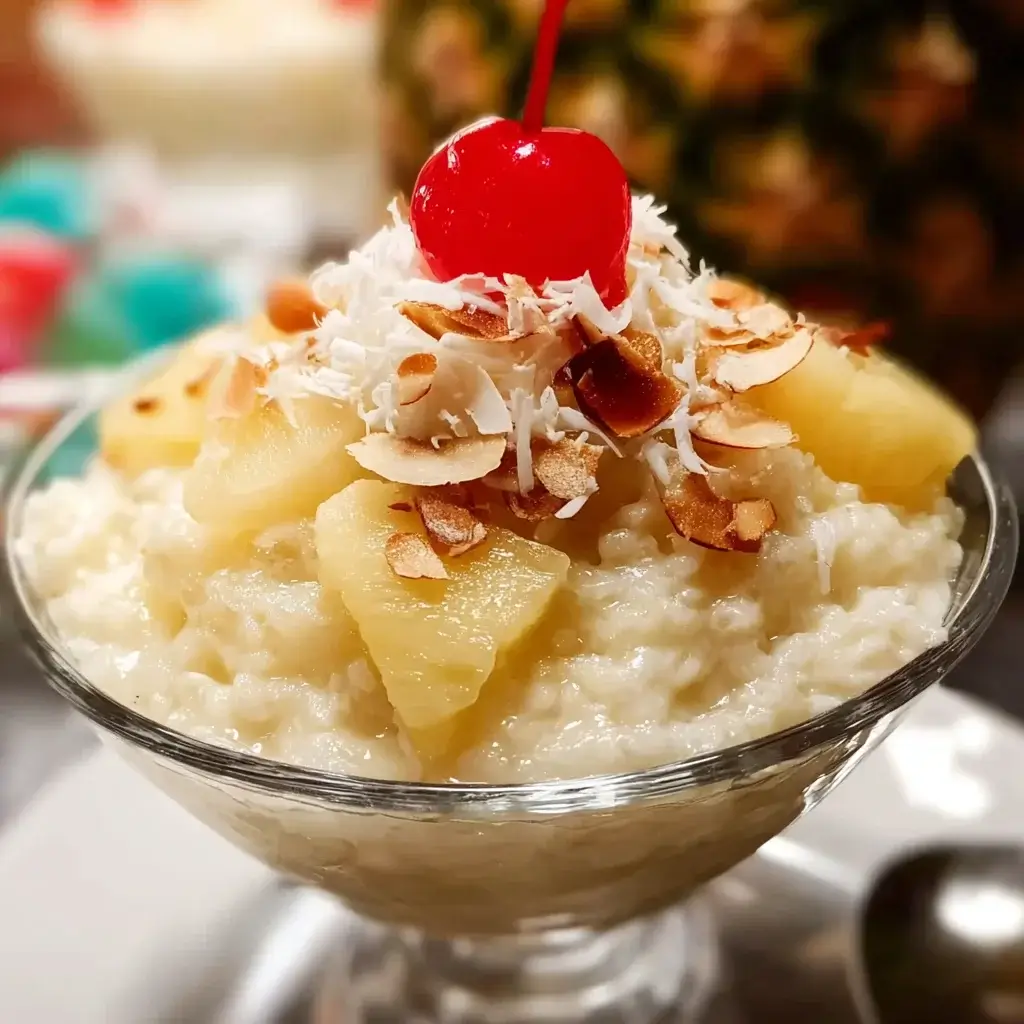
- The Toasted Coconut Crunch: The number one topping for this pudding is toasted coconut flakes. The nutty, crunchy texture is the perfect counterpoint to the creamy pudding and enhances the tropical theme.
- A Drizzle of Caramel: A drizzle of salted caramel sauce over the top creates a beautiful sweet-and-salty contrast.
- With Toasted Nuts: Add some crunch with toasted macadamia nuts, slivered almonds, or pecans.
- Fancy in a Glass: For a more elegant presentation, layer the chilled pudding in parfait glasses with extra diced pineapple and whipped cream (or coconut cream).
- A Boozy Twist (for adults): For an adult version, a tiny splash of dark rum or a pineapple-flavored liqueur stirred in at the end adds a wonderful depth of flavor.
Additional Tips for Rice Pudding Perfection
Master the art of rice pudding with these five expert tips designed to guarantee success.
- Don’t Rinse Your Rice: For most rice dishes, rinsing is a good idea to remove excess starch. For creamy rice pudding, it’s the opposite! We want that surface starch to dissolve into the milk, which acts as a natural thickener. Using unrinsed Arborio rice is a key step to achieving that coveted velvety texture.
- Low and Slow is the Way to Go: The temptation to crank up the heat to speed up the process is real, but it’s the enemy of good rice pudding. High heat will scorch the milk and sugar on the bottom of the pan before the rice has a chance to cook through and release its starch. Keep the heat low and allow for a gentle, lazy simmer.
- Master the Temper: Do not skip the egg tempering step. If you dump the cold egg yolks directly into the hot pot, you will instantly have sweet, scrambled eggs in your rice pudding. The slow, gradual introduction of the hot liquid to the eggs while whisking is non-negotiable for a smooth, custardy result.
- Embrace the Stir: Frequent stirring is essential. It prevents the rice from clumping and sticking to the bottom of the pan, ensures even cooking, and encourages the release of starch. Think of it as a meditative, essential part of the process.
- It Thickens As It Cools: Keep in mind that the pudding will thicken significantly as it cools down. When you take it off the stove, it should still be a bit looser than your desired final consistency. The final cup of milk added at the end helps achieve that perfect texture, whether you plan to serve it warm or cold. If your chilled pudding is too thick, you can always stir in another splash of milk before serving.
Gluten-Free Pineapple Rice Pudding: Your Questions Answered (FAQ)
Here are the answers to some common questions you might have about this recipe.
Q1: My rice pudding is too thick/gummy. What did I do wrong?
A: A gummy or overly thick rice pudding is usually a sign of overcooking. If the rice is cooked for too long, it can break down and release too much starch, leading to a pasty texture. Stick to the recommended cooking times and remember that it will continue to thicken as it cools. If it’s too thick after chilling, simply stir in a splash of milk until it reaches your desired consistency.
Q2: Can I use a different type of rice, like jasmine or brown rice?
A: You can, but it will significantly change the final product. Jasmine or Basmati rice won’t release as much starch, resulting in a less creamy pudding. Brown rice can be used, but it has a much firmer texture and a longer cooking time. You will need to increase the initial simmering time and may need to add more milk to get it to a tender state. For the classic, creamy texture, Arborio rice remains the best choice.
Q3: Is this recipe dairy-free?
A: Yes, this recipe is very easy to make dairy-free! As detailed in the ingredients section, simply substitute the whole milk with full-fat canned coconut milk and use coconut oil or a vegan butter substitute in place of the unsalted butter. The result is just as—if not more—delicious and leans beautifully into the tropical flavor profile.
Q4: Can I make this rice pudding ahead of time?
A: Absolutely! Rice pudding is a fantastic make-ahead dessert. In fact, many people prefer it chilled, which requires it to be made in advance. Simply prepare the recipe as directed and store it in an airtight container in the refrigerator for up to 4 days. Remember to press plastic wrap directly on the surface before chilling to prevent a skin from forming.
Q5: Can I use other fruits instead of pineapple?
A: Yes, this recipe is a great base for other fruit variations. Diced mango would be a wonderful tropical alternative. You could also stir in mashed banana at the end (along with the vanilla) for a banana cream pie-style pudding. For a more classic take, you could rehydrate some raisins or dried cherries in a bit of warm water and fold them in instead of the pineapple.

Gluten Free Pineapple Rice Pudding recipe
Ingredients
-
Arborio Rice: 1/2 cup (uncooked)
-
Whole Milk (or full-fat canned coconut milk for dairy-free): 4 cups, divided
-
Granulated Sugar (or Maple Syrup): 1/2 cup, plus 2 tablespoons, divided
-
Fine Sea Salt: 1/4 teaspoon
-
Large Egg Yolks: 2
-
Pure Vanilla Extract: 1 1/2 teaspoons
-
Unsalted Butter (or coconut oil for dairy-free): 1 tablespoon
-
Ground Cinnamon: 1/4 teaspoon
-
Pinch of Nutmeg: Optional
-
Diced Pineapple (fresh or canned, drained): 1 cup
Instructions
Step 1: The Initial Simmer
In a medium, heavy-bottomed saucepan, combine the 1/2 cup of Arborio rice, 3 cups of the milk (reserving 1 cup for later), 1/2 cup of sugar, and 1/4 teaspoon of salt. Stir everything together. Bring the mixture to a simmer over medium heat, stirring occasionally to prevent the rice from sticking to the bottom.
Step 2: The Slow Cook
Once the mixture reaches a gentle simmer, reduce the heat to low. You want the pudding to be barely bubbling. Continue to cook, uncovered, for about 25-30 minutes. During this time, you need to stir it frequently—every 3-4 minutes is ideal. This agitation is crucial; it helps the rice release its starches and prevents a skin from forming on top. The mixture will gradually thicken as the rice absorbs the milk.
Step 3: Prepare the Custard Base
While the rice is simmering, prepare your egg yolk mixture. In a separate medium-sized bowl, whisk together the 2 large egg yolks and the remaining 2 tablespoons of sugar until the mixture is pale yellow and smooth. Set this aside.
Step 4: Temper the Eggs (The Most Important Step!)
After 25-30 minutes, the rice should be tender and the mixture should have thickened considerably. Now it’s time to temper the eggs. This process slowly acclimates the eggs to the heat, preventing them from scrambling.
Slowly ladle about half a cup of the hot rice mixture into the bowl with the whisked egg yolks, whisking constantly and vigorously as you pour. Once that is fully incorporated, add another half cup of the hot mixture, still whisking. Now, the egg mixture is warmed up. Slowly pour the warmed egg mixture back into the saucepan with the rest of the rice pudding, stirring constantly.
Step 5: The Final Thickening
Continue to cook the rice pudding over low heat for another 2-3 minutes, stirring constantly. The pudding will thicken noticeably into a rich, custard-like consistency. Be careful not to let it boil at this stage. Remove the saucepan from the heat.
Step 6: Finishing Touches
Stir in the remaining 1 cup of milk (this thins the pudding to the perfect consistency and helps cool it down slightly), the 1 1/2 teaspoons of vanilla extract, the 1 tablespoon of butter or coconut oil, and the 1/4 teaspoon of cinnamon and pinch of nutmeg (if using). Stir until the butter/oil has completely melted and everything is well combined.
Step 7: Add the Pineapple
Gently fold in the 1 cup of drained, diced pineapple. Stir just until it’s evenly distributed throughout the pudding.
Step 8: Cool and Serve
You can serve the pineapple rice pudding warm right away. Alternatively, for a chilled version, transfer the pudding to a bowl. To prevent a skin from forming, press a piece of plastic wrap directly onto the surface of the pudding. Chill in the refrigerator for at least 4 hours, or until completely cold. The pudding will thicken further as it chills.
Nutrition
- Serving Size: one normal portion
- Calories: 350-480 kcal