


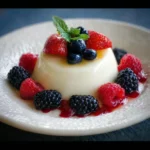
There are some desserts that command attention with their elaborate layers and bold decorations. And then there are those that captivate with their quiet, understated elegance. Panna Cotta falls firmly into the latter category. I’ll never forget the first time I ordered it at a little Italian restaurant tucked away on a cobblestone street. It arrived at the table, a simple, pristine white mound, shimmering ever so slightly under the dim lights. It looked almost too plain. But then, the server placed a small pitcher of ruby-red raspberry coulis beside it. As I poured the sauce, it cascaded over the creamy peak, creating a stunning contrast. The first spoonful was a revelation. It was cool, impossibly smooth, and melted on my tongue with a delicate sweetness and a whisper of vanilla. It wasn’t just a dessert; it was a moment of pure, uncluttered bliss. I became obsessed with recreating that perfect texture—that signature, gentle wobble that signals a panna cotta made with love and precision. The best part? I discovered this masterpiece of Italian cuisine is, in its purest form, completely and naturally gluten-free. This recipe is the culmination of that obsession, a foolproof guide to bringing that little piece of Italian magic into your own kitchen. It has become my go-to for elegant dinner parties, a dessert that never fails to elicit gasps of delight, proving that sometimes, the most profound statements are also the most simple.
The Ultimate Gluten-Free Panna Cotta: A Guide to Silky Perfection
Welcome to your definitive guide to creating the most exquisitely smooth and creamy Gluten-Free Panna Cotta. The name “panna cotta” literally translates from Italian to “cooked cream,” and that is the beautiful, honest simplicity of this dessert. It’s a testament to the idea that you don’t need a long list of complicated ingredients to create something truly spectacular. Because its foundation is built on cream, sugar, and a setting agent like gelatin, it is inherently gluten-free, making it a safe and sophisticated choice for everyone at your table.
This recipe will demystify the process, ensuring you achieve that perfect, delicate set—not rubbery, not soupy, but a gentle, melt-in-your-mouth texture that has made it a world-renowned dessert. Forget the idea that this is a dessert reserved for fancy restaurants. We are bringing that five-star experience right into your home kitchen.
Why You Will Adore This Panna Cotta Recipe
Before we dive into the method, let’s celebrate why this specific recipe will become a treasured part of your dessert repertoire.
- Naturally and Effortlessly Gluten-Free: No substitutions, no special flours, no “gluten-free versions” needed. This dessert is gluten-free in its classic, authentic form. It’s an inclusive dessert that feels luxurious and intentional, not like an afterthought.
- Deceptively Simple: With only a handful of common ingredients and about 15 minutes of active prep time, you can create a dessert that looks and tastes incredibly elegant. It’s the ultimate high-reward, low-effort recipe.
- The Perfect Make-Ahead Dessert: Panna cotta needs time to chill and set, making it the ideal dessert for entertaining. You can prepare it a day or two in advance, leaving you free to focus on your main course and guests on the day of your event.
- A Blank Canvas for Flavor: While the classic vanilla panna cotta is divine, it’s also a perfect base for creativity. You can infuse the cream with different flavors and pair it with an endless variety of sauces, fruits, and toppings. We’ll explore plenty of ideas below.
- Unforgettably Luxurious Texture: The goal of panna cotta is its texture, and this recipe delivers. We’ve perfected the ratios to ensure a silky, creamy consistency with just the right amount of “wobble.” It’s a sensory experience that is pure, simple, and utterly indulgent.
Complete Ingredients for Classic Vanilla Panna Cotta
The simplicity of this recipe means the quality of each ingredient shines through. Use the best you can find for the most delicious results. This recipe makes 6 individual servings.
- For the Panna Cotta:
- 1 ½ cups (360ml) heavy cream (at least 35% fat content)
- ½ cup (120ml) whole milk
- ⅓ cup (65g) granulated sugar
- 1 ½ teaspoons (about ½ a packet) unflavored powdered gelatin
- 1 teaspoon pure vanilla extract, or 1 whole vanilla bean
- A tiny pinch of fine sea salt (to enhance the flavors)
- For a Quick & Easy Raspberry Coulis (Optional Topping):
- 1 ½ cups (180g) fresh or frozen raspberries
- 3 tablespoons granulated sugar (or more, to taste)
- 1 tablespoon fresh lemon juice
Step-by-Step Instructions for Perfect Panna Cotta
Follow these steps with care. The process is simple, but precision is key to achieving that perfect texture.
Step 1: Bloom the Gelatin
This is the most critical step for a smooth, lump-free panna cotta. Pour the cold whole milk into a small bowl. Sprinkle the powdered gelatin evenly over the surface of the milk. Do not stir it in immediately. Let it sit undisturbed for 5-10 minutes. The gelatin will absorb the liquid and “bloom,” becoming soft and jellied. This process ensures the gelatin will dissolve smoothly into the warm cream later.
Step 2: Warm the Cream and Infuse with Vanilla
While the gelatin is blooming, combine the heavy cream, granulated sugar, and the pinch of salt in a medium saucepan.
- If using a vanilla bean: Split the vanilla bean in half lengthwise with a sharp paring knife. Use the back of the knife to scrape out the tiny black seeds from inside the pod. Add both the seeds and the scraped pod to the cream mixture.
- If using vanilla extract: You will add this later, off the heat.
Place the saucepan over medium-low heat. Stir gently and constantly until the sugar has completely dissolved and the cream is warm and steaming. Do not let the mixture boil! Boiling the cream can weaken the gelatin’s setting power and can cause the mixture to curdle. You want it just hot enough to dissolve the sugar and gelatin.
Step 3: Dissolve the Bloomed Gelatin
Once the cream is warm, remove it from the heat. If you used a vanilla bean pod, remove it from the cream now. Add the entire bloomed gelatin-and-milk mixture to the warm cream. Whisk gently but thoroughly for about 1-2 minutes, until you are certain all the gelatin has completely dissolved. There should be no grainy texture remaining. If you are using vanilla extract, stir it in now.
Step 4: Strain the Mixture (The Pro-Secret)
For an absolutely flawless, silky-smooth texture, pour the panna cotta mixture through a fine-mesh sieve into a liquid measuring cup or a pitcher with a spout. This will catch any tiny bits of undissolved gelatin or vanilla bean pod remnants, guaranteeing a perfect final product.
Step 5: Pour into Molds and Chill
Lightly grease 6 small ramekins, dariole molds, or even small glasses with a neutral oil if you plan on unmolding the panna cotta later. If you plan to serve them directly in the glasses, you don’t need to grease them.
Carefully pour the strained mixture evenly among your chosen molds. Cover each one loosely with plastic wrap (be sure the wrap doesn’t touch the surface of the liquid) and place them in the refrigerator. Chill for at least 4 hours, but preferably overnight, until completely firm and set.
Step 6: Prepare the Raspberry Coulis (While Panna Cotta Chills)
In a small saucepan, combine the raspberries (fresh or frozen), sugar, and lemon juice. Cook over medium heat, stirring and mashing the berries with a spoon as they warm up. Bring the mixture to a gentle simmer and cook for 5-7 minutes, until the berries have broken down and the sauce has thickened slightly.
For a smooth, seedless sauce, press the mixture through a fine-mesh sieve into a bowl, using a spatula to push all the liquid through. Discard the seeds left in the sieve. Let the coulis cool completely before serving. It can be stored in an airtight container in the refrigerator for up to a week.
Nutrition Facts
- Servings: 6 individual servings
- Calories per serving: Approximately 300-350 kcal per panna cotta (without topping). The final count will vary based on the fat content of your cream and the amount and type of topping used.
Preparation and Cooking Time
- Active Preparation Time: 15 minutes
- Chilling Time: 4 hours to overnight
- Total Time: Approximately 4 hours and 15 minutes (minimum)
How to Serve Your Gluten-Free Panna Cotta
Presentation is what transforms this simple dessert into a showstopper. Here’s how to serve it with flair.
- Unmolding for a Classic Presentation:
- Fill a bowl with an inch of hot water.
- Briefly dip the bottom of one ramekin into the hot water for 5-10 seconds. Be very quick!
- Run a thin knife around the edge to loosen it.
- Invert a dessert plate over the top of the ramekin, and then, holding them together firmly, flip them over. The panna cotta should release onto the plate with a gentle shake.
- Serve Simply in Glasses: For a rustic, no-fuss approach, simply serve the panna cotta directly in the pretty glasses or jars you chilled it in.
- Perfect Pairings and Toppings (All Gluten-Free):
- Fruit Sauces: The classic raspberry coulis is a winner, but also try a mango-passionfruit purée, a rich cherry compote, or a tart lemon curd.
- Fresh Fruit: A simple arrangement of fresh berries, sliced ripe peaches, mission figs, or pomegranate seeds adds color and freshness.
- Caramel & Chocolate: A drizzle of salted caramel sauce, a rich chocolate ganache, or delicate chocolate shavings offer a decadent contrast.
- A Touch of Crunch: Sprinkle with toasted, slivered almonds, chopped pistachios, or a crumble of gluten-free amaretti cookies.
- Herbal Infusions: Garnish with a sprig of fresh mint or basil for an unexpected, sophisticated aromatic note that pairs wonderfully with fruit.
5 Additional Tips for Panna Cotta Perfection
Master this dessert with these five crucial tips that separate the amateurs from the pros.
- Respect the Bloom: We can’t stress this enough. Properly blooming the gelatin in a cold liquid is the single most important step for success. Sprinkling it over a warm liquid or dumping it all in at once will cause it to clump, resulting in a lumpy dessert.
- Use Full-Fat Dairy: This is not the time for low-fat substitutes. The luxurious, creamy mouthfeel of panna cotta comes from the high fat content of heavy cream. Using lower-fat alternatives will result in a less rich flavor and can sometimes lead to a more icy or less stable set.
- Find the Perfect Wobble: The perfect panna cotta has a delicate wobble. Too much gelatin will make it stiff and rubbery. Too little, and it won’t set. This recipe has been tested for the perfect ratio, but if you want an even softer set for serving in a glass, you can slightly reduce the gelatin to 1 ¼ teaspoons.
- Control Your Temperature: Never, ever boil the cream and gelatin mixture. A gentle warming is all that’s needed to dissolve the sugar and activate the bloomed gelatin. High heat can damage the gelatin’s proteins, compromising its ability to set properly.
- Plan Ahead: While the active time is short, panna cotta cannot be rushed. It truly needs a minimum of 4 hours to set, but its texture and flavor are even better when it’s allowed to chill overnight. Embrace its make-ahead nature for stress-free entertaining.
Frequently Asked Questions (FAQ)
Here are the answers to the most common queries about making this elegant gluten-free dessert.
1. Is panna cotta always gluten-free?
In its traditional form, yes. The core ingredients—cream, milk, sugar, vanilla, and gelatin—are all naturally free from gluten. However, when ordering in a restaurant, you should always confirm that any accompanying sauces, garnishes, or cookie crumbles are also gluten-free.
2. Can I make a dairy-free or vegan version of this recipe?
Yes, you can! For a dairy-free version, substitute the heavy cream and whole milk with full-fat canned coconut milk and a creamy nut milk like cashew. For a fully vegan version, you must also replace the gelatin. Use 1 ½ teaspoons of agar-agar powder as a substitute. The method is slightly different: whisk the agar-agar into the cold liquid, then bring the entire mixture to a boil for 2 minutes, as agar-agar needs to be boiled to activate. It will set more firmly and quickly than gelatin.
3. My panna cotta didn’t set. What went wrong?
This is the most common issue and usually has one of three causes: 1) The gelatin wasn’t measured correctly or wasn’t properly bloomed and dissolved. 2) The cream mixture was boiled, which damaged the gelatin. 3) You used certain fresh tropical fruits like pineapple, kiwi, or mango in the mixture itself (not as a topping), as they contain enzymes that break down gelatin.
4. How far in advance can I make panna cotta?
Panna cotta is an excellent make-ahead dessert. You can prepare it and keep it chilled in the refrigerator for up to 3 days. Keep it covered to prevent it from absorbing any other fridge odors. It’s best to add any fresh toppings or sauces just before serving.
5. What is the difference between panna cotta and crème brûlée?
While both are creamy, classic European desserts, they are quite different. Panna cotta is an Italian, eggless “cooked cream” dessert that is set with gelatin and served cold. Crème brûlée is a French, baked custard made with egg yolks, cream, and sugar, and is famous for its contrasting hard, caramelized sugar crust that is torched just before serving.
Gluten Free Panna Cotta recipe
Ingredients
-
For the Panna Cotta:
-
1 ½ cups (360ml) heavy cream (at least 35% fat content)
-
½ cup (120ml) whole milk
-
⅓ cup (65g) granulated sugar
-
1 ½ teaspoons (about ½ a packet) unflavored powdered gelatin
-
1 teaspoon pure vanilla extract, or 1 whole vanilla bean
-
A tiny pinch of fine sea salt (to enhance the flavors)
-
-
For a Quick & Easy Raspberry Coulis (Optional Topping):
-
1 ½ cups (180g) fresh or frozen raspberries
-
3 tablespoons granulated sugar (or more, to taste)
-
1 tablespoon fresh lemon juice
-
Instructions
Step 1: Bloom the Gelatin
This is the most critical step for a smooth, lump-free panna cotta. Pour the cold whole milk into a small bowl. Sprinkle the powdered gelatin evenly over the surface of the milk. Do not stir it in immediately. Let it sit undisturbed for 5-10 minutes. The gelatin will absorb the liquid and “bloom,” becoming soft and jellied. This process ensures the gelatin will dissolve smoothly into the warm cream later.
Step 2: Warm the Cream and Infuse with Vanilla
While the gelatin is blooming, combine the heavy cream, granulated sugar, and the pinch of salt in a medium saucepan.
-
If using a vanilla bean: Split the vanilla bean in half lengthwise with a sharp paring knife. Use the back of the knife to scrape out the tiny black seeds from inside the pod. Add both the seeds and the scraped pod to the cream mixture.
-
If using vanilla extract: You will add this later, off the heat.
Place the saucepan over medium-low heat. Stir gently and constantly until the sugar has completely dissolved and the cream is warm and steaming. Do not let the mixture boil! Boiling the cream can weaken the gelatin’s setting power and can cause the mixture to curdle. You want it just hot enough to dissolve the sugar and gelatin.
Step 3: Dissolve the Bloomed Gelatin
Once the cream is warm, remove it from the heat. If you used a vanilla bean pod, remove it from the cream now. Add the entire bloomed gelatin-and-milk mixture to the warm cream. Whisk gently but thoroughly for about 1-2 minutes, until you are certain all the gelatin has completely dissolved. There should be no grainy texture remaining. If you are using vanilla extract, stir it in now.
Step 4: Strain the Mixture (The Pro-Secret)
For an absolutely flawless, silky-smooth texture, pour the panna cotta mixture through a fine-mesh sieve into a liquid measuring cup or a pitcher with a spout. This will catch any tiny bits of undissolved gelatin or vanilla bean pod remnants, guaranteeing a perfect final product.
Step 5: Pour into Molds and Chill
Lightly grease 6 small ramekins, dariole molds, or even small glasses with a neutral oil if you plan on unmolding the panna cotta later. If you plan to serve them directly in the glasses, you don’t need to grease them.
Carefully pour the strained mixture evenly among your chosen molds. Cover each one loosely with plastic wrap (be sure the wrap doesn’t touch the surface of the liquid) and place them in the refrigerator. Chill for at least 4 hours, but preferably overnight, until completely firm and set.
Step 6: Prepare the Raspberry Coulis (While Panna Cotta Chills)
In a small saucepan, combine the raspberries (fresh or frozen), sugar, and lemon juice. Cook over medium heat, stirring and mashing the berries with a spoon as they warm up. Bring the mixture to a gentle simmer and cook for 5-7 minutes, until the berries have broken down and the sauce has thickened slightly.
For a smooth, seedless sauce, press the mixture through a fine-mesh sieve into a bowl, using a spatula to push all the liquid through. Discard the seeds left in the sieve. Let the coulis cool completely before serving. It can be stored in an airtight container in the refrigerator for up to a week.
Nutrition
- Serving Size: one normal portion
- Calories: 300-350


