

Of all the desserts in the world that seem to whisper of fancy restaurants and professional pastry chefs, crème caramel holds a special place. For years, I was utterly intimidated by it. The thought of making caramel from scratch felt like a high-wire act without a net, and the magical “flip” at the end seemed destined for disaster in my kitchen. Then one day, hosting a dinner party for a dear friend with celiac disease, I found myself searching for an elegant dessert that was naturally gluten-free. Crème caramel was the answer. I decided to face my fears, and what I discovered was a dessert that is not only stunningly impressive but also deceptively simple. The first time I successfully flipped one from its ramekin, watching that perfect, amber liquid pool around the wobbly, pale custard, was a moment of pure culinary triumph. The silence that fell over the dinner table after the first spoonful, followed by a chorus of “wows,” was all the confirmation I needed. This recipe has since become my go-to for special occasions. It’s a testament to the fact that you don’t need flour or complex ingredients to create something truly spectacular. You just need eggs, milk, sugar, and a little bit of patience.
The Ultimate Gluten-Free Crème Caramel: A Foolproof Guide
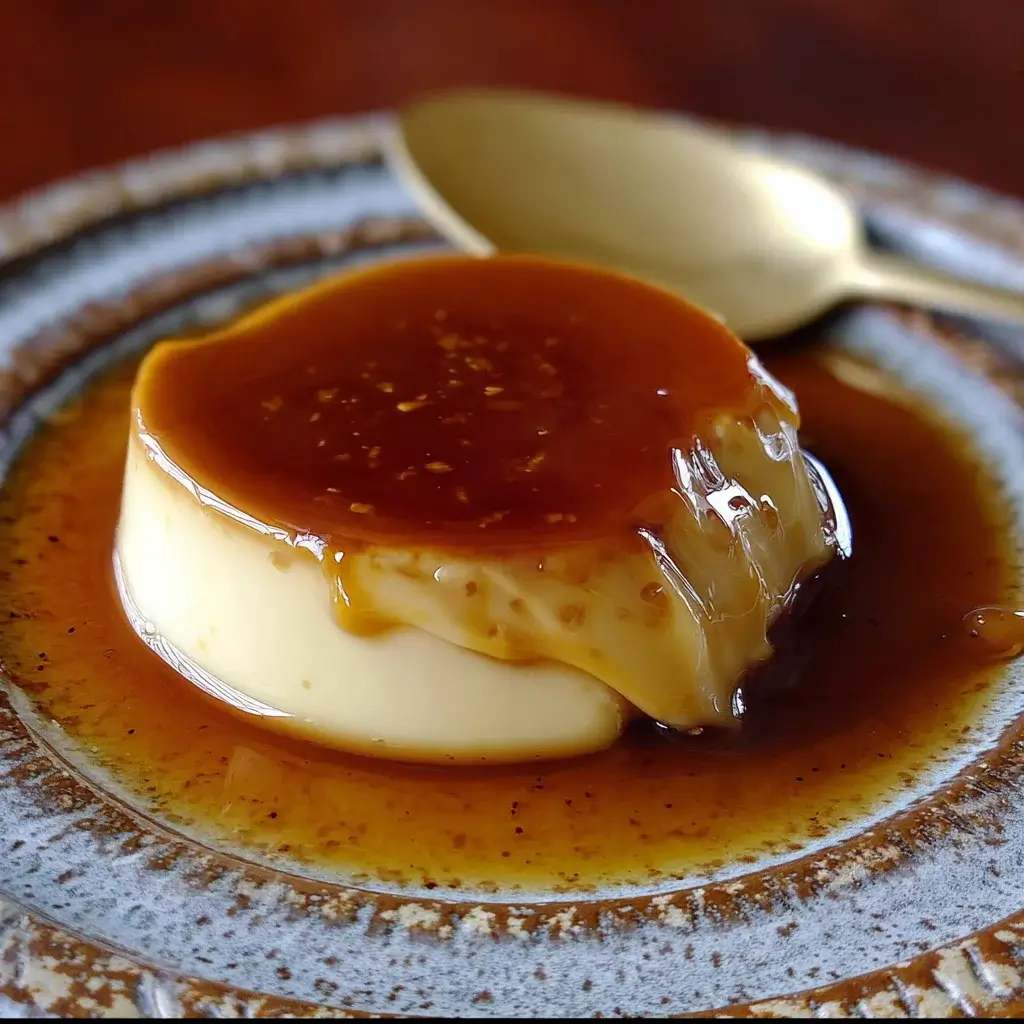
Crème caramel, often called flan in Spanish-speaking countries, is a classic dessert that relies on the simple alchemy of cooking. At its heart, it consists of two components: a layer of soft caramel sauce and a delicate custard. The magic happens during the baking and chilling process. The custard is baked in a ramekin that has been lined with caramel. As it cools, the hardened caramel miraculously liquefies, creating its own sauce. When inverted onto a plate for serving, the custard unmolds, and the liquid caramel cascades down the sides.
The best part? This show-stopping dessert is naturally 100% gluten-free. Its structure and richness come from eggs and dairy, not from any type of flour or grain. This makes it an ideal, worry-free choice for serving guests with gluten sensitivities or celiac disease, without any need for special substitutions or “GF” versions. This recipe will demystify the process, guiding you through each step to ensure a silky-smooth custard and a perfectly bittersweet caramel sauce every single time.
Crème Caramel vs. Flan vs. Crème Brûlée
While often used interchangeably, there are subtle differences:
- Crème Caramel: Typically a French preparation using a custard base of eggs, milk, sugar, and vanilla. It’s baked with the caramel on the bottom and then inverted for serving.
- Flan: The Latin American and Spanish cousin. It often has a richer, denser texture, frequently made with condensed milk and/or evaporated milk in addition to whole eggs, giving it a more pronounced sweetness and body.
- Crème Brûlée: This dessert is a baked custard served in its ramekin with a hardened, brittle layer of caramelized sugar on top, which is famously cracked with a spoon. There is no liquid caramel sauce involved.
This recipe focuses on the classic, elegant, and lighter French-style crème caramel.
Complete Recipe Ingredients
Precision is important for this recipe. Using the correct type of dairy and eggs will yield the best results. All ingredients should ideally be at room temperature, especially the eggs, to ensure the custard mixes smoothly.
For the Caramel:
- Granulated Sugar: 3/4 cup (150g)
- Water: 3 tablespoons
For the Silky Custard:
- Whole Milk: 1 ½ cups (360ml)
- Heavy Cream: 1/2 cup (120ml)
- Granulated Sugar: 1/2 cup (100g)
- Large Eggs: 4
- Large Egg Yolks: 2 (these are key for extra richness and a silkier texture)
- Vanilla Extract: 2 teaspoons, or 1 whole vanilla bean for a more intense flavor
- Salt: 1/4 teaspoon
Equipment Needed:
- Six 6-ounce (175ml) ramekins or custard cups
- A large baking dish or roasting pan that can hold all the ramekins with space around them
- A fine-mesh sieve or strainer
Step-by-Step Instructions
Follow these instructions carefully. The most crucial parts are the making of the caramel and the gentle baking of the custard in a water bath. Don’t rush the process.
Part 1: Preparing the Oven and Ramekins
- Arrange Oven Rack and Preheat: Position a rack in the center of your oven and preheat it to 325°F (165°C). A lower, slower cooking temperature is essential for a smooth, non-curdled custard.
- Prepare the Ramekins: Have your six 6-ounce ramekins clean, dry, and ready on your countertop. Place them inside the larger baking dish. This will make it easier to transport them once they are filled.
Part 2: Making the Liquid Gold Caramel
This step requires your full attention. Caramel can go from perfect to burnt in a matter of seconds.
- Combine Sugar and Water: In a small, heavy-bottomed saucepan, combine the 3/4 cup of sugar and 3 tablespoons of water. Stir gently just to moisten all the sugar.
- Cook the Caramel: Place the saucepan over medium-high heat. Bring the mixture to a boil. From this point on, do not stir the mixture with a spoon. Stirring can cause the sugar to crystallize. If you need to even out the cooking, simply swirl the pan gently by its handle.
- Watch for Color Change: Continue to cook, swirling occasionally, for about 5-8 minutes. The mixture will first be clear and bubbly, then will slowly start to turn a pale straw color, then golden, and finally a beautiful, deep amber—like the color of honey or a copper penny. This is the perfect stage. Be brave and let it get dark; a pale caramel will be overly sweet, while a deep amber caramel has a wonderful bittersweet note that perfectly balances the rich custard.
- Stop the Cooking: As soon as it reaches the deep amber color, immediately remove the pan from the heat. The residual heat will continue to cook it, so you must act quickly.
- Pour into Ramekins: Working carefully and swiftly (caramel is extremely hot!), divide the caramel evenly among the six ramekins. Immediately tilt and swirl each ramekin to coat the bottom surface. The caramel will begin to harden almost instantly. You may hear crackling sounds as the hot caramel hits the cooler ramekins; this is normal. Set the ramekins aside.
Part 3: Creating the Silky Custard
- Heat the Milk and Cream: In the same saucepan (no need to wash it out completely), combine the whole milk and heavy cream. If using a vanilla bean, split it lengthwise, scrape out the seeds, and add both the pod and the seeds to the milk mixture. Heat over medium heat until it is just simmering and bubbles are forming around the edges. This is called scalding. Do not let it come to a rolling boil. Once scalded, remove from the heat.
- Whisk Eggs and Sugar: While the milk is heating, in a separate medium-sized mixing bowl, whisk together the 4 whole eggs, 2 egg yolks, 1/2 cup of sugar, and the salt. Whisk just until the mixture is smooth and slightly pale, but do not over-whisk to the point of creating a lot of foam.
- Temper the Eggs: This is a crucial step to prevent the eggs from scrambling. While whisking the egg mixture continuously with one hand, use your other hand to slowly pour a thin stream of the hot milk mixture into the eggs. Continue pouring and whisking until about half of the milk mixture has been incorporated. This gently raises the temperature of the eggs.
- Combine and Add Vanilla: Now you can pour the tempered egg mixture back into the saucepan with the remaining milk. Whisk to combine everything. If you are using vanilla extract instead of a bean, stir it in now.
- Strain for Silkiness: Position a fine-mesh sieve over a large liquid measuring cup or another bowl. Pour the entire custard mixture through the sieve. This step is non-negotiable for a perfectly smooth texture, as it removes any potential chalazae (the stringy bits from the eggs) or any small bits of egg that may have accidentally cooked. It also helps remove excess air bubbles.
Part 4: Baking, Cooling, and Chilling
- Fill the Ramekins: Carefully pour the strained custard mixture evenly into the six caramel-lined ramekins.
- Prepare the Water Bath (Bain-Marie): Place the baking dish containing the filled ramekins onto the preheated oven rack. Carefully pour hot or boiling water into the larger baking dish until the water level comes about halfway up the sides of the ramekins. Do not get any water into the custards. The water bath ensures that the custards bake gently and evenly, preventing them from becoming rubbery or cracking.
- Bake: Bake for 35 to 45 minutes. The custards are done when they are set around the edges but still have a slight jiggle in the center when you gently shake the pan. They will continue to set as they cool. Do not overbake, as this can lead to a curdled texture.
- Cool Down: Carefully remove the large baking dish from the oven. Let the ramekins cool in the water bath for about 30 minutes. Then, remove the ramekins from the water bath and place them on a wire rack to cool to room temperature.
- Chill Thoroughly: Once at room temperature, cover each ramekin with plastic wrap. Transfer them to the refrigerator to chill for at least 4 hours, but overnight is highly recommended. This chilling period is essential for the custard to fully set and for the caramel to transform back into a liquid sauce.
Nutrition Facts
Please note that these values are an estimate and can vary based on the specific ingredients used, especially the fat content of the dairy.
- Servings: This recipe yields 6 individual crème caramels.
- Serving Size: 1 crème caramel (from a 6-ounce ramekin)
- Calories Per Serving: Approximately 350-400 kcal
Preparation Time
It is important to account for the inactive chilling time, which is crucial for the success of this dessert.
- Active Prep Time: 25 minutes (making caramel, mixing custard)
- Cook Time: 45 minutes
- Cooling & Chilling Time: 4.5 hours minimum (ideally 8+ hours or overnight)
- Total Time: Approximately 5.5 – 6 hours (mostly inactive)
How to Serve This Elegant Dessert
The presentation is part of the magic of a crème caramel. The “grand reveal” is a moment of pure satisfaction.
The Art of the Flip
- Loosen the Edges: About 10-15 minutes before serving, remove the chilled ramekins from the refrigerator. Run a thin, sharp knife or a small offset spatula around the inside edge of each custard to loosen it from the ramekin.
- Choose Your Plate: Select a serving plate with a slight lip or rim. This is important to contain the delicious caramel sauce that will be released.
- Flip with Confidence: Place the serving plate upside down on top of the ramekin. Holding the plate and ramekin firmly together, quickly and confidently invert them.
- The Reveal: The crème caramel should slide out onto the plate. If it doesn’t immediately release, you can give the top of the ramekin a gentle tap. Lift the ramekin away to reveal the custard, now bathed in its own caramel sauce.
Serving Suggestions & Accompaniments
While stunning on its own, a few simple additions can elevate it further.
- Fresh Berries: The tartness of fresh raspberries, sliced strawberries, or blackberries provides a beautiful contrast to the sweet caramel and rich custard.
- Mint Sprig: A single sprig of fresh mint adds a touch of color and a hint of fresh aroma.
- Gluten-Free Cookies: For a textural contrast, serve alongside a crisp, buttery gluten-free shortbread or almond cookie.
- Whipped Cream: A small dollop of lightly sweetened or unsweetened whipped cream can add another layer of creamy texture.
5 Additional Tips for Crème Caramel Perfection
- Don’t Fear the Dark Caramel: The most common mistake is pulling the caramel off the heat when it’s pale yellow. This results in a one-dimensionally sweet sauce. A deep amber caramel provides a complex, slightly bitter counterpoint that makes the dessert sophisticated and far more interesting. Watch it like a hawk, but be brave.
- Strain, Strain, Strain: Do not skip the step of straining the custard mixture. It is the single most important step for achieving that perfectly smooth, silky, homogenous texture that is the hallmark of a great crème caramel. It removes any tiny bits of cooked egg and ensures a flawless mouthfeel.
- The Bain-Marie is Your Best Friend: The water bath (bain-marie) is not optional. It insulates the custard from the direct, harsh heat of the oven. This gentle, even heat is what allows the egg proteins to set slowly and delicately, resulting in a creamy texture. Baking without it will almost certainly give you a tough, rubbery, or curdled dessert.
- Embrace the Chill: Patience during the chilling phase is paramount. This is when two crucial things happen: the custard firms up completely, and the hardened caramel disc at the bottom slowly dissolves in the moisture drawn from the custard, creating the liquid sauce. If you try to unmold it too early, you’ll have a soft custard and a hard puck of caramel. Overnight is truly best.
- Control the Bubbles: For a dense, flawless surface (the bottom of the ramekin, which becomes the top), minimize air bubbles. Whisk the eggs gently, just to combine. After pouring the custard into the ramekins, you can tap them gently on the counter to bring any bubbles to the surface and then use a toothpick or the corner of a paper towel to pop them before baking.
Frequently Asked Questions (FAQ)
1. Why is my crème caramel watery and curdled?
This is almost always a sign of over-baking. When the egg-based custard is cooked at too high a temperature or for too long, the proteins tighten up, curdle, and weep liquid, resulting in a grainy texture and a watery consistency. The key is to bake it just until the edges are set and the center still has a distinct jiggle. It will finish setting as it cools.
2. Can I make this recipe dairy-free as well as gluten-free?
Yes, you can make a delicious dairy-free version. For the best results, replace the whole milk and heavy cream with full-fat canned coconut milk. The high-fat content of coconut milk will create a similarly rich and creamy custard. You could also experiment with other rich plant-based milks like cashew milk or a barista-blend oat milk, but full-fat coconut milk provides the best texture.
3. How far in advance can I make crème caramel?
This is the perfect make-ahead dessert! You can bake, cool, and chill the crème caramels for up to 3 days in the refrigerator. Keep them covered in their ramekins. Wait to unmold and flip them until just before you are ready to serve to ensure the presentation is perfect and the sauce is fresh.
4. My caramel hardened into a rock at the bottom and didn’t turn into a sauce. What went wrong?
This usually happens for one of two reasons. First, and most likely, it wasn’t chilled long enough. The process of the hard caramel liquefying takes several hours. An overnight chill is almost always sufficient. Second, the caramel may have been slightly overcooked past the deep amber stage, making it more brittle and resistant to dissolving. Be patient with the chilling process first; it almost always solves the problem.
5. Is there a way to make the caramel without it crystallizing?
Crystallization (the sugar turning grainy) is a common fear. The “wet caramel” method used in this recipe (with water) is less prone to it than the “dry caramel” method. To prevent it: make sure your saucepan is very clean, don’t stir the mixture once it starts boiling (only swirl the pan), and if you see sugar crystals forming on the sides of the pan, you can use a pastry brush dipped in water to gently brush them down into the boiling syrup.

Gluten free Crème Caramel recipe
Ingredients
For the Caramel:
-
Granulated Sugar: 3/4 cup (150g)
-
Water: 3 tablespoons
For the Silky Custard:
-
Whole Milk: 1 ½ cups (360ml)
-
Heavy Cream: 1/2 cup (120ml)
-
Granulated Sugar: 1/2 cup (100g)
-
Large Eggs: 4
-
Large Egg Yolks: 2 (these are key for extra richness and a silkier texture)
-
Vanilla Extract: 2 teaspoons, or 1 whole vanilla bean for a more intense flavor
-
Salt: 1/4 teaspoon
Instructions
Part 1: Preparing the Oven and Ramekins
-
Arrange Oven Rack and Preheat: Position a rack in the center of your oven and preheat it to 325°F (165°C). A lower, slower cooking temperature is essential for a smooth, non-curdled custard.
-
Prepare the Ramekins: Have your six 6-ounce ramekins clean, dry, and ready on your countertop. Place them inside the larger baking dish. This will make it easier to transport them once they are filled.
Part 2: Making the Liquid Gold Caramel
This step requires your full attention. Caramel can go from perfect to burnt in a matter of seconds.
-
Combine Sugar and Water: In a small, heavy-bottomed saucepan, combine the 3/4 cup of sugar and 3 tablespoons of water. Stir gently just to moisten all the sugar.
-
Cook the Caramel: Place the saucepan over medium-high heat. Bring the mixture to a boil. From this point on, do not stir the mixture with a spoon. Stirring can cause the sugar to crystallize. If you need to even out the cooking, simply swirl the pan gently by its handle.
-
Watch for Color Change: Continue to cook, swirling occasionally, for about 5-8 minutes. The mixture will first be clear and bubbly, then will slowly start to turn a pale straw color, then golden, and finally a beautiful, deep amber—like the color of honey or a copper penny. This is the perfect stage. Be brave and let it get dark; a pale caramel will be overly sweet, while a deep amber caramel has a wonderful bittersweet note that perfectly balances the rich custard.
-
Stop the Cooking: As soon as it reaches the deep amber color, immediately remove the pan from the heat. The residual heat will continue to cook it, so you must act quickly.
-
Pour into Ramekins: Working carefully and swiftly (caramel is extremely hot!), divide the caramel evenly among the six ramekins. Immediately tilt and swirl each ramekin to coat the bottom surface. The caramel will begin to harden almost instantly. You may hear crackling sounds as the hot caramel hits the cooler ramekins; this is normal. Set the ramekins aside.
Part 3: Creating the Silky Custard
-
Heat the Milk and Cream: In the same saucepan (no need to wash it out completely), combine the whole milk and heavy cream. If using a vanilla bean, split it lengthwise, scrape out the seeds, and add both the pod and the seeds to the milk mixture. Heat over medium heat until it is just simmering and bubbles are forming around the edges. This is called scalding. Do not let it come to a rolling boil. Once scalded, remove from the heat.
-
Whisk Eggs and Sugar: While the milk is heating, in a separate medium-sized mixing bowl, whisk together the 4 whole eggs, 2 egg yolks, 1/2 cup of sugar, and the salt. Whisk just until the mixture is smooth and slightly pale, but do not over-whisk to the point of creating a lot of foam.
-
Temper the Eggs: This is a crucial step to prevent the eggs from scrambling. While whisking the egg mixture continuously with one hand, use your other hand to slowly pour a thin stream of the hot milk mixture into the eggs. Continue pouring and whisking until about half of the milk mixture has been incorporated. This gently raises the temperature of the eggs.
-
Combine and Add Vanilla: Now you can pour the tempered egg mixture back into the saucepan with the remaining milk. Whisk to combine everything. If you are using vanilla extract instead of a bean, stir it in now.
-
Strain for Silkiness: Position a fine-mesh sieve over a large liquid measuring cup or another bowl. Pour the entire custard mixture through the sieve. This step is non-negotiable for a perfectly smooth texture, as it removes any potential chalazae (the stringy bits from the eggs) or any small bits of egg that may have accidentally cooked. It also helps remove excess air bubbles.
Part 4: Baking, Cooling, and Chilling
-
Fill the Ramekins: Carefully pour the strained custard mixture evenly into the six caramel-lined ramekins.
-
Prepare the Water Bath (Bain-Marie): Place the baking dish containing the filled ramekins onto the preheated oven rack. Carefully pour hot or boiling water into the larger baking dish until the water level comes about halfway up the sides of the ramekins. Do not get any water into the custards. The water bath ensures that the custards bake gently and evenly, preventing them from becoming rubbery or cracking.
-
Bake: Bake for 35 to 45 minutes. The custards are done when they are set around the edges but still have a slight jiggle in the center when you gently shake the pan. They will continue to set as they cool. Do not overbake, as this can lead to a curdled texture.
-
Cool Down: Carefully remove the large baking dish from the oven. Let the ramekins cool in the water bath for about 30 minutes. Then, remove the ramekins from the water bath and place them on a wire rack to cool to room temperature.
-
Chill Thoroughly: Once at room temperature, cover each ramekin with plastic wrap. Transfer them to the refrigerator to chill for at least 4 hours, but overnight is highly recommended. This chilling period is essential for the custard to fully set and for the caramel to transform back into a liquid sauce.
Nutrition
- Serving Size: one normal portion
- Calories: 350-400 kcal


