Ingredients
-
2 cups cold heavy whipping cream: Use a high-quality, full-fat heavy cream (at least 36% milk fat). It must be very cold to whip up properly.
-
¼ cup powdered sugar (confectioners’ sugar): This dissolves instantly into the cream without any grittiness.
-
1 teaspoon pure vanilla extract: Adds a crucial layer of aromatic depth that complements the chocolate.
-
1 (9-ounce) package Nabisco Famous Chocolate Wafers: This is the iconic, traditional cookie for this cake. Their thinness, crispness, and deep, dark chocolate flavor are specifically designed for this purpose. (See FAQ for substitutions).
-
Optional Garnish: Chocolate shavings, fresh berries, or a dusting of cocoa powder.
Instructions
Part 1: Prepare the Whipped Cream
-
Chill Your Equipment: For the fluffiest, most stable whipped cream, place your large mixing bowl (metal or glass is best) and the beaters from your electric mixer in the freezer for 15-20 minutes before you begin.
-
Whip the Cream: Pour the very cold heavy cream into the chilled bowl. Using an electric hand mixer or a stand mixer with the whisk attachment, whip the cream on medium speed until it begins to thicken and soft peaks form (when you lift the beaters, a peak will form and then immediately slump over).
-
Add Flavor and Sweetness: Add the powdered sugar and vanilla extract to the cream.
-
Whip to Stiff Peaks: Increase the speed to medium-high and continue whipping until stiff peaks form. This is the most crucial step for the cake’s structure. You’ll know you have stiff peaks when you can lift the beaters straight out of the cream and the peak that forms holds its shape completely without folding over. The cream should be thick and spreadable, like a soft frosting. Be careful not to over-whip, or it will start to become grainy and turn into butter.
Part 2: Assemble the Cake
You can assemble this cake in the classic “log” shape or in a loaf pan for easier slicing.
Method 1: The Classic Log (Recommended for the “Zebra Stripe” Effect)
-
Start the Log: Select a long, flat serving platter. Spread a thin layer of whipped cream down the center of the platter, about the length of the final log. This will act as “glue” to hold the cake in place.
-
Build the First Stack: Take one chocolate wafer and spread about a tablespoon of whipped cream on it. Place another wafer on top of the cream, creating a small sandwich. Continue stacking 5-6 cream-covered wafers together this way.
-
Lay it Down: Carefully turn this stack of cookies on its side and place it onto the strip of cream on your platter.
-
Continue Layering: Continue adding cream-covered wafers one by one to the end of the log, pressing gently to adhere them. Repeat until you have used all the wafers and have a long log shape.
-
Frost the “Cake”: Once the log is assembled, use an offset spatula or the back of a spoon to cover the entire log—top and sides—with the remaining whipped cream. Create a smooth surface or decorative swirls.
Method 2: The Loaf Pan or Casserole Dish
-
Line the Pan: Line a standard loaf pan or a small square baking dish (like an 8×8) with plastic wrap, leaving plenty of overhang on the sides.
-
First Cream Layer: Spread a thin layer of whipped cream on the bottom of the pan.
-
First Cookie Layer: Arrange a single, tight layer of chocolate wafers over the cream, breaking cookies as needed to fill any gaps.
-
Repeat Layers: Continue alternating layers of whipped cream and chocolate wafers until you run out of ingredients, ending with a final layer of whipped cream on top.
-
Cover and Chill: Fold the plastic wrap overhang over the top of the cake.
Part 3: The Crucial Chilling Period
-
Refrigerate: Carefully place your assembled cake (either the platter or the pan) in the refrigerator.
-
Wait: Let the cake chill for a minimum of 8 hours. For the absolute best texture, where the wafers have fully transformed into a soft, cake-like consistency, let it chill for a full 24 hours. This is where the magic happens.
Part 4: Garnish and Serve
-
Prepare for Serving: If you used the loaf pan method, use the plastic wrap overhangs to lift the entire cake out of the pan and place it on a serving platter.
-
Garnish: Just before serving, create chocolate shavings by running a vegetable peeler down the side of a room-temperature chocolate bar. Sprinkle the shavings generously over the top of the cake. Alternatively, dust with cocoa powder or top with fresh raspberries.
-
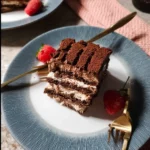
The Perfect Slice: For the classic log, the slice is part of the presentation. Use a sharp knife to cut the log on a sharp diagonal (a 45-degree angle). This will reveal the beautiful, dramatic zebra-like stripes of the chocolate and cream layers.
Nutrition
- Serving Size: one normal portion
- Calories: 350 kcal