
There are some desserts that are so deeply woven into the fabric of my memories that the mere mention of them can transport me back in time. For me, that dessert is the Chocolate Icebox Cake. I can still picture my grandmother’s hands, methodically arranging dark, crisp chocolate wafers and snowy whipped cream in her glass loaf pan. It seemed like alchemy to my childhood self—how could simple cookies and cream, with nothing but the magic of time spent in a cold refrigerator, transform into something so utterly magnificent? She would serve it on the hottest days of summer, a slice of pure, cool relief. The cookies, softened to a cake-like tenderness, would melt in your mouth with the light-as-air cream. It was, and still is, the definition of effortless elegance. Now, as an adult, I appreciate it for a whole new set of reasons. It’s my secret weapon for dinner parties, my go-to for potlucks, and the dessert I make when I crave something spectacular without wanting to turn on my oven. It’s a testament to the fact that the most memorable dishes don’t require complicated techniques or a long list of fancy ingredients, just a little bit of patience and a whole lot of love.
The Enduring Magic of the No-Bake Icebox Cake
Before we grab our whisks, it’s worth taking a moment to appreciate why this century-old recipe remains a beloved classic. Its genius lies in its simplicity and the remarkable transformation that occurs in the refrigerator.
- The Ultimate No-Bake Wonder: In the sweltering heat of summer or during a busy holiday season, the last thing you want to do is turn on your oven. This cake is assembled entirely on the countertop and then hands-off in the fridge, making it the perfect stress-free dessert for any occasion.
- A Feat of Culinary Science: The magic is in the moisture. As the cake chills, the whipped cream slowly softens the crisp chocolate wafers. The moisture migrates from the cream into the cookies, causing them to lose their crunch and adopt a tender, cake-like consistency. The flavors also meld, creating a cohesive dessert where it’s hard to tell where the cookie ends and the cream begins.
- Effortless Elegance: With just a few humble ingredients, you can create a dessert that looks stunningly sophisticated. The zebra-like stripes when you slice it on the diagonal are a beautiful surprise, and it can be decorated simply or elaborately to suit any event.
- The Perfect Make-Ahead Dessert: Not only can this cake be made ahead, it must be. It requires a minimum of 8 hours, but it’s even better after a full 24 hours in the refrigerator. This makes it an entertainer’s dream, as you can have dessert completely finished and ready to go a day before your guests arrive.
Breaking Down the Essential Ingredients
The beauty of this recipe is its short ingredient list. This means the quality of each component is paramount to the final result.
- Heavy Whipping Cream: This is the heart and soul of the cake. You must use heavy whipping cream or heavy cream, which typically has a milk fat content of 36% or higher. This high fat content is what allows the cream to be whipped into stable, fluffy peaks that will hold their shape. Do not substitute with light cream, half-and-half, or milk—they will not whip.
- Chocolate Wafers: The classic, traditional choice is Nabisco Famous Chocolate Wafers. They have a deep, dark, bittersweet chocolate flavor and a crisp, airy texture that is perfect for absorbing the moisture from the cream. They can sometimes be hard to find, so we have a dedicated section on substitutes below.
- Powdered Sugar (Confectioners’ Sugar): We use powdered sugar to sweeten the whipped cream because it dissolves instantly, ensuring a smooth, grit-free texture. It also contains a small amount of cornstarch, which helps to stabilize the whipped cream and prevent it from weeping over time.
- Vanilla Extract: A high-quality pure vanilla extract enhances the flavor of the cream and balances the bitterness of the chocolate. It adds a layer of aromatic warmth that elevates the entire dessert.
- Cocoa Powder: A little unsweetened cocoa powder is folded into the cream to deepen the chocolate flavor throughout and give the cream a lovely light brown hue.
Complete Ingredients for Classic Chocolate Icebox Cake
This recipe makes one loaf-style cake, serving 8-10 people.
- Heavy Whipping Cream: 3 cups, very cold
- Powdered Sugar: ½ cup, sifted
- Pure Vanilla Extract: 2 teaspoons
- Unsweetened Cocoa Powder: 2 tablespoons, plus more for dusting
- Nabisco Famous Chocolate Wafers: 1 package (9 ounces)
- Chocolate Shavings or Curls: For garnish (optional)
Step-by-Step Instructions: Assembling Your Masterpiece
The process is simple and meditative. The key is to have all your ingredients ready and your equipment chilled.
Step 1: Prepare the Whipped Cream
For the best results, chill your large mixing bowl and the beaters from your hand mixer (or the whisk attachment of your stand mixer) in the freezer for 15-20 minutes before you begin. A cold environment helps the cream whip up faster and lighter.
Pour the 3 cups of very cold heavy whipping cream into the chilled bowl. Using the mixer on medium-high speed, beat the cream until it begins to thicken and soft peaks form (when you lift the beaters, a peak forms but its tip flops over).
Add the sifted powdered sugar, vanilla extract, and 2 tablespoons of cocoa powder. Continue to beat on medium-high speed until stiff peaks form. Stiff peaks mean that when you lift the beaters, the peaks hold their shape and stand straight up. Be careful not to over-beat, or the cream will start to look grainy and turn into butter.
Step 2: Assemble the Layers
Line a 9×5 inch loaf pan with plastic wrap, leaving plenty of overhang on all sides. This will make it easy to remove the cake later.
Spread a thin layer of the chocolate whipped cream on the bottom of the prepared pan. This will give the first layer of cookies something to stick to.
Arrange a single layer of chocolate wafers on top of the cream, breaking some cookies as needed to fill in any gaps and cover the surface as completely as possible.
Spread about one-quarter of the remaining whipped cream evenly over the layer of cookies.
Repeat the process—a layer of cookies followed by a layer of cream—three more times, ending with a final layer of cream on top. You should have a total of 4 layers of cookies and 5 layers of cream (including the bottom and top layers).
Step 3: The Magic Chilling Period
Cover the loaf pan with the overhanging plastic wrap, tucking it in snugly against the top layer of cream.
Place the cake in the refrigerator and chill for at least 8 hours, but preferably for 24 hours. This time is not optional; it is essential for the transformation to occur. The longer it chills, the more cake-like and flavorful it will become.
Step 4: Unmold and Garnish
When you are ready to serve, unwrap the top of the cake. Use the overhanging plastic wrap as handles to lift the cake out of the loaf pan and onto a serving platter. Carefully peel away the plastic wrap.
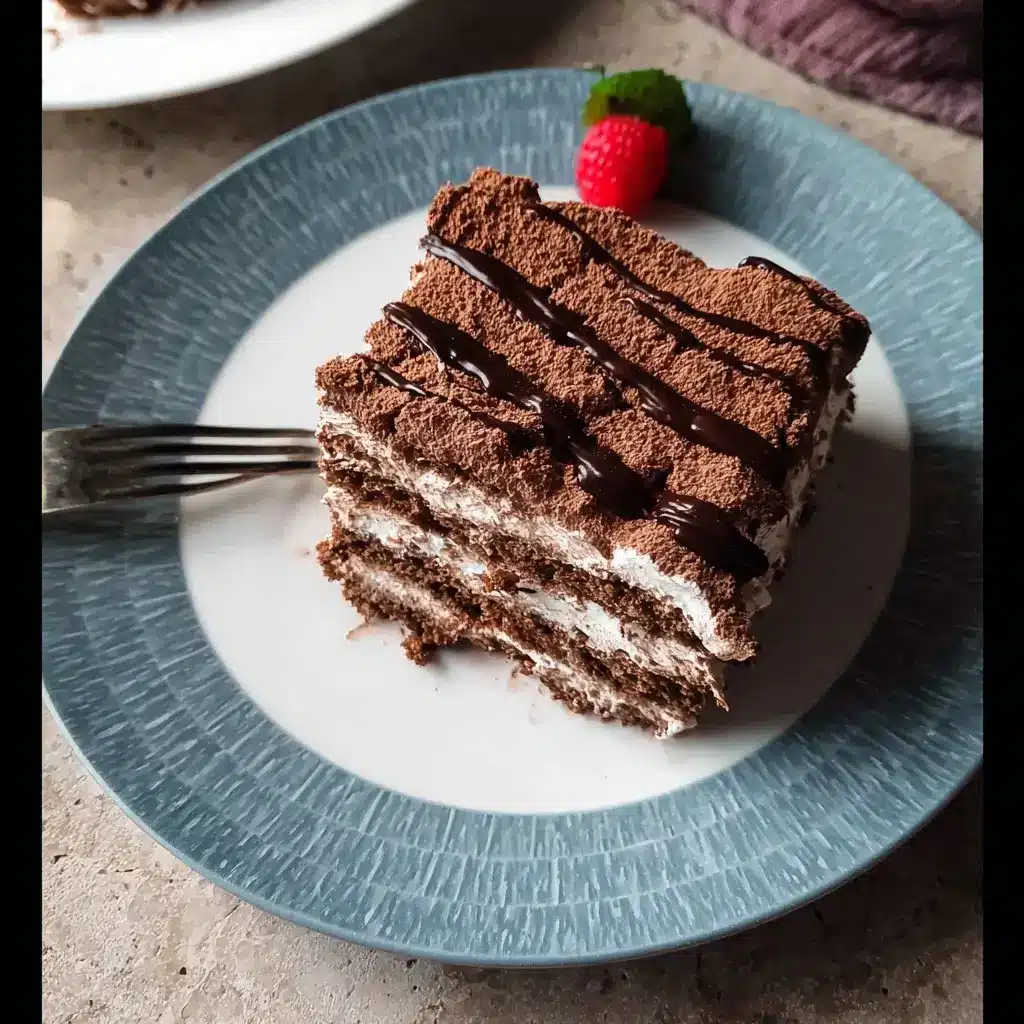
You can serve it as is, or you can decorate it. Dust the top generously with unsweetened cocoa powder or top with beautiful chocolate shavings or curls for a more elegant presentation.
Step 5: Slice and Serve
For the iconic striped look, use a sharp knife to cut the cake on a 45-degree diagonal. Serve immediately and watch your guests marvel at your “baking” skills.
Nutrition Facts
- Servings: 10
- Calories per serving: Approximately 400-450 kcal (This is an estimate and can vary based on specific brands.)
Preparation & Chill Time
- Active Preparation Time: 20 minutes
- Inactive Chill Time: 8 to 24 hours
- Total Time: 8.5 to 24.5 hours
The Big Question: What If I Can’t Find Nabisco Famous Chocolate Wafers?
This is the most common challenge when making a classic icebox cake. Fear not, you have several excellent options:
- Oreo Thins (Top Recommendation): Separate the cookies and scrape off the creme filling. The thin chocolate cookies are a fantastic substitute in both flavor and texture.
- Regular Oreos: Again, you’ll need to remove the filling. The cookies are thicker, so the final cake will be a bit denser, but still delicious.
- Simple Chocolate Cookies: Look for any thin, crisp chocolate cookie or biscuit, such as chocolate digestive biscuits or chocolate shortbread.
- Goya Maria Cookies: While not chocolate, these plain, crisp cookies are a traditional choice for icebox cakes in many cultures and work wonderfully. The cake will be more vanilla-forward.
- Homemade Chocolate Wafers: If you’re feeling ambitious, you can bake your own! There are many recipes online specifically for recreating the Nabisco classic.
How to Serve and Present Your Cake
- The Classic Slice: Cut on the diagonal to show off the beautiful stripes and serve on a dessert plate.
- Add a Pop of Color and Freshness: Serve with a side of fresh raspberries, strawberries, or cherries. The tartness of the berries beautifully cuts through the richness of the cream.
- Drizzle with Sauce: For extra decadence, serve each slice with a drizzle of warm chocolate ganache or salted caramel sauce.
- The “Deconstructed” Parfait: For a more modern presentation, you can layer crumbled cookies and whipped cream in individual glass jars or parfait glasses. Chill as directed for a single-serving treat.
5 Pro Tips for Icebox Cake Perfection
- Chill Everything: The secret to voluminous, stable whipped cream is cold. Cold bowl, cold beaters, and very cold cream. If your kitchen is warm, you can even place your mixing bowl over another larger bowl filled with ice water while you whip.
- Don’t Under-Whip or Over-Whip: The success of the cake depends on the consistency of the cream. Stiff peaks are essential. The cream should be thick and hold its shape completely when the beaters are lifted. If it’s too soft (soft peaks), the cake may become watery. If you go too far, the cream will separate and turn grainy. Watch it closely!
- Embrace the Waiting Game: I cannot stress this enough: do not rush the chilling time. Eight hours is the absolute minimum. At this point, the cookies will be soft but distinct. After 24 hours, the cookies will have fully surrendered, melding into the cream to create a truly seamless, cake-like texture. The flavor also deepens overnight. Patience will be rewarded.
- Get a Clean Slice Every Time: For perfectly clean, beautiful slices that show off the layers, use a long, sharp knife. Dip the knife in a tall glass of hot water, wipe it clean with a paper towel, and then make your cut. Repeat this process for every single slice.
- Get Creative with Flavors: The classic recipe is a perfect canvas. Add a teaspoon of instant espresso powder to the cream for a rich mocha flavor. Swap the vanilla extract for peppermint extract and top with crushed candy canes for a holiday version. Fold in mini chocolate chips or toffee bits into the cream for extra texture.
Frequently Asked Questions (FAQ)
1. Can I use Cool Whip or other stabilized whipped toppings instead of fresh whipped cream?
You can, and many people do for a quick shortcut. However, the flavor and texture will be noticeably different. Cool Whip is much sweeter and has a distinct flavor that is different from real cream. It will work structurally, but for the best, most authentic, and richest-tasting icebox cake, making your own whipped cream is highly recommended and worth the extra five minutes.
2. Why did my icebox cake turn out watery or soggy?
This is almost always due to under-whipped cream. If your cream was only beaten to soft peaks, it doesn’t have the structure to hold its air and will slowly deflate in the refrigerator, releasing liquid and creating a soupy mess. Ensure you beat the cream until very firm, stiff peaks form.
3. How do I store leftovers?
Leftover icebox cake should be covered tightly with plastic wrap and stored in the refrigerator. It will keep for up to 3-4 days. Note that after the second day, the cookies may become even softer and the cake may lose some of its structural integrity, but it will still be delicious.
4. Can I freeze this cake?
Yes! An icebox cake freezes surprisingly well. Wrap the entire cake or individual slices tightly in plastic wrap, then a layer of aluminum foil, and freeze for up to 2 months. Let it thaw in the refrigerator for several hours before serving. The texture will be slightly denser, almost like an ice cream cake, but still fantastic.
5. Can I make this in a different shaped pan?
Absolutely. A round springform pan is a popular choice for a more traditional-looking cake. You can also assemble it free-form on a platter, creating a circular mound. The loaf pan is simply a classic method that makes it easy to create neat, uniform layers and slice beautifully.
Chocolate Icebox Cake recipe
Ingredients
-
Heavy Whipping Cream: 3 cups, very cold
-
Powdered Sugar: ½ cup, sifted
-
Pure Vanilla Extract: 2 teaspoons
-
Unsweetened Cocoa Powder: 2 tablespoons, plus more for dusting
-
Nabisco Famous Chocolate Wafers: 1 package (9 ounces)
-
Chocolate Shavings or Curls: For garnish (optional)
Instructions
tep 1: Prepare the Whipped Cream
For the best results, chill your large mixing bowl and the beaters from your hand mixer (or the whisk attachment of your stand mixer) in the freezer for 15-20 minutes before you begin. A cold environment helps the cream whip up faster and lighter.
Pour the 3 cups of very cold heavy whipping cream into the chilled bowl. Using the mixer on medium-high speed, beat the cream until it begins to thicken and soft peaks form (when you lift the beaters, a peak forms but its tip flops over).
Add the sifted powdered sugar, vanilla extract, and 2 tablespoons of cocoa powder. Continue to beat on medium-high speed until stiff peaks form. Stiff peaks mean that when you lift the beaters, the peaks hold their shape and stand straight up. Be careful not to over-beat, or the cream will start to look grainy and turn into butter.
Step 2: Assemble the Layers
Line a 9×5 inch loaf pan with plastic wrap, leaving plenty of overhang on all sides. This will make it easy to remove the cake later.
Spread a thin layer of the chocolate whipped cream on the bottom of the prepared pan. This will give the first layer of cookies something to stick to.
Arrange a single layer of chocolate wafers on top of the cream, breaking some cookies as needed to fill in any gaps and cover the surface as completely as possible.
Spread about one-quarter of the remaining whipped cream evenly over the layer of cookies.
Repeat the process—a layer of cookies followed by a layer of cream—three more times, ending with a final layer of cream on top. You should have a total of 4 layers of cookies and 5 layers of cream (including the bottom and top layers).
Step 3: The Magic Chilling Period
Cover the loaf pan with the overhanging plastic wrap, tucking it in snugly against the top layer of cream.
Place the cake in the refrigerator and chill for at least 8 hours, but preferably for 24 hours. This time is not optional; it is essential for the transformation to occur. The longer it chills, the more cake-like and flavorful it will become.
Step 4: Unmold and Garnish
When you are ready to serve, unwrap the top of the cake. Use the overhanging plastic wrap as handles to lift the cake out of the loaf pan and onto a serving platter. Carefully peel away the plastic wrap.
You can serve it as is, or you can decorate it. Dust the top generously with unsweetened cocoa powder or top with beautiful chocolate shavings or curls for a more elegant presentation.
Step 5: Slice and Serve
For the iconic striped look, use a sharp knife to cut the cake on a 45-degree diagonal. Serve immediately and watch your guests marvel at your “baking” skills.
Nutrition
- Serving Size: one normal portion
- Calories: 400-450 kcal