
There are certain desserts that are more than just food; they are woven into the fabric of our memories. For me, banana pudding is pure nostalgia. It’s the star of every southern potluck, the comforting hug in a bowl my grandmother would make. For years, I was content with the classic version—creamy pudding, sweet bananas, and soft Nilla wafers. But as a home cook, I’m always chasing that little something extra, a twist that makes a familiar favorite feel brand new. That’s how the “Banana Pudding Surprise” was born. I first unveiled it at our annual summer barbecue. It looked familiar in its big glass trifle bowl, and everyone dug in expecting the classic taste of their childhood. Then, the murmurs started. A quizzical look, a raised eyebrow, and then a slow smile spreading across my brother-in-law’s face. “What is that?” he asked, pointing his spoon at his bowl. It was the “surprise”—a hidden, shimmering layer of golden, homemade salted caramel, nestled between the pudding and wafers. The reaction was electric. The familiar comfort of banana pudding was still there, but it was elevated, made richer and more complex by the deep, buttery notes of the caramel. The salt cut through the sweetness, creating a perfectly balanced, utterly addictive dessert. It was no longer just banana pudding; it was an event. That bowl was scraped clean faster than any dessert I’ve ever made, and now, no family gathering is complete without a request for the “surprise” version.
The Anatomy of the Ultimate Banana Pudding
Before we grab our whisks and spatulas, let’s break down what makes this specific Banana Pudding Surprise recipe a true game-changer. It’s not just about adding one secret ingredient; it’s about perfecting every single component to work in harmony. This isn’t your instant-pudding-mix-in-a-box recipe. This is the real deal, and the difference is staggering.
- The From-Scratch Vanilla Custard: The heart and soul of this dessert is a rich, velvety, homemade vanilla custard. Made with egg yolks, whole milk, and real vanilla, it has a depth of flavor that simply cannot be replicated by a powdered mix. It’s thick, creamy, and has a pure, clean sweetness that allows the banana flavor to shine.
- The Perfect Bananas: The choice of banana is crucial. You need bananas that are perfectly ripe—yellow with a few brown speckles—but still firm. This gives you maximum sweetness and banana flavor without the mushy texture of overripe bananas.
- The Iconic Wafer: We stick with classic Nilla Wafers for a reason. They have a distinct, light, and malty vanilla flavor that is synonymous with banana pudding. As they sit in the pudding, they soften to a perfect, cake-like consistency, absorbing the flavors of the custard and banana without completely disintegrating.
- The Whipped Cream Topping: We fold freshly whipped cream into the custard base and also use it for the topping. This lightens the entire dessert, giving it a fluffy, cloud-like texture that prevents it from feeling too heavy or dense.
- The “Surprise” – A Salted Caramel Layer: This is the masterpiece moment. A thin, decadent layer of homemade salted caramel sauce adds an unexpected and sophisticated flavor dimension. Its buttery, slightly smoky, and salty profile cuts through the sweetness of the bananas and pudding, creating an incredible flavor contrast that will have everyone trying to figure out your secret.
The Secret Surprise: A Perfect Salted Caramel Layer
Don’t be intimidated by the idea of making caramel from scratch. It’s a simple process that requires a little bit of attention but yields a result that is worlds away from any store-bought sauce. The process involves carefully melting sugar until it liquefies and turns a beautiful amber color, then stopping the cooking process with butter and cream. The addition of flaky sea salt at the end is what transforms it from simple caramel to a gourmet ingredient. This “surprise” layer not only adds a new flavor but also a wonderful textural element—a silky, smooth ribbon of liquid gold running through the dessert.
Complete Ingredients for Your Banana Pudding Surprise
Using high-quality, full-fat ingredients is the key to achieving the rich, luxurious texture this dessert is known for. Here is everything you will need.
For the Homemade Vanilla Custard:
- Whole Milk (3 cups / 720ml): The fat content is essential for a creamy, rich pudding. Do not substitute with 2% or skim milk.
- Granulated Sugar (3/4 cup / 150g): Divided for use in the custard and with the egg yolks.
- Cornstarch (1/4 cup / 32g): The primary thickening agent for the pudding.
- Salt (1/2 teaspoon): Balances the sweetness and enhances all the other flavors.
- Large Egg Yolks (5): These provide richness, color, and help to thicken the custard. Save the whites for an omelet or meringue!
- Unsalted Butter (2 tablespoons): Stirred in at the end for a silky-smooth finish and extra richness.
- Pure Vanilla Extract (1 tablespoon): Use a high-quality pure vanilla extract for the best, most authentic flavor.
For the Salted Caramel “Surprise”:
- Granulated Sugar (1 cup / 200g):
- Water (1/4 cup / 60ml):
- Unsalted Butter (6 tablespoons): Cut into small pieces.
- Heavy Whipping Cream (1/2 cup / 120ml): Must be at room temperature to prevent seizing.
- Flaky Sea Salt (1 teaspoon): Such as Maldon or Fleur de Sel.
For the Whipped Cream & Assembly:
- Heavy Whipping Cream (2 cups / 480ml): Very cold.
- Powdered Sugar (1/4 cup / 30g): To sweeten and stabilize the whipped cream.
- Nilla Wafers (1 standard 11-ounce box):
- Ripe-but-Firm Bananas (4-5 large):
Step-by-Step Instructions for Assembling the Pudding
This recipe has a few components, but if you follow the steps methodically, it comes together beautifully.
Step 1: Make the Vanilla Custard
- Combine Dry Ingredients: In a medium, heavy-bottomed saucepan, whisk together 1/2 cup of the granulated sugar, the cornstarch, and the salt.
- Temper the Eggs: In a separate medium bowl, whisk the 5 egg yolks until they are smooth. Whisk in the remaining 1/4 cup of sugar.
- Heat the Milk: Slowly pour the whole milk into the saucepan with the sugar/cornstarch mixture, whisking constantly until smooth. Place the saucepan over medium heat and cook, stirring frequently, until the mixture starts to bubble gently and thicken slightly (about 6-8 minutes).
- Combine Milk and Eggs (Tempering): This is a critical step. To prevent the eggs from scrambling, you must temper them. Very slowly, pour about 1 cup of the hot milk mixture into the egg yolk bowl while whisking the eggs constantly. Once that is fully combined, pour the egg mixture back into the saucepan with the rest of the milk, still whisking.
- Cook and Thicken: Return the saucepan to medium heat and cook, whisking constantly and scraping the bottom and corners of the pan, until the pudding becomes very thick, like a mayonnaise consistency. This should take about 2-3 minutes. You will see large bubbles popping on the surface.
- Finish the Custard: Remove the saucepan from the heat and immediately stir in the 2 tablespoons of butter and 1 tablespoon of vanilla extract until the butter is fully melted and the custard is glossy and smooth.
- Chill the Custard: Transfer the hot custard to a heatproof bowl. To prevent a skin from forming, press a piece of plastic wrap directly onto the surface of the pudding. Refrigerate for at least 4 hours, or until completely chilled and firm.
Step 2: Create the Salted Caramel “Surprise”
- Melt the Sugar: In a medium, heavy-bottomed saucepan, combine the 1 cup of granulated sugar and 1/4 cup of water. Stir just until the sugar is wet. Place over medium-high heat. Do NOT stir from this point on. Let the mixture come to a boil and cook, gently swirling the pan occasionally, until it turns a deep amber color, like a copper penny. Watch it very carefully, as it can go from perfect to burnt in seconds.
- Add Butter and Cream: Immediately remove the pan from the heat. Carefully whisk in the cubed butter until it is melted. The mixture will bubble up furiously. Once the butter is incorporated, stand back and slowly pour in the room-temperature heavy cream while whisking constantly. The mixture will bubble violently again.
- Finish and Cool: Return the saucepan to low heat for 1 minute, whisking until the caramel is completely smooth. Remove from the heat and stir in the flaky sea salt. Pour the caramel into a jar and let it cool to room temperature. It will thicken as it cools.
Step 3: Whip the Cream and Assemble Your Masterpiece
- Whip the Cream: In a large, chilled bowl, use a hand mixer or stand mixer to whip the very cold heavy cream and powdered sugar on high speed until stiff peaks form.
- Lighten the Custard: Remove the chilled custard from the refrigerator and discard the plastic wrap. Whisk it vigorously to loosen it up. Gently fold about one-third of the whipped cream into the custard to lighten its texture.
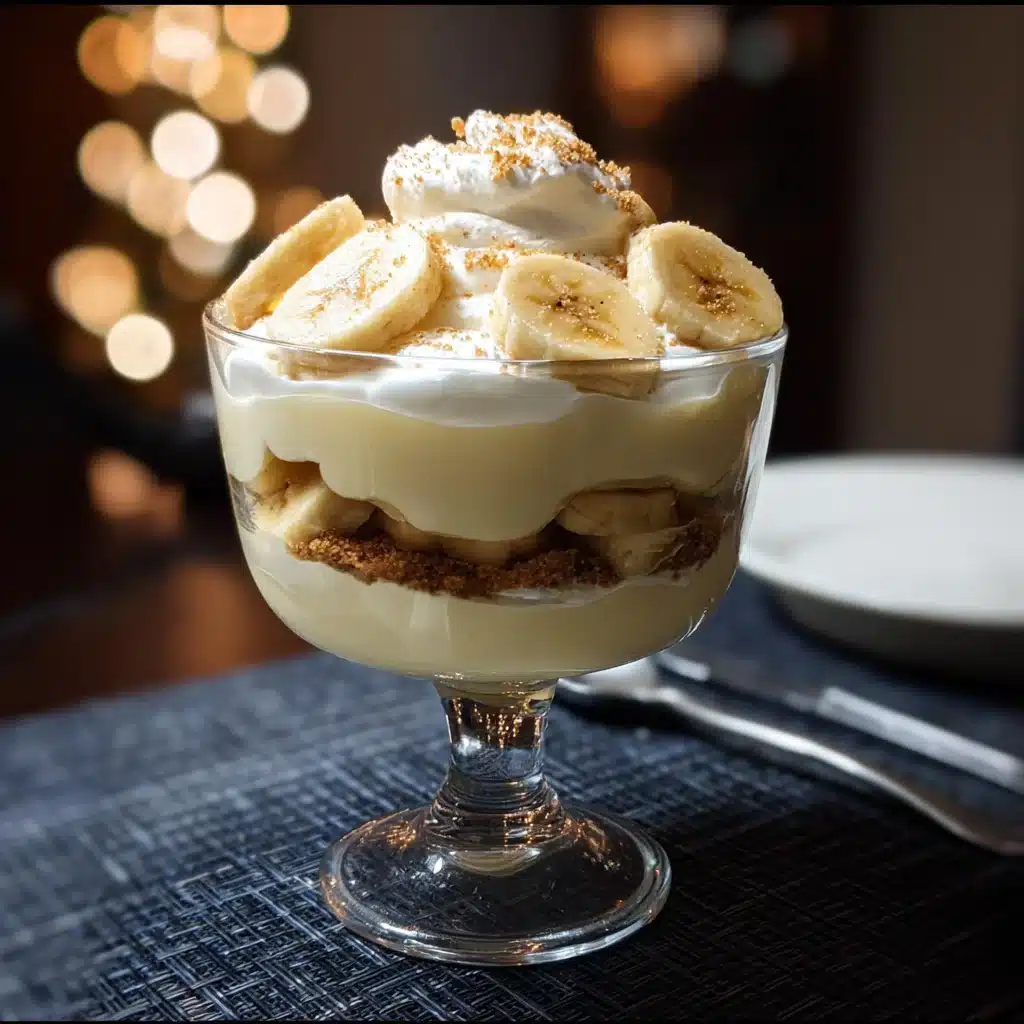
- Prepare for Layering: Slice your bananas into 1/4-inch thick rounds. Have your Nilla wafers, sliced bananas, cooled salted caramel, custard mixture, and remaining whipped cream ready to go. You’ll need a 3-4 quart trifle bowl or a large glass bowl.
- First Layer: Spread a thin layer of the custard mixture on the bottom of the bowl. Arrange a single layer of Nilla wafers on top, followed by a single layer of sliced bananas.
- Second Layer: Spoon about half of the remaining custard mixture over the bananas and spread it evenly to the edges.
- The Surprise Layer: Drizzle about half to two-thirds of the salted caramel sauce evenly over the custard layer.
- Third Layer: Arrange another layer of Nilla wafers and sliced bananas.
- Fourth Layer: Top with the rest of the custard mixture, spreading it to the edges.
- Final Topping: Spoon the remaining plain whipped cream on top of the pudding, creating beautiful swirls and peaks with the back of your spoon.
- Garnish and Chill: Drizzle the remaining salted caramel sauce over the top. For an extra flourish, crush a few Nilla wafers and sprinkle them around the edge. Cover and refrigerate for at least 4 hours, or preferably 6-8 hours, to allow the wafers to soften and the flavors to meld.
Nutrition Facts
- Servings: 12-14
- Calories per serving: Approximately 500-600 kcal (This is an estimate and can vary based on the exact ingredients and portion sizes.)
Preparation Time
- Active Prep Time: 40 minutes
- Chilling Time: 8 hours (4 for custard, 4 for assembled pudding)
- Total Time: Approximately 8 hours 40 minutes
How to Serve This Showstopper
Presentation matters, especially for a layered dessert this beautiful. Here’s how to serve it for maximum impact.
- The Right Vessel:
- Glass Trifle Bowl: This is the classic and best choice, as it shows off all the beautiful, distinct layers of your creation.
- Individual Jars or Glasses: For smaller gatherings or a more modern presentation, assemble the pudding in individual glass jars, parfait glasses, or even wide-mouthed wine glasses. This makes serving a breeze and looks incredibly elegant.
- The Serving Spoon: Use a large, long-handled spoon. You want to dig straight down to the bottom to ensure each serving gets a bit of every single layer—whipped cream, custard, caramel, bananas, and wafers.
- Last-Minute Garnishes: While the pudding needs to chill, some garnishes are best added right before serving to maintain their texture.
- A sprinkle of flaky sea salt over the caramel drizzle on top.
- A few freshly crushed Nilla wafers for crunch.
- A perfectly placed, fresh banana slice (dipped in lemon juice to prevent browning).
5 Essential Tips for Perfect Banana Pudding
- Press Plastic Wrap Directly on the Custard: This is the number one trick to prevent that unappetizing, rubbery “skin” from forming on your pudding as it cools. The plastic wrap should be touching the entire surface.
- Don’t Fear the Caramel: The key to success with caramel is having all your ingredients (butter, cream, salt) measured and ready to go before you start melting the sugar. The process moves quickly at the end, and you won’t have time to measure.
- How to Save Seized Caramel: If your caramel seizes up or gets clumpy when you add the cream (this happens if the cream is too cold), don’t panic. Just put the pan back on very low heat and whisk gently and constantly until the clumps melt and the sauce is smooth again.
- Embrace the Chill Time: The 4-8 hour chill time after assembly is not optional. This is when the magic happens. The Nilla wafers transform from crunchy cookies into soft, cake-like layers, and all the flavors have a chance to meld into a cohesive, delicious whole. A rushed pudding will have crunchy wafers and less developed flavor.
- Bananas 101: Use bananas that are sweet and ripe, but not mushy or covered in black spots. To prevent the banana slices from browning as you assemble, you can toss them very gently in a tablespoon of lemon juice. The acidity prevents oxidation, and the tiny amount won’t be noticeable in the final dessert.
Banana Pudding Surprise: Frequently Asked Questions
1. Can I use store-bought instant pudding mix to save time?
You can, but it will fundamentally change the dessert. The “surprise” will still be delicious, but you will lose the rich, deep flavor and velvety texture of the homemade custard. If you must use a mix, prepare a large box of instant vanilla pudding according to package directions using whole milk. Let it set completely before folding in the whipped cream and proceeding with the assembly.
2. My pudding turned out runny. What did I do wrong?
Runny custard is usually due to one of two things: it wasn’t cooked long enough, or it wasn’t properly thickened. You must bring the custard to a boil after adding the eggs and cook it while whisking constantly for a full 2-3 minutes. This activates the thickening power of both the cornstarch and the egg yolks. If you pull it off the heat too soon, it won’t set up properly in the fridge.
3. How far in advance can I make this dessert?
You can make the components ahead of time. The custard and caramel sauce can be made up to 2 days in advance and stored in airtight containers in the refrigerator. However, for the best texture, I recommend assembling the pudding no more than 24 hours before you plan to serve it. The ideal window is to assemble it in the morning for an evening event. If made too far in advance (2+ days), the bananas can become overly dark and the wafers can become too mushy.
4. How do I store leftovers?
Store any leftover banana pudding tightly covered with plastic wrap in the refrigerator. It will keep for up to 3 days. Note that the texture will continue to change; the whipped cream may weep slightly, and the bananas will darken over time. It will still taste delicious, but it’s at its absolute best on day one. This dessert does not freeze well.
5. Can I use a different kind of cookie or add another “surprise”?
Absolutely! This recipe is a wonderful template. For a different cookie, you could try shortbread cookies or even chessmen cookies for a classic twist. If you want to experiment with another “surprise” instead of salted caramel, consider these ideas:
- Chocolate Ganache: A rich layer of dark chocolate ganache would be incredible with the banana.
- Toffee Bits: A layer of crushed Heath bars or other toffee bits would add a delightful crunch.
- Peanut Butter Layer: Thin some creamy peanut butter with a little powdered sugar and milk to make a spreadable layer for a decadent peanut butter-banana combination.

Banana Pudding Surprise recipe
Ingredients
For the Homemade Vanilla Custard:
-
Whole Milk (3 cups / 720ml): The fat content is essential for a creamy, rich pudding. Do not substitute with 2% or skim milk.
-
Granulated Sugar (3/4 cup / 150g): Divided for use in the custard and with the egg yolks.
-
Cornstarch (1/4 cup / 32g): The primary thickening agent for the pudding.
-
Salt (1/2 teaspoon): Balances the sweetness and enhances all the other flavors.
-
Large Egg Yolks (5): These provide richness, color, and help to thicken the custard. Save the whites for an omelet or meringue!
-
Unsalted Butter (2 tablespoons): Stirred in at the end for a silky-smooth finish and extra richness.
-
Pure Vanilla Extract (1 tablespoon): Use a high-quality pure vanilla extract for the best, most authentic flavor.
For the Salted Caramel “Surprise”:
-
Granulated Sugar (1 cup / 200g):
-
Water (1/4 cup / 60ml):
-
Unsalted Butter (6 tablespoons): Cut into small pieces.
-
Heavy Whipping Cream (1/2 cup / 120ml): Must be at room temperature to prevent seizing.
-
Flaky Sea Salt (1 teaspoon): Such as Maldon or Fleur de Sel.
For the Whipped Cream & Assembly:
-
Heavy Whipping Cream (2 cups / 480ml): Very cold.
-
Powdered Sugar (1/4 cup / 30g): To sweeten and stabilize the whipped cream.
-
Nilla Wafers (1 standard 11-ounce box):
-
Ripe-but-Firm Bananas (4-5 large):
Instructions
Step 1: Make the Vanilla Custard
-
Combine Dry Ingredients: In a medium, heavy-bottomed saucepan, whisk together 1/2 cup of the granulated sugar, the cornstarch, and the salt.
-
Temper the Eggs: In a separate medium bowl, whisk the 5 egg yolks until they are smooth. Whisk in the remaining 1/4 cup of sugar.
-
Heat the Milk: Slowly pour the whole milk into the saucepan with the sugar/cornstarch mixture, whisking constantly until smooth. Place the saucepan over medium heat and cook, stirring frequently, until the mixture starts to bubble gently and thicken slightly (about 6-8 minutes).
-
Combine Milk and Eggs (Tempering): This is a critical step. To prevent the eggs from scrambling, you must temper them. Very slowly, pour about 1 cup of the hot milk mixture into the egg yolk bowl while whisking the eggs constantly. Once that is fully combined, pour the egg mixture back into the saucepan with the rest of the milk, still whisking.
-
Cook and Thicken: Return the saucepan to medium heat and cook, whisking constantly and scraping the bottom and corners of the pan, until the pudding becomes very thick, like a mayonnaise consistency. This should take about 2-3 minutes. You will see large bubbles popping on the surface.
-
Finish the Custard: Remove the saucepan from the heat and immediately stir in the 2 tablespoons of butter and 1 tablespoon of vanilla extract until the butter is fully melted and the custard is glossy and smooth.
-
Chill the Custard: Transfer the hot custard to a heatproof bowl. To prevent a skin from forming, press a piece of plastic wrap directly onto the surface of the pudding. Refrigerate for at least 4 hours, or until completely chilled and firm.
Step 2: Create the Salted Caramel “Surprise”
-
Melt the Sugar: In a medium, heavy-bottomed saucepan, combine the 1 cup of granulated sugar and 1/4 cup of water. Stir just until the sugar is wet. Place over medium-high heat. Do NOT stir from this point on. Let the mixture come to a boil and cook, gently swirling the pan occasionally, until it turns a deep amber color, like a copper penny. Watch it very carefully, as it can go from perfect to burnt in seconds.
-
Add Butter and Cream: Immediately remove the pan from the heat. Carefully whisk in the cubed butter until it is melted. The mixture will bubble up furiously. Once the butter is incorporated, stand back and slowly pour in the room-temperature heavy cream while whisking constantly. The mixture will bubble violently again.
-
Finish and Cool: Return the saucepan to low heat for 1 minute, whisking until the caramel is completely smooth. Remove from the heat and stir in the flaky sea salt. Pour the caramel into a jar and let it cool to room temperature. It will thicken as it cools.
Step 3: Whip the Cream and Assemble Your Masterpiece
-
Whip the Cream: In a large, chilled bowl, use a hand mixer or stand mixer to whip the very cold heavy cream and powdered sugar on high speed until stiff peaks form.
-
Lighten the Custard: Remove the chilled custard from the refrigerator and discard the plastic wrap. Whisk it vigorously to loosen it up. Gently fold about one-third of the whipped cream into the custard to lighten its texture.
-
Prepare for Layering: Slice your bananas into 1/4-inch thick rounds. Have your Nilla wafers, sliced bananas, cooled salted caramel, custard mixture, and remaining whipped cream ready to go. You’ll need a 3-4 quart trifle bowl or a large glass bowl.
-
First Layer: Spread a thin layer of the custard mixture on the bottom of the bowl. Arrange a single layer of Nilla wafers on top, followed by a single layer of sliced bananas.
-
Second Layer: Spoon about half of the remaining custard mixture over the bananas and spread it evenly to the edges.
-
The Surprise Layer: Drizzle about half to two-thirds of the salted caramel sauce evenly over the custard layer.
-
Third Layer: Arrange another layer of Nilla wafers and sliced bananas.
-
Fourth Layer: Top with the rest of the custard mixture, spreading it to the edges.
-
Final Topping: Spoon the remaining plain whipped cream on top of the pudding, creating beautiful swirls and peaks with the back of your spoon.
-
Garnish and Chill: Drizzle the remaining salted caramel sauce over the top. For an extra flourish, crush a few Nilla wafers and sprinkle them around the edge. Cover and refrigerate for at least 4 hours, or preferably 6-8 hours, to allow the wafers to soften and the flavors to meld.
Nutrition
- Serving Size: one normal portion
- Calories: 500-600 kcal