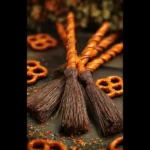
Of all the spooky, silly, and sweet traditions my family has embraced for Halloween, creating these Witch’s Broomstick Pretzels has to be one of our most cherished. The first time I made them, I was skeptical. Could something so simple, with just three ingredients, really be a showstopper? I laid them out on a platter for our annual Halloween movie night, nestled next to more complicated “mummy” pastries and “ghostly” cupcakes. To my surprise, the broomsticks were the first to vanish. My kids, usually picky, couldn’t get enough of the salty, cheesy crunch. My husband, who typically skips the cutesy snacks, was grabbing them by the handful. They are the perfect blend of playful and delicious, a savory antidote to the inevitable sugar overload of the season. They require no baking, no complex techniques, and the “wow” factor they deliver is disproportionately huge for the minimal effort involved. Now, they are a non-negotiable part of our October festivities, and I’m thrilled to share this spellbindingly simple recipe with you, so you can start your own magical tradition.
Bewitching Bites: The Ultimate Witch’s Broomstick Pretzels Recipe
Get ready to conjure up the most popular snack at your next Halloween gathering. This recipe is your secret potion for a fun, easy, and crowd-pleasing treat that looks like it took hours of intricate work, but actually comes together in minutes. It’s the perfect activity to do with little goblins and ghouls, as their small hands are perfect for some of the assembly steps. Whether you’re hosting a haunted house party, looking for a creative school snack, or just want to add a touch of whimsy to a family dinner, these savory broomsticks are guaranteed to fly off the plate.
The Classic Trio: Your Potion’s Ingredients
The magic of this recipe lies in its simplicity. You don’t need a bubbling cauldron or a pantry full of exotic ingredients—just three common items that transform into something truly enchanting.
- Pretzel Sticks: 24-30 thin pretzel sticks. These form the sturdy handle of our broom. Standard thin pretzel sticks work best for scale, but pretzel rods can be used for a larger, more dramatic broomstick.
- Mozzarella String Cheese: 8-10 sticks. This is the key to creating the broom’s bristles. The peelable nature of string cheese is what makes this recipe so clever and easy.
- Fresh Chives: A small bunch (you’ll need 24-30 individual chives). These act as the “twine” that ties the bristles to the handle, adding a pop of color and a subtle, fresh oniony flavor.
Casting the Spell: Step-by-Step Instructions
Follow these detailed instructions carefully to ensure your broomsticks are both structurally sound and delightfully spooky. The process can be broken down into three main phases: preparing your components, crafting the bristles, and the final assembly.
Phase 1: Preparing Your Magical Components
Before you begin assembling, it’s crucial to have all your ingredients prepped and ready to go. This will make the process smooth and prevent any last-minute scrambling.
- Unwrap and Cut the Cheese: Begin by unwrapping your string cheese sticks. Place them on a clean cutting board. Using a sharp knife, carefully cut each string cheese stick into thirds. You will end up with shorter, chunkier cheese segments. This size is ideal for creating proportional broom bristles. If you cut them in half, the bristles can look too long and may be more prone to breaking. Cutting them into thirds creates the perfect bite-sized broom head.
- Prepare the Chives: Gently wash your fresh chives under cool running water and pat them completely dry with a paper towel. Moisture can make them slippery and difficult to tie. Select the longest, most pliable chives from the bunch and set them aside. You will need one chive for each broomstick you plan to make.
Phase 2: Crafting the Broom’s Bristles
This is where the real transformation happens. Turning a simple piece of cheese into a broom’s bristles is a fun, tactile process.
- Fray the Cheese: Take one of your cut cheese segments. Starting from about three-quarters of the way down, use your fingertips to gently pull down and separate the cheese strings. The goal is to create a frayed, broom-like effect on one end.
- Keep it Together: Be careful not to pull the strings all the way off. You want to leave about a quarter-inch of the cheese segment intact at the top. This solid portion is what you will use to insert the pretzel stick into and tie the chive around.
- Fluff the Bristles: Once you have frayed the bottom portion, gently fluff the strings with your fingers to make them look more voluminous and realistic, just like an old, well-used witch’s broom. Repeat this process for all of your cheese segments.
Phase 3: Assembling Your Witch’s Brooms
With your broom handles (pretzels) and bristly heads (cheese) ready, it’s time for the final, magical assembly.
- Insert the Handle: Take a single pretzel stick. Carefully and gently push the end of the pretzel into the solid, uncut top of a frayed cheese segment. Push it in about half an inch, or just enough so it feels secure. Be gentle to avoid splitting the cheese. If you find the cheese is splitting, you can use the tip of the pretzel to create a small “pilot hole” first before pushing it in fully.
- Tie the Knot: Now, take one of your prepared fresh chives. Carefully wrap it around the solid part of the cheese, right where the frayed bristles begin. Tie the chive into a simple, single knot to secure it in place. The chive not only completes the look but also helps reinforce the connection between the pretzel and the cheese. If your chives are stiff and snapping, see the “Additional Tips” section for a trick to make them more pliable.
- Trim the Excess: If the ends of your chive knot are excessively long, you can use a pair of kitchen scissors to snip them for a cleaner look.
- Repeat and Display: Continue this assembly process for the remaining pretzels and cheese pieces until you have a full fleet of witch’s brooms. Arrange them on a platter, stand them up in a short glass or cauldron, and get ready to impress your guests.
Nutrition Facts
Please note that these nutritional values are an approximation. The final count can vary based on the specific brands of pretzels and cheese used, as well as the exact size of your portions.
- Servings: This recipe makes approximately 24-30 individual broomstick pretzels.
- Calories Per Serving: Each Witch’s Broomstick Pretzel contains approximately 35-45 calories.
This makes them a relatively light and sensible savory snack option amidst a sea of sugary Halloween candy, offering a small amount of protein and calcium from the cheese.
Preparation Time
One of the best features of this recipe is how quickly it comes together. There is no cooking time involved, making it a perfect last-minute party preparation.
A Breakdown of Your Potion-Making Time
- Prep Time: 5 minutes (for unwrapping cheese, cutting, and washing chives)
- Assembly Time: 15-20 minutes (for fraying cheese, inserting pretzels, and tying chives)
- Total Time: 20-25 minutes
This quick turnaround means you can spend less time in the kitchen and more time enjoying the spooky festivities with your family and friends.
How to Serve Your Spooky Snacks
Presentation is everything when it comes to themed party food. A little bit of creative staging can elevate these simple broomsticks into a centerpiece for your Halloween spread. Here are some enchanting ideas for serving them:
On a Themed Platter
- Witch’s Workshop: Arrange the broomsticks on a rustic wooden cutting board or a dark slate platter. Scatter some candy corn, plastic spiders, or gummy worms around them to create a spooky scene.
- Broomstick Parking: Stand the broomsticks up in a short, wide-mouthed glass or a small black cauldron. You can fill the bottom of the container with black beans or dark candy to help hold them upright. Place a small, handmade sign next to it that reads “Broom Parking.”
- Flying Formation: Lay the broomsticks flat on a platter in a swirling, “flying” pattern to give them a sense of motion and magic.
As Part of a Larger Spread
- Savory Graveyard: Create a “dip graveyard” by serving the broomsticks alongside a variety of dips. A dark pumpernickel bread bowl filled with spinach dip makes an excellent “cauldron.” A bowl of hummus can be a “quicksand pit,” and a spicy cheese dip can be a “lava pool.” The broomsticks are the perfect vehicle for dipping.
- Char-BOO-terie Board: Integrate the broomsticks into a larger Halloween-themed charcuterie board. Pair them with:
- Orange-colored cheeses like cheddar and Mimolette.
- Dark-colored fruits like blackberries, black grapes, and figs.
- Cured meats like salami and prosciutto.
- Spooky-shaped crackers and other ghoulish treats.
For Parties and Giveaways
- Individual Party Favors: Wrap two or three broomsticks together in a small cellophane bag and tie it with an orange or purple ribbon. This makes a wonderful, non-candy treat for guests to take home.
- Classroom Treat: If you’re bringing them for a school party, transport them carefully in a flat, airtight container, arranged in a single layer. They are a great nut-free option for many schools (always double-check your school’s specific allergy policies).
Additional Tips for Perfect Pretzel Brooms
Unlock the full potential of this recipe with these five expert tips. They address common issues and offer creative variations to make your broomsticks even more magical.
1. The Pliable Chive Trick:
Fresh chives can sometimes be brittle and snap easily when you try to tie them. To make them more flexible, you can blanch them. Simply dip the chives in a bowl of hot (not boiling) water for about 30 seconds, then immediately transfer them to a bowl of ice water to stop the cooking process. Pat them dry. This quick process makes them significantly more pliable and easier to tie without breaking.
2. Make-Ahead Magic:
While these are best assembled right before serving to keep the pretzels crunchy, you can absolutely prep the components ahead of time to save precious minutes on party day. You can cut and fray all the cheese segments and store them in an airtight container in the refrigerator for up to 24 hours. Keep the pretzels in their original bag and have your chives washed and ready. When it’s time to serve, the assembly will take less than 10 minutes.
3. The Sweet Switch-Up: Peanut Butter Cup Brooms:
For those with a sweet tooth, there’s a popular and equally easy variation using candy!
- Ingredients: Use pretzel sticks and miniature Reese’s Peanut Butter Cups. You can also use a small amount of melted chocolate or candy melts as “glue.”
- Instructions: Unwrap the miniature Reese’s cups. Gently push a pretzel stick into the center of the wider top of the peanut butter cup until it feels secure. For extra stability, you can dip the end of the pretzel in a little melted chocolate before inserting it. The ridged edges of the candy cup perfectly mimic the look of broom bristles. Let them set, and you have a sweet and salty version of the witch’s broom!
4. Ensuring Stability:
There’s nothing more frustrating than having your broom heads fall off the handles. To ensure a stable broomstick, make sure you push the pretzel deep enough into the solid part of the cheese (about half an inch). Twisting the pretzel gently as you insert it can help create a more secure fit without splitting the cheese. The chive tie also acts as an important structural reinforcement.
5. Gluten-Free & Allergy-Friendly Options:
It’s easy to adapt this recipe for various dietary needs.
- For a Gluten-Free Version: Simply substitute the standard pretzel sticks with your favorite brand of gluten-free pretzel sticks. The rest of the recipe remains the same.
- For a Dairy-Free Version: Many brands now offer excellent dairy-free, plant-based cheese sticks. Look for vegan mozzarella-style sticks that have a firm texture. These can be frayed and used just like their dairy counterparts to create a treat that everyone can enjoy.
Frequently Asked Questions (FAQ)
Here are answers to some of the most common questions about making Witch’s Broomstick Pretzels.
1. How do I store leftover broomsticks? Will the pretzels get soggy?
Leftovers can be stored in an airtight container in the refrigerator for up to two days. However, be aware that the moisture from the cheese will eventually cause the pretzels to lose their crispness and become soft. For the best experience, they are ideally eaten within a few hours of assembly. If you know you’ll have leftovers, consider storing the components separately and assembling them as needed.
2. My chives keep breaking when I try to tie them. What can I do?
This is a very common issue! The best solution is the blanching trick mentioned in the tips section. Soaking the chives in hot water for 30 seconds makes them much more flexible. If you’re in a pinch and don’t have time for that, you can try using the green tops of scallions (green onions), which are often a bit sturdier. Cut them into thin strips to mimic the look of a chive.
3. Can I use a block of cheese instead of string cheese?
While you technically can, it is not recommended. The magic of this recipe is the unique, peelable nature of string cheese, which allows you to create the frayed bristle effect effortlessly. If you were to use a block of cheese, you would have to cut it into sticks and then meticulously slice thin slivers into one end with a knife, which is far more time-consuming and doesn’t produce the same rustic look.
4. How far in advance can I make these for a party?
For optimal freshness and crunch, it’s best to assemble them no more than 3-4 hours before your party begins. You can store them in a single layer in an airtight container in the refrigerator until you’re ready to serve. If you need to work further in advance, prepare all the cheese “bristles” the day before and store them in the fridge, then do the final assembly on party day.
5. What’s the best way to transport these to a party or school event?
The key to successful transportation is to prevent them from rolling around and breaking. The best method is to lay them in a single, flat layer in a shallow, airtight container or a baking dish covered tightly with plastic wrap. If you need to stack them, place a layer of parchment paper between the layers to prevent them from sticking and breaking. Transporting them upright in a “broom parking” cup is generally not advisable, as they can topple over easily.
Witch’s Broomstick Pretzels recipe
Ingredients
-
Pretzel Sticks: 24-30 thin pretzel sticks. These form the sturdy handle of our broom. Standard thin pretzel sticks work best for scale, but pretzel rods can be used for a larger, more dramatic broomstick.
-
Mozzarella String Cheese: 8-10 sticks. This is the key to creating the broom’s bristles. The peelable nature of string cheese is what makes this recipe so clever and easy.
-
Fresh Chives: A small bunch (you’ll need 24-30 individual chives). These act as the “twine” that ties the bristles to the handle, adding a pop of color and a subtle, fresh oniony flavor.
Instructions
Phase 1: Preparing Your Magical Components
Before you begin assembling, it’s crucial to have all your ingredients prepped and ready to go. This will make the process smooth and prevent any last-minute scrambling.
-
Unwrap and Cut the Cheese: Begin by unwrapping your string cheese sticks. Place them on a clean cutting board. Using a sharp knife, carefully cut each string cheese stick into thirds. You will end up with shorter, chunkier cheese segments. This size is ideal for creating proportional broom bristles. If you cut them in half, the bristles can look too long and may be more prone to breaking. Cutting them into thirds creates the perfect bite-sized broom head.
-
Prepare the Chives: Gently wash your fresh chives under cool running water and pat them completely dry with a paper towel. Moisture can make them slippery and difficult to tie. Select the longest, most pliable chives from the bunch and set them aside. You will need one chive for each broomstick you plan to make.
Phase 2: Crafting the Broom’s Bristles
This is where the real transformation happens. Turning a simple piece of cheese into a broom’s bristles is a fun, tactile process.
-
Fray the Cheese: Take one of your cut cheese segments. Starting from about three-quarters of the way down, use your fingertips to gently pull down and separate the cheese strings. The goal is to create a frayed, broom-like effect on one end.
-
Keep it Together: Be careful not to pull the strings all the way off. You want to leave about a quarter-inch of the cheese segment intact at the top. This solid portion is what you will use to insert the pretzel stick into and tie the chive around.
-
Fluff the Bristles: Once you have frayed the bottom portion, gently fluff the strings with your fingers to make them look more voluminous and realistic, just like an old, well-used witch’s broom. Repeat this process for all of your cheese segments.
Phase 3: Assembling Your Witch’s Brooms
With your broom handles (pretzels) and bristly heads (cheese) ready, it’s time for the final, magical assembly.
-
Insert the Handle: Take a single pretzel stick. Carefully and gently push the end of the pretzel into the solid, uncut top of a frayed cheese segment. Push it in about half an inch, or just enough so it feels secure. Be gentle to avoid splitting the cheese. If you find the cheese is splitting, you can use the tip of the pretzel to create a small “pilot hole” first before pushing it in fully.
-
Tie the Knot: Now, take one of your prepared fresh chives. Carefully wrap it around the solid part of the cheese, right where the frayed bristles begin. Tie the chive into a simple, single knot to secure it in place. The chive not only completes the look but also helps reinforce the connection between the pretzel and the cheese. If your chives are stiff and snapping, see the “Additional Tips” section for a trick to make them more pliable.
-
Trim the Excess: If the ends of your chive knot are excessively long, you can use a pair of kitchen scissors to snip them for a cleaner look.
-
Repeat and Display: Continue this assembly process for the remaining pretzels and cheese pieces until you have a full fleet of witch’s brooms. Arrange them on a platter, stand them up in a short glass or cauldron, and get ready to impress your guests.
Nutrition
- Serving Size: one normal portion
- Calories: 35-45