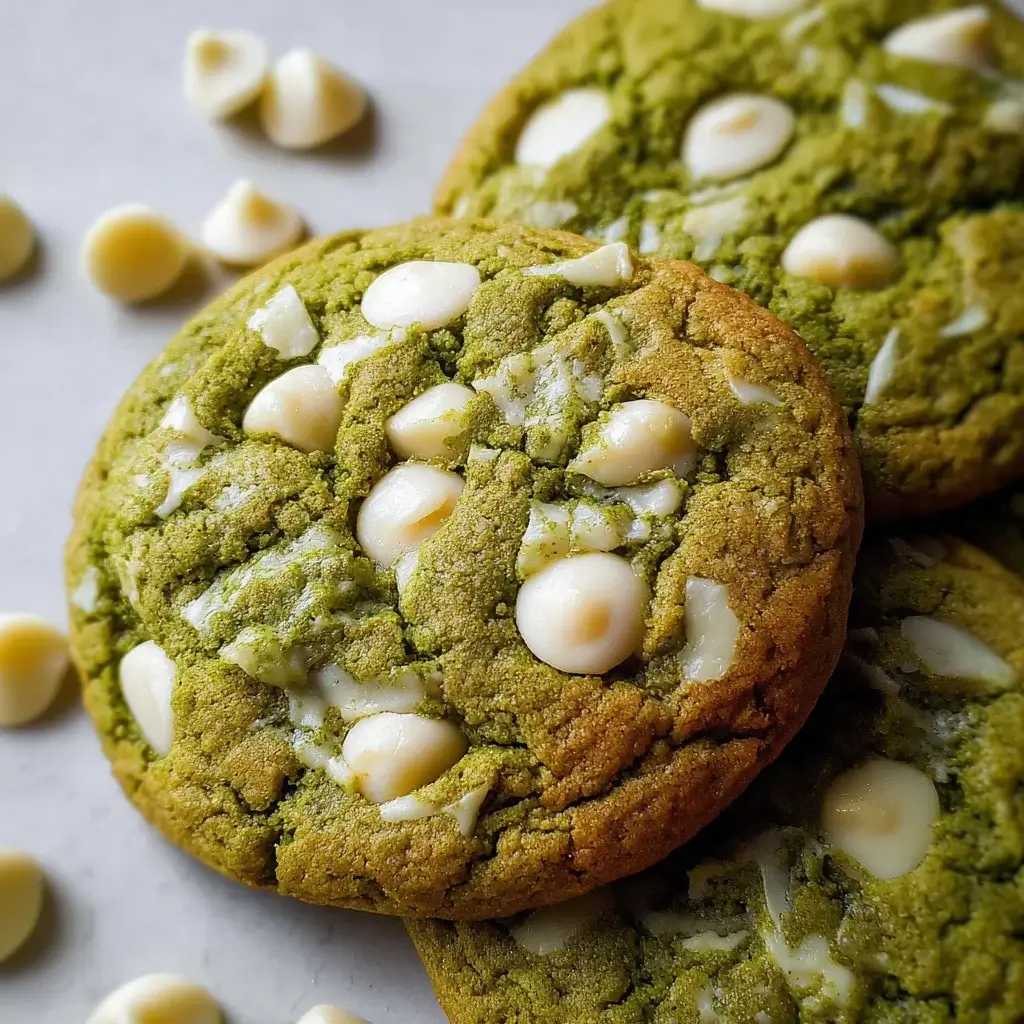

I have a deep and abiding love for a classic, gooey, chocolate chip cookie. For years, I believed it was the pinnacle of cookie perfection, a flawless formula that couldn’t be improved upon. That was until a friend, returning from a trip to Japan, handed me a small, unassuming cookie from a local bakery. It was a stunning, jewel-toned green, studded with creamy white chocolate. I was intrigued but skeptical. One bite, however, was a revelation. It was perfectly chewy in the middle with delicately crisp edges, but the flavor was something entirely new and captivating. Instead of pure sweetness, there was a complex, earthy, slightly grassy bitterness from matcha, perfectly balanced by the sweet, milky vanilla notes of the white chocolate. It was sophisticated yet comforting, familiar yet exotic. I was instantly hooked. Recreating that perfect balance became my personal baking challenge. This recipe is the culmination of dozens of batches, of tweaking sugar ratios and chill times, of sourcing the best possible matcha. This is the cookie that converts the skeptics, the one that makes people’s eyes widen in surprise and delight. It’s the one that proves there is, in fact, a cookie that can stand shoulder-to-shoulder with the classic chocolate chip.
The Perfect Harmony: Ingredients for White Chocolate Matcha Cookies
Achieving the perfect chewy texture, vibrant green color, and balanced flavor in these cookies relies on using the right ingredients in the right proportions. For the most accurate and consistent results, I highly recommend using a kitchen scale.
The Dry Ingredient Foundation
- All-Purpose Flour: 240g (2 cups) – This provides the primary structure for the cookie. For the best texture, use the “spoon and level” method: spoon the flour into your measuring cup until it’s overflowing, then use the back of a knife to level it off.
- High-Quality Culinary Grade Matcha Powder: 15g (2 to 3 tablespoons) – This is the soul of the cookie and the most critical ingredient choice. Do not use low-quality or old matcha, as it will result in a bitter taste and a dull, brownish-green color. A high-quality culinary grade matcha will provide a vibrant green hue and a smooth, robust, earthy flavor designed to stand up to baking.
- Baking Soda: 1 teaspoon – This is our leavening agent. It reacts with the brown sugar’s acidity to give the cookies a bit of lift and helps them spread to the perfect chewy thickness.
- Salt: 1/2 teaspoon – Salt is a crucial flavor enhancer. It sharpens the taste of all the other ingredients, balances the sweetness of the white chocolate, and makes the complex notes of the matcha truly shine.
The Wet Ingredient Core for Chewiness and Richness
- Unsalted Butter: 170g (3/4 cup or 1.5 sticks), melted – Using melted butter is the secret to an intensely chewy, fudgy cookie rather than a light, cakey one. Let it cool slightly after melting so it doesn’t scramble the eggs.
- Light Brown Sugar: 165g (3/4 cup), packed – The molasses in brown sugar provides moisture, which is essential for a soft and chewy texture. It also adds a wonderful caramel-like depth of flavor.
- Granulated Sugar: 100g (1/2 cup) – White sugar contributes to the cookie’s spread and helps create those desirable crispy edges. The combination of both sugars yields the perfect texture.
- Large Egg: 1, at room temperature – The egg acts as a binder, holding the cookie together.
- Large Egg Yolk: 1, at room temperature – The addition of an extra egg yolk is a key trick for ultra-rich and chewy cookies. The extra fat from the yolk contributes to a fudgier texture and a richer flavor.
- Vanilla Extract: 2 teaspoons – A generous amount of high-quality vanilla extract is essential. It bridges the gap between the earthy matcha and the sweet white chocolate, rounding out the flavor profile beautifully.
The Sweet Finish
- High-Quality White Chocolate: 170g (6 oz or about 1 cup), chopped or in callets/chips – The quality of your white chocolate matters immensely. For the best flavor and melt, use a high-quality white chocolate bar that you chop yourself, or premium white chocolate callets. Standard white chocolate chips often contain stabilizers that prevent them from melting into luscious pools.
From Bowl to Bliss: Step-by-Step Instructions
Follow these instructions meticulously, paying close attention to the chilling step—it is the most important part of achieving the perfect texture and preventing the cookies from spreading too thin.
Step 1: Combine the Dry Ingredients
In a medium-sized bowl, place a fine-mesh sieve over the top. Add the all-purpose flour, matcha powder, baking soda, and salt. Sift all the ingredients together into the bowl. Sifting is especially crucial for the matcha powder, which tends to clump. This step ensures an even distribution of flavor, a uniform green color, and a smooth texture in the final cookie. Whisk the sifted ingredients together to fully combine them and set the bowl aside.
Step 2: Mix the Wet Ingredients
In a separate large bowl, add the melted and slightly cooled unsalted butter. Add the packed light brown sugar and granulated sugar to the butter. Whisk vigorously for about a minute until the mixture is smooth, glossy, and well combined. The sugar should begin to dissolve into the butter. Add the room-temperature egg, the extra egg yolk, and the vanilla extract. Whisk again until the mixture is pale, thick, and fully emulsified.
Step 3: Combine Wet and Dry
Pour the dry ingredient mixture into the large bowl with the wet ingredients. Using a rubber spatula or a wooden spoon, gently fold the ingredients together until they are just combined. It is very important not to overmix at this stage. Stop mixing when you still see a few small streaks of flour. Overmixing will develop the gluten in the flour and result in tough, dense cookies.
Step 4: Fold in the White Chocolate
Add the chopped white chocolate or callets to the dough. Fold them in gently until they are evenly distributed throughout the dough. At this point, the dough will be quite soft and sticky.
Step 5: The Crucial Chilling Step
This is the most important step for cookie success. Cover the bowl with plastic wrap and transfer it to the refrigerator. Chill the dough for a minimum of 2 hours, but for the absolute best flavor and texture, chill it for 24 to 48 hours. This mandatory rest period does two things:
- Solidifies the Fat: Chilling the butter prevents the cookies from spreading into thin, greasy crisps in the oven. It ensures they bake up thick and chewy.
- Hydrates the Flour & Matures the Flavor: The rest time allows the flour to fully absorb the liquid, and the flavors of the matcha, vanilla, and butter to meld and deepen significantly. A well-rested dough produces a cookie with a much more complex and delicious flavor profile.
Step 6: Prepare for Baking
When you are ready to bake, position your oven racks in the upper and lower thirds of the oven and preheat to 350°F (175°C). Line two large baking sheets with parchment paper.
Step 7: Scoop and Bake
Remove the chilled dough from the refrigerator. It will be firm. Using a medium cookie scoop (about 1.5 to 2 tablespoons), scoop out balls of dough and place them on the prepared baking sheets, leaving at least 2 inches of space between each cookie to allow for spreading. For a bakery-style look, you can press a few extra pieces of chopped white chocolate onto the tops of the dough balls before baking.
Bake for 11-13 minutes, rotating the baking sheets halfway through the baking time (swapping their positions on the racks and turning them 180 degrees) to ensure even baking. The cookies are done when the edges are set and lightly golden brown, but the centers still look slightly soft and underdone. Do not overbake them, as they will continue to set on the hot pan after being removed from the oven.
Step 8: Cool for Optimal Chewiness
Remove the baking sheets from the oven. For an extra chewy, wrinkly texture, you can carefully lift the baking sheet a few inches and drop it flat onto the counter once or twice (this is optional but effective). Let the cookies cool on the baking sheet for 5-10 minutes. This allows them to firm up enough to be moved. After 10 minutes, transfer the cookies to a wire rack to cool completely.
Nutrition Facts
- Servings: Makes approximately 24 medium cookies
- Calories Per Serving: Approximately 180-210 kcal
(Disclaimer: This nutritional information is an estimate and can vary significantly based on the specific brands of matcha, butter, and white chocolate used.)
Preparation Time
- Active Preparation Time: 20 minutes
- Chilling Time: 2 hours (minimum) to 48 hours (recommended)
- Baking Time: 11-13 minutes per batch
- Total Time: Minimum of 2 hours 45 minutes
Elevating Your Matcha Moment: How to Serve
These cookies are a delight on their own, but pairing them thoughtfully can enhance the experience even further.
- The Classic Pairing: Enjoy a cookie with a cold glass of milk. The creaminess of the milk is a perfect foil for the earthy matcha.
- A Tea Lover’s Dream: Create a perfect afternoon tea moment by pairing these cookies with a hot, unsweetened Japanese tea.
- Genmaicha: A green tea with toasted brown rice, its nutty flavor beautifully complements the cookies.
- Hojicha: A roasted green tea with a toasty, nutty, and less bitter profile that harmonizes well.
- Gourmet Ice Cream Sandwiches: Place a scoop of high-quality ice cream between two completely cooled cookies. Vanilla bean is a classic choice, but for a truly unique treat, try:
- Black sesame ice cream
- Coconut ice cream
- A high-quality strawberry ice cream for a fruity contrast
- On a Dessert Board: Their vibrant green color makes them a stunning addition to any dessert platter, offering a unique flavor profile alongside classic chocolate treats, fruits, and cheeses.
- The Perfect Gift: These cookies travel well and make a beautiful and sophisticated homemade gift. Pack them in a clear cellophane bag tied with a ribbon or in a nice cookie tin.
5 Secrets to Bakery-Worthy Matcha Cookies
- Your Matcha Matters Most: This cannot be overstated. Using a high-quality, fresh, culinary-grade matcha powder is the number one factor in achieving both a beautiful vibrant green color and a delicious, non-bitter flavor. It is worth the investment.
- Don’t You Dare Skip the Chill: Chilling the dough is not an optional step; it is the fundamental secret to thick, chewy cookies that don’t spread into oblivion. The longer you can chill the dough (up to 72 hours), the more complex and developed the flavor will be.
- Melted Butter for the Win: The choice between creamed butter and melted butter completely changes a cookie’s final texture. Creamed butter incorporates air, leading to a lighter, cakier cookie. Melted butter coats the flour differently, resulting in a denser, fudgier, chewier cookie with a crispier edge. For this recipe, melted is a must.
- The Extra Yolk is Not a Typo: That single extra egg yolk adds a significant amount of fat and richness to the dough. This translates directly into a softer, fudgier, and more flavorful cookie that stays chewy for days.
- Underbake for Perfection: The key to a soft, gooey center is to pull the cookies from the oven when they still look slightly underdone in the middle. The residual heat from the hot baking sheet will continue to cook them as they cool, resulting in the perfect final texture.
Your Matcha Cookie Questions, Answered!
1. Why did my matcha cookies turn a dull, brownish color instead of bright green?
This is a very common problem and is almost always caused by one of two things: the quality of your matcha powder or overbaking. Low-grade, old, or improperly stored matcha will have lost its vibrant chlorophyll and will turn a muddy, swampy green-brown when baked. Secondly, baking the cookies for too long can “toast” the matcha, dulling its color and making it more bitter.
2. My cookies spread way too much and are thin and crispy. What happened?
The most likely culprit is that the dough was not chilled for long enough. When the butter in the dough is too warm, it melts instantly in the oven, causing rapid spread before the cookie’s structure has a chance to set. Ensure you chill the dough for at least the minimum 2 hours. Another possibility is that your butter was too hot when you mixed it with the sugars, which can also contribute to excess spread.
3. Can I freeze the cookie dough?
Yes, absolutely! This dough freezes beautifully. Scoop the dough balls onto a parchment-lined baking sheet and freeze until solid. Then, transfer the frozen dough balls to a freezer-safe zip-top bag. You can bake them directly from frozen; just add 2-3 minutes to the baking time. This is a fantastic way to have fresh-baked cookies on demand.
4. The recipe calls for chopped white chocolate. Can I just use white chocolate chips?
You can, but the result will be different. Most commercial white chocolate chips contain emulsifiers and stabilizers that are designed to help them hold their shape during baking. This means you’ll get distinct “chips” in your cookie. Using a high-quality white chocolate bar that you chop yourself (or premium callets) will result in luscious, melted pools of creamy white chocolate throughout the cookie, which many people prefer.
5. How do I store these cookies to keep them soft and chewy?
Store the completely cooled cookies in an airtight container at room temperature. They should stay chewy for 3-4 days. For an extra trick to maintain softness, you can place a slice of plain bread inside the container with the cookies. The cookies will absorb moisture from the bread, helping them stay soft and fresh for longer.
White Chocolate Matcha Cookies recipe
Ingredients
The Dry Ingredient Foundation
-
All-Purpose Flour: 240g (2 cups) – This provides the primary structure for the cookie. For the best texture, use the “spoon and level” method: spoon the flour into your measuring cup until it’s overflowing, then use the back of a knife to level it off.
-
High-Quality Culinary Grade Matcha Powder: 15g (2 to 3 tablespoons) – This is the soul of the cookie and the most critical ingredient choice. Do not use low-quality or old matcha, as it will result in a bitter taste and a dull, brownish-green color. A high-quality culinary grade matcha will provide a vibrant green hue and a smooth, robust, earthy flavor designed to stand up to baking.
-
Baking Soda: 1 teaspoon – This is our leavening agent. It reacts with the brown sugar’s acidity to give the cookies a bit of lift and helps them spread to the perfect chewy thickness.
-
Salt: 1/2 teaspoon – Salt is a crucial flavor enhancer. It sharpens the taste of all the other ingredients, balances the sweetness of the white chocolate, and makes the complex notes of the matcha truly shine.
The Wet Ingredient Core for Chewiness and Richness
-
Unsalted Butter: 170g (3/4 cup or 1.5 sticks), melted – Using melted butter is the secret to an intensely chewy, fudgy cookie rather than a light, cakey one. Let it cool slightly after melting so it doesn’t scramble the eggs.
-
Light Brown Sugar: 165g (3/4 cup), packed – The molasses in brown sugar provides moisture, which is essential for a soft and chewy texture. It also adds a wonderful caramel-like depth of flavor.
-
Granulated Sugar: 100g (1/2 cup) – White sugar contributes to the cookie’s spread and helps create those desirable crispy edges. The combination of both sugars yields the perfect texture.
-
Large Egg: 1, at room temperature – The egg acts as a binder, holding the cookie together.
-
Large Egg Yolk: 1, at room temperature – The addition of an extra egg yolk is a key trick for ultra-rich and chewy cookies. The extra fat from the yolk contributes to a fudgier texture and a richer flavor.
-
Vanilla Extract: 2 teaspoons – A generous amount of high-quality vanilla extract is essential. It bridges the gap between the earthy matcha and the sweet white chocolate, rounding out the flavor profile beautifully.
The Sweet Finish
-
High-Quality White Chocolate: 170g (6 oz or about 1 cup), chopped or in callets/chips – The quality of your white chocolate matters immensely. For the best flavor and melt, use a high-quality white chocolate bar that you chop yourself, or premium white chocolate callets. Standard white chocolate chips often contain stabilizers that prevent them from melting into luscious pools.
Instructions
Step 1: Combine the Dry Ingredients
In a medium-sized bowl, place a fine-mesh sieve over the top. Add the all-purpose flour, matcha powder, baking soda, and salt. Sift all the ingredients together into the bowl. Sifting is especially crucial for the matcha powder, which tends to clump. This step ensures an even distribution of flavor, a uniform green color, and a smooth texture in the final cookie. Whisk the sifted ingredients together to fully combine them and set the bowl aside.
Step 2: Mix the Wet Ingredients
In a separate large bowl, add the melted and slightly cooled unsalted butter. Add the packed light brown sugar and granulated sugar to the butter. Whisk vigorously for about a minute until the mixture is smooth, glossy, and well combined. The sugar should begin to dissolve into the butter. Add the room-temperature egg, the extra egg yolk, and the vanilla extract. Whisk again until the mixture is pale, thick, and fully emulsified.
Step 3: Combine Wet and Dry
Pour the dry ingredient mixture into the large bowl with the wet ingredients. Using a rubber spatula or a wooden spoon, gently fold the ingredients together until they are just combined. It is very important not to overmix at this stage. Stop mixing when you still see a few small streaks of flour. Overmixing will develop the gluten in the flour and result in tough, dense cookies.
Step 4: Fold in the White Chocolate
Add the chopped white chocolate or callets to the dough. Fold them in gently until they are evenly distributed throughout the dough. At this point, the dough will be quite soft and sticky.
Step 5: The Crucial Chilling Step
This is the most important step for cookie success. Cover the bowl with plastic wrap and transfer it to the refrigerator. Chill the dough for a minimum of 2 hours, but for the absolute best flavor and texture, chill it for 24 to 48 hours. This mandatory rest period does two things:
-
Solidifies the Fat: Chilling the butter prevents the cookies from spreading into thin, greasy crisps in the oven. It ensures they bake up thick and chewy.
-
Hydrates the Flour & Matures the Flavor: The rest time allows the flour to fully absorb the liquid, and the flavors of the matcha, vanilla, and butter to meld and deepen significantly. A well-rested dough produces a cookie with a much more complex and delicious flavor profile.
Step 6: Prepare for Baking
When you are ready to bake, position your oven racks in the upper and lower thirds of the oven and preheat to 350°F (175°C). Line two large baking sheets with parchment paper.
Step 7: Scoop and Bake
Remove the chilled dough from the refrigerator. It will be firm. Using a medium cookie scoop (about 1.5 to 2 tablespoons), scoop out balls of dough and place them on the prepared baking sheets, leaving at least 2 inches of space between each cookie to allow for spreading. For a bakery-style look, you can press a few extra pieces of chopped white chocolate onto the tops of the dough balls before baking.
Bake for 11-13 minutes, rotating the baking sheets halfway through the baking time (swapping their positions on the racks and turning them 180 degrees) to ensure even baking. The cookies are done when the edges are set and lightly golden brown, but the centers still look slightly soft and underdone. Do not overbake them, as they will continue to set on the hot pan after being removed from the oven.
Step 8: Cool for Optimal Chewiness
Remove the baking sheets from the oven. For an extra chewy, wrinkly texture, you can carefully lift the baking sheet a few inches and drop it flat onto the counter once or twice (this is optional but effective). Let the cookies cool on the baking sheet for 5-10 minutes. This allows them to firm up enough to be moved. After 10 minutes, transfer the cookies to a wire rack to cool completely.
Nutrition
- Serving Size: one normal portion
- Calories: 180-210 kcal