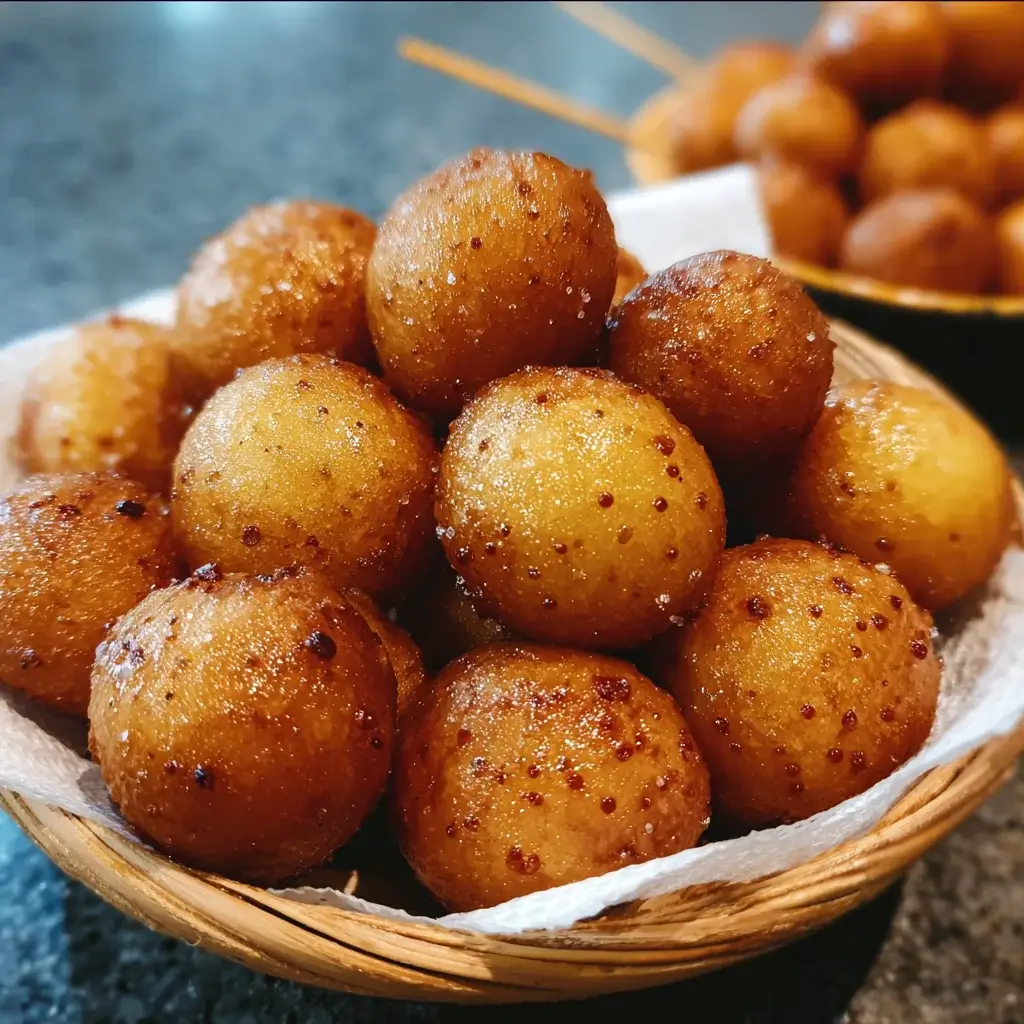

Of all the world’s street food, there are few that capture pure, unadulterated joy quite like Taiwanese Sweet Potato Balls, or Di Gua Qiu (地瓜球). My first encounter was on a sweltering evening at the Raohe Night Market in Taipei. The air was thick with a thousand competing, delicious smells, but I was drawn to the rhythmic thump-thump-thump of a vendor pressing a giant metal ladle into a vat of sizzling oil. In the oil bobbed dozens of golden orbs, inflating and deflating with each press. I bought a paper bag full of them, hot enough to burn my fingertips. The first bite was a textural revelation. A shatteringly thin, crispy shell gave way to a chewy, mochi-like layer, and then… nothing. A hollow center. It was sweet but not overly so, with the unmistakable homey flavor of sweet potato. It was baffling and magical. How could something so simple be so complex? That experience sent me on a mission to recreate that night market magic in my own kitchen. After many trials—some dense and leaden, others that refused to puff—I finally unlocked the secrets. This recipe is the result of that quest. It’s a guaranteed guide to creating those perfectly hollow, addictively chewy, and deeply satisfying sweet potato balls that will transport you straight to the bustling, vibrant streets of Taiwan.
The Soul of a Night Market: Understanding Di Gua Qiu
Before we dive into the recipe, it’s important to understand what makes these little golden spheres so iconic. Di Gua Qiu are a quintessential Taiwanese night market snack, beloved by locals and tourists alike. They represent the pinnacle of what Taiwanese street food does best: elevating simple, humble ingredients into something extraordinary through technique and a focus on texture.
The ultimate goal of a good Di Gua Qiu is achieving the signature “QQ” texture. This term, ubiquitous in Taiwan, describes a specific type of satisfying, springy chewiness, similar to al dente pasta or gummy candy. It’s a highly prized textural quality, and these sweet potato balls are the poster child for it. The magic lies in a specific blend of starches and a unique deep-frying technique that involves repeatedly pressing the balls as they cook. This pressing action expels steam and forces the balls to inflate dramatically, creating the signature hollow interior and the perfect crispy-chewy contrast. This isn’t just a recipe; it’s a technique, a science, and a little bit of culinary alchemy.
Complete Ingredients for Authentic Sweet Potato Balls
The ingredient list is deceptively simple, which means the quality of each component and the accuracy of your measurements are key. For best results, use a kitchen scale.
- Sweet Potatoes: 1 lb (about 450g), preferably orange or yellow-fleshed varieties. This will yield about 1 ½ cups of mashed sweet potato.
- Tapioca Starch: 1 ½ cups (180g), plus more for dusting. This is the key ingredient for the “QQ” chewy texture. It is sometimes labeled as tapioca flour. Do not substitute with cornstarch.
- Glutinous Rice Flour: ¼ cup (40g). While some recipes use only tapioca starch, adding a small amount of glutinous rice flour (like Mochiko) lends a softer, more mochi-like chewiness that elevates the final texture. This is optional but highly recommended.
- Granulated Sugar: ⅓ cup (65g). You can adjust this slightly depending on the natural sweetness of your potatoes.
- Salt: ¼ teaspoon. A small amount of salt enhances the sweetness and overall flavor.
- Frying Oil: About 6-8 cups of a neutral oil with a high smoke point, such as canola, vegetable, peanut, or soybean oil.
Step-by-Step Instructions: The Secret to Hollow, Chewy Balls
Follow these steps with care, especially the frying technique. This is where the magic happens.
Part 1: Preparing the Sweet Potato Dough
- Cook the Sweet Potatoes: Peel the sweet potatoes and cut them into 1-inch chunks. Place them in a steamer basket over simmering water and steam for 15-20 minutes, or until they are completely tender and easily pierced with a fork. It is crucial to steam, not boil, the potatoes. Boiling adds excess water to the potatoes, which will make your dough too wet and sticky to work with.
- Mash Until Smooth: Transfer the hot, steamed sweet potatoes to a large mixing bowl. While they are still hot, mash them thoroughly with a potato masher or fork until they are as smooth as possible. Any lumps will affect the final texture.
- Add Sugar and Salt: Add the ⅓ cup of sugar and ¼ teaspoon of salt to the hot mashed sweet potatoes. The heat from the potatoes will help the sugar dissolve completely. Mix well until fully incorporated.
- Combine the Starches: In a separate small bowl, whisk together the 1 ½ cups of tapioca starch and the ¼ cup of glutinous rice flour (if using).
- Form the Dough: Add the starch mixture to the sweet potato mixture. Start by mixing with a spatula or wooden spoon. As it starts to come together, switch to using your hands. Knead the mixture inside the bowl until it forms a uniform, smooth, and pliable dough that doesn’t stick to your hands, similar in consistency to Play-Doh. If the dough feels too dry and crumbly, add a teaspoon of hot water. If it feels too sticky, add a teaspoon of tapioca starch.
- Shape the Balls: Pinch off pieces of the dough and roll them between your palms to form small, smooth balls about 1 inch in diameter. Try to make them as uniform in size as possible to ensure they cook evenly. Place the rolled balls on a baking sheet lined with parchment paper.
Part 2: The Art of Deep Frying
This three-stage frying process is the non-negotiable secret to hollow sweet potato balls.
- The Initial Low-Heat Fry: Pour your oil into a deep, heavy-bottomed pot or wok until it’s at least 2-3 inches deep. Heat the oil over medium-low heat. You are NOT looking for hot, shimmering oil yet. To test, drop one ball into the oil. It should sink to the bottom and only have a few lazy bubbles rising from it. The oil temperature should be around 220-240°F (105-115°C). Carefully add about half of the sweet potato balls to the pot, being sure not to crowd it. Let them cook on the bottom for 2-3 minutes, stirring gently to prevent sticking.
- The Puff and Press Stage: The balls will slowly start to float to the surface. Once most of them are floating, increase the heat to medium (about 280-300°F / 140-150°C). Now comes the crucial step. Take a large, sturdy metal spider strainer or slotted spoon. As the balls cook and begin to puff slightly, use the back of the strainer to gently press them against the side or bottom of the pot. Press just enough to slightly flatten them. As you release the pressure, they will re-inflate, puffing up even bigger. Continue this cycle of pressing, deflating, and re-inflating every 30-40 seconds for the next 5-7 minutes. With each press, they will grow larger and become more hollow.
- The High-Heat Crisping Stage: Once the balls have doubled or tripled in size and are a light golden color, increase the heat to high (about 350°F / 175°C). Fry for another 1-2 minutes without pressing. This final blast of high heat makes the outer shell firm and incredibly crispy, helps expel excess oil, and prevents them from deflating after you take them out.
- Drain and Serve: Use the strainer to remove the beautifully puffed, golden-brown sweet potato balls from the oil. Let them drain on a wire rack (not on paper towels, which can make them soggy). They are best served immediately while hot and crispy. Repeat the entire frying process with the remaining batch of balls, allowing the oil to cool back down to the low initial temperature before starting again.
Nutrition Facts
Please note this is an estimate for this indulgent street food snack. The final values can vary based on the size of the balls and oil absorption.
- Servings: This recipe makes about 40-50 one-inch balls. A typical serving would be 8-10 balls.
- Calories per serving (approximate): 250-300 kcal per serving of 10 balls.
Preparation Time
- Active Time: 40 minutes (making dough, rolling balls, frying)
- Inactive Time: 20 minutes (steaming and cooling potatoes)
- Total Time: Approximately 1 hour
How to Serve and Enjoy
The best way to enjoy Di Gua Qiu is the way you’d get them at a night market, but here are a few other ideas:
- The Authentic Experience:
- Serve them piping hot, right out of the fryer, in a simple paper bag for easy snacking. This is the quintessential way to eat them.
- With a Sprinkle of Powder:
- For a classic Taiwanese twist, lightly dust the hot balls with plum powder (suan mei fen). The sweet, sour, and salty flavor of the plum powder is a phenomenal contrast to the sweet potato.
- A light dusting of cinnamon sugar is also a delicious Western-style alternative.
- As a Dessert Component:
- Serve a small bowl of them alongside a scoop of vanilla or coconut ice cream. The contrast between the hot, chewy balls and the cold, creamy ice cream is divine.
- Create a fun dessert platter with the sweet potato balls, fresh fruit, and a side of condensed milk or chocolate sauce for dipping.
- For Parties:
- Skewer 3-4 balls onto a small bamboo stick for easy, mess-free party food.
- The Perfect Pairing:
- Enjoy them with a cold, refreshing glass of Taiwanese bubble milk tea for the ultimate night market snack combination.
Additional Tips for Perfect Di Gua Qiu
1. Control the Dough’s Moisture: Steam, Don’t Boil
This is the most critical tip for the dough. Steaming the sweet potatoes ensures they are cooked through without absorbing excess water. A dough that is too wet will be impossible to roll and will not puff up correctly during frying, resulting in dense, greasy balls.
2. The Double-Starch Blend is Superior
While you can make this recipe with only tapioca starch, the small addition of glutinous rice flour makes a noticeable difference. The tapioca starch provides the primary crispness and signature “QQ” chew, while the glutinous rice flour adds a softer, more tender, mochi-like quality to the chew, creating a more complex and satisfying final texture.
3. Don’t Be Shy with the Pressing
The pressing technique is not optional; it is the entire secret to the hollow center. Be firm but gentle. You want to press hard enough to expel the steam and flatten the ball, but not so hard that you burst it. A sturdy, wide spider strainer is the best tool for this job. Embrace the process; it’s what separates a regular fritter from a true Di Gua Qiu.
4. Master the Three-Stage Oil Temperature
Controlling the oil temperature is paramount. Starting too hot will cook the outside too quickly, leaving the inside raw and preventing it from puffing. Skipping the final high-heat crisping will result in oily balls that deflate sadly as they cool. Follow the low -> medium -> high temperature progression for guaranteed success.
5. Plan Ahead: Freeze for Later
These sweet potato balls are fantastic for making ahead. After you roll the dough into balls (Part 1, Step 6), arrange them on a parchment-lined baking sheet and place them in the freezer. Once frozen solid, transfer them to a freezer-safe bag or container. You can fry them directly from frozen, with no need to thaw. Just add a few extra minutes to the initial low-heat frying stage.
Frequently Asked Questions (FAQ)
1. Q: Why aren’t my sweet potato balls hollow? They are dense inside.
A: This is the most common issue, and it’s almost always due to the frying technique. Either you didn’t press them at all, or you didn’t press them enough. The repeated action of pressing and deflating is what creates the hollow interior. A secondary cause could be that your oil was too hot from the start, which seared the outside shut before the inside had a chance to generate steam and puff.
2. Q: Can I use different types of sweet potatoes, like purple ones?
A: Yes! Purple sweet potatoes make for a stunningly beautiful version of Di Gua Qiu. Be aware that purple sweet potatoes are often drier and starchier than orange varieties, so you may need to add a tablespoon or two of hot water to your dough to get the right consistency. The flavor will also be slightly different and earthier.
3. Q: Can I bake or air-fry these instead of deep-frying?
A: Unfortunately, no. The magic of this specific recipe is entirely dependent on the physics of deep-frying. The buoyancy of the oil allows the balls to float and expand, and the pressure of the surrounding hot oil is what allows the “press and re-inflate” action to work. Baking or air-frying will simply result in dense, cooked dough balls—they will still taste nice, but they will not be the hollow, chewy Di Gua Qiu.
4. Q: My balls deflated and became wrinkly after I took them out of the oil. Why?
A: This happens when the outer crust isn’t firm and crispy enough to support the structure. This is usually because you skipped the final high-heat crisping stage. That last minute or two in very hot oil is essential for setting the shell. It could also mean they were slightly under-cooked and still too soft when you removed them.
5. Q: My dough was way too sticky to roll. What went wrong?
A: The number one culprit is boiling the sweet potatoes instead of steaming them, which introduces too much water. If you did steam them and the dough is still too sticky, it could be that your specific sweet potatoes had a very high moisture content. You can fix a sticky dough by kneading in more tapioca starch, one tablespoon at a time, until it reaches a smooth, non-sticky, Play-Doh-like consistency.
Taiwanese Deep Fried Sweet Potato Balls recipe
Ingredients
-
Sweet Potatoes: 1 lb (about 450g), preferably orange or yellow-fleshed varieties. This will yield about 1 ½ cups of mashed sweet potato.
-
Tapioca Starch: 1 ½ cups (180g), plus more for dusting. This is the key ingredient for the “QQ” chewy texture. It is sometimes labeled as tapioca flour. Do not substitute with cornstarch.
-
Glutinous Rice Flour: ¼ cup (40g). While some recipes use only tapioca starch, adding a small amount of glutinous rice flour (like Mochiko) lends a softer, more mochi-like chewiness that elevates the final texture. This is optional but highly recommended.
-
Granulated Sugar: ⅓ cup (65g). You can adjust this slightly depending on the natural sweetness of your potatoes.
-
Salt: ¼ teaspoon. A small amount of salt enhances the sweetness and overall flavor.
-
Frying Oil: About 6-8 cups of a neutral oil with a high smoke point, such as canola, vegetable, peanut, or soybean oil.
Instructions
Part 1: Preparing the Sweet Potato Dough
-
Cook the Sweet Potatoes: Peel the sweet potatoes and cut them into 1-inch chunks. Place them in a steamer basket over simmering water and steam for 15-20 minutes, or until they are completely tender and easily pierced with a fork. It is crucial to steam, not boil, the potatoes. Boiling adds excess water to the potatoes, which will make your dough too wet and sticky to work with.
-
Mash Until Smooth: Transfer the hot, steamed sweet potatoes to a large mixing bowl. While they are still hot, mash them thoroughly with a potato masher or fork until they are as smooth as possible. Any lumps will affect the final texture.
-
Add Sugar and Salt: Add the ⅓ cup of sugar and ¼ teaspoon of salt to the hot mashed sweet potatoes. The heat from the potatoes will help the sugar dissolve completely. Mix well until fully incorporated.
-
Combine the Starches: In a separate small bowl, whisk together the 1 ½ cups of tapioca starch and the ¼ cup of glutinous rice flour (if using).
-
Form the Dough: Add the starch mixture to the sweet potato mixture. Start by mixing with a spatula or wooden spoon. As it starts to come together, switch to using your hands. Knead the mixture inside the bowl until it forms a uniform, smooth, and pliable dough that doesn’t stick to your hands, similar in consistency to Play-Doh. If the dough feels too dry and crumbly, add a teaspoon of hot water. If it feels too sticky, add a teaspoon of tapioca starch.
-
Shape the Balls: Pinch off pieces of the dough and roll them between your palms to form small, smooth balls about 1 inch in diameter. Try to make them as uniform in size as possible to ensure they cook evenly. Place the rolled balls on a baking sheet lined with parchment paper.
Part 2: The Art of Deep Frying
This three-stage frying process is the non-negotiable secret to hollow sweet potato balls.
-
The Initial Low-Heat Fry: Pour your oil into a deep, heavy-bottomed pot or wok until it’s at least 2-3 inches deep. Heat the oil over medium-low heat. You are NOT looking for hot, shimmering oil yet. To test, drop one ball into the oil. It should sink to the bottom and only have a few lazy bubbles rising from it. The oil temperature should be around 220-240°F (105-115°C). Carefully add about half of the sweet potato balls to the pot, being sure not to crowd it. Let them cook on the bottom for 2-3 minutes, stirring gently to prevent sticking.
-
The Puff and Press Stage: The balls will slowly start to float to the surface. Once most of them are floating, increase the heat to medium (about 280-300°F / 140-150°C). Now comes the crucial step. Take a large, sturdy metal spider strainer or slotted spoon. As the balls cook and begin to puff slightly, use the back of the strainer to gently press them against the side or bottom of the pot. Press just enough to slightly flatten them. As you release the pressure, they will re-inflate, puffing up even bigger. Continue this cycle of pressing, deflating, and re-inflating every 30-40 seconds for the next 5-7 minutes. With each press, they will grow larger and become more hollow.
-
The High-Heat Crisping Stage: Once the balls have doubled or tripled in size and are a light golden color, increase the heat to high (about 350°F / 175°C). Fry for another 1-2 minutes without pressing. This final blast of high heat makes the outer shell firm and incredibly crispy, helps expel excess oil, and prevents them from deflating after you take them out.
-
Drain and Serve: Use the strainer to remove the beautifully puffed, golden-brown sweet potato balls from the oil. Let them drain on a wire rack (not on paper towels, which can make them soggy). They are best served immediately while hot and crispy. Repeat the entire frying process with the remaining batch of balls, allowing the oil to cool back down to the low initial temperature before starting again.
Nutrition
- Serving Size: one normal portion
- Calories: 250-300 kcal