

Of all the traditions our family has adopted for Halloween, from carving pumpkins to our annual horror movie marathon, nothing quite captures the spirit of the season like our dinner on Halloween night itself. For years, I struggled to find a meal that was both festive and not loaded with sugar before the trick-or-treating candy avalanche began. I wanted something savory, something relatively healthy, and most importantly, something that would make my kids’ eyes light up with ghoulish glee. That’s when I stumbled upon the idea of carving faces into bell peppers, and this recipe for Stuffed Bell Peppers with Creepy Faces was born. The first time I brought these to the table, with their spooky, cheesy grins and glowing orange hue, the reaction was pure magic. It was an instant hit. They’re not just a meal; they’re a craft, a centerpiece, and a delicious way to fuel up for a long night of spooky fun. This recipe has become our non-negotiable Halloween tradition, a perfect blend of wholesome and haunting that brings the whole family together in the kitchen.
Stuffed Bell Peppers with Creepy Faces: A Spooky & Savory Halloween Dinner
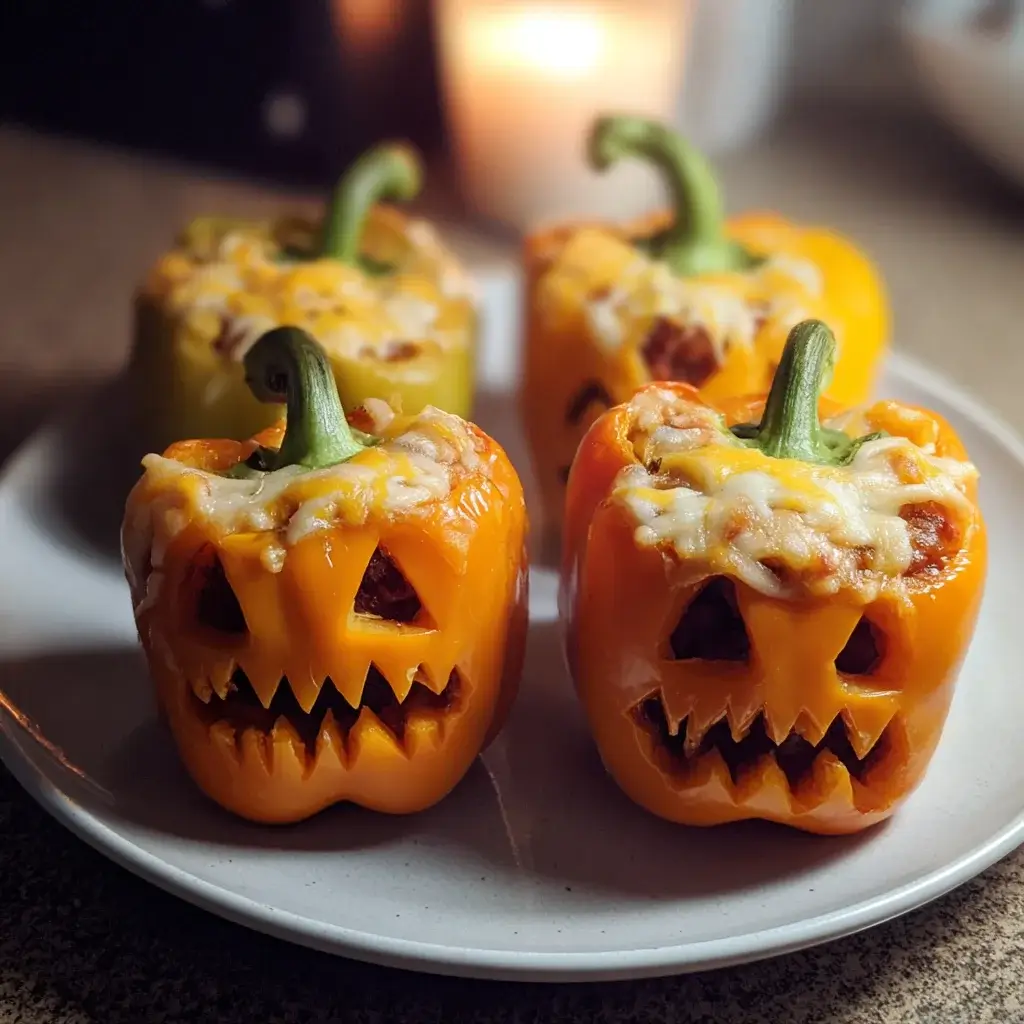
This recipe is designed to be the ultimate showstopper for your Halloween dinner table. It transforms a classic comfort food—the humble stuffed bell pepper—into a fun, edible art project. The savory filling, a delicious mix of seasoned ground beef, rice, tomatoes, and cheese, perfectly complements the sweetness of the roasted bell peppers. But the real star is the presentation. By carving simple or elaborate jack-o’-lantern faces into the peppers before baking, you create a dish that’s as fun to make as it is to eat.
The Ghoulish Ingredients List
To bring these creepy creations to life, you’ll need a handful of simple, wholesome ingredients. This recipe is highly adaptable, so feel free to check the “Additional Tips” section for vegetarian, low-carb, and other variations.
- For the Peppers:
- 6 large bell peppers: Orange or yellow peppers work best for that classic pumpkin look, but red and green create a fun, monstrous variety. Look for peppers that are blocky and can stand up on their own.
- 1 tablespoon olive oil: For brushing the peppers to help them roast beautifully.
- For the Savory Filling:
- 1 lb (450g) lean ground beef: 80/20 or 85/15 provides the best flavor and moisture.
- 1 large yellow onion, finely chopped: Forms the aromatic base of our filling.
- 2 cloves garlic, minced: For that essential savory, pungent kick.
- 1 cup cooked rice: White, brown, or even a wild rice blend works wonderfully. You can use leftover rice or cook it fresh.
- 1 (15-ounce) can diced tomatoes, drained: Adds moisture, tang, and color to the filling.
- 1 (8-ounce) can tomato sauce: Helps bind the filling together and deepens the tomato flavor.
- 1 teaspoon Worcestershire sauce: A secret weapon for adding a deep, umami flavor.
- 1 teaspoon dried Italian seasoning: Or a blend of dried oregano, basil, and thyme.
- ½ teaspoon salt: Or to taste.
- ¼ teaspoon black pepper: Freshly ground is always best.
- 1 ½ cups shredded cheddar or Monterey Jack cheese, divided: One cup will go into the filling for melty goodness, and the remaining half cup will be sprinkled on top.
- For the Baking Dish:
- ½ cup beef broth or water: This creates steam in the bottom of the pan, helping the peppers cook through without burning.
Step-by-Step Instructions to Create Your Monsters
Follow these detailed instructions carefully to ensure your stuffed peppers are both perfectly cooked and spooktacularly presented. We’ll break it down into three key phases: preparing the peppers, making the filling, and bringing it all together.
Phase 1: Preparing the Peppers & Carving the Creepy Faces
This is the most creative part of the process! Get the kids involved and let their imaginations run wild.
- Preheat and Prep: Preheat your oven to 400°F (200°C).
- Wash and Dry: Thoroughly wash and dry the bell peppers.
- Slice the Tops: Using a sharp paring knife, carefully slice off the top of each bell pepper, about half an inch from the stem. Don’t discard the tops! They will act as little “hats” for your jack-o’-lanterns.
- Hollow Out the Peppers: Remove the seeds and the white membrane from the inside of each pepper. A small spoon or a grapefruit spoon works great for scraping the insides clean.
- Carve the Faces: Now for the fun! Place a pepper on a stable cutting board. Using your paring knife, carefully carve faces into one side of each pepper. You can do classic triangle eyes and a jagged grin, or get creative with spooky eyebrows, fangs, or goofy smiles.
- Pro-Tip: Think of it like carving a mini pumpkin. It’s easier to cut out simple shapes. For younger kids, you can draw the face on with a food-safe marker first and have them guide you.
- Par-Bake (Optional but Recommended): Place the hollowed-out, carved peppers and their “hats” into a 9×13 inch baking dish. Brush them lightly all over with olive oil. Bake for 10-15 minutes. This step helps soften the peppers and reduces the final baking time, preventing a watery filling. Remove from the oven and set aside.
Phase 2: Cooking the Rich and Savory Filling
While the peppers are par-baking, you can prepare the delicious filling.
- Sauté the Aromatics: Heat a large skillet or Dutch oven over medium-high heat. Add the ground beef and chopped onion. Cook, breaking up the meat with a spoon, until the beef is browned and the onion is soft and translucent, about 7-8 minutes.
- Add the Garlic: Add the minced garlic and cook for another minute until fragrant. Be careful not to burn it. Drain off any excess grease from the skillet.
- Combine the Ingredients: Reduce the heat to medium. Stir in the cooked rice, drained diced tomatoes, tomato sauce, Worcestershire sauce, Italian seasoning, salt, and pepper.
- Melt the Cheese: Stir everything together until well combined. Continue to cook for 2-3 minutes, allowing the flavors to meld. Remove the skillet from the heat and stir in 1 cup of the shredded cheese until it’s melted and gooey. Your filling is now ready!
Phase 3: Stuffing, Baking, and Serving
It’s time to assemble your spooky creations and bake them to perfection.
- Reduce Oven Temperature: Lower your oven temperature to 375°F (190°C).
- Prepare the Baking Dish: Pour the ½ cup of beef broth or water into the bottom of the baking dish where your par-baked peppers are sitting. This prevents the bottoms from scorching and helps steam the peppers.
- Stuff the Peppers: Carefully spoon the beef and rice mixture into each carved pepper. Fill them all the way to the top, packing the filling in gently.
- Top with Cheese: Sprinkle the remaining ½ cup of shredded cheese over the top of the filling in each pepper.
- Bake to Perfection: Place the “hats” (the pepper tops) alongside the stuffed peppers in the baking dish. Bake, uncovered, for 20-25 minutes, or until the peppers are tender-crisp and the cheese on top is melted, bubbly, and slightly browned.
- Rest and Serve: Carefully remove the baking dish from the oven. Let the peppers rest for a few minutes, as they will be extremely hot. Place the “hats” back on top of each pepper before serving for the full jack-o’-lantern effect.
Nutrition Facts
Please note that these values are an estimate and can vary based on the specific ingredients used, such as the leanness of the ground beef and the type of rice.
- Servings: 6
- Calories per serving (1 stuffed pepper): Approximately 380-420 calories
Preparation and Cook Time
- Prep Time: 25 minutes (includes carving time)
- Cook Time: 40 minutes (includes par-baking and final baking)
- Total Time: 1 hour 5 minutes
How to Serve Your Creepy-Faced Peppers
The presentation is key to making this Halloween meal memorable. Serve them directly from the baking dish for a rustic feel, or plate them individually for a more dramatic effect. Here are some fun ways to serve them:
- On a “Graveyard” Bed:
- Serve the peppers on a platter covered with a bed of dark-colored grains like black rice or quinoa to resemble “dirt.”
- Stick a “tombstone” made from a rectangular cracker or a piece of toasted bread into the grain next to each pepper.
- As the Main Event of a Spooky Buffet:
- Make these peppers the centerpiece of your Halloween dinner.
- Surround them with other themed side dishes to complete the feast.
- Spooky Side Dish Pairings:
- Ghostly Mashed Potatoes: A scoop of creamy mashed potatoes with two black olive pieces for eyes.
- Witch’s Brew Tomato Soup: A simple tomato soup served in a cauldron-like bowl.
- Severed Fingers Breadsticks: Classic breadsticks with a slivered almond “fingernail” pressed into one end.
- Graveyard Salad: A simple green salad topped with “dirt” (crumbled dark rye bread) and “worms” (shredded carrots or gummy worms for a sweet-and-savory twist).
Additional tips (5 tips)
These tips will help you customize the recipe and troubleshoot any common issues, ensuring your ghoulish gourds are a roaring success.
- Prevent Tipping Peppers: Some bell peppers are naturally wobbly. To ensure they stand upright in the baking dish, slice a very thin layer off the bottom to create a flat, stable base. Be careful not to cut a hole through the bottom! If they still want to tip, you can prop them up against each other in a snug-fitting baking dish.
- Master the Dietary Variations: This recipe is incredibly flexible.
- For a Vegetarian/Vegan Version: Replace the ground beef with 1 ½ cups of cooked lentils, black beans, or a plant-based ground “meat” substitute. Use vegetable broth instead of beef broth, and a vegan Worcestershire sauce (or soy sauce). For the cheese, use your favorite dairy-free shredded alternative.
- For a Low-Carb/Keto Version: This is a fantastic keto-friendly meal! Simply substitute the rice with an equal amount of cauliflower rice. To prepare it, sauté the cauliflower rice with the onion until tender before adding the other ingredients. Ensure your tomato sauce and diced tomatoes have no added sugar.
- For a Gluten-Free Version: The recipe is naturally gluten-free as long as you use a certified gluten-free Worcestershire sauce (some brands contain malt vinegar).
- Make-Ahead Magic for a Stress-Free Halloween: Halloween can be a hectic day. You can easily prep this meal in advance.
- Option 1 (Partial Prep): Carve the peppers and prepare the filling up to 24 hours in advance. Store the hollowed-out peppers and the cooked filling in separate airtight containers in the refrigerator. When ready to bake, simply stuff and proceed with the recipe, adding 5-10 minutes to the baking time since the ingredients will be cold.
- Option 2 (Freezer-Friendly): These peppers freeze wonderfully! Prepare and stuff the peppers completely (but do not bake). Place them in a freezer-safe dish, cover tightly with plastic wrap and then foil, and freeze for up to 3 months. Bake directly from frozen, adding 30-40 minutes to the total baking time, covering with foil for the first half to prevent the tops from burning.
- Don’t Skip the Par-Baking Step: While listed as optional, pre-baking the peppers for 10-15 minutes makes a huge difference. Raw peppers release a lot of water as they cook, which can lead to a soupy filling and an undercooked pepper texture. Par-baking softens the pepper and allows some of that initial moisture to evaporate, resulting in a more tender pepper and a perfectly textured filling.
- Get Creative with the Filling: The beef and rice filling is a classic, but don’t be afraid to experiment!
- Spice it Up: Add a pinch of red pepper flakes or a chopped jalapeño with the onions for a spicy kick.
- Add More Veggies: Bulk up the filling with finely chopped mushrooms, zucchini, or corn for extra nutrients and texture.
- Switch the Protein: Ground turkey, chicken, or even Italian sausage would be delicious substitutes for the ground beef.
FAQ section ( 5 Q/A)
Here are answers to some common questions about making these fun and festive stuffed peppers.
1. Can I use different colors of bell peppers?
Absolutely! In fact, using a variety of colors makes for a more visually appealing and fun display. Orange and yellow peppers give the most authentic “jack-o’-lantern” look, but red peppers can look extra sinister, and green peppers can look like classic monsters or Frankenstein’s creation. Keep in mind that different colored peppers have slightly different flavors; green peppers are more earthy and slightly bitter, while red, orange, and yellow peppers are sweeter.
2. My peppers turned out soggy. What did I do wrong?
Soggy peppers are usually caused by excess moisture. There are two main culprits. First, you may have skipped the par-baking step. Pre-baking the peppers allows some of their natural water content to cook off before you add the filling. Second, ensure you drain your canned tomatoes very well. Any extra liquid from the can will release into the filling as it bakes. Using a slightly less shallow baking dish and the recommended amount of broth (just ½ cup) also helps.
3. How do I store and reheat leftovers?
Leftover stuffed peppers store beautifully. Let them cool completely, then place them in an airtight container in the refrigerator for up to 3-4 days. To reheat, you can use the microwave for a quick meal (heat in 1-minute increments until hot), but the best method is reheating them in the oven. Place the peppers in a small baking dish and bake at 350°F (175°C) for 15-20 minutes, or until heated through. This helps the pepper regain some of its texture and melts the cheese nicely again.
4. My kids are picky eaters. Is this recipe kid-friendly?
This recipe is a huge hit with kids, largely because of the fun presentation! The flavor of the filling is a savory, classic combination similar to spaghetti bolognese or tacos, which is generally very kid-friendly. The recipe isn’t spicy. If your children are sensitive to onions or garlic, you can chop them extra finely so they blend into the filling seamlessly. The best part is that getting them involved in carving the faces often makes them much more excited to eat their creation.
5. The filling seems to make more than I need for the peppers. What can I do with the extra?
It’s common to have a little extra filling, depending on the size of your peppers. Don’t throw it out! This delicious filling is incredibly versatile. You can serve it on its own as a “deconstructed” stuffed pepper bowl, use it as a topping for baked potatoes, roll it into tortillas to make quick burritos, or use it as a hearty sauce over pasta for another quick and easy meal later in the week.

Stuffed Bell Peppers with Creepy Faces recipe
Ingredients
-
For the Peppers:
-
6 large bell peppers: Orange or yellow peppers work best for that classic pumpkin look, but red and green create a fun, monstrous variety. Look for peppers that are blocky and can stand up on their own.
-
1 tablespoon olive oil: For brushing the peppers to help them roast beautifully.
-
-
For the Savory Filling:
-
1 lb (450g) lean ground beef: 80/20 or 85/15 provides the best flavor and moisture.
-
1 large yellow onion, finely chopped: Forms the aromatic base of our filling.
-
2 cloves garlic, minced: For that essential savory, pungent kick.
-
1 cup cooked rice: White, brown, or even a wild rice blend works wonderfully. You can use leftover rice or cook it fresh.
-
1 (15-ounce) can diced tomatoes, drained: Adds moisture, tang, and color to the filling.
-
1 (8-ounce) can tomato sauce: Helps bind the filling together and deepens the tomato flavor.
-
1 teaspoon Worcestershire sauce: A secret weapon for adding a deep, umami flavor.
-
1 teaspoon dried Italian seasoning: Or a blend of dried oregano, basil, and thyme.
-
½ teaspoon salt: Or to taste.
-
¼ teaspoon black pepper: Freshly ground is always best.
-
1 ½ cups shredded cheddar or Monterey Jack cheese, divided: One cup will go into the filling for melty goodness, and the remaining half cup will be sprinkled on top.
-
-
For the Baking Dish:
-
½ cup beef broth or water: This creates steam in the bottom of the pan, helping the peppers cook through without burning.
-
Instructions
Phase 1: Preparing the Peppers & Carving the Creepy Faces
This is the most creative part of the process! Get the kids involved and let their imaginations run wild.
-
Preheat and Prep: Preheat your oven to 400°F (200°C).
-
Wash and Dry: Thoroughly wash and dry the bell peppers.
-
Slice the Tops: Using a sharp paring knife, carefully slice off the top of each bell pepper, about half an inch from the stem. Don’t discard the tops! They will act as little “hats” for your jack-o’-lanterns.
-
Hollow Out the Peppers: Remove the seeds and the white membrane from the inside of each pepper. A small spoon or a grapefruit spoon works great for scraping the insides clean.
-
Carve the Faces: Now for the fun! Place a pepper on a stable cutting board. Using your paring knife, carefully carve faces into one side of each pepper. You can do classic triangle eyes and a jagged grin, or get creative with spooky eyebrows, fangs, or goofy smiles.
-
Pro-Tip: Think of it like carving a mini pumpkin. It’s easier to cut out simple shapes. For younger kids, you can draw the face on with a food-safe marker first and have them guide you.
-
-
Par-Bake (Optional but Recommended): Place the hollowed-out, carved peppers and their “hats” into a 9×13 inch baking dish. Brush them lightly all over with olive oil. Bake for 10-15 minutes. This step helps soften the peppers and reduces the final baking time, preventing a watery filling. Remove from the oven and set aside.
Phase 2: Cooking the Rich and Savory Filling
While the peppers are par-baking, you can prepare the delicious filling.
-
Sauté the Aromatics: Heat a large skillet or Dutch oven over medium-high heat. Add the ground beef and chopped onion. Cook, breaking up the meat with a spoon, until the beef is browned and the onion is soft and translucent, about 7-8 minutes.
-
Add the Garlic: Add the minced garlic and cook for another minute until fragrant. Be careful not to burn it. Drain off any excess grease from the skillet.
-
Combine the Ingredients: Reduce the heat to medium. Stir in the cooked rice, drained diced tomatoes, tomato sauce, Worcestershire sauce, Italian seasoning, salt, and pepper.
-
Melt the Cheese: Stir everything together until well combined. Continue to cook for 2-3 minutes, allowing the flavors to meld. Remove the skillet from the heat and stir in 1 cup of the shredded cheese until it’s melted and gooey. Your filling is now ready!
Phase 3: Stuffing, Baking, and Serving
It’s time to assemble your spooky creations and bake them to perfection.
-
Reduce Oven Temperature: Lower your oven temperature to 375°F (190°C).
-
Prepare the Baking Dish: Pour the ½ cup of beef broth or water into the bottom of the baking dish where your par-baked peppers are sitting. This prevents the bottoms from scorching and helps steam the peppers.
-
Stuff the Peppers: Carefully spoon the beef and rice mixture into each carved pepper. Fill them all the way to the top, packing the filling in gently.
-
Top with Cheese: Sprinkle the remaining ½ cup of shredded cheese over the top of the filling in each pepper.
-
Bake to Perfection: Place the “hats” (the pepper tops) alongside the stuffed peppers in the baking dish. Bake, uncovered, for 20-25 minutes, or until the peppers are tender-crisp and the cheese on top is melted, bubbly, and slightly browned.
-
Rest and Serve: Carefully remove the baking dish from the oven. Let the peppers rest for a few minutes, as they will be extremely hot. Place the “hats” back on top of each pepper before serving for the full jack-o’-lantern effect.
Nutrition
- Serving Size: one normal portion
- Calories: 380-420


