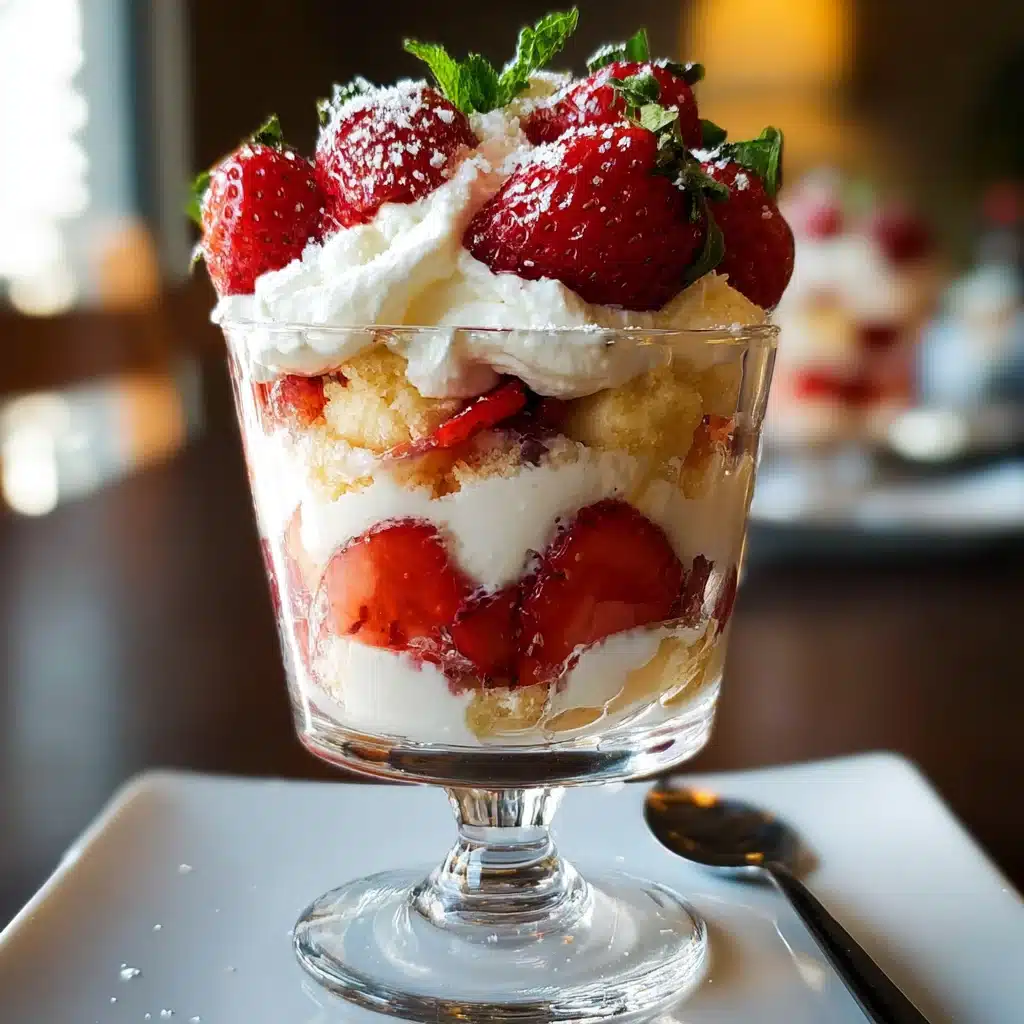

Of all the summer vegetables that grace our garden and farmer’s market stalls, zucchini holds a special place in my heart and, admittedly, a slightly overwhelming presence on my kitchen counter. There’s a poOf all the desserts that scream “summer,” there’s one that holds a particularly special place in my heart and on our family’s table: the Strawberry Shortcake Parfait. I remember the first time I made this. We were having a last-minute backyard barbecue, and I needed a dessert that was quick, required no oven on a sweltering day, and would impress our guests. I’d always loved classic strawberry shortcake, but the idea of baking biscuits felt like too much work. That’s when I had the idea to deconstruct it, layering the vibrant, juicy strawberries, fluffy cream, and tender cake into elegant glass cups. The result was nothing short of a revelation. My kids’ eyes went wide as they saw the beautiful red and white stripes, and the adults raved about how light, refreshing, and utterly delicious it was. It wasn’t just a dessert; it was an experience. Since that day, this Strawberry Shortcake Parfait recipe has become my go-to for everything from quiet family dinners to celebratory brunches. It’s a simple, stress-free recipe that delivers a “wow” factor every single time, proving that the most memorable dishes are often the ones made with simple ingredients and a whole lot of love.
The Ultimate Strawberry Shortcake Parfait Recipe
This recipe breaks down the classic American dessert into its three core components—sweet strawberries, tender cake, and luscious cream—and rebuilds them into a visually stunning, individually portioned masterpiece. It’s designed for simplicity and flavor, allowing the freshness of the ingredients to shine through.
Complete Ingredients List
This recipe is broken down into three main components for clarity. Using high-quality ingredients will elevate the final taste significantly.
For the Strawberry Layer:
- 2 lbs (about 4 cups) fresh strawberries, hulled and sliced or diced
- 1/4 cup (50g) granulated sugar, or more to taste, depending on the sweetness of your berries
- 1 tablespoon fresh lemon juice (from about half a lemon)
For the Whipped Cream Layer:
- 2 cups (480ml) heavy whipping cream, very cold
- 1/2 cup (60g) powdered sugar, sifted
- 2 teaspoons pure vanilla extract
- Optional Stabilizer: 1 tablespoon of instant vanilla pudding mix (this helps the cream hold its shape for longer)
For the Shortcake Layer:
- 1 store-bought pound cake or angel food cake (about 16 oz), cut into 1/2-inch cubes
- See “A Deep Dive into the Ingredients” for alternative cake options.
Step-by-Step Instructions
Follow these detailed instructions for perfect layers and incredible flavor. The key is to prepare each component before beginning the assembly.
Step 1: Macerate the Strawberries
- First, prepare your strawberries. Gently rinse them under cold water and pat them completely dry with a paper towel.
- Hull the strawberries by removing the green leafy tops with a small paring knife or a strawberry huller.
- Slice or dice the strawberries into small, bite-sized pieces and place them in a medium-sized bowl.
- Sprinkle the granulated sugar and fresh lemon juice over the strawberries. The sugar will draw out the natural juices, creating a beautiful syrup, while the lemon juice brightens the flavor and prevents the berries from browning.
- Gently stir to combine, being careful not to mash the berries. Set the bowl aside for at least 30 minutes at room temperature (or up to 2 hours in the refrigerator) to allow the berries to macerate and release their juices. You will see a lovely ruby-red syrup forming at the bottom of the bowl.
Step 2: Prepare the Whipped Cream
- To ensure your cream whips up perfectly, place your mixing bowl and whisk attachment (or beaters) in the freezer for about 10-15 minutes before you begin. A cold bowl is the secret to voluminous, stable whipped cream.
- Pour the very cold heavy whipping cream into the chilled bowl.
- Using an electric mixer (stand or hand-held), begin whipping the cream on medium speed. Once it starts to thicken and soft peaks begin to form (when you lift the beater, a peak forms but flops over immediately), it’s time to add the flavor.
- Gradually add the sifted powdered sugar and the pure vanilla extract. If you are using the instant vanilla pudding mix for stabilization, add it now as well.
- Increase the mixer speed to medium-high and continue to whip until stiff peaks form. You’ll know it’s ready when you can lift the beaters out of the cream and the peak holds its shape firmly. Be very careful not to over-whip, or the cream will start to turn grainy and buttery.
Step 3: Prepare the Cake
- Using a serrated knife, slice your pound cake or angel food cake into thick slices.
- Cut these slices into 1/2-inch to 3/4-inch cubes. You want them to be small enough to fit easily into your serving glasses and create distinct layers. Set the cubes aside.
Step 4: Assemble the Parfaits
- Choose your serving glasses. Clear glasses, such as parfait glasses, wine glasses, or even mason jars, work best to showcase the beautiful layers.
- Begin with the first layer: Place a layer of cake cubes at the bottom of each glass, covering the base.
- Next, add a generous spoonful of the macerated strawberries, including some of the delicious syrup. Let the syrup drizzle down the sides for a beautiful effect.
- Follow with a layer of the fresh whipped cream. You can spoon it on or, for a neater and more professional look, transfer the whipped cream to a piping bag fitted with a large star tip and pipe it over the strawberry layer.
- Repeat the layers: Add another layer of cake cubes, another layer of strawberries and syrup, and a final, generous swirl of whipped cream on top.
- For a final touch, garnish each parfait. A single, perfect strawberry slice, a fresh mint leaf, or a sprinkle of cake crumbs on top looks elegant.
- For the best flavor and texture, chill the assembled parfaits in the refrigerator for at least 30 minutes before serving. This allows the flavors to meld and the cake to soften slightly from the strawberry syrup and cream.
Nutrition Facts
- Servings: 6-8 individual parfaits
- Calories per serving (approximate): 450-550 kcal (This can vary significantly based on the type of cake used and the exact amount of sugar and cream.)
Preparation Time
- Active Preparation Time: 25 minutes
- Macerating & Chilling Time: 1 hour
- Total Time: 1 hour 25 minutes
How to Serve: Presentation and Occasions
The beauty of a parfait lies in its presentation. How you serve it can transform it from a simple dessert into the star of the show.
- Choose the Right Vessel:
- Classic Parfait Glasses: Tall and slender, these are specifically designed to show off layers.
- Wine Glasses: An elegant and sophisticated option, perfect for a dinner party or romantic dessert.
- Stemless Wine Glasses: Modern and stable, they provide a wide canvas for beautiful layers.
- Mason Jars (8oz): Ideal for a rustic, casual feel, perfect for picnics, barbecues, and potlucks. They also come with lids, making them easily transportable.
- Small Trifle Bowl: If you want to make one large dessert for a crowd to share instead of individual portions, a small trifle bowl is the perfect choice.
- Garnishing for the “Wow” Factor:
- The Classic: Top with a dollop of whipped cream and a fanned strawberry. To fan a strawberry, make several thin, parallel slices from the tip towards the stem, leaving the stem end intact. Gently press down to fan it out.
- The Fresh Touch: A single, vibrant green mint leaf provides a beautiful color contrast and a hint of fresh aroma.
- The Textural Crunch: Sprinkle a few reserved cake crumbs, some toasted slivered almonds, or a dusting of crushed shortbread cookies over the top.
- The Decadent Drizzle: For a more indulgent version, drizzle a little bit of melted chocolate or high-quality balsamic glaze over the top cream layer.
- The Simple Dusting: A light dusting of powdered sugar just before serving adds a touch of snowy elegance.
A Deep Dive into the Ingredients: Making It Your Own
While the recipe is fantastic as is, understanding each component allows for endless customization and ensures you get the best possible result every time.
Choosing the Perfect Strawberries
The strawberries are the star, so choosing well is paramount. Look for berries that are bright red from tip to stem, with no white or green shoulders. They should be plump, firm, and have a fragrant, sweet smell. In-season, local strawberries will always provide the most spectacular flavor. Avoid berries that are bruised, mushy, or moldy.
The “Shortcake” in Your Parfait: A World of Options
The “shortcake” element is where you can truly get creative. The goal is a tender, absorbent base that will soak up the strawberry juice without turning to complete mush.
- Pound Cake (The Classic Choice): Its dense, buttery crumb holds up beautifully in the parfait, offering a rich flavor and satisfying texture. Both store-bought and homemade work wonderfully.
- Angel Food Cake (The Lighter Option): This airy, fat-free cake is a fantastic choice for a lighter, healthier-feeling dessert. Its spongy texture is perfect for soaking up the juices.
- Homemade Shortcake Biscuits (The Traditionalist’s Dream): For the ultimate traditionalist, bake a batch of classic, slightly sweet shortcake biscuits. Let them cool completely, then crumble them into the parfait for an authentic texture.
- Ladyfingers: These dry, spongy cookies are what’s traditionally used in tiramisu and work wonderfully here. They absorb the syrup beautifully.
- Vanilla Wafers or Graham Crackers: For a quick and easy option with a different textural profile, crush some vanilla wafers or graham crackers to use as a layer. This adds a delightful crunch.
Crafting the Dreamiest Whipped Cream
Homemade whipped cream is non-negotiable for this recipe; its flavor and texture are far superior to canned versions.
- The Importance of Cold: Everything must be cold! The heavy cream, the bowl, the beaters. Cold fat globules trap air more efficiently, resulting in a more stable and voluminous cream.
- To Stabilize or Not to Stabilize? If you plan to serve the parfaits immediately, you don’t need a stabilizer. However, if you’re making them even an hour or two ahead, a stabilizer is your best friend. The instant vanilla pudding mix trick is a game-changer. It adds a subtle vanilla flavor and ensures your cream stays fluffy and doesn’t weep (release liquid) in the fridge.
- Flavor Variations: While vanilla is classic, feel free to experiment. A half-teaspoon of almond extract can add a lovely, nutty depth, or a little bit of citrus zest (lemon or orange) can brighten the cream even more.
Additional Tips for Parfait Perfection
These five expert tips will help you nail this recipe every single time.
- Don’t Skip the Maceration Step. It may seem like an unnecessary extra step, but allowing the strawberries to macerate is crucial. This process draws out the juices and concentrates the strawberry flavor, creating the natural, delicious syrup that is essential for moistening the cake layers and tying the whole dessert together. A parfait without it would be dry and far less flavorful.
- The Art of Clean Layering. For those picture-perfect, distinct layers, be deliberate during assembly. Use a spoon to carefully place the cake cubes and strawberries against the glass. For the cream, using a piping bag gives you the most control and prevents smearing it down the sides of the glass, keeping your presentation clean and professional.
- Chill Before Serving for a Flavor Meld. Chilling the assembled parfaits for at least 30 minutes (and up to 4 hours) is highly recommended. This short resting period allows the cake to absorb some of the strawberry syrup and cream, softening its texture slightly. It also gives the flavors of the strawberry, cake, and cream time to meld together into a more cohesive and delicious bite.
- Master the Make-Ahead Method. This dessert is perfect for entertaining because you can prepare all the components ahead of time. You can macerate the strawberries, whip the cream (be sure to use a stabilizer), and cube the cake up to 24 hours in advance. Store each component separately in airtight containers in the refrigerator. When you’re ready to serve, all you have to do is assemble the parfaits, which takes only a few minutes.
- Control the Sweetness. The recipe provides a guideline for sugar, but the right amount depends entirely on your ingredients and your palate. Taste your strawberries before adding sugar; if they are very ripe and sweet, you may need less. The same goes for the whipped cream. Feel free to adjust the powdered sugar to your liking. Remember, it’s easier to add more sweetness than to take it away.
Frequently Asked Questions (FAQ)
Here are answers to some of the most common questions about making Strawberry Shortcake Parfaits.
1. Can I make the entire dessert ahead of time?
You can assemble the parfaits up to 4 hours ahead of serving time. If you used stabilized whipped cream, they will hold up well in the refrigerator. Any longer than that, and the cake layer may become too soggy and the whipped cream might start to deflate slightly. For best results, follow the “make-ahead method” tip above and assemble just before serving or a few hours prior.
2. Can I use frozen strawberries for this recipe?
Yes, you absolutely can, making this a wonderful dessert to enjoy year-round. Thaw the frozen strawberries completely in a colander over a bowl to catch the juice. Use the thawed strawberries as you would fresh ones, and you can even add the collected juice to the macerating bowl for extra flavor. Be aware that frozen strawberries will have a much softer, less firm texture than fresh ones, but the flavor will still be delicious.
3. My whipped cream became runny and separated. What went wrong?
This usually happens for one of two reasons: either your cream and equipment weren’t cold enough, or you over-whipped it. If it’s under-whipped, just keep whipping until you reach stiff peaks. If you’ve over-whipped it past the stiff peak stage, it will look grainy and start to separate into butter and buttermilk. Unfortunately, there’s no going back from this point for a parfait. You can, however, keep whipping it to make homemade butter! To avoid this, watch your cream closely and stop whipping as soon as firm peaks hold their shape.
4. What other fruits can I use in this parfait recipe?
This parfait formula is incredibly versatile! You can easily swap the strawberries for other fruits or create a mixed berry parfait. Some excellent choices include:
- Mixed Berries: A combination of blueberries, raspberries, and blackberries.
- Peach & Raspberry: A classic summer combination.
- Mango & Coconut: For a tropical twist, use diced mango and add toasted coconut flakes to the layers.
- Cherry & Chocolate: Use pitted, halved fresh cherries and swap the pound cake for brownie chunks.
5. How long will the assembled parfaits last in the refrigerator?
Assembled Strawberry Shortcake Parfaits are best enjoyed on the day they are made. They will last for up to 2 days in the refrigerator, but their texture will change over time. The cake will become progressively softer, and the whipped cream may lose some of its volume. They will still be tasty, but for the best texture and presentation, serving within a few hours of assembly is ideal.
This Strawberry Shortcake Parfait is more than just a recipe; it’s a template for creating a simple, elegant, and crowd-pleasing dessert that you can adapt for any season or occasion. Enjoy the process of layering these beautiful ingredients and sharing the delicious result with people you love.
Print
Strawberry Shortcake Parfait recipe
Ingredients
For the Strawberry Layer:
-
2 lbs (about 4 cups) fresh strawberries, hulled and sliced or diced
-
1/4 cup (50g) granulated sugar, or more to taste, depending on the sweetness of your berries
-
1 tablespoon fresh lemon juice (from about half a lemon)
For the Whipped Cream Layer:
-
2 cups (480ml) heavy whipping cream, very cold
-
1/2 cup (60g) powdered sugar, sifted
-
2 teaspoons pure vanilla extract
-
Optional Stabilizer: 1 tablespoon of instant vanilla pudding mix (this helps the cream hold its shape for longer)
For the Shortcake Layer:
-
1 store-bought pound cake or angel food cake (about 16 oz), cut into 1/2-inch cubes
-
See “A Deep Dive into the Ingredients” for alternative cake options.
Instructions
Step 1: Macerate the Strawberries
-
First, prepare your strawberries. Gently rinse them under cold water and pat them completely dry with a paper towel.
-
Hull the strawberries by removing the green leafy tops with a small paring knife or a strawberry huller.
-
Slice or dice the strawberries into small, bite-sized pieces and place them in a medium-sized bowl.
-
Sprinkle the granulated sugar and fresh lemon juice over the strawberries. The sugar will draw out the natural juices, creating a beautiful syrup, while the lemon juice brightens the flavor and prevents the berries from browning.
-
Gently stir to combine, being careful not to mash the berries. Set the bowl aside for at least 30 minutes at room temperature (or up to 2 hours in the refrigerator) to allow the berries to macerate and release their juices. You will see a lovely ruby-red syrup forming at the bottom of the bowl.
Step 2: Prepare the Whipped Cream
-
To ensure your cream whips up perfectly, place your mixing bowl and whisk attachment (or beaters) in the freezer for about 10-15 minutes before you begin. A cold bowl is the secret to voluminous, stable whipped cream.
-
Pour the very cold heavy whipping cream into the chilled bowl.
-
Using an electric mixer (stand or hand-held), begin whipping the cream on medium speed. Once it starts to thicken and soft peaks begin to form (when you lift the beater, a peak forms but flops over immediately), it’s time to add the flavor.
-
Gradually add the sifted powdered sugar and the pure vanilla extract. If you are using the instant vanilla pudding mix for stabilization, add it now as well.
-
Increase the mixer speed to medium-high and continue to whip until stiff peaks form. You’ll know it’s ready when you can lift the beaters out of the cream and the peak holds its shape firmly. Be very careful not to over-whip, or the cream will start to turn grainy and buttery.
Step 3: Prepare the Cake
-
Using a serrated knife, slice your pound cake or angel food cake into thick slices.
-
Cut these slices into 1/2-inch to 3/4-inch cubes. You want them to be small enough to fit easily into your serving glasses and create distinct layers. Set the cubes aside.
Step 4: Assemble the Parfaits
-
Choose your serving glasses. Clear glasses, such as parfait glasses, wine glasses, or even mason jars, work best to showcase the beautiful layers.
-
Begin with the first layer: Place a layer of cake cubes at the bottom of each glass, covering the base.
-
Next, add a generous spoonful of the macerated strawberries, including some of the delicious syrup. Let the syrup drizzle down the sides for a beautiful effect.
-
Follow with a layer of the fresh whipped cream. You can spoon it on or, for a neater and more professional look, transfer the whipped cream to a piping bag fitted with a large star tip and pipe it over the strawberry layer.
-
Repeat the layers: Add another layer of cake cubes, another layer of strawberries and syrup, and a final, generous swirl of whipped cream on top.
-
For a final touch, garnish each parfait. A single, perfect strawberry slice, a fresh mint leaf, or a sprinkle of cake crumbs on top looks elegant.
-
For the best flavor and texture, chill the assembled parfaits in the refrigerator for at least 30 minutes before serving. This allows the flavors to meld and the cake to soften slightly from the strawberry syrup and cream.
Nutrition
- Serving Size: one normal portion
- Calories: 450-550 kcal