


Sticky Rice Cake with Red Bean Paste. Just the name itself evokes a sense of warmth and comforting sweetness. For me, this isn’t just a recipe; it’s a taste of childhood memories, of festive family gatherings, and the simple joy of a perfectly chewy, subtly sweet treat. Growing up, my grandmother would make these delicate cakes, her hands moving with practiced ease, transforming humble ingredients into something truly special. The aroma of steaming glutinous rice filling the kitchen was always a sign of celebration. Even now, years later, the first bite of a warm, soft sticky rice cake with that sweet, earthy red bean paste center instantly transports me back to those cherished moments. It’s a dessert that transcends trends, a timeless classic that continues to bring smiles and satisfy sweet cravings. Whether you’re familiar with this delightful treat or discovering it for the first time, I promise you, the experience of making and savoring Sticky Rice Cake with Red Bean Paste is one that’s both rewarding and utterly delicious. It’s a little piece of culinary heritage you can easily create in your own kitchen and share with loved ones.
Ingredients for Delicious Sticky Rice Cake with Red Bean Paste
Crafting the perfect Sticky Rice Cake with Red Bean Paste relies on a careful selection of ingredients, each playing a crucial role in achieving the desired texture and flavor. While the ingredient list is relatively short, the quality and type of each component are key to a truly authentic and satisfying result. Here’s what you’ll need to gather to embark on this delightful culinary journey:
- For the Sticky Rice Cake (Mochi):
- 2 cups Glutinous Rice Flour (Sweet Rice Flour): This is the absolute star ingredient! Glutinous rice flour, also known as sweet rice flour or mochiko, is what gives the cake its signature chewy, sticky texture. It is essential to use glutinous rice flour and not regular rice flour. Look for it in Asian grocery stores or the international aisle of well-stocked supermarkets. It’s made from short-grain glutinous rice and has a distinct opaque white appearance and a slightly sweet taste even in its raw form.
- 1 cup Warm Water (approximately 105-115°F or 40-46°C): Warm water is crucial for activating the glutinous rice flour and creating a smooth, pliable dough. The temperature should be warm to the touch but not scalding hot. Using water that’s too hot can cook the flour prematurely, while water that’s too cold won’t properly hydrate the flour.
- 1/4 cup Sugar (Granulated or Caster Sugar): Sugar provides the subtle sweetness to the rice cake itself, balancing the richness of the red bean paste. You can use granulated sugar or caster sugar (superfine sugar) – both work well. Adjust the amount slightly to your preference if you desire a less or more sweet cake base.
- 2 tablespoons Vegetable Oil (Neutral Flavor): A neutral-flavored vegetable oil, such as canola, soybean, or corn oil, is added to the dough to enhance its elasticity and prevent it from becoming too dry or tough during steaming. It also contributes to a slightly softer texture.
- Pinch of Salt: A tiny pinch of salt enhances the overall flavors and balances the sweetness. It’s a subtle but important addition.
- For the Red Bean Paste Filling (Anko or Red Bean Jam):
- 1 cup Dried Red Beans (Adzuki Beans): Authentic red bean paste is made from adzuki beans. These small, reddish-brown beans have a slightly nutty and sweet flavor that is characteristic of traditional Asian red bean paste. You can find them in Asian grocery stores or online.
- 3-4 cups Water (for boiling beans): You’ll need ample water to boil the red beans until they are tender and easily mashable.
- 1 cup Sugar (Granulated or Caster Sugar): Sugar is essential to sweeten the red bean paste. The amount of sugar can be adjusted to your sweetness preference. Traditionally, red bean paste can be quite sweet, but you can reduce the sugar for a less intensely sweet filling. Granulated or caster sugar works well. Brown sugar can also be used for a slightly more molasses-like flavor.
- Pinch of Salt: Just like in the rice cake dough, a pinch of salt in the red bean paste enhances the overall flavor and balances the sweetness.
- For Coating (Optional but Recommended):
- Potato Starch or Cornstarch (for dusting): Dusting the cooked sticky rice cakes with potato starch or cornstarch prevents them from sticking to each other and your hands, making them easier to handle and serve. Potato starch is often preferred for a smoother, less powdery finish, but cornstarch is a readily available and effective alternative.
Ingredient Variations and Substitutions:
- Glutinous Rice Flour Alternatives (Not Recommended for Texture): While there isn’t a true substitute for glutinous rice flour in terms of achieving the authentic sticky texture, in a pinch, you might be able to use tapioca starch in combination with regular rice flour, but the result will be significantly different and less chewy. It is strongly recommended to use glutinous rice flour for the best results.
- Sugar Substitutes: For the rice cake dough and red bean paste, you can experiment with sugar substitutes like erythritol or stevia if you are looking to reduce sugar content. However, be mindful that sugar contributes to both sweetness and texture, so substitutions may slightly alter the final product. Adjust quantities based on the sweetness level of your chosen substitute.
- Red Bean Paste – Homemade vs. Store-Bought: Making red bean paste from scratch is more time-consuming but allows you to control the sweetness and texture. High-quality store-bought red bean paste (anko) is a convenient shortcut and can be found in Asian grocery stores. Look for smooth or chunky varieties depending on your preference. If using store-bought, you can skip the red bean paste ingredients and step in the recipe.
- Flavorings for Rice Cake Dough: You can infuse the rice cake dough with subtle flavors by adding:
- Matcha Powder: For a green tea flavor and color (add 1-2 teaspoons of culinary grade matcha powder to the dry glutinous rice flour).
- Pandan Extract: For a fragrant, slightly vanilla-like aroma (add a few drops of pandan extract to the warm water).
- Purple Sweet Potato Powder: For a natural purple color and subtle sweetness (add 1-2 tablespoons of purple sweet potato powder to the dry glutinous rice flour).
- Fillings Beyond Red Bean Paste: While red bean paste is classic, you can experiment with other fillings:
- Custard Cream: A smooth, creamy custard.
- Taro Paste: A sweet and nutty taro filling.
- Sesame Paste: A rich and nutty black sesame paste.
- Peanut Butter: For a more Western-inspired twist.
Step-by-Step Instructions: Making Sticky Rice Cake with Red Bean Paste
Creating Sticky Rice Cake with Red Bean Paste is a rewarding process that involves two main parts: making the red bean paste filling and then preparing and steaming the sticky rice cake. Here’s a detailed guide to walk you through each step:
Part 1: Making the Red Bean Paste (Anko)
(If using store-bought red bean paste, skip to Part 2)
- Step 1: Rinse and Soak Red Beans: Rinse the dried red beans thoroughly under cold water. Place the rinsed beans in a large bowl and cover them with plenty of water. Soak the beans for at least 4-6 hours, or preferably overnight. Soaking helps to soften the beans, reduce cooking time, and improve their digestibility.
- Step 2: Boil the Beans (First Boil): Drain the soaked beans and transfer them to a large pot. Add fresh water to cover the beans by about 2-3 inches. Bring the water to a boil over high heat. Once boiling, reduce the heat to medium-low and simmer for about 5 minutes. This initial boiling helps to remove any impurities and bitterness from the beans.
- Step 3: Drain and Re-boil (Second Boil): Drain the beans again and rinse the pot. Return the beans to the pot and add fresh water to cover them by about 2-3 inches. Bring the water back to a boil, then reduce the heat to low, cover the pot, and simmer gently for 1-1.5 hours, or until the beans are very tender and easily mashed with a spoon or fork. Check for tenderness periodically and add more water if necessary to keep the beans submerged.
- Step 4: Mash the Beans: Once the beans are tender, drain most of the cooking liquid, leaving just a little bit to help with mashing. You can mash the beans directly in the pot using a potato masher, or for a smoother paste, you can transfer them to a food processor or blender and pulse until smooth. If using a blender or food processor, be careful not to over-process, as it can become too gluey. For a slightly chunkier paste, mash by hand or pulse lightly in a food processor.
- Step 5: Cook with Sugar (Sweetening and Thickening): Return the mashed beans to the pot (if you used a separate appliance). Add the sugar and a pinch of salt to the mashed beans. Cook over medium-low heat, stirring constantly with a spatula or wooden spoon. As you cook, the sugar will dissolve, and the red bean paste will start to thicken. Continue cooking and stirring for about 15-20 minutes, or until the paste has thickened to your desired consistency. It should be thick enough to hold its shape but still soft and spreadable. Be careful not to burn the paste – reduce the heat if it starts to stick to the bottom of the pot.
- Step 6: Cool Completely: Once the red bean paste has reached the desired consistency, remove it from the heat and let it cool completely. As it cools, it will thicken further. You can transfer it to a bowl and cover it with plastic wrap, pressing the wrap directly onto the surface of the paste to prevent a skin from forming. The red bean paste can be made ahead of time and stored in the refrigerator for several days.
Part 2: Making and Steaming the Sticky Rice Cake (Mochi)
- Step 1: Prepare Steaming Setup: Set up your steamer. You can use a bamboo steamer set over a pot of boiling water, a metal steamer insert in a pot, or even a makeshift steamer using a heatproof bowl placed inside a pot with water, ensuring the bowl is elevated above the water level. Line the steamer basket or bowl with parchment paper or banana leaves to prevent the sticky rice cake from sticking.
- Step 2: Mix Dry Ingredients: In a large mixing bowl, whisk together the glutinous rice flour, sugar, and salt until well combined. This ensures the sugar and salt are evenly distributed throughout the flour.
- Step 3: Add Warm Water and Oil: Gradually pour the warm water into the dry ingredients while mixing with a spatula or your hands. Mix until a shaggy dough forms. Then, add the vegetable oil and continue to mix and knead until a smooth, soft, and slightly sticky dough comes together. The dough should be pliable and easy to handle. If the dough seems too dry, add a tiny bit more warm water, a teaspoon at a time. If it’s too sticky, add a little more glutinous rice flour, a teaspoon at a time.
- Step 4: Knead the Dough: Turn the dough out onto a lightly floured surface (use glutinous rice flour for dusting if needed). Knead the dough for about 5-7 minutes until it becomes very smooth and elastic. Kneading helps to develop the gluten in the glutinous rice flour, resulting in a chewier texture.
- Step 5: Divide and Fill the Dough: Divide the dough into equal portions, depending on the desired size of your sticky rice cakes. For medium-sized cakes, divide into about 12-16 portions. Take one portion of dough and flatten it into a disc in the palm of your hand. Place a spoonful (about 1-2 teaspoons, depending on the size of your cakes) of cooled red bean paste in the center of the dough disc. Bring the edges of the dough up and around the red bean paste, pinching them together to completely enclose the filling and form a smooth ball. Repeat with the remaining dough and red bean paste.
- Step 6: Steam the Sticky Rice Cakes: Place the filled sticky rice cakes in the prepared steamer basket or bowl, leaving some space between them to allow for expansion during steaming. Make sure the water in your pot is boiling vigorously and producing steam. Place the steamer basket over the boiling water, cover it tightly, and steam for 15-20 minutes, or until the sticky rice cakes become translucent and puffy. The steaming time may vary slightly depending on the size of your cakes and the intensity of your steamer. Check for doneness by gently pressing a cake – it should feel soft and springy.
- Step 7: Dust with Starch and Cool Slightly: Once steamed, carefully remove the steamer basket from the pot. Let the sticky rice cakes cool slightly for a few minutes to make them easier to handle. While they are still warm (but not too hot to handle), generously dust them with potato starch or cornstarch on all sides. This prevents them from sticking and makes them easier to serve.
- Step 8: Serve Warm or at Room Temperature: Sticky Rice Cakes with Red Bean Paste are best enjoyed warm or at room temperature on the same day they are made, when they are at their softest and chewiest.
Alternative Cooking Methods (Less Common for Authentic Texture):
- Microwave (Quick but Texture May Vary): For a faster but less ideal method, you can microwave the sticky rice cakes. Place them on a microwave-safe plate lined with parchment paper. Microwave on high for 1-2 minutes, checking frequently, until they are softened. Microwaving can sometimes make them slightly tougher compared to steaming.
- Boiling (Can Become Waterlogged): Boiling is generally not recommended as it can make the sticky rice cakes waterlogged and less flavorful.
Nutrition Facts: A Sweet Treat in Moderation
Sticky Rice Cake with Red Bean Paste is a delicious treat, but like most desserts, it’s best enjoyed in moderation as part of a balanced diet. Here’s an approximate nutritional breakdown per serving. Please note that these are estimates and can vary based on ingredient quantities, specific brands, and serving sizes.
Serving Size: Approximately 1 medium-sized Sticky Rice Cake (around 50-60 grams)
Approximate Nutritional Information per Serving (1 cake):
- Calories: 150-200 kcal
- Fat: 2-3 grams
- Saturated Fat: < 1 gram
- Trans Fat: 0 grams
- Unsaturated Fat: 1-2 grams
- Cholesterol: 0 mg
- Sodium: 20-30 mg
- Carbohydrates: 35-40 grams
- Sugar: 15-20 grams (primarily from added sugar in the red bean paste and dough)
- Fiber: 1-2 grams
- Protein: 2-3 grams
Important Notes on Nutrition:
- Serving Size Matters: The nutritional values are per one medium-sized cake. If you consume multiple cakes, the calorie and sugar intake will increase proportionally.
- Sugar Content: A significant portion of the calories and carbohydrates comes from sugar, primarily added sugar in the red bean paste and the dough. Homemade red bean paste allows you to control the sugar level to some extent.
- Glutinous Rice Flour: Glutinous rice flour is primarily carbohydrates. While it’s gluten-free (despite the name “glutinous,” it refers to its sticky texture, not gluten), it is still a refined carbohydrate source.
- Red Bean Benefits: Red beans themselves are a good source of fiber, protein, and various nutrients. However, the processing into red bean paste, especially with added sugar, reduces some of these nutritional benefits.
- Moderation is Key: Enjoy Sticky Rice Cake as an occasional treat rather than an everyday staple. Balance it with whole, unprocessed foods in your overall diet.
- Homemade vs. Store-Bought: Homemade versions may have slightly different nutritional profiles compared to store-bought, especially in terms of sugar content and added preservatives.
- Estimate Only: These are approximate values. For precise nutritional information, you can use online recipe analyzers, but these will still be estimates based on generic ingredient data.
Preparation Time: Plan Your Sweet Treat
Making Sticky Rice Cake with Red Bean Paste involves several steps, and while none are overly complicated, it’s helpful to plan your time accordingly. Here’s a breakdown of the estimated preparation time:
- Red Bean Paste (Homemade):
- Soaking Beans: 4-6 hours (or overnight) – Passive time, can be done ahead
- Cooking Beans: 1.5-2 hours (including both boiling steps)
- Mashing and Sweetening: 20-30 minutes
- Cooling: 1-2 hours – Passive time, can be done ahead
- Total Homemade Red Bean Paste Time (excluding soaking & cooling): Approximately 2-2.5 hours
- Sticky Rice Cake (Mochi):
- Prep Dough: 15-20 minutes
- Kneading Dough: 5-7 minutes
- Filling and Shaping Cakes: 20-30 minutes
- Steaming: 15-20 minutes
- Cooling and Dusting: 10-15 minutes
- Total Sticky Rice Cake Time: Approximately 50-70 minutes
- Total Recipe Time (Homemade Red Bean Paste): Approximately 3-4 hours (excluding bean soaking and red bean paste cooling, which can be done in advance).
- Total Recipe Time (Using Store-Bought Red Bean Paste): Approximately 1-1.5 hours
Time-Saving Tips:
- Use Store-Bought Red Bean Paste: This significantly reduces preparation time. High-quality store-bought anko is readily available and a great shortcut.
- Make Red Bean Paste Ahead: If you prefer homemade paste, make it a day or two in advance and store it in the refrigerator. This breaks down the workload and makes the day of cake-making less time-consuming.
- Soak Beans Overnight: Soaking beans overnight is passive time and greatly reduces the cooking time for the red bean paste.
- Work Efficiently: Organize your ingredients and workspace before starting. Read through the recipe fully to understand the steps and flow.
- Enlist Help: Making sticky rice cakes can be a fun activity to do with family or friends. Enlist helpers for filling and shaping the cakes to speed up the process.
How to Serve Sticky Rice Cake: Presentation and Pairings
Sticky Rice Cake with Red Bean Paste is a versatile dessert that can be enjoyed in various settings and presentations. Here are some serving suggestions and ideas to enhance your experience:
Serving Occasions:
- Dessert After Meals: A classic and satisfying dessert to conclude a meal, especially after Asian cuisine.
- Tea Time Snack: Perfect for enjoying with a cup of tea (green tea, black tea, or herbal tea) for a delightful afternoon or morning snack.
- Festivals and Celebrations: Traditionally enjoyed during Lunar New Year, Mid-Autumn Festival, and other Asian festivals as a symbol of good fortune and togetherness.
- Special Occasions: Serve for birthdays, family gatherings, potlucks, or any celebration where a sweet treat is desired.
- Gifts: Homemade sticky rice cakes make thoughtful and appreciated gifts for friends and family, especially during festive seasons.
Presentation Ideas:
- Simple Platter: Arrange the dusted sticky rice cakes on a simple platter or serving dish. Their natural beauty and soft, rounded shapes are visually appealing on their own.
- Tiered Dessert Stand: For a more elegant presentation, especially for parties or celebrations, arrange the cakes on a tiered dessert stand.
- Individual Wrappers: Wrap each sticky rice cake individually in food-safe wrappers or parchment paper ties for a more refined and gift-worthy presentation.
- Garnish (Subtle): While they are beautiful as is, you can add subtle garnishes:
- Edible Gold Leaf (very small piece): For a touch of luxury and festivity (especially for celebrations).
- Sprinkle of Toasted Sesame Seeds: Adds a subtle nutty flavor and visual texture.
- Matcha Powder Dusting (light): If you used plain dough, a very light dusting of matcha powder can add visual interest and a hint of flavor.
Serving Temperature and Pairings:
- Serve Warm or Room Temperature: Sticky Rice Cakes are delicious served slightly warm or at room temperature. They are at their chewiest and softest when freshly made and warm. They can also be enjoyed at room temperature, but may become slightly firmer as they cool.
- Beverage Pairings:
- Tea: Green tea (like Sencha or Jasmine), black tea (like Earl Grey or Assam), or herbal teas complement the sweetness and richness of the cakes.
- Milk: A glass of cold milk or warm milk pairs well with the sweet and slightly chewy texture.
- Coffee (Less Traditional but Works): A mild coffee can also be a pleasant pairing for those who prefer coffee with desserts.
- Dipping Sauces (Not Traditional but Possible): While not traditionally served with dipping sauces, you could experiment with:
- Sweetened Condensed Milk: For extra sweetness and creaminess.
- Coconut Cream or Coconut Milk: For a tropical twist.
- Honey Syrup: A light honey syrup for added sweetness and glaze.
Cultural Serving Styles:
- Japanese Mochi Style: Often served individually on small plates or in decorative bowls. May be accompanied by green tea.
- Chinese Nian Gao Style: Can be served sliced into pieces, sometimes pan-fried or added to savory dishes as well (though this recipe is for a sweet version).
- Korean Chapssaltteok Style: Often enjoyed as a snack or dessert, sometimes served with a sprinkle of roasted soybean powder (konggaru) for a nutty flavor.
Additional Tips for Sticky Rice Cake Success
To ensure your Sticky Rice Cakes with Red Bean Paste turn out perfectly chewy, delicious, and visually appealing, keep these five additional tips in mind:
- Use the Right Flour: Glutinous Rice Flour is Key: This cannot be stressed enough! Make absolutely sure you are using glutinous rice flour (sweet rice flour, mochiko) and not regular rice flour. Regular rice flour will result in a completely different texture – hard and crumbly, not chewy and sticky. Check the label carefully when purchasing.
- Don’t Overcook the Red Bean Paste: When making homemade red bean paste, be careful not to overcook it until it becomes too dry or stiff. It should be thick enough to hold its shape but still soft and spreadable. Overcooked paste can be dry and less pleasant in the finished cake. Cook it until it reaches a consistency slightly thicker than what you ultimately desire, as it will thicken further as it cools.
- Knead the Dough Properly: Kneading the sticky rice cake dough is important for developing its elasticity and chewiness. Don’t skip the kneading step. Knead until the dough is smooth, elastic, and no longer sticky (except for a slight tackiness, which is normal). Proper kneading contributes significantly to the final texture.
- Steam Thoroughly: Ensure the sticky rice cakes are steamed thoroughly until they are translucent and puffy. Under-steamed cakes will be doughy and uncooked in the center. Over-steaming is less of a concern, but steaming for the recommended time (15-20 minutes) is usually sufficient for medium-sized cakes. Check for doneness by gently pressing a cake – it should feel soft and springy.
- Dust Generously with Starch While Warm: Dust the steamed sticky rice cakes generously with potato starch or cornstarch while they are still warm. This is crucial for preventing them from sticking together and to your hands. The starch adheres better to warm, slightly moist surfaces. Dust all sides thoroughly for best results.
Frequently Asked Questions (FAQ) About Sticky Rice Cake
Here are five frequently asked questions about making Sticky Rice Cake with Red Bean Paste to help you troubleshoot and perfect your recipe:
Q1: My sticky rice cakes are too sticky and hard to handle after steaming. What did I do wrong?
A: Excessive stickiness after steaming is normal for sticky rice cakes! However, if they are too sticky to handle even after cooling slightly and dusting with starch.
Q2: Can I freeze Sticky Rice Cakes?
A: Yes, you can freeze cooked Sticky Rice Cakes, but the texture may change slightly upon thawing.
Q3: Can I make Sticky Rice Cakes without red bean paste? What are other filling options?
A: Yes, you can absolutely make sticky rice cakes with other fillings! Red bean paste is classic, but you can get creative.
Q4: My red bean paste is too sweet/not sweet enough. How can I adjust it?
A: Adjusting the sweetness of homemade red bean paste is easy.
Q5: Can I make vegan Sticky Rice Cakes?
A: Yes, this recipe is naturally vegan! All the ingredients – glutinous rice flour, water, sugar, oil, salt, red beans, and starch – are plant-based and suitable for a vegan diet. Ensure you are using vegetable oil and granulated or caster sugar, as these are typically vegan-friendly.
Enjoy the delightful process of making and sharing these wonderfully chewy and sweet Sticky Rice Cakes with Red Bean Paste! They are a delicious taste of tradition that you can create and savor in your own home.
Print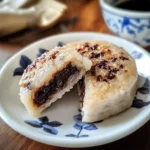
Sticky Rice Cake with Red Bean Paste recipe
Ingredients
- For the Sticky Rice Cake (Mochi):
- 2 cups Glutinous Rice Flour (Sweet Rice Flour): This is the absolute star ingredient! Glutinous rice flour, also known as sweet rice flour or mochiko, is what gives the cake its signature chewy, sticky texture. It is essential to use glutinous rice flour and not regular rice flour. Look for it in Asian grocery stores or the international aisle of well-stocked supermarkets. It’s made from short-grain glutinous rice and has a distinct opaque white appearance and a slightly sweet taste even in its raw form.
- 1 cup Warm Water (approximately 105-115°F or 40-46°C): Warm water is crucial for activating the glutinous rice flour and creating a smooth, pliable dough. The temperature should be warm to the touch but not scalding hot. Using water that’s too hot can cook the flour prematurely, while water that’s too cold won’t properly hydrate the flour.
- 1/4 cup Sugar (Granulated or Caster Sugar): Sugar provides the subtle sweetness to the rice cake itself, balancing the richness of the red bean paste. You can use granulated sugar or caster sugar (superfine sugar) – both work well. Adjust the amount slightly to your preference if you desire a less or more sweet cake base.
- 2 tablespoons Vegetable Oil (Neutral Flavor): A neutral-flavored vegetable oil, such as canola, soybean, or corn oil, is added to the dough to enhance its elasticity and prevent it from becoming too dry or tough during steaming. It also contributes to a slightly softer texture.
- Pinch of Salt: A tiny pinch of salt enhances the overall flavors and balances the sweetness. It’s a subtle but important addition.
- For the Red Bean Paste Filling (Anko or Red Bean Jam):
- 1 cup Dried Red Beans (Adzuki Beans): Authentic red bean paste is made from adzuki beans. These small, reddish-brown beans have a slightly nutty and sweet flavor that is characteristic of traditional Asian red bean paste. You can find them in Asian grocery stores or online.
- 3–4 cups Water (for boiling beans): You’ll need ample water to boil the red beans until they are tender and easily mashable.
- 1 cup Sugar (Granulated or Caster Sugar): Sugar is essential to sweeten the red bean paste. The amount of sugar can be adjusted to your sweetness preference. Traditionally, red bean paste can be quite sweet, but you can reduce the sugar for a less intensely sweet filling. Granulated or caster sugar works well. Brown sugar can also be used for a slightly more molasses-like flavor.
- Pinch of Salt: Just like in the rice cake dough, a pinch of salt in the red bean paste enhances the overall flavor and balances the sweetness.
- For Coating (Optional but Recommended):
- Potato Starch or Cornstarch (for dusting): Dusting the cooked sticky rice cakes with potato starch or cornstarch prevents them from sticking to each other and your hands, making them easier to handle and serve. Potato starch is often preferred for a smoother, less powdery finish, but cornstarch is a readily available and effective alternative.
Instructions
- Step 1: Rinse and Soak Red Beans: Rinse the dried red beans thoroughly under cold water. Place the rinsed beans in a large bowl and cover them with plenty of water. Soak the beans for at least 4-6 hours, or preferably overnight. Soaking helps to soften the beans, reduce cooking time, and improve their digestibility.
- Step 2: Boil the Beans (First Boil): Drain the soaked beans and transfer them to a large pot. Add fresh water to cover the beans by about 2-3 inches. Bring the water to a boil over high heat. Once boiling, reduce the heat to medium-low and simmer for about 5 minutes. This initial boiling helps to remove any impurities and bitterness from the beans.
- Step 3: Drain and Re-boil (Second Boil): Drain the beans again and rinse the pot. Return the beans to the pot and add fresh water to cover them by about 2-3 inches. Bring the water back to a boil, then reduce the heat to low, cover the pot, and simmer gently for 1-1.5 hours, or until the beans are very tender and easily mashed with a spoon or fork. Check for tenderness periodically and add more water if necessary to keep the beans submerged.
- Step 4: Mash the Beans: Once the beans are tender, drain most of the cooking liquid, leaving just a little bit to help with mashing. You can mash the beans directly in the pot using a potato masher, or for a smoother paste, you can transfer them to a food processor or blender and pulse until smooth. If using a blender or food processor, be careful not to over-process, as it can become too gluey. For a slightly chunkier paste, mash by hand or pulse lightly in a food processor.
- Step 5: Cook with Sugar (Sweetening and Thickening): Return the mashed beans to the pot (if you used a separate appliance). Add the sugar and a pinch of salt to the mashed beans. Cook over medium-low heat, stirring constantly with a spatula or wooden spoon. As you cook, the sugar will dissolve, and the red bean paste will start to thicken. Continue cooking and stirring for about 15-20 minutes, or until the paste has thickened to your desired consistency. It should be thick enough to hold its shape but still soft and spreadable. Be careful not to burn the paste – reduce the heat if it starts to stick to the bottom of the pot.
- Step 6: Cool Completely: Once the red bean paste has reached the desired consistency, remove it from the heat and let it cool completely. As it cools, it will thicken further. You can transfer it to a bowl and cover it with plastic wrap, pressing the wrap directly onto the surface of the paste to prevent a skin from forming. The red bean paste can be made ahead of time and stored in the refrigerator for several days.
Part 2: Making and Steaming the Sticky Rice Cake (Mochi)
- Step 1: Prepare Steaming Setup: Set up your steamer. You can use a bamboo steamer set over a pot of boiling water, a metal steamer insert in a pot, or even a makeshift steamer using a heatproof bowl placed inside a pot with water, ensuring the bowl is elevated above the water level. Line the steamer basket or bowl with parchment paper or banana leaves to prevent the sticky rice cake from sticking.
- Step 2: Mix Dry Ingredients: In a large mixing bowl, whisk together the glutinous rice flour, sugar, and salt until well combined. This ensures the sugar and salt are evenly distributed throughout the flour.
- Step 3: Add Warm Water and Oil: Gradually pour the warm water into the dry ingredients while mixing with a spatula or your hands. Mix until a shaggy dough forms. Then, add the vegetable oil and continue to mix and knead until a smooth, soft, and slightly sticky dough comes together. The dough should be pliable and easy to handle. If the dough seems too dry, add a tiny bit more warm water, a teaspoon at a time. If it’s too sticky, add a little more glutinous rice flour, a teaspoon at a time.
- Step 4: Knead the Dough: Turn the dough out onto a lightly floured surface (use glutinous rice flour for dusting if needed). Knead the dough for about 5-7 minutes until it becomes very smooth and elastic. Kneading helps to develop the gluten in the glutinous rice flour, resulting in a chewier texture.
- Step 5: Divide and Fill the Dough: Divide the dough into equal portions, depending on the desired size of your sticky rice cakes. For medium-sized cakes, divide into about 12-16 portions. Take one portion of dough and flatten it into a disc in the palm of your hand. Place a spoonful (about 1-2 teaspoons, depending on the size of your cakes) of cooled red bean paste in the center of the dough disc. Bring the edges of the dough up and around the red bean paste, pinching them together to completely enclose the filling and form a smooth ball. Repeat with the remaining dough and red bean paste.
- Step 6: Steam the Sticky Rice Cakes: Place the filled sticky rice cakes in the prepared steamer basket or bowl, leaving some space between them to allow for expansion during steaming. Make sure the water in your pot is boiling vigorously and producing steam. Place the steamer basket over the boiling water, cover it tightly, and steam for 15-20 minutes, or until the sticky rice cakes become translucent and puffy. The steaming time may vary slightly depending on the size of your cakes and the intensity of your steamer. Check for doneness by gently pressing a cake – it should feel soft and springy.
- Step 7: Dust with Starch and Cool Slightly: Once steamed, carefully remove the steamer basket from the pot. Let the sticky rice cakes cool slightly for a few minutes to make them easier to handle. While they are still warm (but not too hot to handle), generously dust them with potato starch or cornstarch on all sides. This prevents them from sticking and makes them easier to serve.
- Step 8: Serve Warm or at Room Temperature: Sticky Rice Cakes with Red Bean Paste are best enjoyed warm or at room temperature on the same day they are made, when they are at their softest and chewiest.
Nutrition
- Serving Size: one normal portion
- Calories: 150-200
- Sugar: 15-20 grams
- Sodium: 20-30 mg
- Fat: 2-3 grams
- Saturated Fat: 1 gram
- Unsaturated Fat: 1-2 grams
- Carbohydrates: 35-40 grams
- Fiber: 1-2 grams
- Protein: 2-3 grams


