
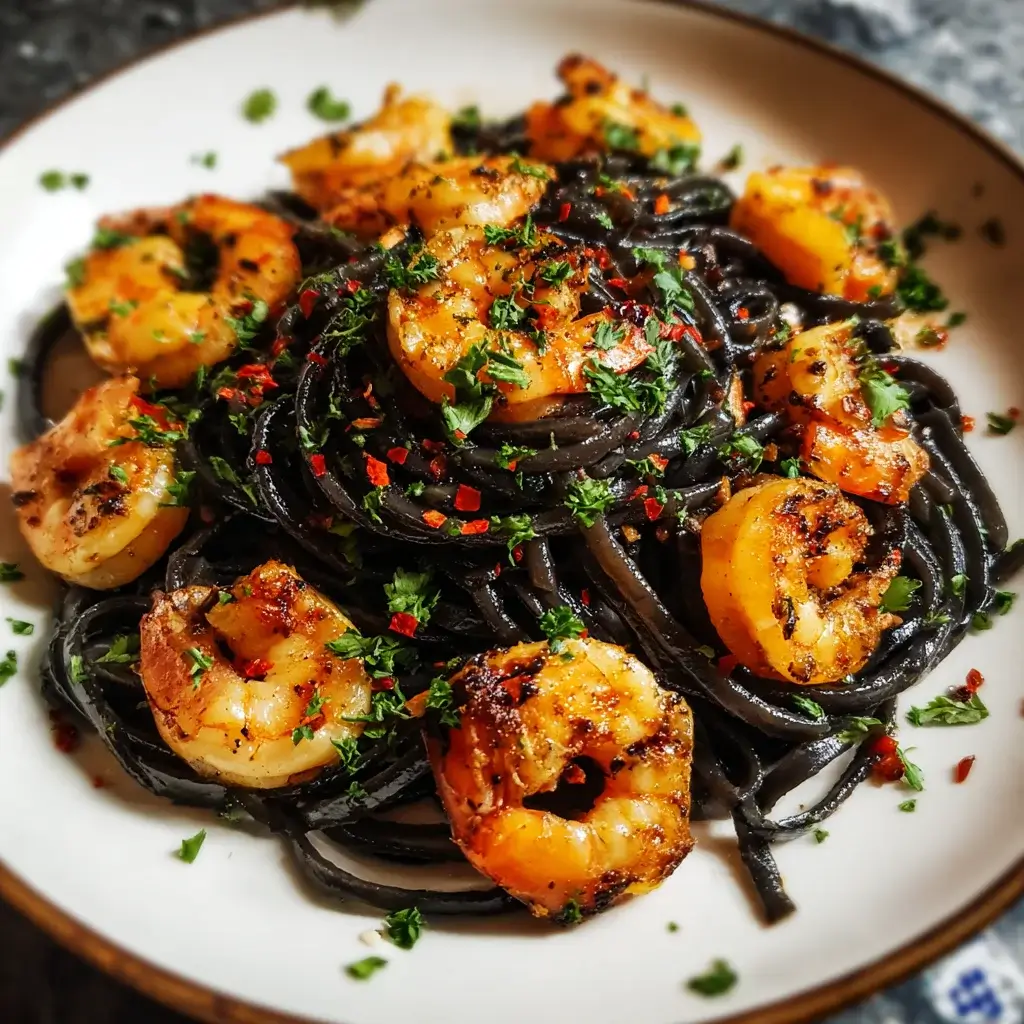

There is a certain type of dish that feels less like a meal and more like an event. It’s a dish that, when placed on the table, commands a moment of silence, a collective, appreciative hush. It’s visually dramatic, aromatically intoxicating, and promises a culinary experience that transcends the everyday. This Squid Ink Pasta with Garlic and Shrimp is precisely that kind of dish. It is a masterpiece of striking contrasts—the profound, inky black of the pasta serving as a dramatic canvas for the pearly pink shrimp, the vibrant red of cherry tomatoes, and the fresh green of parsley.
My first encounter with squid ink pasta, or pasta al nero di seppia, was on a trip to the Venetian coast, where the food is an unapologetic celebration of the sea. I was initially hesitant, the jet-black color feeling both mysterious and slightly intimidating. But the first bite was a revelation. It wasn’t fishy or overpowering as I had feared. Instead, it was subtly briny, with a deep, savory umami that tasted of the ocean itself, a perfect, sophisticated partner to the sweet, delicate seafood it was served with. It was love at first bite.
I was determined to recreate that moment of culinary magic in my own kitchen. I wanted to capture not just the flavor, but the feeling—that sense of special occasion, of enjoying something truly unique and elegant. This recipe is the culmination of that passion. It has become my go-to for date nights, for small, intimate dinner parties, or for any evening when I want to turn a simple dinner into a memorable experience. The process itself is surprisingly swift and straightforward, yet the result is a dish that looks and tastes like it came from a high-end Italian restaurant. It’s the sizzle of garlic in olive oil, the fragrant cloud of steam from deglazing the pan with white wine, and the final, satisfying toss that coats every strand of black pasta in a glossy, flavor-packed sauce. It is a dish that delights all the senses, a testament to the fact that with a few special ingredients and a little bit of confidence, you can create true culinary artistry at home.
Complete with the ingredients amount
The elegance of this dish lies in its relative simplicity and the quality of its components. While the ingredient list is concise, each element plays a crucial role in building layers of flavor and texture. This recipe is designed to generously serve 4 people.
The Stars of the Show (Pasta and Shrimp):
- Squid Ink Pasta: 1 pound (16 ounces or 450g). Look for long strands like tagliatelle, linguine, or spaghetti, as they beautifully capture the sauce. The squid ink (nero di seppia) is infused into the pasta dough, giving it its dramatic color and a subtle, savory brininess.
- Large Shrimp: 1 ½ pounds, peeled and deveined. Using large or jumbo shrimp (16-20 or 21-25 per pound) is ideal, as they remain plump and juicy and are less prone to overcooking. You can choose to leave the tails on for a more elegant presentation, or remove them for easier eating. Ensure they are raw, not pre-cooked.
For the Aromatic Garlic and White Wine Sauce:
- Extra Virgin Olive Oil: ¼ cup. Use a good quality olive oil, as its flavor is a key component of the sauce base.
- Garlic: 8 to 10 cloves, thinly sliced. This may seem like a lot, but sliced garlic provides a sweet, mellow flavor without the harsh bite of minced garlic. It is the aromatic heart of the sauce.
- Shallot: 1 large, finely minced. Shallots provide a milder, more delicate, and slightly sweeter flavor than onions, which perfectly complements the seafood.
- Dry White Wine: ½ cup. This is essential for deglazing the pan and adding a layer of acidity and complexity. A crisp, dry white wine like a Pinot Grigio, Sauvignon Blanc, or an unoaked Chardonnay is perfect.
- Red Pepper Flakes: ½ to 1 teaspoon. This provides a gentle, warm hum of heat that cuts through the richness. Adjust the amount based on your preference for spiciness.
- Unsalted Butter: 2 tablespoons, cold and cut into small pieces. Swirled in at the end, this creates a richer, glossier sauce.
- Lemon: 1, for both zest and juice. The fresh acidity is crucial for brightening the flavors and balancing the richness of the dish.
For the Fresh Components and Garnish:
- Cherry Tomatoes: 1 pint (about 2 cups), halved. The tomatoes add a burst of sweetness, a beautiful pop of color, and a juicy acidity that complements the seafood.
- Fresh Italian (Flat-Leaf) Parsley: ½ cup, finely chopped, plus more for garnish. The fresh, clean, and slightly peppery flavor of parsley is essential for cutting through the richness and adding a final touch of freshness.
- Salt: To taste, for both the pasta water and the sauce.
- Black Pepper: Freshly ground, to taste.
Instructions
This recipe comes together very quickly once you start cooking, so it is imperative to have all of your ingredients prepped and ready to go—a culinary practice known as “mise en place.” Have your garlic sliced, shallot minced, tomatoes halved, and parsley chopped before you even turn on the stove.
Step 1: Cook the Squid Ink Pasta to Al Dente
Bring a large pot of water to a rolling boil. Once it is boiling vigorously, generously salt the water. It should taste as salty as the sea. This is your only chance to season the pasta itself from the inside out.
Add the 1 pound of squid ink pasta to the boiling water and cook according to the package directions until it is al dente. “Al dente,” which means “to the tooth” in Italian, is the ideal texture—the pasta should be fully cooked but still have a firm, pleasant bite in the very center. It will continue to cook slightly when you toss it with the hot sauce.
Before you drain the pasta, carefully reserve at least 1 ½ cups of the starchy, black pasta water. This water is liquid gold and the secret to creating a perfectly emulsified, glossy sauce that clings beautifully to the pasta. Drain the cooked pasta in a colander and set it aside. Do not rinse the pasta, as this would wash away the starches that help the sauce adhere.
Step 2: Sear the Shrimp to Perfection
While the pasta is cooking, you can begin with the shrimp. First, ensure your peeled and deveined shrimp are very dry by patting them thoroughly with paper towels. Moisture is the enemy of a good sear. Season the dry shrimp lightly with salt and freshly ground black pepper.
Place a large, heavy-bottomed skillet or sauté pan over medium-high heat and add 2 tablespoons of the olive oil. Once the oil is hot and shimmering, carefully add the shrimp to the pan in a single, even layer. Do not overcrowd the pan; if necessary, cook the shrimp in two batches.
Sear the shrimp for about 1-2 minutes per side. They cook very quickly. You are looking for them to turn pink and opaque and develop a light golden sear. The moment they curl from a straight line into a loose “C” shape, they are done. Immediately remove the seared shrimp from the skillet and set them aside on a clean plate. This step is crucial to prevent them from overcooking and becoming rubbery while you build the sauce.
Step 3: Build the Aromatic Sauce Base
Reduce the heat under the skillet to medium. Add the remaining 2 tablespoons of olive oil to the same pan. Add the finely minced shallot and cook, stirring frequently, for about 2-3 minutes until it has softened and become translucent.
Add the thinly sliced garlic and the red pepper flakes to the pan. Cook, stirring constantly, for about 1-2 minutes until the garlic is fragrant and just beginning to turn a pale golden color. It is very important not to let the garlic brown or burn, as it will become bitter and ruin the flavor of your sauce.
Step 4: Deglaze, Simmer, and Finish the Sauce
Pour the ½ cup of dry white wine into the hot pan. It will bubble and steam vigorously. Use a wooden spoon or spatula to deglaze the pan by scraping up all the delicious browned bits (known as fond) from the bottom of the skillet. These bits are packed with concentrated flavor. Let the wine simmer and reduce by about half, which should take 2-3 minutes.
Add the halved cherry tomatoes to the skillet, along with a pinch of salt and pepper. Cook, stirring occasionally, for about 4-5 minutes, until the tomatoes begin to soften, break down slightly, and release their juices into the sauce.
Step 5: The Final Toss – Bringing It All Together
Add the drained, cooked squid ink pasta directly to the skillet with the tomato and garlic sauce. Add ½ cup of the reserved starchy pasta water. Using tongs, toss everything together vigorously and continuously. The starchy water will begin to emulsify with the olive oil, creating a light but creamy sauce that coats every strand of pasta.
Add the 2 tablespoons of cold, cubed butter to the pan. Continue to toss until the butter has melted completely, making the sauce even glossier and richer. If the sauce seems too thick, add another splash of the reserved pasta water, a tablespoon at a time, until it reaches your desired consistency.
Turn off the heat. Add the seared shrimp back to the pan, along with the chopped fresh parsley, the zest of one lemon, and a generous squeeze of fresh lemon juice (about 1-2 tablespoons). Toss everything one final time to combine and gently warm the shrimp through.
Step 6: Serve Immediately
Taste the pasta and adjust the seasoning if necessary, adding more salt, pepper, or lemon juice to your liking. Serve immediately in warm, shallow bowls. Garnish with an extra sprinkle of fresh parsley and perhaps a final drizzle of high-quality extra virgin olive oil.
Nutrition Facts (Servings and calories per serving)
The nutritional information provided here is an estimate and can vary based on the specific brands of ingredients used, the size of the shrimp, and serving accompaniments. This dish is a wonderfully balanced meal, offering lean protein, healthy fats, and carbohydrates.
- Servings: This recipe is designed to yield 4 main course servings.
- Calories per serving: Approximately 550 to 650 calories.
This dish is an excellent source of lean protein from the shrimp, which is also rich in selenium and vitamin B12. The olive oil provides heart-healthy monounsaturated fats. While a pasta dish, the focus on fresh ingredients like tomatoes, garlic, and parsley adds valuable vitamins and minerals.
Preparation time
This elegant pasta dish comes together with surprising speed, making it an excellent choice for a special weeknight dinner or an impressive meal for guests without spending hours in the kitchen.
- Active Preparation Time: 20 minutes. This is the “mise en place” time, which includes peeling and deveining the shrimp, slicing the garlic, mincing the shallot, and chopping the parsley.
- Cook Time: 15-20 minutes. The actual cooking process, from boiling the pasta to finishing the sauce, is very quick and happens concurrently.
- Total Time: Approximately 35 to 40 minutes. From start to finish, you can have this stunning, restaurant-quality meal on the table in under an hour.
How to Serve
The presentation of this dish is almost as important as its flavor. Its dramatic appearance deserves to be showcased.
- Plating is Key: Serve the pasta in warm, shallow bowls. Use tongs to lift a portion of the pasta, lower it into the center of the bowl, and then give the tongs a gentle twist as you pull them away to create a beautiful, high nest. Arrange the shrimp and cherry tomatoes artfully on and around the pasta.
- Essential Garnishes: A final flourish before serving can elevate the dish to a new level.
- Fresh Herbs: A generous sprinkle of freshly chopped Italian parsley is a must for freshness and color.
- Lemon Zest: A fine grating of fresh lemon zest over the top adds a burst of bright, citrusy aroma.
- High-Quality Olive Oil: A final, light drizzle of a peppery, extra-virgin olive oil over each bowl adds a touch of fruity richness.
- The Cheese Debate: Traditionally, Italians do not serve cheese with seafood pasta dishes, as the strong flavor of aged cheese is believed to overpower the delicate taste of the seafood. However, if you are a cheese lover, a very light dusting of a high-quality Parmigiano-Reggiano won’t be frowned upon in a home kitchen.
- Perfect Side Dishes: This pasta is a complete meal, but a few simple accompaniments can round it out beautifully.
- Crusty Bread: A loaf of warm, crusty ciabatta or a baguette is absolutely essential for sopping up every last drop of the incredible garlic and white wine sauce from the bottom of the bowl.
- Simple Green Salad: A crisp, simple salad of arugula or mixed greens, dressed with nothing more than lemon juice, olive oil, salt, and pepper, provides a fresh, acidic contrast that cleanses the palate.
- Wine Pairing: The perfect wine to drink with this dish is the same one you used to cook with. A crisp, dry Pinot Grigio or Sauvignon Blanc will cut through the richness of the sauce and complement the delicate sweetness of the shrimp perfectly.
Additional tips (5 tips)
These five professional tips will help you master the nuances of this dish, ensuring a flawless result that will impress anyone lucky enough to taste it.
- Do Not Overcook the Shrimp—It’s the Cardinal Sin: This is the most important rule for any shrimp dish. Shrimp cook in a matter of minutes. The difference between perfectly tender, juicy shrimp and unpleasantly tough, rubbery shrimp is about 60 seconds. Cook the shrimp separately first, just until they turn pink and form a loose “C” shape, then remove them from the pan. They will be added back at the very end only to be warmed through. An overcooked shrimp will curl into a tight “O” shape—remember, “O” stands for “overcooked.”
- Starchy Pasta Water is Your Secret Sauce: Never discard all of your pasta water! That cloudy, black liquid is full of starches that have leached out from the pasta during cooking. This starchy water is a powerful emulsifier. When tossed vigorously with the pasta and the fat (olive oil and butter) in your sauce, it helps to bind them together, creating a silky, creamy, and cohesive sauce that clings perfectly to every strand of pasta instead of leaving a greasy puddle at the bottom of your bowl. It is the secret to a restaurant-quality sauce texture.
- The Magic of a Cold Butter Finish (Monte au Buerre): This classic French technique, known as monter au beurre, is the secret to creating an incredibly rich and glossy sauce. By turning off the heat and swirling in a few pieces of cold butter at the very end, you are creating an emulsion. The cold butter melts slowly, dispersing its fat evenly throughout the sauce without separating, resulting in a velvety texture and a beautiful sheen that makes the entire dish look more professional and taste more luxurious.
- Layer Your Aromatics for Deeper Flavor: Don’t just dump all your aromatic ingredients into the pan at once. They cook at different rates and serve different purposes. Start with the shallots to build a sweet, mellow base. Then, add the thinly sliced garlic, which needs less time and can burn easily. Finally, toast the red pepper flakes for just 30 seconds to “bloom” them, which awakens their essential oils and infuses the fat with their flavor. This patient, layered approach builds a much more complex and harmonious flavor profile.
- Embrace Freshness: The Power of Acid and Herbs: In a dish with rich components like butter and olive oil, acid and fresh herbs are not just garnishes; they are essential balancing elements. The fresh lemon juice, added off the heat at the very end, cuts through the richness and brightens the entire dish, making the flavors pop. The fresh parsley adds a clean, peppery note that provides a counterpoint to the savory sauce and sweet seafood. Using fresh lemon juice and fresh parsley, not bottled or dried, will make a world of difference in the final taste.
FAQ section (5 Q/A)
Here are the answers to some of the most frequently asked questions about preparing and enjoying this elegant Squid Ink Pasta with Garlic and Shrimp.
Q1: What does squid ink pasta actually taste like? Is it very fishy?
A1: This is the most common and important question! Squid ink pasta does not have a strong, overwhelming, or “fishy” taste. Instead, it has a very subtle, nuanced flavor. The squid ink lends a mild brininess, a hint of the sea, and a deep, savory umami quality that is difficult to describe but incredibly delicious. It’s richer and more complex than regular pasta, and it pairs beautifully with the delicate sweetness of seafood.
Q2: I can’t find squid ink pasta at my local store. Can I use regular pasta instead?
A2: Absolutely! While you will lose the dramatic black color and the subtle brininess, this sauce is absolutely delicious with any high-quality regular pasta. Long strands like standard linguine, spaghetti, or fettuccine would be the best substitutes, as they work beautifully with this type of sauce. Simply follow the recipe exactly as written, just swapping the type of pasta.
Q3: Can I make this dish without the white wine?
A3: Yes, you can. The purpose of the wine is to deglaze the pan and add a layer of acidic complexity. The best non-alcoholic substitute is low-sodium chicken broth or vegetable broth. Use an equal amount (½ cup). When you substitute the wine, you lose a bit of the acidity, so you may want to add an extra squeeze of fresh lemon juice at the end to brighten the flavors and balance the sauce.
Q4: How should I store and reheat leftovers for the best results?
A4: To be honest, seafood pasta is always at its absolute best when enjoyed fresh, immediately after it’s made. The texture of shrimp can change upon reheating. However, if you do have leftovers, store them in an airtight container in the refrigerator for up to 2 days. The best way to reheat is to do it gently. Place the pasta in a skillet over low heat with a splash of water or broth to loosen the sauce and create some steam. Toss gently until it is just warmed through. Avoid the microwave if at all possible, as it can easily overcook the shrimp, making them tough and rubbery.
Q5: Can I add other types of seafood or vegetables to this recipe?
A5: Definitely! This recipe is a wonderful template. You could add other quick-cooking seafood like bay scallops, mussels, or clams. If using mussels or clams, add them to the pan after the wine has reduced, cover the pan, and let them steam until they open (discard any that do not open). Bay scallops can be seared quickly alongside the shrimp. For vegetables, quick-cooking options are best. You could wilt a large handful of fresh spinach into the sauce at the very end, or add thinly sliced asparagus spears or peas along with the cherry tomatoes.
Print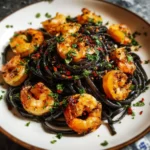
Squid Ink Pasta with Garlic and Shrimp recipe
Ingredients
The Stars of the Show (Pasta and Shrimp):
-
Squid Ink Pasta: 1 pound (16 ounces or 450g). Look for long strands like tagliatelle, linguine, or spaghetti, as they beautifully capture the sauce. The squid ink (nero di seppia) is infused into the pasta dough, giving it its dramatic color and a subtle, savory brininess.
-
Large Shrimp: 1 ½ pounds, peeled and deveined. Using large or jumbo shrimp (16-20 or 21-25 per pound) is ideal, as they remain plump and juicy and are less prone to overcooking. You can choose to leave the tails on for a more elegant presentation, or remove them for easier eating. Ensure they are raw, not pre-cooked.
For the Aromatic Garlic and White Wine Sauce:
-
Extra Virgin Olive Oil: ¼ cup. Use a good quality olive oil, as its flavor is a key component of the sauce base.
-
Garlic: 8 to 10 cloves, thinly sliced. This may seem like a lot, but sliced garlic provides a sweet, mellow flavor without the harsh bite of minced garlic. It is the aromatic heart of the sauce.
-
Shallot: 1 large, finely minced. Shallots provide a milder, more delicate, and slightly sweeter flavor than onions, which perfectly complements the seafood.
-
Dry White Wine: ½ cup. This is essential for deglazing the pan and adding a layer of acidity and complexity. A crisp, dry white wine like a Pinot Grigio, Sauvignon Blanc, or an unoaked Chardonnay is perfect.
-
Red Pepper Flakes: ½ to 1 teaspoon. This provides a gentle, warm hum of heat that cuts through the richness. Adjust the amount based on your preference for spiciness.
-
Unsalted Butter: 2 tablespoons, cold and cut into small pieces. Swirled in at the end, this creates a richer, glossier sauce.
-
Lemon: 1, for both zest and juice. The fresh acidity is crucial for brightening the flavors and balancing the richness of the dish.
For the Fresh Components and Garnish:
-
Cherry Tomatoes: 1 pint (about 2 cups), halved. The tomatoes add a burst of sweetness, a beautiful pop of color, and a juicy acidity that complements the seafood.
-
Fresh Italian (Flat-Leaf) Parsley: ½ cup, finely chopped, plus more for garnish. The fresh, clean, and slightly peppery flavor of parsley is essential for cutting through the richness and adding a final touch of freshness.
-
Salt: To taste, for both the pasta water and the sauce.
-
Black Pepper: Freshly ground, to taste.
Instructions
Bring a large pot of water to a rolling boil. Once it is boiling vigorously, generously salt the water. It should taste as salty as the sea. This is your only chance to season the pasta itself from the inside out.
Add the 1 pound of squid ink pasta to the boiling water and cook according to the package directions until it is al dente. “Al dente,” which means “to the tooth” in Italian, is the ideal texture—the pasta should be fully cooked but still have a firm, pleasant bite in the very center. It will continue to cook slightly when you toss it with the hot sauce.
Before you drain the pasta, carefully reserve at least 1 ½ cups of the starchy, black pasta water. This water is liquid gold and the secret to creating a perfectly emulsified, glossy sauce that clings beautifully to the pasta. Drain the cooked pasta in a colander and set it aside. Do not rinse the pasta, as this would wash away the starches that help the sauce adhere.
While the pasta is cooking, you can begin with the shrimp. First, ensure your peeled and deveined shrimp are very dry by patting them thoroughly with paper towels. Moisture is the enemy of a good sear. Season the dry shrimp lightly with salt and freshly ground black pepper.
Place a large, heavy-bottomed skillet or sauté pan over medium-high heat and add 2 tablespoons of the olive oil. Once the oil is hot and shimmering, carefully add the shrimp to the pan in a single, even layer. Do not overcrowd the pan; if necessary, cook the shrimp in two batches.
Sear the shrimp for about 1-2 minutes per side. They cook very quickly. You are looking for them to turn pink and opaque and develop a light golden sear. The moment they curl from a straight line into a loose “C” shape, they are done. Immediately remove the seared shrimp from the skillet and set them aside on a clean plate. This step is crucial to prevent them from overcooking and becoming rubbery while you build the sauce.
Reduce the heat under the skillet to medium. Add the remaining 2 tablespoons of olive oil to the same pan. Add the finely minced shallot and cook, stirring frequently, for about 2-3 minutes until it has softened and become translucent.
Add the thinly sliced garlic and the red pepper flakes to the pan. Cook, stirring constantly, for about 1-2 minutes until the garlic is fragrant and just beginning to turn a pale golden color. It is very important not to let the garlic brown or burn, as it will become bitter and ruin the flavor of your sauce.
Pour the ½ cup of dry white wine into the hot pan. It will bubble and steam vigorously. Use a wooden spoon or spatula to deglaze the pan by scraping up all the delicious browned bits (known as fond) from the bottom of the skillet. These bits are packed with concentrated flavor. Let the wine simmer and reduce by about half, which should take 2-3 minutes.
Add the halved cherry tomatoes to the skillet, along with a pinch of salt and pepper. Cook, stirring occasionally, for about 4-5 minutes, until the tomatoes begin to soften, break down slightly, and release their juices into the sauce.
Add the drained, cooked squid ink pasta directly to the skillet with the tomato and garlic sauce. Add ½ cup of the reserved starchy pasta water. Using tongs, toss everything together vigorously and continuously. The starchy water will begin to emulsify with the olive oil, creating a light but creamy sauce that coats every strand of pasta.
Add the 2 tablespoons of cold, cubed butter to the pan. Continue to toss until the butter has melted completely, making the sauce even glossier and richer. If the sauce seems too thick, add another splash of the reserved pasta water, a tablespoon at a time, until it reaches your desired consistency.
Turn off the heat. Add the seared shrimp back to the pan, along with the chopped fresh parsley, the zest of one lemon, and a generous squeeze of fresh lemon juice (about 1-2 tablespoons). Toss everything one final time to combine and gently warm the shrimp through.
Taste the pasta and adjust the seasoning if necessary, adding more salt, pepper, or lemon juice to your liking. Serve immediately in warm, shallow bowls. Garnish with an extra sprinkle of fresh parsley and perhaps a final drizzle of high-quality extra virgin olive oil.
Nutrition
- Serving Size: one normal portion
- Calories: 550 to 650


