
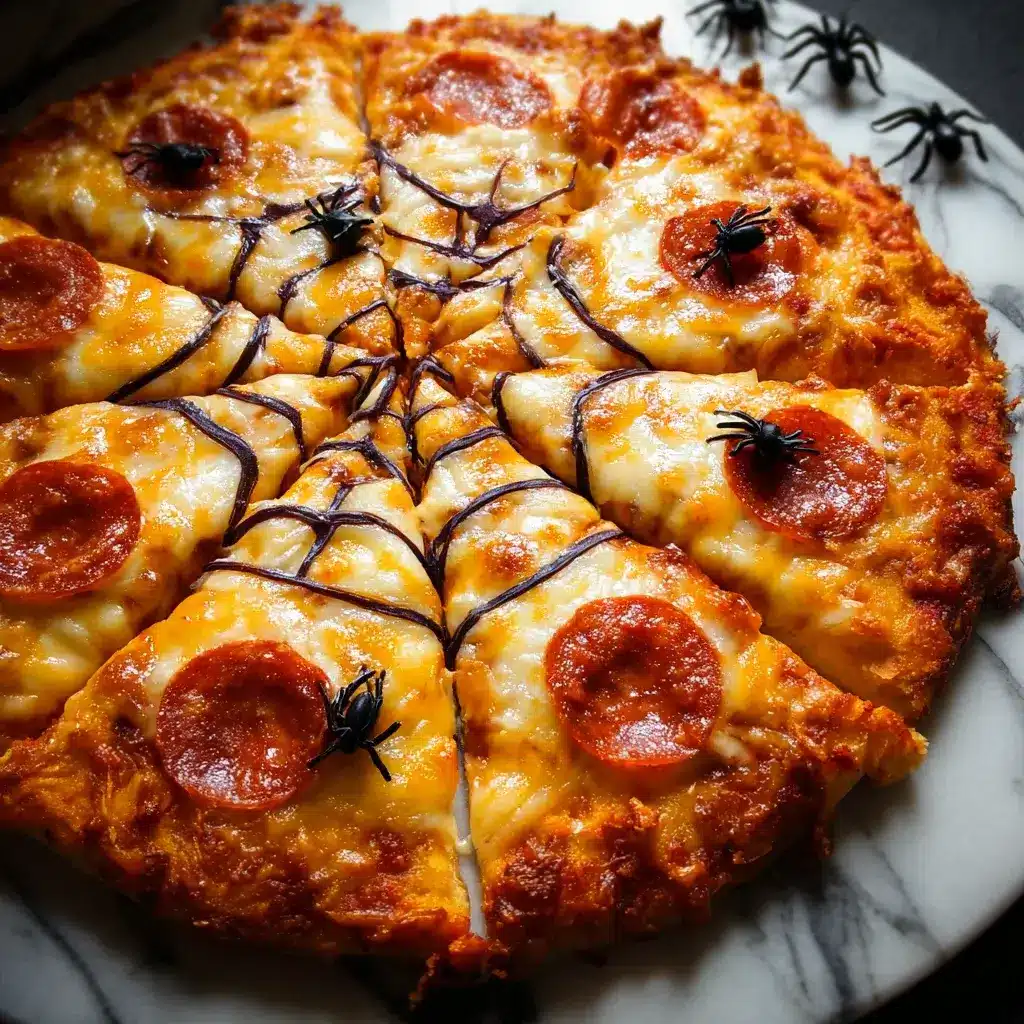

Of all the traditions our family has embraced for Halloween, from carving pumpkins to meticulously planning costumes, the one that creates the most buzz and excitement is our annual pizza night. For years, I struggled to find a meal that felt festive enough for the occasion but wasn’t loaded with sugar or overly complicated to make amidst the chaos of getting everyone ready for trick-or-treating. That’s when the Spiderweb Halloween Pizza scuttled its way into our lives, and it was a game-changer. The first time I served it, my kids’ eyes widened with a mix of delight and spooky wonder. They were so fascinated by the edible spiders and the intricate web design that they barely noticed they were eating a wholesome dinner. It’s become the official taste of Halloween in our home—a savory, cheesy, and delightfully creepy masterpiece that’s as fun to create as it is to devour. This recipe isn’t just about feeding your family; it’s about making a memory, a delicious centerpiece that will have everyone, from toddlers to teens, reaching for another slice.
Complete Ingredients for Your Spooky Creation
This recipe is designed for flexibility, allowing you to use store-bought shortcuts or go fully homemade. The amounts below will yield one large 12-14 inch pizza, perfect for a family of four.
For the Pizza Base and Toppings:
- Pizza Dough: 1 pound (16 ounces) of either store-bought pizza dough or your favorite homemade recipe. This could be classic, whole wheat, or a gluten-free alternative.
- Pizza Sauce: 3/4 cup of your preferred pizza sauce. A simple marinara or a seasoned tomato sauce works perfectly.
- Shredded Mozzarella Cheese: 2 cups (about 8 ounces) of low-moisture, whole-milk mozzarella cheese, preferably freshly shredded for the best melt.
- Olive Oil: 1 tablespoon of extra virgin olive oil for brushing the crust.
- Optional Seasoning: 1/2 teaspoon each of garlic powder and dried oregano to sprinkle over the sauce for extra flavor.
For the Spiderweb and Spiders:
- Sour Cream or Cream Cheese: 1/4 cup of full-fat sour cream or softened cream cheese. This will be used to create the web design. If using cream cheese, you may need to thin it with a teaspoon of milk to get a pipeable consistency.
- Black Olives: 1/2 cup of large, pitted black olives. These will be transformed into the bodies and legs of our creepy-crawly spiders.
Equipment Needed:
- Large Baking Sheet or a 12-14 inch Pizza Stone
- Parchment Paper (if using a baking sheet)
- Small Piping Bag, a Ziploc-style bag, or a squeeze bottle
- Small, sharp knife (a paring knife is ideal)
- Pastry brush
- Pizza Cutter or a large knife
Step-by-Step Instructions to Weave Your Web
Creating this pizza is a fun activity that even the little ones can help with. Follow these steps carefully to ensure your spiderweb pizza is a spooky success.
Step 1: Prepare Your Workstation and Oven
- Preheat the Oven: Place your oven rack in the middle position and preheat to 450°F (232°C). If you are using a pizza stone, place it in the oven while it preheats to get it scorching hot. This is the secret to a crispy crust.
- Prepare the Dough: If using refrigerated dough, let it sit at room temperature for about 20-30 minutes. This will relax the gluten and make it much easier to stretch.
- Set Up Your Surface: Lightly flour a clean work surface or a large piece of parchment paper. This will prevent the dough from sticking as you shape it.
Step 2: Shape the Pizza Crust
- Place your ball of dough on the floured surface. Gently press down in the center with your fingertips, pushing outwards to form a circle.
- Continue to stretch the dough by picking it up and letting gravity help you, or by gently pulling and rotating it on your knuckles. Aim for a circle that is approximately 12-14 inches in diameter.
- Try to keep a slightly thicker rim around the edge to form a crust. Don’t worry if it’s not a perfect circle; a rustic shape adds to the homemade charm.
- If using a baking sheet, transfer the shaped dough onto a sheet lined with parchment paper. If using a preheated pizza stone, you will assemble the pizza on a pizza peel or the back of a baking sheet dusted with cornmeal for easy sliding.
Step 3: Build the Pizza Base
- Brush the Crust: Using a pastry brush, lightly coat the outer rim of the pizza dough with the tablespoon of olive oil. This will give the crust a beautiful golden-brown color and a crispy texture.
- Spread the Sauce: Spoon the pizza sauce into the center of the dough and use the back of the spoon to spread it in a circular motion, leaving about a 1/2-inch border for the crust.
- Add Seasoning: If desired, sprinkle the garlic powder and dried oregano evenly over the sauce for an extra layer of flavor.
- Sprinkle the Cheese: Generously and evenly cover the sauce with the shredded mozzarella cheese, going all the way to the edge of the sauce.
Step 4: Create the Signature Spiderweb
- Prepare Your “Webbing”: Place your sour cream or thinned cream cheese into a small piping bag with a small round tip, or into the corner of a Ziploc bag. If using a Ziploc bag, snip a very tiny piece off the corner to create a small opening.
- Pipe the Spiral: Starting from the center of the pizza, pipe a continuous spiral of the sour cream/cream cheese mixture, working your way outwards until you are about an inch from the crust. The lines don’t have to be perfectly spaced or perfectly straight.
- “Drag” the Web: Take a toothpick, skewer, or the tip of a sharp knife. Starting from the center of the pizza, gently drag the tip outwards towards the crust, pulling the sour cream through the cheese. Wipe the tip clean and repeat this process every inch or two around the entire pizza, creating the classic spiderweb effect.
Step 5: Assemble the Olive Spiders
- This is a fantastic step for kids to help with! You’ll need to create several “spiders” to place on your web.
- To Make One Spider:
- Take one whole pitted black olive for the body.
- Take a second olive and slice it in half lengthwise.
- Take one of the halves and slice it thinly widthwise into 6-8 tiny, curved slivers. These will be the spider’s legs.
- Place the Spiders: Arrange the whole olive “bodies” strategically around your pizza. Then, carefully tuck the small, curved olive “legs” (3-4 on each side) around the body to complete your creepy crawlers. Create as many spiders as you like!
Step 6: Bake to Spooky Perfection
- Carefully transfer the pizza to the preheated oven. If using a baking sheet, place it directly on the middle rack. If using a pizza stone, confidently slide the pizza from your peel onto the hot stone.
- Bake for 12-15 minutes, or until the crust is golden brown and the cheese is melted, bubbly, and just starting to brown in spots.
- Keep a close eye on it during the last few minutes, as oven temperatures can vary.
Step 7: Cool and Serve
- Once baked, carefully remove the pizza from the oven and let it rest on a cutting board for 3-5 minutes. This allows the cheese to set slightly, preventing it from sliding off when you slice it.
- Slice with a pizza cutter and serve immediately to your hungry ghouls and goblins.
Nutrition Facts
- Servings: 8 slices
- Calories per serving: Approximately 350-400 kcal
Disclaimer: The nutritional information provided is an estimate and can vary significantly based on the specific brands of ingredients used, such as the type of dough (whole wheat, cauliflower crust), the fat content of the cheese and sour cream, and the exact portion sizes.
Preparation Time
- Prep Time: 25 minutes (includes time for dough to rest and for assembling the pizza)
- Cook Time: 12-15 minutes
- Total Time: Approximately 40 minutes
This quick turnaround time makes it an ideal meal for a busy Halloween night before the festivities begin.
How to Serve Your Spiderweb Halloween Pizza
Presentation is everything when it comes to themed foods. Elevate your spooky pizza from a simple meal to a full-blown Halloween experience with these serving suggestions.
- Create a Spooky Buffet: Don’t let the pizza stand alone! Serve it as the star of a Halloween-themed dinner buffet.
- Ghoulish Green Salad: A simple garden salad with a green goddess or pesto vinaigrette dressing.
- “Witch Finger” Breadsticks: Serve breadsticks alongside a bowl of “bloody” marinara dipping sauce.
- Monster Mash Pasta Salad: A tri-color pasta salad with chopped veggies and a simple Italian dressing.
- Themed Platters and Decor:
- Serve the pizza on a black or dark-colored platter to make the white web and cheese really pop.
- Surround the platter with plastic spiders, cotton cobwebs, and other spooky table decorations.
- Use Halloween-themed paper plates and napkins for an easy cleanup and a more festive atmosphere.
- Creepy Condiments and Dips:
- Offer a variety of dipping sauces in small bowls with spooky labels.
- “Vampire’s Blood”: A classic marinara sauce.
- “Ghostly Garlic”: A white garlic butter sauce.
- “Swamp Slime”: A pesto or ranch dip.
- Offer a variety of dipping sauces in small bowls with spooky labels.
- Individual Mini Pizzas:
- For a kids’ party, consider making individual mini spiderweb pizzas. Use pre-made mini pizza bases or even English muffins.
- This allows each child to decorate their own spooky pizza, turning dinner into a fun and interactive activity before they even take a bite.
- Perfect Drink Pairings:
- For Kids: Serve a “Witches’ Brew” punch made from green Hawaiian Punch, lemon-lime soda, and a scoop of lime sherbet for a frothy, bubbly effect.
- For Adults: A deep red wine like a Merlot or Cabernet Sauvignon pairs wonderfully with the savory pizza and fits the “vampire” theme.
Additional Tips for a Flawless Halloween Pizza
Here are five extra tips to ensure your pizza-making process is smooth and the result is spectacularly spooky.
- Master the Web: The consistency of your “web” material is crucial. If your sour cream is too thin, it will spread and disappear. If your cream cheese is too thick, it won’t pipe smoothly. For sour cream, choose a full-fat version. For cream cheese, make sure it’s fully softened to room temperature and whisk it with a tiny splash of milk until it reaches the consistency of thick yogurt.
- Shred Your Own Cheese: While pre-shredded cheese is convenient, it’s often coated with anti-caking agents like potato starch, which can prevent it from melting as smoothly. Taking a few extra minutes to shred a block of low-moisture mozzarella will result in a superior, gooey cheese pull that everyone loves.
- Get the Kids Involved (Safely): This recipe is a fantastic way to get children excited about cooking. Assign them age-appropriate tasks. Younger kids can help spread the sauce with the back of a spoon and sprinkle the cheese. Older kids can have a blast assembling the olive spiders. It makes the meal more meaningful when they’ve had a hand in creating it.
- Don’t Overload the Toppings: While it can be tempting to add more of everything, a heavily loaded pizza can result in a soggy crust. Stick to the recommended amounts for the sauce and cheese to ensure the dough bakes properly and becomes crisp on the bottom. The sour cream web and olive spiders are the stars here, so let them shine.
- Make-Ahead Strategy: Halloween night can be hectic. To save time, you can prepare all your components in advance. Shred the cheese, slice the olives for the spiders, and mix your pizza sauce with seasonings. Store everything in separate airtight containers in the refrigerator. When it’s time to eat, all you have to do is assemble and bake, cutting your prep time in half.
Frequently Asked Questions (FAQ)
1. My sour cream web seemed to melt and disappear into the cheese. What went wrong?
This is a common issue and usually comes down to two things: the type of sour cream used or the timing. First, always use full-fat sour cream; low-fat or fat-free versions have a higher water content and will turn runny when heated. Second, for a more defined web, you can partially bake the pizza with just the sauce and cheese for about 5-7 minutes, then pull it out of the oven, quickly pipe on your web and spiders, and return it to finish baking. This gives the cheese a chance to set slightly before the web is applied.
2. Can I make this Spiderweb Halloween Pizza gluten-free?
Absolutely! This recipe is incredibly adaptable to dietary needs. Simply swap the regular pizza dough for your favorite gluten-free pizza crust. Many stores now offer excellent pre-made gluten-free crusts in the freezer section, or you can find many simple recipes online for homemade versions using gluten-free flour blends. All other ingredients in this recipe are naturally gluten-free, but always double-check labels on your sauce and seasonings just to be safe.
3. Can I use something other than olives for the spiders?
Of course! While black olives are traditional and create a very convincing spider, you can get creative if you have olive-averse eaters. For the body, you could use a small mushroom cap (cooked) or a round slice of black forest ham or salami. For the legs, you could use slivers of roasted red pepper or very thinly sliced pieces of black onion. The key is to use a contrasting color that will stand out against the cheesy background.
4. What’s the best way to store and reheat leftover pizza?
Store any leftover slices in an airtight container or wrap them tightly in foil and refrigerate for up to 3 days. The best way to reheat pizza and revive its crispy crust is not in the microwave! Place the slices in a dry, non-stick skillet over medium-low heat. Cover the skillet with a lid and heat for 3-5 minutes. The direct heat will crisp up the bottom crust, while the trapped steam will gently re-melt the cheese on top, making it taste almost as good as fresh.
5. Can I add other toppings to this pizza?
Yes, you can definitely customize it with your favorite toppings. However, to keep the spiderweb design as the main focus, it’s best to add other toppings under the cheese layer. You could add a layer of pepperoni, cooked sausage, or finely diced bell peppers and onions on top of the sauce before you sprinkle on the mozzarella. This way, you get the flavors you love without obscuring your spooky, edible art on top.
Print
Spiderweb Halloween Pizza recipe
Ingredients
- For the Pizza Base and Toppings:
-
Pizza Dough: 1 pound (16 ounces) of either store-bought pizza dough or your favorite homemade recipe. This could be classic, whole wheat, or a gluten-free alternative.
-
Pizza Sauce: 3/4 cup of your preferred pizza sauce. A simple marinara or a seasoned tomato sauce works perfectly.
-
Shredded Mozzarella Cheese: 2 cups (about 8 ounces) of low-moisture, whole-milk mozzarella cheese, preferably freshly shredded for the best melt.
-
Olive Oil: 1 tablespoon of extra virgin olive oil for brushing the crust.
-
Optional Seasoning: 1/2 teaspoon each of garlic powder and dried oregano to sprinkle over the sauce for extra flavor.
For the Spiderweb and Spiders:
-
Sour Cream or Cream Cheese: 1/4 cup of full-fat sour cream or softened cream cheese. This will be used to create the web design. If using cream cheese, you may need to thin it with a teaspoon of milk to get a pipeable consistency.
-
Black Olives: 1/2 cup of large, pitted black olives. These will be transformed into the bodies and legs of our creepy-crawly spiders.
Equipment Needed:
-
-
Large Baking Sheet or a 12-14 inch Pizza Stone
-
Parchment Paper (if using a baking sheet)
-
Small Piping Bag, a Ziploc-style bag, or a squeeze bottle
-
Small, sharp knife (a paring knife is ideal)
-
Pastry brush
-
Pizza Cutter or a large knife
-
Instructions
Step 1: Prepare Your Workstation and Oven
-
Preheat the Oven: Place your oven rack in the middle position and preheat to 450°F (232°C). If you are using a pizza stone, place it in the oven while it preheats to get it scorching hot. This is the secret to a crispy crust.
-
Prepare the Dough: If using refrigerated dough, let it sit at room temperature for about 20-30 minutes. This will relax the gluten and make it much easier to stretch.
-
Set Up Your Surface: Lightly flour a clean work surface or a large piece of parchment paper. This will prevent the dough from sticking as you shape it.
Step 2: Shape the Pizza Crust
-
Place your ball of dough on the floured surface. Gently press down in the center with your fingertips, pushing outwards to form a circle.
-
Continue to stretch the dough by picking it up and letting gravity help you, or by gently pulling and rotating it on your knuckles. Aim for a circle that is approximately 12-14 inches in diameter.
-
Try to keep a slightly thicker rim around the edge to form a crust. Don’t worry if it’s not a perfect circle; a rustic shape adds to the homemade charm.
-
If using a baking sheet, transfer the shaped dough onto a sheet lined with parchment paper. If using a preheated pizza stone, you will assemble the pizza on a pizza peel or the back of a baking sheet dusted with cornmeal for easy sliding.
Step 3: Build the Pizza Base
-
Brush the Crust: Using a pastry brush, lightly coat the outer rim of the pizza dough with the tablespoon of olive oil. This will give the crust a beautiful golden-brown color and a crispy texture.
-
Spread the Sauce: Spoon the pizza sauce into the center of the dough and use the back of the spoon to spread it in a circular motion, leaving about a 1/2-inch border for the crust.
-
Add Seasoning: If desired, sprinkle the garlic powder and dried oregano evenly over the sauce for an extra layer of flavor.
-
Sprinkle the Cheese: Generously and evenly cover the sauce with the shredded mozzarella cheese, going all the way to the edge of the sauce.
Step 4: Create the Signature Spiderweb
-
Prepare Your “Webbing”: Place your sour cream or thinned cream cheese into a small piping bag with a small round tip, or into the corner of a Ziploc bag. If using a Ziploc bag, snip a very tiny piece off the corner to create a small opening.
-
Pipe the Spiral: Starting from the center of the pizza, pipe a continuous spiral of the sour cream/cream cheese mixture, working your way outwards until you are about an inch from the crust. The lines don’t have to be perfectly spaced or perfectly straight.
-
“Drag” the Web: Take a toothpick, skewer, or the tip of a sharp knife. Starting from the center of the pizza, gently drag the tip outwards towards the crust, pulling the sour cream through the cheese. Wipe the tip clean and repeat this process every inch or two around the entire pizza, creating the classic spiderweb effect.
Step 5: Assemble the Olive Spiders
-
This is a fantastic step for kids to help with! You’ll need to create several “spiders” to place on your web.
-
To Make One Spider:
-
Take one whole pitted black olive for the body.
-
Take a second olive and slice it in half lengthwise.
-
Take one of the halves and slice it thinly widthwise into 6-8 tiny, curved slivers. These will be the spider’s legs.
-
-
Place the Spiders: Arrange the whole olive “bodies” strategically around your pizza. Then, carefully tuck the small, curved olive “legs” (3-4 on each side) around the body to complete your creepy crawlers. Create as many spiders as you like!
Step 6: Bake to Spooky Perfection
-
Carefully transfer the pizza to the preheated oven. If using a baking sheet, place it directly on the middle rack. If using a pizza stone, confidently slide the pizza from your peel onto the hot stone.
-
Bake for 12-15 minutes, or until the crust is golden brown and the cheese is melted, bubbly, and just starting to brown in spots.
-
Keep a close eye on it during the last few minutes, as oven temperatures can vary.
Step 7: Cool and Serve
-
Once baked, carefully remove the pizza from the oven and let it rest on a cutting board for 3-5 minutes. This allows the cheese to set slightly, preventing it from sliding off when you slice it.
-
Slice with a pizza cutter and serve immediately to your hungry ghouls and goblins.
Nutrition
- Serving Size: one normal portion
- Calories: 350-400


