


There’s a certain magic to a truly great spicy chicken sandwich. It’s a culinary unicorn that, for years, I believed could only be captured in the wild at a handful of fast-food chains that sparked a nationwide obsession. My family and I were willing participants in the great “chicken sandwich wars,” driving across town, waiting in long lines, all for that perfect bite: the shatteringly crisp crust, the juicy, well-seasoned chicken, the tangy pickles, and the creamy, spicy sauce all nestled in a soft brioche bun. But often, the reality fell short of the memory. The sandwich would be lukewarm, the breading a little soggy, the chicken a bit dry. I became convinced I could do better. I could control the quality, the spice level, the freshness. My kitchen became a laboratory. I experimented with brines, marinades, flour blends, and frying techniques. There were some failures—soggy breading, bland chicken, sauces that were just hot with no flavor. Then, one Saturday, it all came together. I pulled the last golden-brown chicken thigh from the hot oil, the crust craggy and impossibly crisp. I assembled the sandwiches with toasted buns and a spicy mayo I’d finally perfected. The silence that fell over the dinner table was profound, broken only by the sound of audible crunching. My daughter, a notoriously picky eater, looked up with wide, sauce-smeared eyes and said, “Dad, this is better than any restaurant.” That was it. That was the moment of victory. This recipe isn’t just a copycat; it’s an upgrade. It’s the culmination of that quest, a recipe that guarantees a phenomenally crispy, incredibly juicy, and perfectly spicy chicken sandwich every single time.
The Ultimate Homemade Spicy Chicken Sandwich
This recipe is a labor of love, but every step is designed to build layers of flavor and texture, resulting in a sandwich that is truly transcendent. We’ll tackle this by breaking down the components: the chicken and its crucial marinade, the ultra-crispy breading, the creamy and fiery sauce, and finally, the perfect assembly.
The Anatomy of a Perfect Sandwich: Ingredients
Success lies in using the right ingredients and understanding their roles. We’ve broken them down by component for clarity.
For the Spicy Buttermilk Marinade (The Flavor & Tenderness Foundation):
- 4 boneless, skinless chicken thighs (about 1.5 lbs): While chicken breast is common, chicken thighs are the secret to an incredibly juicy and flavorful sandwich. They are more forgiving and less prone to drying out during frying. Pound them gently to an even ½-inch thickness for consistent cooking.
- 1 ½ cups Buttermilk: This is non-negotiable. The acidity in buttermilk tenderizes the chicken, while its enzymes break down proteins, resulting in an exceptionally moist and tender interior. It also helps the breading adhere to the chicken.
- 2 Tablespoons Hot Sauce (e.g., Frank’s RedHot or Crystal): This begins the first layer of spice. It infuses the meat itself with a tangy heat, ensuring the flavor isn’t just on the crust.
- 1 Tablespoon Kosher Salt: For seasoning the meat from the inside out.
- 1 Teaspoon Black Pepper: For a classic warm spice note.
- 1 Teaspoon Smoked Paprika: Adds a smoky depth that complements the fried flavor.
- 1 Teaspoon Garlic Powder: For a foundational savory, aromatic flavor.
For the Extra-Crispy Spicy Breading (The Crunch Factor):
- 2 cups All-Purpose Flour: The structural base of our breading.
- ½ cup Cornstarch: The secret weapon for an airy, shatteringly crisp crust. Cornstarch prevents gluten development, which results in a lighter, crispier texture that stays crunchy longer.
- ¼ cup Powdered Sugar (Icing Sugar): A trick inspired by some of the best fried chicken joints. It doesn’t make the chicken sweet; instead, it helps the crust brown beautifully and adds an almost imperceptible depth.
- 2 Tablespoons Kosher Salt: A well-seasoned breading is critical. Bland breading is a cardinal sin of fried chicken.
- 2 Teaspoons Cayenne Pepper: This is our primary heat source in the breading. Adjust up or down based on your preferred spice level.
- 2 Teaspoons Smoked Paprika: Reinforces that smoky flavor and gives the crust a beautiful deep reddish-gold color.
- 1 Teaspoon Garlic Powder: Echoes the flavor from the marinade.
- 1 Teaspoon Onion Powder: Adds another layer of savory, aromatic flavor.
- 1 Teaspoon Black Pepper: To round out the spice blend.
For the Creamy Spicy Mayo (The Perfect Sauce):
- 1 cup Mayonnaise: Use a good quality, full-fat mayonnaise like Duke’s or Kewpie for the best flavor and creamy texture.
- 2-3 Tablespoons Sriracha or your favorite chili-garlic sauce: This provides the main punch of heat and garlic flavor for the sauce.
- 1 Tablespoon Ketchup: Adds a touch of sweetness and tang to balance the richness of the mayo.
- 1 Teaspoon Smoked Paprika: For color and a smoky undertone.
- 1 Teaspoon Rice Vinegar or Lime Juice: A crucial touch of acidity to cut through the fat and brighten up the entire sauce.
- A pinch of salt and pepper to taste.
For Frying & Assembly:
- 4-6 cups Peanut Oil or other high-smoke-point oil (like canola or vegetable oil): Peanut oil is the traditional choice for frying chicken due to its high smoke point and neutral flavor, which lets the chicken’s seasoning shine.
- 4 Brioche Buns: The rich, buttery, and slightly sweet flavor of a brioche bun is the perfect complement to the savory, spicy chicken.
- Dill Pickle Slices: The classic, non-negotiable topping. Their tangy, acidic crunch cuts through the richness of the fried chicken perfectly.
- Softened Butter (for toasting the buns).
The Path to Sandwich Glory: Step-by-Step Instructions
Follow these steps precisely for flawless results. The process isn’t complicated, but the techniques are important.
Step 1: Marinate the Chicken (The Overnight Step for Best Results)
Place the chicken thighs between two pieces of plastic wrap. Using a meat mallet or a heavy pan, gently pound them to an even thickness of about ½-inch. This ensures they cook quickly and evenly. In a large bowl or a zip-top bag, combine the buttermilk, hot sauce, 1 tablespoon of salt, black pepper, smoked paprika, and garlic powder. Whisk until fully combined. Add the pounded chicken thighs, ensuring they are fully submerged in the marinade. Cover the bowl or seal the bag and refrigerate for at least 4 hours, but for the most tender and flavorful results, marinate overnight (8-24 hours).
Step 2: Prepare the Spicy Mayo and Pickles
While the chicken is marinating (or just before you start frying), prepare your sauce. In a small bowl, combine the mayonnaise, sriracha, ketchup, smoked paprika, and rice vinegar. Whisk until smooth and creamy. Taste and adjust seasoning with a pinch of salt and pepper if needed. Cover and refrigerate until ready to use. This allows the flavors to meld. Have your pickle slices ready for assembly.
Step 3: Set Up Your Breading Station
In a wide, shallow dish (a pie plate or baking dish works well), combine all the ingredients for the breading: all-purpose flour, cornstarch, powdered sugar, salt, cayenne pepper, smoked paprika, garlic powder, onion powder, and black pepper. Whisk vigorously for at least 30 seconds to ensure everything is evenly distributed. Take about ¼ cup of the marinade from the chicken bowl and drizzle it into the dry flour mixture. Use your fingers to toss it around, creating little lumps and craggy bits. These will turn into extra-crunchy pockets on your fried chicken.
Step 4: Bread the Chicken
Set up an assembly line: your bowl of marinated chicken, your dish of seasoned flour, and a clean wire rack set over a baking sheet. Working with one piece at a time, lift a chicken thigh out of the buttermilk marinade, allowing the excess to drip off for a few seconds (do not pat it dry). Place the moist chicken into the flour mixture. Press the flour mixture firmly onto all sides of the chicken, making sure every nook and cranny is coated. This firm pressure is key to ensuring the breading adheres during frying. Shake off any excess flour and place the breaded chicken on the wire rack. Let the breaded chicken rest for 15-20 minutes. This allows the flour to hydrate and form a “glue,” which also helps the crust stay on.
Step 5: Fry the Chicken to Golden Perfection
Pour the peanut oil into a large, heavy-bottomed pot (like a Dutch oven) or a deep cast-iron skillet. The oil should be about 1.5 to 2 inches deep. Heat the oil over medium-high heat until it reaches 350°F (175°C). An instant-read or candy thermometer is crucial here for maintaining the correct temperature.
Carefully place 2 pieces of chicken into the hot oil, making sure not to overcrowd the pot (this would lower the oil temperature and result in soggy chicken). Fry for 4-6 minutes per side, until the crust is a deep golden brown and impossibly crispy. The internal temperature of the chicken should register 165°F (74°C).
Once cooked, use tongs to remove the chicken from the oil and place it back on the clean wire rack to drain. The wire rack allows air to circulate, keeping the bottom crust from getting steamy and soft. Repeat with the remaining chicken, making sure the oil returns to 350°F before adding the next batch.
Step 6: The Final Assembly
While the last batch of chicken is frying, prepare your buns. Lightly butter the cut sides of the brioche buns. Toast them in a hot, dry skillet or on a griddle for 1-2 minutes until golden brown and fragrant. This adds flavor and prevents the bun from getting soggy from the sauce.
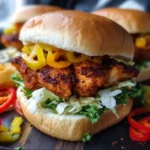
To build your masterpiece: Slather a generous amount of the spicy mayo on both the top and bottom toasted buns. Place a hot, crispy chicken thigh on the bottom bun. Top with a few dill pickle slices. Place the top bun on, and serve immediately while the chicken is at its peak of crispiness.
Nutrition Facts
This information is an estimate, as the exact amount of oil absorbed during frying and the specific brands of ingredients used can vary.
- Servings: 4 sandwiches
- Serving Size: 1 sandwich
- Calories per serving: Approximately 850-950 kcal
- This is a decadent, restaurant-style sandwich. The calorie count reflects the fried nature of the chicken and the richness of the bun and sauce.
Preparation and Cooking Time
- Prep Time: 25 minutes (active)
- Marinating Time: 4 hours to 24 hours
- Cook Time: 25 minutes
- Total Time: Approximately 5 hours (including minimum marinating time)
How to Serve Your Spicy Chicken Sandwich
While the sandwich is a masterpiece on its own, the right accompaniments and variations can elevate the entire meal.
The Classic Toppings & Variations
- Pickles are King: The classic dill pickle chip is essential for its bright, acidic crunch.
- Add Some Green: For a touch of freshness, add a leaf of crisp iceberg or butter lettuce.
- A Slice of Cheese: While not traditional, a slice of melted provolone or American cheese can add a gooey, salty element.
- Extra Heat: For true fire-breathers, add a few slices of fresh or pickled jalapeños on top.
Perfect Side Dish Pairings
- Classic French Fries: Thin and crispy shoestring fries or classic crinkle-cut fries are a natural partner.
- Creamy Coleslaw: A cool, creamy, and tangy coleslaw provides a refreshing contrast to the hot and spicy chicken.
- Macaroni and Cheese: A rich, decadent, baked macaroni and cheese makes this an ultimate comfort food feast.
- Onion Rings: The sweet and savory crunch of thick-cut onion rings is another fantastic pairing.
- Simple Green Salad: A simple salad with a light vinaigrette can help to balance the richness of the meal.
5 Additional Tips for Sandwich Supremacy
- Don’t Skip the Marinade Time: The buttermilk marinade is the most crucial step for juicy, tender chicken. A short marinade of 30 minutes won’t cut it. You need at least 4 hours for the acidity to work its magic. For truly superior results that rival the best restaurants, marinate it overnight.
- Oil Temperature is Not a Suggestion, It’s a Law: This is the most common pitfall in frying. If your oil is too cool (below 325°F), the chicken will absorb excess oil and the breading will be greasy and soggy. If the oil is too hot (above 375°F), the crust will burn before the chicken inside is cooked through. Use a thermometer and monitor it constantly, allowing the temperature to recover between batches.
- The Double Dredge for Hardcore Crunch: For an even thicker, craggier, and more durable crust, you can perform a double dredge. Go from the marinade into the flour, back into the marinade for a quick dip, and then back into the flour one last time, pressing firmly. This creates an armor-like crust that is unbelievably crunchy.
- Give it Space: Don’t Overcrowd the Pan: It’s tempting to try and cook all the chicken at once, but this is a fatal error. Adding too much chicken to the pot will cause the oil temperature to plummet dramatically. The chicken will end up steaming in the oil rather than frying, leading to a pale, soft crust. Fry in batches of two for the best results.
- The Bun is Part of the Experience: Don’t neglect the bun! A cold, plain bun will be a disappointment. Toasting the buttered buns in a hot pan creates a slight barrier that prevents the sauce from making it soggy, adds a wonderful buttery flavor, and provides a gentle textural contrast to the soft interior. It’s a small step that makes a huge difference.
Frequently Asked Questions (FAQ)
Q1: Can I make this in an air fryer or bake it in the oven to make it healthier?
A: Yes, you can, but you must manage your expectations. You will not achieve the same shatteringly crisp, deep-fried texture.
- For the Air Fryer: After breading the chicken, generously spray both sides with cooking oil spray. Place in the air fryer basket in a single layer. Cook at 380°F (193°C) for 18-22 minutes, flipping halfway through, until the chicken is cooked through and the crust is golden.
- For the Oven: Place the breaded chicken on a wire rack set inside a baking sheet (this allows air to circulate). Spray generously with oil. Bake at 425°F (220°C) for 20-25 minutes, flipping once, until cooked through and golden. The result will be a tasty chicken sandwich, but it will be a “baked chicken sandwich,” not a “fried chicken sandwich.”
Q2: Why did my breading fall off during frying?
A: This is a common and frustrating problem! It’s usually due to one of a few things. First, you may not have pressed the flour mixture onto the chicken firmly enough. You need to create a good bond. Second, you might have skipped the 15-minute resting period after breading; this step is crucial for the flour to hydrate and “glue” itself to the chicken. Finally, you might be moving the chicken around too much in the oil right after you put it in. Let the crust set for a couple of minutes before trying to move it.
Q3: Can I use chicken breasts instead of thighs?
A: Absolutely. If you prefer chicken breast, it works well. Just be sure to buy thick breasts and slice them in half horizontally to create two thinner cutlets. Then, pound them to an even ½-inch thickness. Chicken breasts have less fat, so the buttermilk marinade becomes even more important to prevent them from drying out. Be extra careful not to overcook them.
Q4: How can I make the sandwich even spicier?
A: There are several ways to crank up the heat. You can add 1-2 teaspoons of ghost pepper powder or finely minced habanero pepper to the buttermilk marinade. You can also significantly increase the cayenne pepper in the breading (try 1 full tablespoon or more). Finally, you can use a hotter chili sauce in your spicy mayo, or even add a few dashes of a superhot extract-based hot sauce (use with extreme caution).
Q5: Can I prepare any components ahead of time?
A: Yes, this recipe is great for prepping. You can marinate the chicken up to 24 hours in advance. The spicy mayo can be made up to 3 days ahead and stored in an airtight container in the fridge. The dry breading mixture can be combined and stored in an airtight container at room temperature for weeks. This way, on the day you want to eat, your main task is simply to bread and fry the chicken.
Spicy Chicken Sandwiches recipe
Ingredients
For the Spicy Buttermilk Marinade (The Flavor & Tenderness Foundation):
-
4 boneless, skinless chicken thighs (about 1.5 lbs): While chicken breast is common, chicken thighs are the secret to an incredibly juicy and flavorful sandwich. They are more forgiving and less prone to drying out during frying. Pound them gently to an even ½-inch thickness for consistent cooking.
-
1 ½ cups Buttermilk: This is non-negotiable. The acidity in buttermilk tenderizes the chicken, while its enzymes break down proteins, resulting in an exceptionally moist and tender interior. It also helps the breading adhere to the chicken.
-
2 Tablespoons Hot Sauce (e.g., Frank’s RedHot or Crystal): This begins the first layer of spice. It infuses the meat itself with a tangy heat, ensuring the flavor isn’t just on the crust.
-
1 Tablespoon Kosher Salt: For seasoning the meat from the inside out.
-
1 Teaspoon Black Pepper: For a classic warm spice note.
-
1 Teaspoon Smoked Paprika: Adds a smoky depth that complements the fried flavor.
-
1 Teaspoon Garlic Powder: For a foundational savory, aromatic flavor.
For the Extra-Crispy Spicy Breading (The Crunch Factor):
-
2 cups All-Purpose Flour: The structural base of our breading.
-
½ cup Cornstarch: The secret weapon for an airy, shatteringly crisp crust. Cornstarch prevents gluten development, which results in a lighter, crispier texture that stays crunchy longer.
-
¼ cup Powdered Sugar (Icing Sugar): A trick inspired by some of the best fried chicken joints. It doesn’t make the chicken sweet; instead, it helps the crust brown beautifully and adds an almost imperceptible depth.
-
2 Tablespoons Kosher Salt: A well-seasoned breading is critical. Bland breading is a cardinal sin of fried chicken.
-
2 Teaspoons Cayenne Pepper: This is our primary heat source in the breading. Adjust up or down based on your preferred spice level.
-
2 Teaspoons Smoked Paprika: Reinforces that smoky flavor and gives the crust a beautiful deep reddish-gold color.
-
1 Teaspoon Garlic Powder: Echoes the flavor from the marinade.
-
1 Teaspoon Onion Powder: Adds another layer of savory, aromatic flavor.
-
1 Teaspoon Black Pepper: To round out the spice blend.
For the Creamy Spicy Mayo (The Perfect Sauce):
-
1 cup Mayonnaise: Use a good quality, full-fat mayonnaise like Duke’s or Kewpie for the best flavor and creamy texture.
-
2-3 Tablespoons Sriracha or your favorite chili-garlic sauce: This provides the main punch of heat and garlic flavor for the sauce.
-
1 Tablespoon Ketchup: Adds a touch of sweetness and tang to balance the richness of the mayo.
-
1 Teaspoon Smoked Paprika: For color and a smoky undertone.
-
1 Teaspoon Rice Vinegar or Lime Juice: A crucial touch of acidity to cut through the fat and brighten up the entire sauce.
-
A pinch of salt and pepper to taste.
For Frying & Assembly:
-
4-6 cups Peanut Oil or other high-smoke-point oil (like canola or vegetable oil): Peanut oil is the traditional choice for frying chicken due to its high smoke point and neutral flavor, which lets the chicken’s seasoning shine.
-
4 Brioche Buns: The rich, buttery, and slightly sweet flavor of a brioche bun is the perfect complement to the savory, spicy chicken.
-
Dill Pickle Slices: The classic, non-negotiable topping. Their tangy, acidic crunch cuts through the richness of the fried chicken perfectly.
-
Softened Butter (for toasting the buns).
Instructions
Step 1: Marinate the Chicken (The Overnight Step for Best Results)
Place the chicken thighs between two pieces of plastic wrap. Using a meat mallet or a heavy pan, gently pound them to an even thickness of about ½-inch. This ensures they cook quickly and evenly. In a large bowl or a zip-top bag, combine the buttermilk, hot sauce, 1 tablespoon of salt, black pepper, smoked paprika, and garlic powder. Whisk until fully combined. Add the pounded chicken thighs, ensuring they are fully submerged in the marinade. Cover the bowl or seal the bag and refrigerate for at least 4 hours, but for the most tender and flavorful results, marinate overnight (8-24 hours).
Step 2: Prepare the Spicy Mayo and Pickles
While the chicken is marinating (or just before you start frying), prepare your sauce. In a small bowl, combine the mayonnaise, sriracha, ketchup, smoked paprika, and rice vinegar. Whisk until smooth and creamy. Taste and adjust seasoning with a pinch of salt and pepper if needed. Cover and refrigerate until ready to use. This allows the flavors to meld. Have your pickle slices ready for assembly.
Step 3: Set Up Your Breading Station
In a wide, shallow dish (a pie plate or baking dish works well), combine all the ingredients for the breading: all-purpose flour, cornstarch, powdered sugar, salt, cayenne pepper, smoked paprika, garlic powder, onion powder, and black pepper. Whisk vigorously for at least 30 seconds to ensure everything is evenly distributed. Take about ¼ cup of the marinade from the chicken bowl and drizzle it into the dry flour mixture. Use your fingers to toss it around, creating little lumps and craggy bits. These will turn into extra-crunchy pockets on your fried chicken.
Step 4: Bread the Chicken
Set up an assembly line: your bowl of marinated chicken, your dish of seasoned flour, and a clean wire rack set over a baking sheet. Working with one piece at a time, lift a chicken thigh out of the buttermilk marinade, allowing the excess to drip off for a few seconds (do not pat it dry). Place the moist chicken into the flour mixture. Press the flour mixture firmly onto all sides of the chicken, making sure every nook and cranny is coated. This firm pressure is key to ensuring the breading adheres during frying. Shake off any excess flour and place the breaded chicken on the wire rack. Let the breaded chicken rest for 15-20 minutes. This allows the flour to hydrate and form a “glue,” which also helps the crust stay on.
Step 5: Fry the Chicken to Golden Perfection
Pour the peanut oil into a large, heavy-bottomed pot (like a Dutch oven) or a deep cast-iron skillet. The oil should be about 1.5 to 2 inches deep. Heat the oil over medium-high heat until it reaches 350°F (175°C). An instant-read or candy thermometer is crucial here for maintaining the correct temperature.
Carefully place 2 pieces of chicken into the hot oil, making sure not to overcrowd the pot (this would lower the oil temperature and result in soggy chicken). Fry for 4-6 minutes per side, until the crust is a deep golden brown and impossibly crispy. The internal temperature of the chicken should register 165°F (74°C).
Once cooked, use tongs to remove the chicken from the oil and place it back on the clean wire rack to drain. The wire rack allows air to circulate, keeping the bottom crust from getting steamy and soft. Repeat with the remaining chicken, making sure the oil returns to 350°F before adding the next batch.
Step 6: The Final Assembly
While the last batch of chicken is frying, prepare your buns. Lightly butter the cut sides of the brioche buns. Toast them in a hot, dry skillet or on a griddle for 1-2 minutes until golden brown and fragrant. This adds flavor and prevents the bun from getting soggy from the sauce.
To build your masterpiece: Slather a generous amount of the spicy mayo on both the top and bottom toasted buns. Place a hot, crispy chicken thigh on the bottom bun. Top with a few dill pickle slices. Place the top bun on, and serve immediately while the chicken is at its peak of crispiness.
Nutrition
- Serving Size: one normal portion
- Calories: 850-950 kcal


