

Caramels are a classic confection that evoke warm memories of childhood treats, holiday gatherings, and simple indulgences. There’s something magical about the way they melt in your mouth with a rich, buttery flavor that captivates the senses. If you’ve ever wondered how to make these delightful sweets at home, you’re in the right place. This comprehensive guide will walk you through the process of crafting soft, buttery homemade caramels that are sure to impress. Whether you’re a seasoned candy maker or a curious beginner, this recipe is perfect for you.
Ingredients
To create these delectable caramels, you’ll need the following ingredients:
- 4 cups sugar
- 2 sticks butter (1 cup)
- 2 cups light corn syrup
- 1 tsp kosher salt
- 2 (12 oz.) cans evaporated milk
These ingredients come together to form a smooth, creamy caramel that will have you reaching for seconds.
Instructions
Making homemade caramels is a rewarding process that requires patience and attention to detail. Follow these steps for perfect results:
- Prepare the Pan:
Line a 9×13 inch pan with parchment paper and set aside. This will ensure easy removal and cutting of the caramels once they’re set. - Combine Ingredients:
In a large, heavy pot, melt the sugar, butter, corn syrup, and salt over medium heat. Stir continuously to prevent burning and ensure a smooth blend of ingredients. - Incorporate Evaporated Milk:
Once the mixture is bubbling, gradually stir in the evaporated milk. Take your time, adding the milk over 10-15 minutes per can. This slow addition is crucial for achieving the perfect caramel texture. Keep stirring! - Monitor the Temperature:
Use a candy thermometer to heat the mixture to 238°F—no hotter! This should take around 15 minutes. Maintaining this precise temperature is key to achieving soft, yet firm caramels. - Pour and Cool:
Pour the hot mixture into the prepared pan. Let it cool completely at room temperature. For easier cutting, chill the caramel in the freezer for 20-30 minutes or refrigerate for a few hours. - Cut and Enjoy:
Once firm, remove the caramel from the pan and cut it into pieces of your desired size. Enjoy the fruits of your labor!
Nutrition Facts
Understanding the nutritional content of your homemade caramels can help you enjoy them responsibly. Here are the approximate nutrition facts per serving:
- Calories: ~80
- Total Fat: ~3g
- Sugars: ~13g
These values are based on standard serving sizes and can vary depending on the size of your caramel pieces.
How to Serve
Homemade caramels are incredibly versatile and can be enjoyed in a variety of ways, providing an opportunity to delight your senses while impressing friends and family. Here are several creative and delicious ways to serve and enjoy your homemade caramels:
Classic Enjoyment:
The simplest way to enjoy homemade caramels is to savor them in their purest form. Unwrap a piece and let it sit on your tongue, allowing the rich, buttery flavor to melt in your mouth. The slow release of sweetness combined with the creamy texture creates a moment of indulgence that can be savored anytime. Pairing your caramels with a cup of hot coffee or tea enhances the experience, as the warmth of the beverage complements the caramel’s richness, creating a luxurious treat to be enjoyed during quiet moments or as an afternoon pick-me-up.
Gift-Giving:
Homemade caramels make for thoughtful and personal gifts that can be cherished by loved ones. To create an appealing presentation, wrap individual caramels in wax paper or decorative foil. You can choose seasonal colors or patterns to match the occasion, whether it’s a holiday, birthday, or just because. For an extra touch, consider placing the wrapped caramels in a decorative tin or a clear bag tied with a ribbon. Attach a handwritten note or a label with the flavor description, and you have a delightful gift that conveys warmth and care. Gift baskets filled with assorted homemade caramels, chocolates, and other treats can also make a visually stunning and delicious surprise for friends and family.
Dessert Topping:
Elevate your desserts by using chopped caramels as a decadent topping. By cutting the caramels into small pieces, you can sprinkle them over a variety of desserts. Imagine a scoop of vanilla ice cream drizzled with warm chocolate sauce and topped with pieces of caramel for added texture and flavor. Or, enhance the experience of brownies or cakes with a generous sprinkle of chopped caramels before serving; the combination of chewy and fudgy textures is sure to delight. If you want to create an impressive dessert, consider making a caramel sauce by gently melting the chopped caramels with a splash of cream, then drizzling this over your favorite desserts for a rich and gooey finish.
Party Treats:
Homemade caramels can add a touch of elegance to any gathering, making them an ideal addition to a candy buffet or dessert table at parties. Arrange the caramels on a platter, mixing in other candies, chocolates, or homemade treats for a colorful and inviting display. Consider labeling the different flavors of caramels to encourage guests to sample and enjoy them. You can also create themed candy bags for guests to take home, filled with a mix of caramels and other sweets. For a fun twist, consider incorporating the caramels into themed cocktails or mocktails, using them as a garnish or blending them into the drink for a unique flavor experience.
Creative Pairings:
Experimenting with different flavor pairings can take your homemade caramels to the next level. Try serving them alongside a selection of cheeses for a sophisticated appetizer; the creaminess of the cheese complements the sweetness of the caramel beautifully. Additionally, consider pairing your caramels with fruits such as apples or pears for a refreshing contrast. A fruit platter with sliced apples, a sprinkle of sea salt, and a few caramels can create a delightful combination that balances sweet and tart flavors.
With their rich flavor and delightful texture, homemade caramels can be enjoyed in numerous ways that cater to any occasion. Whether you choose to savor them on their own, gift them to loved ones, use them as a topping, or feature them at a gathering, the possibilities are endless. By incorporating these serving ideas, you can enhance your caramel experience and share the joy of homemade sweets with others.
Additional Tips
Creating the perfect caramel requires not only precision in cooking but also a few additional tips and tricks that can elevate your finished product. Here’s a comprehensive look at how to enhance your caramel-making experience:
Add Vanilla Bean Seeds
For an extra layer of flavor, consider adding vanilla bean seeds during the cooking process. Vanilla bean seeds provide a rich, aromatic quality that elevates the sweetness of the caramel. To incorporate them, split a vanilla bean lengthwise and scrape out the tiny black seeds using the back of a knife. Stir these seeds into the sugar mixture just after the sugar has melted and begun to bubble. This method infuses your caramel with a deep, luxurious flavor, making it stand out. If you don’t have vanilla beans on hand, high-quality vanilla extract can be used instead, but add it towards the end of cooking to prevent the flavor from evaporating.
Storage
To maintain the freshness and quality of your homemade caramels, proper storage is crucial. Individually wrap each caramel in wax paper or parchment paper to prevent them from sticking together. This not only helps preserve their texture but also makes them easy to grab on the go. After wrapping, store the caramels in an airtight container in the refrigerator; this will keep them fresh for several weeks. For longer storage, consider freezing them. Just be sure to layer the caramels with parchment paper in an airtight freezer-safe container to prevent freezer burn. When you’re ready to enjoy them, simply let them thaw at room temperature for a few minutes.
Cutting Caramels
Cutting caramel can be tricky due to its sticky nature. To ensure smooth and clean cuts, use a sharp knife coated with butter or cooking spray. This will create a non-stick surface that helps the knife glide through the caramel without tearing or sticking. If you’re aiming for uniform pieces, consider using a ruler to mark even sections before cutting. Alternatively, you can use a pizza cutter for faster slicing. For an even neater finish, chill the caramel in the refrigerator for about 30 minutes before cutting, as this will harden it slightly and make it easier to handle.
Experiment with Flavors
Don’t hesitate to get creative in the kitchen! Caramel is a versatile base that pairs well with a variety of flavors. For a sophisticated touch, consider adding a sprinkle of flaky sea salt just before the caramel sets. This contrast between the sweetness of the caramel and the saltiness creates a delightful flavor profile. If you’re a fan of nuts, finely chopped pecans, walnuts, or almonds can be mixed into the caramel for added crunch and flavor. For a spicy kick, try incorporating a pinch of cayenne pepper or a dash of cinnamon to the mixture at the beginning of cooking. You can also infuse your caramel with herbal notes by adding a few sprigs of fresh rosemary or thyme during cooking—just be sure to remove them before pouring the caramel into molds.
Final Touches
For an even more indulgent treat, consider drizzling your finished caramels with melted chocolate. Dark, milk, or white chocolate can add a rich layer of flavor and a visually appealing finish. Allow the chocolate to set before packaging or serving. Additionally, you can roll your caramels in crushed nuts or coconut flakes for a fun texture twist. Remember, the key to exceptional caramel lies in the balance of flavors and textures, so don’t be afraid to experiment and find your signature combination.
By following these additional tips, you can create caramels that not only taste amazing but also impress everyone who tries them. Happy caramel-making!
FAQs
Can I use a different type of milk?
While this recipe specifically calls for evaporated milk due to its consistency and sweetness, you might experiment with condensed milk or heavy cream. However, note that the texture and flavor may differ.
What if I don’t have a candy thermometer?
A candy thermometer is crucial for achieving the right temperature. However, if you don’t have one, you can use the cold water test: Drop a small amount of caramel into cold water. If it forms a soft ball, it’s ready.
How do I prevent my caramels from becoming too hard?
Ensure you do not heat the mixture above 238°F. Overcooking will result in harder caramels. Also, be precise with your measurements, especially with sugar and syrup.
Can I make these caramels without corn syrup?
Corn syrup helps prevent crystallization, which is important for smooth caramels. If you prefer to avoid it, you can substitute with honey or a homemade sugar syrup, though results may vary.
Conclusion
Crafting soft, buttery homemade caramels is not just a cooking project; it’s a delightful endeavor that allows you to create a mouthwatering treat that epitomizes comfort and indulgence. The process of making caramels is both an art and a science, requiring simple ingredients like sugar, butter, cream, and a touch of salt, combined with a bit of patience and precision. This combination yields a sweet reward that can elevate any occasion, be it a festive gathering, a cozy family night, or a simple afternoon snack.
One of the most enchanting aspects of homemade caramels is their versatility. They can be enjoyed on their own, offering a rich, buttery flavor that melts in your mouth. However, these delightful confections can also be thoughtfully packaged and gifted to friends and family, making them an ideal homemade present for holidays, birthdays, or just because. Imagine the joy on a loved one’s face when they receive a beautifully wrapped box of your homemade caramels, each piece a testament to your culinary skills and thoughtfulness.
Moreover, homemade caramels can be used to elevate other desserts, adding layers of flavor and texture that store-bought options simply cannot match. Imagine drizzling warm caramel sauce over a scoop of vanilla ice cream, incorporating it into a decadent chocolate cake, or using it as a filling for cookies. The possibilities are endless, and each application invites creativity in the kitchen, allowing you to experiment with flavors and pairings that suit your taste.
As you embark on your caramel-making journey, remember that the process itself can be just as rewarding as the end product. The gentle transformation of sugar as it melts and caramelizes, the rich scent that fills your kitchen, and the anticipation as you watch the mixture bubble to the perfect consistency are all part of the experience. Embrace the small challenges along the way—whether it’s achieving the right temperature or mastering the perfect pour—because each step enhances your skills and builds confidence in your cooking abilities.
In conclusion, gathering your ingredients and following the simple yet effective steps to create homemade caramels is not just about making candy; it’s about creating moments of joy, nurturing creativity, and indulging in the sweet pleasures of life. These irresistible treats have the potential to become a beloved staple in your confectionery repertoire, cherished by both you and those who are fortunate enough to share in your creations. So, roll up your sleeves, don your apron, and dive into the wonderful world of caramel-making. Happy cooking, and may your adventures in the kitchen be as sweet as the caramels you create!
Print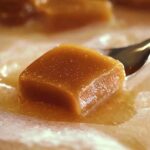
Soft, Buttery Homemade Caramels Recipe 🍬
Ingredients
- 4 cups sugar
- 2 sticks butter (1 cup)
- 2 cups light corn syrup
- 1 tsp kosher salt
- 2 (12 oz.) cans evaporated milk
Instructions
- Prepare the Pan:
Line a 9×13 inch pan with parchment paper and set aside. This will ensure easy removal and cutting of the caramels once they’re set. - Combine Ingredients:
In a large, heavy pot, melt the sugar, butter, corn syrup, and salt over medium heat. Stir continuously to prevent burning and ensure a smooth blend of ingredients. - Incorporate Evaporated Milk:
Once the mixture is bubbling, gradually stir in the evaporated milk. Take your time, adding the milk over 10-15 minutes per can. This slow addition is crucial for achieving the perfect caramel texture. Keep stirring! - Monitor the Temperature:
Use a candy thermometer to heat the mixture to 238°F—no hotter! This should take around 15 minutes. Maintaining this precise temperature is key to achieving soft, yet firm caramels. - Pour and Cool:
Pour the hot mixture into the prepared pan. Let it cool completely at room temperature. For easier cutting, chill the caramel in the freezer for 20-30 minutes or refrigerate for a few hours. - Cut and Enjoy:
Once firm, remove the caramel from the pan and cut it into pieces of your desired size. Enjoy the fruits of your labor!
Nutrition
- Serving Size: one normal portion
- Calories: 80
- Sugar: 13g
- Fat: 3g


