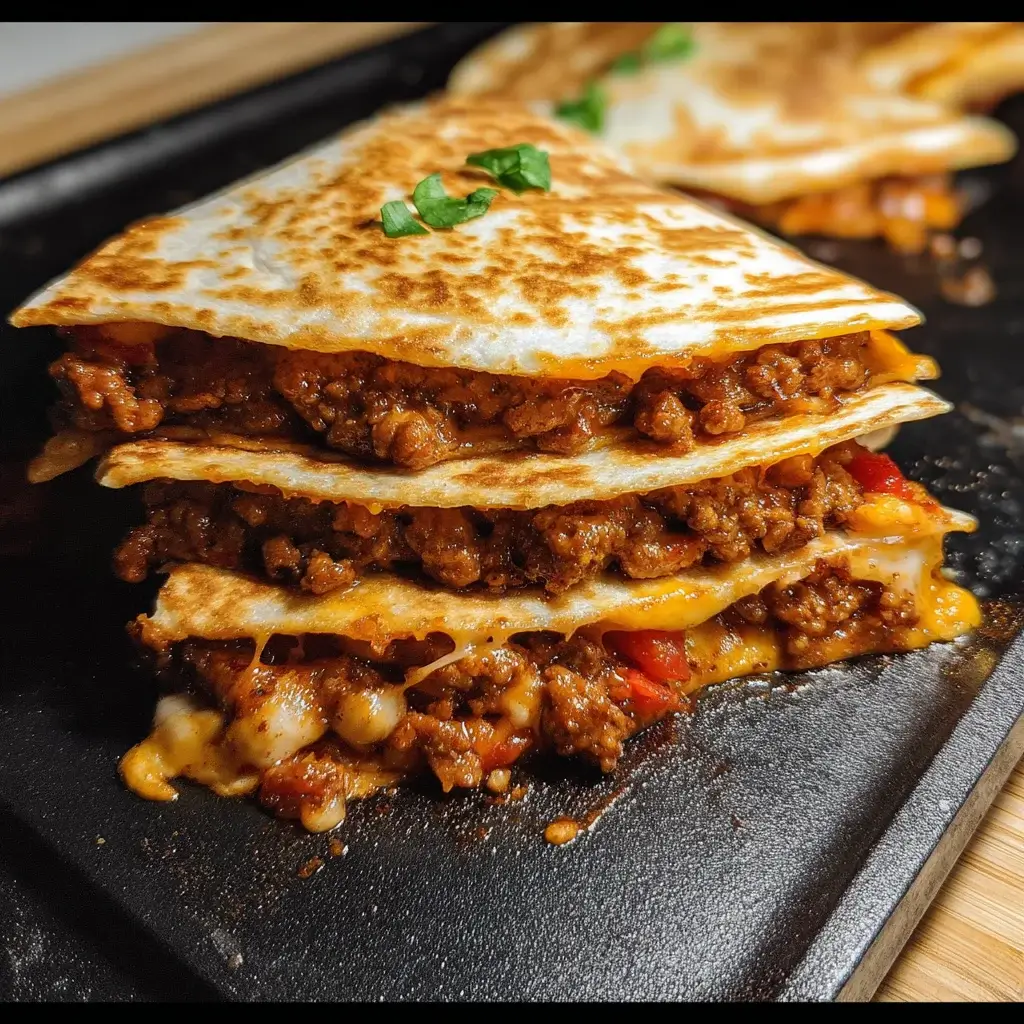

Some of the best recipes are born from happy accidents, a flash of inspiration in the face of dinner-time chaos. This Sloppy Joe Quesadilla is the reigning champion of happy accidents in my kitchen. I was making a big batch of my classic, from-scratch Sloppy Joes for the family, but as I went to the pantry, I was met with a heartbreaking sight: only two hamburger buns for a family of four. Panic started to set in. Then, my eyes landed on a pack of large flour tortillas. A lightbulb went off. What if I took that sweet, savory, gloriously messy filling and contained it between two layers of crispy, cheesy tortilla? I quickly assembled my Frankenstein creation, sliding it into a buttery skillet. The result was beyond anything I could have imagined. It was all the nostalgic, comforting flavor of a Sloppy Joe, but the entire experience was elevated. The crispy, golden-brown tortilla provided the perfect textural contrast, the gooey, melted cheddar cheese cut through the richness of the meat, and best of all—it was neat! My kids, who usually end up wearing half of their dinner, devoured them without a single drip. It was a weeknight miracle, a fusion of two of our favorite comfort foods that instantly became a legendary, most-requested meal in our home.
Sloppy Joe Quesadillas: The Ultimate Comfort Food Mashup
The classic Sloppy Joe is a cornerstone of American comfort food, beloved for its sweet and savory ground beef filling. The quesadilla is a masterclass in simplicity, delivering cheesy, crispy satisfaction. When you bring these two powerhouses together, you create something truly special. This recipe is the perfect solution for a fun family dinner, a creative way to use up leftover Sloppy Joe meat, or a game-day appetizer that will have everyone cheering. It’s hearty, flavorful, and delivers all the nostalgic taste you love in a cleaner, crispier, and cheesier package.
Complete with the ingredients amount .
This recipe is broken down into two simple parts: creating the perfect, not-too-sloppy Sloppy Joe filling, and then assembling the quesadillas. Using quality ingredients will make a noticeable difference in the final product.
For the Classic Sloppy Joe Filling:
- Lean Ground Beef: 1.5 pounds (preferably 85/15 or 90/10). Using a leaner ground beef means you’ll have less grease to drain off, but still enough fat to keep the filling moist and flavorful.
- Yellow Onion: 1 medium, finely diced. The onion provides a sweet, aromatic base for the entire dish.
- Green Bell Pepper: 1 medium, finely diced. This adds a classic, slightly vegetal flavor that is characteristic of traditional Sloppy Joes.
- Garlic: 3 cloves, minced. Fresh garlic adds a pungent, savory depth that you can’t get from powder.
- Ketchup: 1 cup. This forms the primary base of the sauce, providing sweetness, tang, and a rich tomato flavor.
- Light Brown Sugar: 2 tablespoons, packed. This is the key to the signature sweetness of the sauce. You can adjust this to your personal preference.
- Worcestershire Sauce: 1 tablespoon. This is the secret umami weapon, adding a complex, savory, and tangy depth that makes the sauce taste like it’s been simmering for hours.
- Yellow Mustard: 1 tablespoon. A classic hot dog condiment, yellow mustard adds a bright, tangy note that cuts through the sweetness and richness.
- Chili Powder: 1 teaspoon. This adds a subtle warmth and earthy complexity, not significant heat.
- Salt: ¾ teaspoon.
- Freshly Ground Black Pepper: ½ teaspoon.
For Assembling the Quesadillas:
- Large Flour Tortillas: 8 (10-inch “burrito size”). Large tortillas are essential for holding a generous amount of filling without overflowing.
- Shredded Sharp Cheddar Cheese: 3 cups. Sharp cheddar has a robust flavor that can stand up to the sweet and savory Sloppy Joe filling. Monterey Jack or a Mexican cheese blend would also work well.
- Unsalted Butter or Vegetable Oil: 4 tablespoons, for pan-frying. Butter will give you a richer flavor and a beautiful golden-brown color, while oil has a higher smoke point and can make the tortillas extra crispy.
Instructions
Follow these detailed steps to create the perfect Sloppy Joe Quesadillas, ensuring a thick, flavorful filling and a perfectly crispy, cheesy exterior.
Part 1: Making the Perfect, Not-So-Sloppy Filling
The key to a successful Sloppy Joe Quesadilla is a filling that is thick and hearty, not watery. A runny filling will lead to a soggy quesadilla.
- Brown the Beef and Vegetables: In a large skillet or Dutch oven, cook the ground beef, diced yellow onion, and diced green bell pepper over medium-high heat. Use a spatula or wooden spoon to break up the meat into small crumbles. Cook for 8-10 minutes, or until the beef is no longer pink and the vegetables have softened.
- Drain the Fat: Once the beef is cooked, carefully tilt the skillet and use a spoon to remove any excess grease from the pan. This is a crucial step to prevent a greasy filling.
- Add the Aromatics: Add the minced garlic to the skillet and cook for another minute, stirring constantly, until it is fragrant. Be careful not to burn the garlic.
- Create the Sauce: To the skillet, add the ketchup, brown sugar, Worcestershire sauce, yellow mustard, chili powder, salt, and pepper. Stir everything together until the meat and vegetables are thoroughly coated in the sauce.
- Simmer to Thicken: Bring the mixture to a gentle bubble, then reduce the heat to low. Let the filling simmer, uncovered, for 15-20 minutes, stirring occasionally. This simmering process is vital. It allows the flavors to meld and, more importantly, it allows the sauce to reduce and thicken considerably. You’re looking for a consistency that is thick enough to be easily spreadable, not runny. Once thickened, remove from the heat.
Part 2: Assembling and Cooking the Quesadillas
Now for the fun part: bringing it all together into a crispy, cheesy masterpiece.
- Heat the Skillet: Place a large non-stick skillet or a cast-iron pan over medium heat.
- Melt the Butter/Oil: Add 1 tablespoon of butter or oil to the hot skillet and swirl to coat the bottom.
- Build the Quesadilla: Place one large flour tortilla in the skillet. Immediately sprinkle about ¼ cup of the shredded cheddar cheese evenly over the entire surface of the tortilla.
- Add the Filling: Spoon about ½ to ¾ cup of the warm Sloppy Joe filling onto one half of the tortilla, spreading it out evenly.
- Add More Cheese: Sprinkle another ¼ cup of cheese over the top of the meat filling. This extra layer of cheese acts as a “glue” to hold the quesadilla together.
- Fold and Cook: Using a spatula, carefully fold the empty half of the tortilla over the half with the filling. Gently press down on the top with the spatula.
- Cook to Golden Perfection: Cook the quesadilla for 3-4 minutes on the first side, until the bottom is deeply golden brown and crispy and the cheese has begun to melt.
- Flip and Finish: Carefully flip the quesadilla over and cook for another 2-3 minutes on the second side, until it is also golden brown and the cheese is completely melted and gooey.
- Rest and Slice: Transfer the cooked quesadilla to a cutting board and let it rest for a minute or two. This allows the cheese to set slightly, which helps prevent the filling from spilling out when you cut it.
- Repeat: Repeat the process with the remaining tortillas, filling, and cheese, adding more butter or oil to the skillet as needed for each new quesadilla. Slice each finished quesadilla into 3 or 4 wedges and serve immediately.
Nutrition Facts
Please note these values are an approximation and can vary based on the specific brands of ingredients used and the final portion size. This recipe makes about 4 large quesadillas.
- Servings: 4
- Calories Per Serving: Approximately 750-850 kcal (for one whole quesadilla)
Preparation time
This is a fantastic 30-minute meal if you make the filling ahead, or under an hour from start to finish.
- Preparation Time: 15 minutes (dicing vegetables)
- Cook Time: 40-45 minutes (25 for the filling, 15-20 for cooking the quesadillas)
- Total Time: Approximately 1 hour
How to Serve
These quesadillas are a meal in themselves, but serving them with the right dips and sides can elevate the experience from a simple dinner to a fun-filled feast.
- Essential Dips and Dollops: The cool creaminess of a good dip is the perfect counterpoint to the rich, savory quesadilla.
- Sour Cream or Plain Greek Yogurt: A classic for a reason. Its tangy coolness is the perfect balance.
- Ranch Dressing: A kid-friendly favorite that pairs surprisingly well with the sweet and savory filling.
- Guacamole: The creamy texture and fresh flavor of avocado add another dimension.
- Pico de Gallo: For a fresh, zesty kick of tomato, onion, and cilantro.
- Classic Sloppy Joe Companions: Serve these with the sides you’d expect at a classic American diner or cookout.
- Dill Pickles: The sharp, briny crunch of a dill pickle spear is a non-negotiable side for many.
- Crispy French Fries or Tater Tots: Perfect for a hearty, satisfying meal.
- Creamy Coleslaw: A simple, crunchy coleslaw provides a refreshing contrast in both texture and temperature.
- Corn on the Cob: Especially delicious during the summer months.
- For a Party or Game Day Spread:
- Cut the quesadillas into smaller, appetizer-sized wedges.
- Arrange them on a large platter with a variety of dipping sauces in the center.
- To keep them warm for a crowd, place the cooked quesadillas on a baking sheet in a 200°F (95°C) oven until ready to serve.
Additional tips (5 tips)
These five expert tips will help you perfect your Sloppy Joe Quesadilla technique.
- The “Not-So-Sloppy” Simmer is Crucial: This is the most important tip for this recipe. If your Sloppy Joe filling is too wet, it will turn your crispy tortilla into a soggy mess. Don’t rush the simmering step. Let the sauce reduce until it’s thick and jammy. It should mound on a spoon rather than run off it.
- Create a “Cheese Barrier”: For maximum sogginess prevention, use cheese as your first and last layer of the filling. Sprinkling cheese directly onto the tortilla before adding the meat creates a barrier that helps protect the tortilla from the moisture of the sauce. The cheese on top of the meat acts as the delicious “glue” that holds it all together.
- Medium Heat is Your Friend: When cooking the quesadillas, it can be tempting to crank up the heat to speed things up. Resist this urge. High heat will burn the tortilla before the cheese inside has a chance to fully melt. Medium heat is the sweet spot, allowing the tortilla to slowly toast to a perfect, even golden-brown while giving the cheesy filling enough time to become gloriously gooey.
- Shred Your Own Cheese: While pre-shredded cheese is convenient, it’s coated in starches and anti-caking agents like cellulose to prevent it from clumping in the bag. These additives can inhibit its ability to melt smoothly. For the ultimate cheese pull and the creamiest texture, buy a block of sharp cheddar and shred it yourself. It only takes a minute and the difference is significant.
- Make-Ahead for a Super-Speedy Meal: The Sloppy Joe filling is a perfect make-ahead component. You can prepare a double batch and keep it in an airtight container in the refrigerator for up to 4 days or in the freezer for up to 3 months. When you’re ready for a quick dinner, simply thaw and reheat the filling, and you can have hot, crispy quesadillas on the table in less than 15 minutes.
FAQ section ( 5 Q/A)
Here are answers to some of the most common questions about making this delicious comfort food mashup.
1. Can I use ground turkey or chicken instead of ground beef?
Absolutely! Ground turkey or chicken are excellent, leaner alternatives. Since they have a lower fat content, you may want to add a tablespoon of olive oil to the pan when you brown the meat to prevent it from sticking and to add a little richness. The rest of the recipe remains exactly the same.
2. How do I store and reheat leftover quesadillas?
Store any leftover quesadilla wedges in an airtight container in the refrigerator for up to 3 days. The key to reheating is to restore the crispiness. The microwave is not your friend here; it will make them soft and rubbery.
- Skillet Method (Best): Place the wedges in a dry, non-stick skillet over medium-low heat. Cook for 2-3 minutes per side until the tortilla is crisp again and the filling is warmed through.
- Air Fryer Method: Reheat at 350°F (175°C) for 3-5 minutes for an exceptionally crispy result.
- Oven/Toaster Oven Method: Place on a baking sheet and heat at 375°F (190°C) for about 8-10 minutes.
3. What are some fun variations or additions to the Sloppy Joe filling?
This recipe is a fantastic canvas for creativity! To change things up, consider adding:
- For a Spicy Kick: Add a finely diced jalapeño or a pinch of red pepper flakes along with the onions and bell peppers.
- For a Smoky Flavor: Add ½ teaspoon of smoked paprika or a few dashes of liquid smoke to the sauce.
- To Sneak in Veggies: Add finely shredded carrots or zucchini to the mix when you’re browning the beef.
- For Extra Heartiness: Stir in a can of rinsed and drained black beans or kidney beans during the last 10 minutes of simmering.
4. Can I make these gluten-free?
Yes, making a gluten-free version is very straightforward. The filling itself is naturally gluten-free, but you should always double-check the label on your Worcestershire sauce, as some brands can contain gluten. The only substitution needed is to use your favorite brand of gluten-free flour tortillas.
5. My quesadillas are falling apart when I try to flip them. What am I doing wrong?
This is a common issue that usually comes down to one of three things. First, you might be overstuffing them. Be generous, but don’t pile the filling too high. Second, your filling might be too wet (see tip #1!). Third, you might not be using enough cheese “glue.” Make sure you have a layer of cheese both under and over the meat filling. The melted cheese is what really holds everything together and makes for a sturdy, flippable quesadilla.

Sloppy Joe Quesadillas recipe
Ingredients
For the Classic Sloppy Joe Filling:
-
Lean Ground Beef: 1.5 pounds (preferably 85/15 or 90/10). Using a leaner ground beef means you’ll have less grease to drain off, but still enough fat to keep the filling moist and flavorful.
-
Yellow Onion: 1 medium, finely diced. The onion provides a sweet, aromatic base for the entire dish.
-
Green Bell Pepper: 1 medium, finely diced. This adds a classic, slightly vegetal flavor that is characteristic of traditional Sloppy Joes.
-
Garlic: 3 cloves, minced. Fresh garlic adds a pungent, savory depth that you can’t get from powder.
-
Ketchup: 1 cup. This forms the primary base of the sauce, providing sweetness, tang, and a rich tomato flavor.
-
Light Brown Sugar: 2 tablespoons, packed. This is the key to the signature sweetness of the sauce. You can adjust this to your personal preference.
-
Worcestershire Sauce: 1 tablespoon. This is the secret umami weapon, adding a complex, savory, and tangy depth that makes the sauce taste like it’s been simmering for hours.
-
Yellow Mustard: 1 tablespoon. A classic hot dog condiment, yellow mustard adds a bright, tangy note that cuts through the sweetness and richness.
-
Chili Powder: 1 teaspoon. This adds a subtle warmth and earthy complexity, not significant heat.
-
Salt: ¾ teaspoon.
-
Freshly Ground Black Pepper: ½ teaspoon.
For Assembling the Quesadillas:
-
Large Flour Tortillas: 8 (10-inch “burrito size”). Large tortillas are essential for holding a generous amount of filling without overflowing.
-
Shredded Sharp Cheddar Cheese: 3 cups. Sharp cheddar has a robust flavor that can stand up to the sweet and savory Sloppy Joe filling. Monterey Jack or a Mexican cheese blend would also work well.
-
Unsalted Butter or Vegetable Oil: 4 tablespoons, for pan-frying. Butter will give you a richer flavor and a beautiful golden-brown color, while oil has a higher smoke point and can make the tortillas extra crispy.
Instructions
Part 1: Making the Perfect, Not-So-Sloppy Filling
The key to a successful Sloppy Joe Quesadilla is a filling that is thick and hearty, not watery. A runny filling will lead to a soggy quesadilla.
-
Brown the Beef and Vegetables: In a large skillet or Dutch oven, cook the ground beef, diced yellow onion, and diced green bell pepper over medium-high heat. Use a spatula or wooden spoon to break up the meat into small crumbles. Cook for 8-10 minutes, or until the beef is no longer pink and the vegetables have softened.
-
Drain the Fat: Once the beef is cooked, carefully tilt the skillet and use a spoon to remove any excess grease from the pan. This is a crucial step to prevent a greasy filling.
-
Add the Aromatics: Add the minced garlic to the skillet and cook for another minute, stirring constantly, until it is fragrant. Be careful not to burn the garlic.
-
Create the Sauce: To the skillet, add the ketchup, brown sugar, Worcestershire sauce, yellow mustard, chili powder, salt, and pepper. Stir everything together until the meat and vegetables are thoroughly coated in the sauce.
-
Simmer to Thicken: Bring the mixture to a gentle bubble, then reduce the heat to low. Let the filling simmer, uncovered, for 15-20 minutes, stirring occasionally. This simmering process is vital. It allows the flavors to meld and, more importantly, it allows the sauce to reduce and thicken considerably. You’re looking for a consistency that is thick enough to be easily spreadable, not runny. Once thickened, remove from the heat.
Part 2: Assembling and Cooking the Quesadillas
Now for the fun part: bringing it all together into a crispy, cheesy masterpiece.
-
Heat the Skillet: Place a large non-stick skillet or a cast-iron pan over medium heat.
-
Melt the Butter/Oil: Add 1 tablespoon of butter or oil to the hot skillet and swirl to coat the bottom.
-
Build the Quesadilla: Place one large flour tortilla in the skillet. Immediately sprinkle about ¼ cup of the shredded cheddar cheese evenly over the entire surface of the tortilla.
-
Add the Filling: Spoon about ½ to ¾ cup of the warm Sloppy Joe filling onto one half of the tortilla, spreading it out evenly.
-
Add More Cheese: Sprinkle another ¼ cup of cheese over the top of the meat filling. This extra layer of cheese acts as a “glue” to hold the quesadilla together.
-
Fold and Cook: Using a spatula, carefully fold the empty half of the tortilla over the half with the filling. Gently press down on the top with the spatula.
-
Cook to Golden Perfection: Cook the quesadilla for 3-4 minutes on the first side, until the bottom is deeply golden brown and crispy and the cheese has begun to melt.
-
Flip and Finish: Carefully flip the quesadilla over and cook for another 2-3 minutes on the second side, until it is also golden brown and the cheese is completely melted and gooey.
-
Rest and Slice: Transfer the cooked quesadilla to a cutting board and let it rest for a minute or two. This allows the cheese to set slightly, which helps prevent the filling from spilling out when you cut it.
-
Repeat: Repeat the process with the remaining tortillas, filling, and cheese, adding more butter or oil to the skillet as needed for each new quesadilla. Slice each finished quesadilla into 3 or 4 wedges and serve immediately.
Nutrition
- Serving Size: one normal portion
- Calories: 750-850