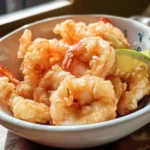
There’s something undeniably magical about perfect Shrimp Tempura. I remember the first time I had really good tempura at an authentic Japanese restaurant – it was a revelation. Unlike the sometimes heavy, greasy versions I’d encountered before, this was ethereal. The batter was incredibly light, shattering with an audible crispness, giving way to perfectly sweet, succulent shrimp inside. It seemed like culinary wizardry! For years, I was intimidated to try making it at home, assuming it required special equipment or secret techniques beyond my reach. When I finally gathered the courage, armed with tips gleaned from various chefs and cookbooks, my first few attempts were… okay. Edible, but not quite that shatteringly crisp texture I craved. Then, I discovered the secrets – the ice-cold water, the minimal mixing, the precise oil temperature. The first time I pulled a batch from the fryer that looked and sounded right, I nearly cheered. Sharing that perfectly crisp, golden shrimp tempura with my family, alongside a bowl of savory Tentsuyu dipping sauce, was incredibly rewarding. Seeing their eyes light up with the same delight I felt that first time in the restaurant made all the experimenting worthwhile. It’s now a requested favorite for special occasions, and while it requires a bit more attention than a simple weeknight stir-fry, the payoff is absolutely spectacular. It transforms simple shrimp into a delicate, delicious masterpiece.
Shrimp Tempura: Ingredients You’ll Need
Achieving that authentic, light-as-air crisp requires specific ingredients and attention to detail. Gather these components for tempura perfection:
- For the Shrimp:
- Large Shrimp (Prawns): 1 lb (about 16-20 count), peeled and deveined, tails left on
- All-Purpose Flour or Potato Starch: 2 tablespoons (for dusting shrimp)
- Salt: 1/4 teaspoon
- For the Tempura Batter:
- Cake Flour: 1 cup (preferred for extra lightness, but all-purpose flour can be substituted)
- Large Egg: 1, lightly beaten
- Ice-Cold Sparkling Water or Still Water: 1 cup (Sparkling water adds extra lightness, but very cold still water works well. Must be ice cold!)
- Cornstarch: 2 tablespoons (optional, but enhances crispiness)
- For Frying:
- Neutral Frying Oil: 4-6 cups (such as Canola, Vegetable, Peanut, or Rice Bran Oil – enough for about 2-3 inches depth in your pot)
- For the Tentsuyu (Tempura Dipping Sauce):
- Dashi Stock: 3/4 cup (Japanese soup stock – instant granules or homemade)
- Soy Sauce: 1/4 cup (Japanese soy sauce like Kikkoman recommended)
- Mirin: 1/4 cup (Japanese sweet rice wine)
- Sugar: 1 tablespoon (optional, adjust to taste)
- For Garnish/Serving (Optional):
- Grated Daikon Radish: 2-3 tablespoons
- Grated Fresh Ginger: 1 teaspoon
Ingredient Notes & Considerations:
- Shrimp: Choose large shrimp (16/20 or 21/25 count per pound). Peeling and deveining are standard, but leaving the tail on provides a convenient handle for dipping and eating. The preparation steps to keep them straight are key.
- Flour for Batter: Cake flour has lower gluten content than all-purpose flour, resulting in a more tender, lighter, and crispier batter. If using all-purpose flour, the result will still be good, just slightly less delicate. Some recipes use rice flour for gluten-free versions and extra crispness.
- Ice-Cold Water: This is non-negotiable! Cold temperature inhibits gluten development in the flour, which is crucial for a light, crispy batter rather than a heavy, bready one. Keep the water in the fridge with ice cubes until the moment you mix the batter. Using sparkling water adds carbonation, which can create even more air pockets for lightness.
- Egg: Just one egg, lightly beaten, helps bind the batter. Too much egg can make it heavy.
- Oil: Use a neutral oil with a high smoke point. The oil needs to be heated to the correct temperature and maintained there. Avoid olive oil, as its flavor is too strong and its smoke point is lower.
- Dashi: This is the base of many Japanese sauces and soups. You can make it from scratch using kombu (kelp) and bonito flakes (katsuobushi), or use convenient instant dashi granules dissolved in hot water according to package directions.
- Mirin: This sweet Japanese cooking wine adds authentic flavor and balances the saltiness of the soy sauce. If unavailable, you can substitute dry sherry or sake with a little extra sugar, but the flavor won’t be quite the same.
Step-by-Step Instructions for Making Crispy Shrimp Tempura
Follow these steps carefully, paying close attention to temperature and technique, for the best results.
Phase 1: Preparing the Shrimp
- Clean and Devein: Ensure your shrimp are peeled (tail on) and thoroughly deveined. Rinse them under cold water and pat them completely dry with paper towels. Excess moisture will prevent the batter from adhering properly and cause dangerous oil splattering.
- Straighten the Shrimp (Crucial Step): To prevent the shrimp from curling tightly during frying (making them hard to dip and eat), lay each shrimp on its back (underside up) on a cutting board. Make 3-4 shallow, small cuts horizontally across the belly side. Be careful not to cut all the way through.
- Gentle Press: Turn the shrimp over (shell side up). Gently press down along the back of the shrimp. You might hear or feel a slight “snap” as the muscle relaxes. This helps ensure the shrimp fries relatively straight.
- Season and Dust: Lightly sprinkle the prepared shrimp with the 1/4 teaspoon of salt. Place the 2 tablespoons of all-purpose flour or potato starch in a shallow dish or plate. Lightly dredge each shrimp in the flour/starch, shaking off any excess. This light coating helps the wet batter adhere better. Place the dusted shrimp on a clean plate or tray and ideally, chill them in the refrigerator while you prepare the batter and oil.
Phase 2: Making the Tentsuyu Dipping Sauce
- Combine Ingredients: In a small saucepan, combine the dashi stock, soy sauce, mirin, and optional sugar.
- Heat Gently: Place the saucepan over medium heat. Bring the mixture just to a gentle simmer, stirring occasionally to dissolve the sugar (if using). Do not boil rapidly.
- Keep Warm: Once simmering, reduce the heat to low to keep the sauce warm while you fry the tempura. Prepare the grated daikon and ginger, if using, and set aside to be added just before serving.
Phase 3: Preparing the Batter and Frying Oil
- Heat the Oil: Pour the frying oil into a deep, heavy-bottomed pot (like a Dutch oven) or a wok. You need about 2-3 inches of depth. Attach a deep-fry thermometer to the side of the pot, ensuring the tip is submerged in oil but not touching the bottom. Heat the oil over medium-high heat until it reaches and maintains a steady temperature between 340°F and 360°F (170°C – 180°C). This temperature is critical. Too low, and the tempura will be greasy; too high, and it will burn before the shrimp cooks.
- Prepare Batter Station: Set up your frying station near the stove. You’ll need: the chilled, flour-dusted shrimp, the ingredients for the batter (ready to be mixed), tongs or long cooking chopsticks, and a wire rack set over a baking sheet (for draining the cooked tempura). Do not use paper towels for draining, as this traps steam and makes the tempura soggy.
- Mix the Batter (JUST Before Frying): Do not make the batter ahead of time. In a medium bowl, lightly whisk the egg. Pour in the ice-cold sparkling or still water and whisk briefly just to combine. Add the cake flour (and optional cornstarch) all at once. Using chopsticks or a fork, mix very minimally – just until the ingredients are roughly combined. The batter should be thin and very lumpy. Do not overmix! Overmixing develops gluten, resulting in a heavy, chewy batter instead of a light, crispy one. Lumps are good! Some streaks of flour are perfectly fine.
Phase 4: Frying the Shrimp Tempura
- Test Oil Temperature: Before adding shrimp, test the oil temperature by dropping a small bit of batter into the hot oil. It should sink slightly, then immediately rise to the surface, sizzling vigorously without browning too quickly. Adjust the heat as needed to maintain the 340-360°F (170-180°C) range throughout frying.
- Dip Shrimp: Holding a prepared shrimp by its tail, dip it into the lumpy batter, ensuring it’s lightly coated. Allow any excess batter to drip off briefly.
- Fry in Batches: Carefully lower the battered shrimp into the hot oil, holding the tail for a moment before releasing. Fry only a few shrimp at a time (e.g., 3-4) to avoid overcrowding the pot. Overcrowding lowers the oil temperature significantly, leading to greasy results.
- Cook Until Crispy: Fry the shrimp for approximately 2-3 minutes per side, or until the batter is a light golden brown, crisp, and the shrimp is cooked through (it will turn pink and opaque). Use tongs or chopsticks to gently turn them as needed for even cooking. Experienced tempura makers sometimes flick droplets of batter onto the frying shrimp (“hana o sakaseru” – making flowers bloom) to create extra crispy bits, but this is an advanced technique.
- Drain Properly: Using tongs or a slotted spoon/spider strainer, carefully remove the cooked shrimp tempura from the oil, allowing excess oil to drip back into the pot. Immediately transfer the tempura to the prepared wire rack to drain. The wire rack allows air to circulate, keeping the crust crisp.
- Maintain Oil Temp & Skim: Between batches, use a fine-mesh skimmer to remove any floating bits of fried batter from the oil. These bits can burn and impart a bitter taste to subsequent batches. Check the oil temperature and allow it to return to the target range (340-360°F / 170-180°C) before adding the next batch of shrimp.
- Repeat: Continue dipping and frying the remaining shrimp in batches until all are cooked.
Phase 5: Serving
- Serve Immediately: Tempura is best served piping hot, straight from the fryer, for maximum crispness.
- Prepare Sauce: Pour the warm Tentsuyu dipping sauce into small individual bowls. Optionally, stir a small amount of grated daikon radish and grated ginger into each bowl of sauce just before serving.
- Arrange and Enjoy: Arrange the freshly fried shrimp tempura on a platter (perhaps lined with tempura paper if you have it, otherwise just serve from the rack or platter) and serve immediately with the dipping sauce.
Nutrition Facts (Approximate)
Tempura is a fried food and thus higher in calories and fat. These values are estimates and will vary based on shrimp size, oil absorption (which depends on frying temperature and time), and exact ingredient amounts.
- Servings: This recipe typically makes 4 appetizer servings or 2 main course servings.
- Calories per Serving (assuming 4 servings, approx. 4-5 shrimp each): Approximately 350-450 kcal.
Breakdown Approximation (per serving):
- Fat: 20-30g (primarily from frying oil absorption)
- Saturated Fat: 3-6g (depending on oil type)
- Carbohydrates: 15-25g (from flour and batter)
- Sugar: 2-4g (mostly from mirin in sauce, if used)
- Protein: 20-25g (primarily from shrimp)
- Sodium: 600-800mg (largely from soy sauce and added salt)
While delicious, shrimp tempura is best enjoyed as an occasional treat due to the deep-frying method.
Preparation and Cooking Time
Making tempura requires focused effort, especially during the frying stage.
- Shrimp Preparation Time: 15-20 minutes (peeling, deveining, straightening, dusting)
- Sauce Preparation Time: 5 minutes
- Oil Heating Time: 10-15 minutes
- Batter Mixing Time: 1 minute (must be done last minute)
- Frying Time: 3-5 minutes per batch (Total frying time depends on pot size and number of batches, likely 15-25 minutes)
- Active Time: Approximately 45-60 minutes
- Total Time: Approximately 55 – 75 minutes
Time Management Note: You can prepare the shrimp (up to the dusting stage) and the Tentsuyu sauce ahead of time. Refrigerate the shrimp and gently reheat the sauce before serving. The batter must be made immediately before frying.
How to Serve Your Crispy Shrimp Tempura
Presentation and accompaniments enhance the tempura experience:
- Serve Immediately: The cardinal rule of tempura! Serve it as soon as it comes off the wire rack for peak crispness. Arrange attractively on a platter, perhaps on Japanese absorbent paper (tenshi-gami) if available, or just a clean platter.
- Dipping Sauce: Provide small individual bowls filled with the warm Tentsuyu dipping sauce.
- Offer small mounds of grated daikon radish and grated fresh ginger on the side for guests to stir into their sauce to taste. This adds freshness and cuts through the richness.
- As an Appetizer: Serve shrimp tempura on its own as a stunning starter before a Japanese meal or any main course.
- Part of a Tempura Meal: Fry other items alongside the shrimp! Good candidates include:
- Vegetables: Sliced sweet potato, kabocha squash, lotus root, eggplant, bell peppers, green beans, shishito peppers, broccoli florets, asparagus spears, sliced onion rings, whole mushrooms. (Adjust frying times accordingly; vegetables often cook faster than shrimp).
- Serve a mixed tempura platter (shrimp and assorted vegetables) for a more substantial offering.
- With Noodles or Rice:
- Serve over a bowl of steamed Japanese rice (Tendon).
- Serve alongside cold soba noodles or hot udon noodle soup (Tempura Udon/Soba).
- Accompaniments:
- A simple bowl of miso soup.
- A side of pickled ginger (gari).
- Steamed Japanese rice.
Pro Tips for Achieving Perfect Shrimp Tempura
Mastering tempura involves finesse. These tips will help you achieve that coveted light and crispy texture:
- Ice-Cold Batter Ingredients are Key: We can’t stress this enough. Use ice-cold water (sparkling adds extra lift!) and ensure your egg is cold. Keep batter ingredients refrigerated until the absolute last second. Consider placing the batter bowl over a larger bowl filled with ice water while frying to keep it cold. Cold inhibits gluten formation = lighter tempura.
- Do NOT Overmix the Batter: Lumps are your friends! Mix the wet and dry ingredients just until roughly combined, using chopsticks or a fork, not a whisk. Streaks of flour are perfectly acceptable. Overmixing develops gluten, leading to a heavy, doughy, and chewy coating – the opposite of what you want.
- Master Oil Temperature Control: Use a deep-fry thermometer and diligently maintain the oil temperature between 340°F and 360°F (170°C – 180°C). Too low = greasy tempura. Too high = burnt exterior, raw interior. Adjust the stove heat frequently as needed, especially after adding cold battered items which lower the oil temp.
- Fry in Small Batches & Skim Debris: Never overcrowd the pot. Frying only 3-4 pieces at a time prevents the oil temperature from dropping too drastically. Use a fine-mesh skimmer to remove any stray bits of fried batter between batches – these burn quickly and will make your oil (and subsequent tempura) taste bitter.
- Drain on a Wire Rack, Not Paper Towels: Immediately transfer cooked tempura from the hot oil to a wire rack set over a baking sheet. This allows air to circulate all around the tempura, keeping the crust crispy. Placing it directly on paper towels traps steam underneath, leading to a soggy bottom.
Frequently Asked Questions (FAQ) about Shrimp Tempura
Common queries about making this Japanese favorite at home:
- Why is my tempura soggy or greasy?
- This is usually due to incorrect oil temperature. If the oil is too cool (below 340°F/170°C), the batter absorbs oil instead of quickly crisping up. Overcrowding the pot also drastically lowers oil temperature. Ensure your oil is hot enough before adding food and fry in small batches. Also, ensure shrimp are patted very dry before dusting and battering, and drain properly on a wire rack.
- Can I use All-Purpose flour instead of Cake Flour?
- Yes, you can. However, cake flour has a lower protein/gluten content, which results in a noticeably lighter, more tender, and crispier batter, closer to authentic Japanese tempura. If using All-Purpose flour, be extra careful not to overmix the batter.
- What is the best oil for frying tempura?
- Choose a neutral-flavored oil with a high smoke point (meaning it can get hot without burning and smoking). Good options include canola oil, vegetable oil, rice bran oil, peanut oil, or light sesame oil (not toasted sesame oil, which has a strong flavor and lower smoke point).
- Can I make the tempura batter ahead of time?
- No, this is strongly discouraged. Tempura batter relies on being ice-cold and minimally mixed just before frying. Letting it sit allows the flour to fully hydrate, gluten to develop, and the batter to warm up, all of which will result in a heavier, less crispy coating. Mix it right before you start dipping and frying.
- Is it possible to make Gluten-Free Shrimp Tempura?
- Yes! You can substitute the cake/all-purpose flour in the batter with a good quality gluten-free all-purpose flour blend (one that includes rice flour, tapioca starch, etc.) or use primarily rice flour sometimes mixed with potato starch or cornstarch. Ensure your soy sauce for the dipping sauce is also certified gluten-free (Tamari is a common GF substitute). Remember to dust the shrimp with GF flour or starch too.
Shrimp Tempura recipe
Ingredients
- For the Shrimp:
- Large Shrimp (Prawns): 1 lb (about 16-20 count), peeled and deveined, tails left on
- All-Purpose Flour or Potato Starch: 2 tablespoons (for dusting shrimp)
- Salt: 1/4 teaspoon
- For the Tempura Batter:
- Cake Flour: 1 cup (preferred for extra lightness, but all-purpose flour can be substituted)
- Large Egg: 1, lightly beaten
- Ice-Cold Sparkling Water or Still Water: 1 cup (Sparkling water adds extra lightness, but very cold still water works well. Must be ice cold!)
- Cornstarch: 2 tablespoons (optional, but enhances crispiness)
- For Frying:
- Neutral Frying Oil: 4-6 cups (such as Canola, Vegetable, Peanut, or Rice Bran Oil – enough for about 2-3 inches depth in your pot)
- For the Tentsuyu (Tempura Dipping Sauce):
- Dashi Stock: 3/4 cup (Japanese soup stock – instant granules or homemade)
- Soy Sauce: 1/4 cup (Japanese soy sauce like Kikkoman recommended)
- Mirin: 1/4 cup (Japanese sweet rice wine)
- Sugar: 1 tablespoon (optional, adjust to taste)
- For Garnish/Serving (Optional):
- Grated Daikon Radish: 2-3 tablespoons
- Grated Fresh Ginger: 1 teaspoon
Instructions
Phase 1: Preparing the Shrimp
- Clean and Devein: Ensure your shrimp are peeled (tail on) and thoroughly deveined. Rinse them under cold water and pat them completely dry with paper towels. Excess moisture will prevent the batter from adhering properly and cause dangerous oil splattering.
- Straighten the Shrimp (Crucial Step): To prevent the shrimp from curling tightly during frying (making them hard to dip and eat), lay each shrimp on its back (underside up) on a cutting board. Make 3-4 shallow, small cuts horizontally across the belly side. Be careful not to cut all the way through.
- Gentle Press: Turn the shrimp over (shell side up). Gently press down along the back of the shrimp. You might hear or feel a slight “snap” as the muscle relaxes. This helps ensure the shrimp fries relatively straight.
- Season and Dust: Lightly sprinkle the prepared shrimp with the 1/4 teaspoon of salt. Place the 2 tablespoons of all-purpose flour or potato starch in a shallow dish or plate. Lightly dredge each shrimp in the flour/starch, shaking off any excess. This light coating helps the wet batter adhere better. Place the dusted shrimp on a clean plate or tray and ideally, chill them in the refrigerator while you prepare the batter and oil.
Phase 2: Making the Tentsuyu Dipping Sauce
- Combine Ingredients: In a small saucepan, combine the dashi stock, soy sauce, mirin, and optional sugar.
- Heat Gently: Place the saucepan over medium heat. Bring the mixture just to a gentle simmer, stirring occasionally to dissolve the sugar (if using). Do not boil rapidly.
- Keep Warm: Once simmering, reduce the heat to low to keep the sauce warm while you fry the tempura. Prepare the grated daikon and ginger, if using, and set aside to be added just before serving.
Phase 3: Preparing the Batter and Frying Oil
- Heat the Oil: Pour the frying oil into a deep, heavy-bottomed pot (like a Dutch oven) or a wok. You need about 2-3 inches of depth. Attach a deep-fry thermometer to the side of the pot, ensuring the tip is submerged in oil but not touching the bottom. Heat the oil over medium-high heat until it reaches and maintains a steady temperature between 340°F and 360°F (170°C – 180°C). This temperature is critical. Too low, and the tempura will be greasy; too high, and it will burn before the shrimp cooks.
- Prepare Batter Station: Set up your frying station near the stove. You’ll need: the chilled, flour-dusted shrimp, the ingredients for the batter (ready to be mixed), tongs or long cooking chopsticks, and a wire rack set over a baking sheet (for draining the cooked tempura). Do not use paper towels for draining, as this traps steam and makes the tempura soggy.
- Mix the Batter (JUST Before Frying): Do not make the batter ahead of time. In a medium bowl, lightly whisk the egg. Pour in the ice-cold sparkling or still water and whisk briefly just to combine. Add the cake flour (and optional cornstarch) all at once. Using chopsticks or a fork, mix very minimally – just until the ingredients are roughly combined. The batter should be thin and very lumpy. Do not overmix! Overmixing develops gluten, resulting in a heavy, chewy batter instead of a light, crispy one. Lumps are good! Some streaks of flour are perfectly fine.
Phase 4: Frying the Shrimp Tempura
- Test Oil Temperature: Before adding shrimp, test the oil temperature by dropping a small bit of batter into the hot oil. It should sink slightly, then immediately rise to the surface, sizzling vigorously without browning too quickly. Adjust the heat as needed to maintain the 340-360°F (170-180°C) range throughout frying.
- Dip Shrimp: Holding a prepared shrimp by its tail, dip it into the lumpy batter, ensuring it’s lightly coated. Allow any excess batter to drip off briefly.
- Fry in Batches: Carefully lower the battered shrimp into the hot oil, holding the tail for a moment before releasing. Fry only a few shrimp at a time (e.g., 3-4) to avoid overcrowding the pot. Overcrowding lowers the oil temperature significantly, leading to greasy results.
- Cook Until Crispy: Fry the shrimp for approximately 2-3 minutes per side, or until the batter is a light golden brown, crisp, and the shrimp is cooked through (it will turn pink and opaque). Use tongs or chopsticks to gently turn them as needed for even cooking. Experienced tempura makers sometimes flick droplets of batter onto the frying shrimp (“hana o sakaseru” – making flowers bloom) to create extra crispy bits, but this is an advanced technique.
- Drain Properly: Using tongs or a slotted spoon/spider strainer, carefully remove the cooked shrimp tempura from the oil, allowing excess oil to drip back into the pot. Immediately transfer the tempura to the prepared wire rack to drain. The wire rack allows air to circulate, keeping the crust crisp.
- Maintain Oil Temp & Skim: Between batches, use a fine-mesh skimmer to remove any floating bits of fried batter from the oil. These bits can burn and impart a bitter taste to subsequent batches. Check the oil temperature and allow it to return to the target range (340-360°F / 170-180°C) before adding the next batch of shrimp.
- Repeat: Continue dipping and frying the remaining shrimp in batches until all are cooked.
Phase 5: Serving
- Serve Immediately: Tempura is best served piping hot, straight from the fryer, for maximum crispness.
- Prepare Sauce: Pour the warm Tentsuyu dipping sauce into small individual bowls. Optionally, stir a small amount of grated daikon radish and grated ginger into each bowl of sauce just before serving.
- Arrange and Enjoy: Arrange the freshly fried shrimp tempura on a platter (perhaps lined with tempura paper if you have it, otherwise just serve from the rack or platter) and serve immediately with the dipping sauce.
Nutrition
- Serving Size: one normal portion
- Calories: 350-450
- Sugar: 2-4g
- Sodium: 600-800mg
- Fat: 20-30g
- Saturated Fat: 3-6g
- Carbohydrates: 15-25g
- Protein: 20-25g