


The aroma wafting from my oven today is pure bliss – a delicate dance of cocoa, buttermilk, and a hint of tang, all culminating in the most gorgeous, ruby-red hue. My family, usually a tough crowd to impress on weekday afternoons, practically inhaled this Red Velvet Loaf Cake the moment it cooled enough to slice. The moist crumb, the subtle chocolatey notes, and that signature cream cheese frosting swirl on top… it’s a slice of pure comfort and a recipe I know will become a regular in our baking rotation. If you’re looking for a treat that’s both visually stunning and utterly delicious, look no further. This Red Velvet Loaf Cake is your answer.
Ingredients: Your Shopping List for Red Velvet Perfection
To embark on your red velvet baking journey, gather these readily available ingredients. We’ve broken it down into the essentials for the cake and the dreamy cream cheese frosting that truly completes the experience.
For the Luscious Red Velvet Loaf Cake:
- 2 ½ cups All-Purpose Flour: The foundation of our cake, providing structure and a tender crumb. Ensure it’s measured correctly – spoon and level for best results.
- 2 cups Granulated Sugar: For sweetness, of course, but also for moisture and to help create that perfect texture.
- 1 teaspoon Baking Soda: Our leavening agent, reacting with the acidic ingredients to give the cake its lift and airy texture.
- 1 teaspoon Baking Powder: Working in tandem with baking soda, baking powder provides a double boost of leavening for a beautifully risen cake.
- 1 teaspoon Salt: Enhances the flavors of all the other ingredients and balances the sweetness.
- 1 tablespoon Unsweetened Cocoa Powder: The subtle chocolate note that’s characteristic of red velvet. Don’t be tempted to use Dutch-processed cocoa powder here, as the acidity of natural cocoa powder is important for the red velvet reaction.
- 1 ½ cups Vegetable Oil: Contributes to the cake’s incredible moistness. You can also use canola oil or another neutral-flavored oil.
- 1 cup Buttermilk: The magic ingredient for red velvet! Buttermilk adds tanginess, tenderizes the gluten in the flour, and reacts with baking soda to create that signature texture. If you don’t have buttermilk, you can make a substitute (instructions provided later!).
- 2 Large Eggs: Bind the ingredients together, add richness, and contribute to the cake’s structure.
- 2 teaspoons Vanilla Extract: Enhances all the flavors and adds a warm, comforting note.
- 1 tablespoon White Vinegar: Another key ingredient in red velvet. Vinegar reacts with baking soda to further enhance the rise and create a subtle tang. It also helps to brighten the red color.
- 1 ounce Red Food Coloring (Liquid or Gel): The star of the show for that vibrant red hue. Gel food coloring is generally more concentrated, so you might need slightly less. Adjust to your desired shade of red, but be mindful that too much liquid food coloring can affect the batter consistency. Note: For a more natural approach, consider using beet juice or natural red food coloring alternatives, but be aware they might slightly alter the color and flavor.
For the Dreamy Cream Cheese Frosting:
- 8 ounces Cream Cheese, softened: The heart of the frosting, providing that tangy, creamy richness that perfectly complements the red velvet cake. Make sure it’s softened to room temperature to avoid lumps.
- ½ cup (1 stick) Unsalted Butter, softened: Adds richness and helps create a smooth, spreadable frosting. Softened butter is crucial for a light and airy frosting.
- 3 cups Powdered Sugar: Sweetens and thickens the frosting to the perfect consistency. Sift it before measuring to avoid clumps.
- 1 teaspoon Vanilla Extract: Enhances the flavor of the frosting, adding a touch of warmth and sweetness.
Instructions: Baking Your Red Velvet Loaf Cake Step-by-Step
Follow these detailed instructions to create a perfect Red Velvet Loaf Cake every time. We’ll guide you through each step, ensuring even beginner bakers can achieve delicious results.
- Preheat and Prepare: Preheat your oven to 350°F (175°C). Grease and flour a 9×5 inch loaf pan. You can also line the pan with parchment paper, leaving an overhang on the sides for easy removal after baking. This is a pro tip to prevent sticking and ensure a clean loaf.
- Whisk Dry Ingredients: In a large bowl, whisk together the flour, sugar, baking soda, baking powder, salt, and cocoa powder. Whisking ensures all the dry ingredients are evenly distributed, preventing clumps and ensuring consistent texture in the final cake.
- Combine Wet Ingredients: In a separate medium bowl, whisk together the vegetable oil, buttermilk, eggs, vanilla extract, vinegar, and red food coloring. Whisk until everything is well combined and the color is evenly dispersed. The buttermilk might look slightly curdled – this is normal and actually contributes to the cake’s tenderness.
- Combine Wet and Dry Ingredients: Gradually pour the wet ingredients into the dry ingredients, mixing on low speed with an electric mixer or by hand with a spatula. Mix until just combined. Be careful not to overmix. Overmixing can develop the gluten in the flour, resulting in a tough cake. A few streaks of flour are okay at this stage.
- Bake to Perfection: Pour the batter into the prepared loaf pan and spread evenly. Bake for 50-60 minutes, or until a wooden skewer inserted into the center comes out clean or with just a few moist crumbs attached. Baking times can vary depending on your oven, so start checking for doneness around 50 minutes.
- Cool Completely: Let the cake cool in the pan for 10-15 minutes before inverting it onto a wire rack to cool completely. Cooling in the pan allows the cake to set and prevents it from crumbling when you try to remove it while it’s still warm. Make sure the cake is completely cool before frosting, otherwise, the frosting will melt.
- Prepare the Cream Cheese Frosting: While the cake is cooling, make the frosting. In a large bowl, beat the softened cream cheese and butter together with an electric mixer until smooth and creamy. Ensure both the cream cheese and butter are truly softened to room temperature for a lump-free frosting.
- Add Powdered Sugar and Vanilla: Gradually add the powdered sugar, one cup at a time, beating on low speed until incorporated. Then, increase the speed to medium and beat until the frosting is light and fluffy. Stir in the vanilla extract and mix until just combined. Be careful not to overbeat the frosting, as it can become too soft or even separate.
- Frost and Decorate: Once the cake is completely cool, frost it generously with the cream cheese frosting. You can create swirls with a spatula for a rustic look, or use a piping bag for a more decorative finish. Get creative with your frosting!
- Chill (Optional but Recommended): For easier slicing and a firmer frosting, chill the frosted cake in the refrigerator for at least 30 minutes before serving. This also allows the flavors to meld together beautifully.
Nutrition Facts: A Treat to Indulge In Moderation
Here’s an estimated nutritional breakdown for our Red Velvet Loaf Cake. Please note that these are approximate values and can vary based on specific ingredient brands and portion sizes.
- Servings: Approximately 12 slices
- Calories per serving (estimated): 350-450 calories (depending on frosting thickness and slice size)
Approximate Nutritional Information per Serving (Estimate):
- Calories: 350-450 kcal
- Fat: 20-25g
- Saturated Fat: 10-15g
- Cholesterol: 80-100mg
- Sodium: 200-250mg
- Carbohydrates: 40-50g
- Sugar: 30-35g
- Protein: 3-4g
Important Note: This Red Velvet Loaf Cake is a delicious treat, but it’s also relatively high in calories, fat, and sugar. Enjoy it in moderation as part of a balanced diet. Portion control is key!
Preparation Time: Plan Your Baking Schedule
- Prep Time: 20-25 minutes (for mixing batter and frosting)
- Bake Time: 50-60 minutes
- Cooling Time: 2-3 hours (including time to cool completely before frosting and chilling time)
- Total Time: Approximately 3-4 hours
While the total time might seem lengthy, much of it is hands-off cooling and baking time. The active preparation is relatively quick and straightforward. This recipe is perfect to make ahead for gatherings or special occasions.
How to Serve: Elevating Your Red Velvet Experience
Red Velvet Loaf Cake is delightful on its own, but here are some serving suggestions to elevate your experience and impress your guests:
- Classic Slice: Simply slice the loaf cake and serve it as is. The beauty of this cake is that it’s wonderful on its own!
- Dust with Powdered Sugar: For a simple yet elegant touch, dust the top of the frosted cake with powdered sugar before slicing.
- Fresh Berries: Serve slices of Red Velvet Loaf Cake alongside a medley of fresh berries like strawberries, raspberries, and blueberries. The tartness of the berries complements the richness of the cake and frosting beautifully.
- Whipped Cream: A dollop of freshly whipped cream adds a light and airy contrast to the dense and rich cake.
- Coffee or Tea Pairing: Red Velvet Loaf Cake is the perfect accompaniment to a cup of hot coffee or tea. The subtle cocoa notes pair wonderfully with these beverages.
- Dessert Platter: Include slices of Red Velvet Loaf Cake on a dessert platter alongside other sweet treats for a visually appealing and varied spread.
- Warm it Up (Slightly): For an extra indulgent experience, gently warm a slice of cake in the microwave for a few seconds (just until slightly warm, not hot). This enhances the moistness and aroma.
- Ice Cream Sundae: Crumble slices of Red Velvet Loaf Cake and layer them in a sundae glass with vanilla ice cream, chocolate sauce, and whipped cream for a decadent dessert.
- Gift Giving: Red Velvet Loaf Cake makes a beautiful and thoughtful homemade gift. Wrap slices individually or present the whole loaf in a decorative box.
Additional Tips for Baking Success
Here are five essential tips to ensure your Red Velvet Loaf Cake is a resounding success:
- Room Temperature Ingredients are Key: Ensure your cream cheese, butter, eggs, and buttermilk are all at room temperature before starting. This helps them emulsify properly, creating a smooth batter and frosting. Room temperature ingredients blend together more easily, resulting in a better texture and volume in your cake.
- Don’t Overmix the Batter: Overmixing develops the gluten in the flour, which can lead to a tough and dense cake. Mix the wet and dry ingredients until just combined. A few streaks of flour are okay – they will disappear as you bake.
- Measure Flour Correctly: Incorrectly measured flour is a common baking mistake. Spoon flour into your measuring cup and level it off with a straight edge. Don’t scoop directly from the bag, as this can compact the flour and result in too much flour in your recipe.
- Test for Doneness Properly: Use a wooden skewer or toothpick to check for doneness. Insert it into the center of the cake. If it comes out clean or with just a few moist crumbs attached, the cake is done. If it comes out with wet batter, bake for a few more minutes and test again.
- Cool Completely Before Frosting: Patience is key! Make sure the cake is completely cool before frosting. Frosting a warm cake will cause the frosting to melt and slide off, resulting in a messy and less visually appealing cake. Cooling also helps to set the cake and make it easier to frost.
FAQ: Your Red Velvet Loaf Cake Questions Answered
Here are answers to some frequently asked questions about making Red Velvet Loaf Cake:
Q1: Can I make Red Velvet Loaf Cake ahead of time?
A: Absolutely! Red Velvet Loaf Cake is a great make-ahead dessert. You can bake the cake a day or two in advance and store it tightly wrapped at room temperature or in the refrigerator. Frost it the day you plan to serve for the freshest flavor. The frosting can also be made a day ahead and stored in an airtight container in the refrigerator.
Q2: How do I store Red Velvet Loaf Cake?
A: Store frosted Red Velvet Loaf Cake in an airtight container in the refrigerator for up to 3-4 days. Bring it to room temperature for about 30 minutes before serving for the best texture. Unfrosted cake can be stored at room temperature for 2-3 days or in the refrigerator for up to a week.
Q3: Can I freeze Red Velvet Loaf Cake?
A: Yes, Red Velvet Loaf Cake freezes beautifully! Wrap the completely cooled, unfrosted loaf tightly in plastic wrap, then in foil, and freeze for up to 2-3 months. Thaw overnight in the refrigerator and frost before serving. You can also freeze individual slices for easy single-serving desserts.
Q4: I don’t have buttermilk. Can I substitute anything?
A: Yes, you can make a buttermilk substitute. For 1 cup of buttermilk, combine 1 tablespoon of white vinegar or lemon juice with 1 cup of milk. Stir and let it sit for 5-10 minutes to slightly thicken and curdle. This will mimic the acidity and texture of buttermilk in your recipe.
Q5: Can I reduce the amount of food coloring?
A: You can certainly reduce the amount of food coloring if you prefer a less intensely red cake. However, keep in mind that the red color is a signature characteristic of red velvet. Reducing it significantly will result in a less vibrant cake. You can also explore natural food coloring options like beet juice, but be aware they may subtly alter the flavor and color.
Print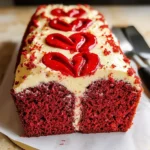
Red Velvet Loaf Cake recipe
Ingredients
For the Luscious Red Velvet Loaf Cake:
- 2 ½ cups All-Purpose Flour: The foundation of our cake, providing structure and a tender crumb. Ensure it’s measured correctly – spoon and level for best results.
- 2 cups Granulated Sugar: For sweetness, of course, but also for moisture and to help create that perfect texture.
- 1 teaspoon Baking Soda: Our leavening agent, reacting with the acidic ingredients to give the cake its lift and airy texture.
- 1 teaspoon Baking Powder: Working in tandem with baking soda, baking powder provides a double boost of leavening for a beautifully risen cake.
- 1 teaspoon Salt: Enhances the flavors of all the other ingredients and balances the sweetness.
- 1 tablespoon Unsweetened Cocoa Powder: The subtle chocolate note that’s characteristic of red velvet. Don’t be tempted to use Dutch-processed cocoa powder here, as the acidity of natural cocoa powder is important for the red velvet reaction.
- 1 ½ cups Vegetable Oil: Contributes to the cake’s incredible moistness. You can also use canola oil or another neutral-flavored oil.
- 1 cup Buttermilk: The magic ingredient for red velvet! Buttermilk adds tanginess, tenderizes the gluten in the flour, and reacts with baking soda to create that signature texture. If you don’t have buttermilk, you can make a substitute (instructions provided later!).
- 2 Large Eggs: Bind the ingredients together, add richness, and contribute to the cake’s structure.
- 2 teaspoons Vanilla Extract: Enhances all the flavors and adds a warm, comforting note.
- 1 tablespoon White Vinegar: Another key ingredient in red velvet. Vinegar reacts with baking soda to further enhance the rise and create a subtle tang. It also helps to brighten the red color.
- 1 ounce Red Food Coloring (Liquid or Gel): The star of the show for that vibrant red hue. Gel food coloring is generally more concentrated, so you might need slightly less. Adjust to your desired shade of red, but be mindful that too much liquid food coloring can affect the batter consistency. Note: For a more natural approach, consider using beet juice or natural red food coloring alternatives, but be aware they might slightly alter the color and flavor.
For the Dreamy Cream Cheese Frosting:
- 8 ounces Cream Cheese, softened: The heart of the frosting, providing that tangy, creamy richness that perfectly complements the red velvet cake. Make sure it’s softened to room temperature to avoid lumps.
- ½ cup (1 stick) Unsalted Butter, softened: Adds richness and helps create a smooth, spreadable frosting. Softened butter is crucial for a light and airy frosting.
- 3 cups Powdered Sugar: Sweetens and thickens the frosting to the perfect consistency. Sift it before measuring to avoid clumps.
- 1 teaspoon Vanilla Extract: Enhances the flavor of the frosting, adding a touch of warmth and sweetness.
Instructions
- Preheat and Prepare: Preheat your oven to 350°F (175°C). Grease and flour a 9×5 inch loaf pan. You can also line the pan with parchment paper, leaving an overhang on the sides for easy removal after baking. This is a pro tip to prevent sticking and ensure a clean loaf.
- Whisk Dry Ingredients: In a large bowl, whisk together the flour, sugar, baking soda, baking powder, salt, and cocoa powder. Whisking ensures all the dry ingredients are evenly distributed, preventing clumps and ensuring consistent texture in the final cake.
- Combine Wet Ingredients: In a separate medium bowl, whisk together the vegetable oil, buttermilk, eggs, vanilla extract, vinegar, and red food coloring. Whisk until everything is well combined and the color is evenly dispersed. The buttermilk might look slightly curdled – this is normal and actually contributes to the cake’s tenderness.
- Combine Wet and Dry Ingredients: Gradually pour the wet ingredients into the dry ingredients, mixing on low speed with an electric mixer or by hand with a spatula. Mix until just combined. Be careful not to overmix. Overmixing can develop the gluten in the flour, resulting in a tough cake. A few streaks of flour are okay at this stage.
- Bake to Perfection: Pour the batter into the prepared loaf pan and spread evenly. Bake for 50-60 minutes, or until a wooden skewer inserted into the center comes out clean or with just a few moist crumbs attached. Baking times can vary depending on your oven, so start checking for doneness around 50 minutes.
- Cool Completely: Let the cake cool in the pan for 10-15 minutes before inverting it onto a wire rack to cool completely. Cooling in the pan allows the cake to set and prevents it from crumbling when you try to remove it while it’s still warm. Make sure the cake is completely cool before frosting, otherwise, the frosting will melt.
- Prepare the Cream Cheese Frosting: While the cake is cooling, make the frosting. In a large bowl, beat the softened cream cheese and butter together with an electric mixer until smooth and creamy. Ensure both the cream cheese and butter are truly softened to room temperature for a lump-free frosting.
- Add Powdered Sugar and Vanilla: Gradually add the powdered sugar, one cup at a time, beating on low speed until incorporated. Then, increase the speed to medium and beat until the frosting is light and fluffy. Stir in the vanilla extract and mix until just combined. Be careful not to overbeat the frosting, as it can become too soft or even separate.
- Frost and Decorate: Once the cake is completely cool, frost it generously with the cream cheese frosting. You can create swirls with a spatula for a rustic look, or use a piping bag for a more decorative finish. Get creative with your frosting!
- Chill (Optional but Recommended): For easier slicing and a firmer frosting, chill the frosted cake in the refrigerator for at least 30 minutes before serving. This also allows the flavors to meld together beautifully.
Nutrition
- Serving Size: one normal portion
- Calories: 350-450
- Sugar: 30-35g
- Sodium: 200-250mg
- Fat: 20-25g
- Saturated Fat: 10-15g
- Carbohydrates: 40-50g
- Protein: 3-4g
- Cholesterol: 80-100mg


