

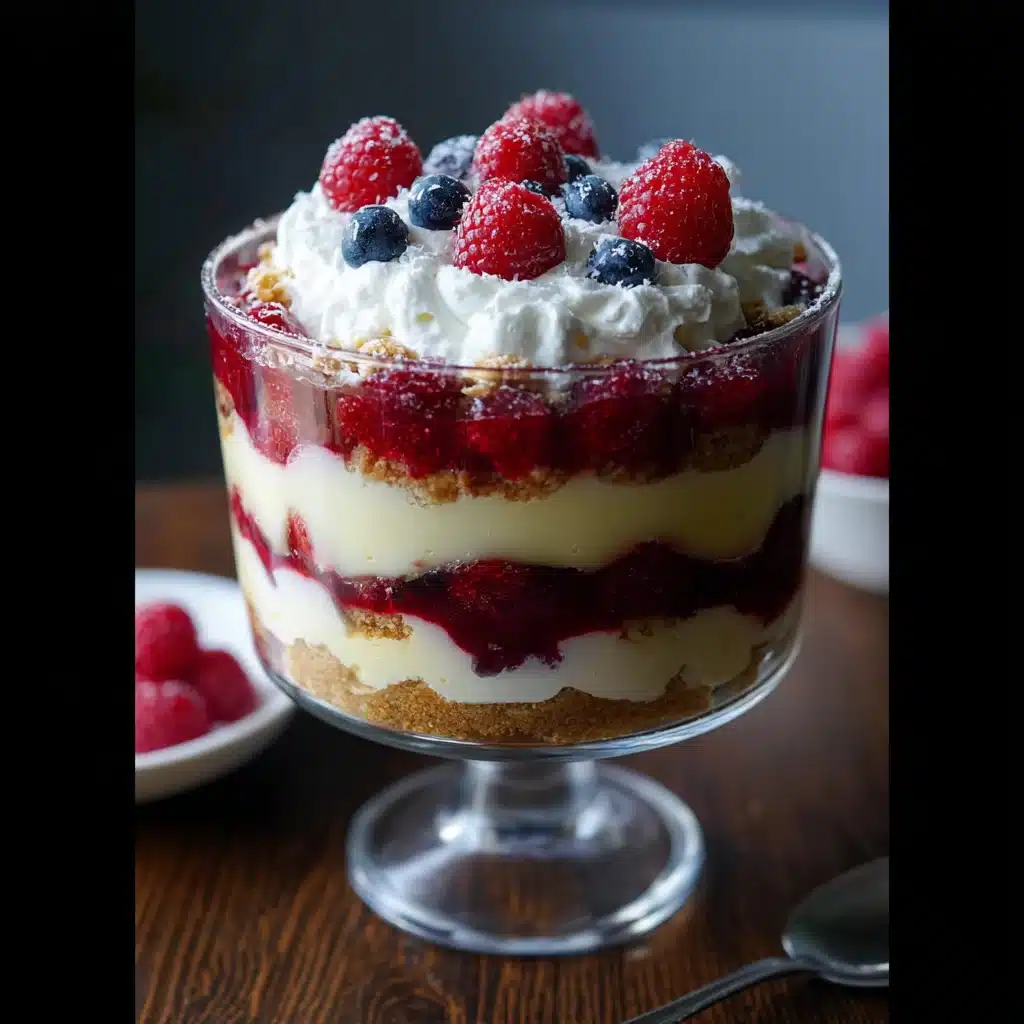

Of all the desserts in my repertoire, the ones that create a collective “wow” at the table are always my favorite. This Raspberry Cheesecake Trifle is, without a doubt, the undisputed champion of showstoppers in our house. I first made it for a big family Easter gathering, needing something that could feed a crowd but wouldn’t have me chained to the oven all day. I was a bit nervous, as trifle can sometimes feel old-fashioned. But this? This is different. This is a modern, vibrant, and utterly decadent reinvention. The moment I placed the towering, jewel-toned glass bowl on the dessert table, conversations paused. You could see the distinct, beautiful layers: the snowy white of the cheesecake cream, the deep ruby red of the raspberry sauce, and the soft, angelic cubes of cake peeking through. The first spoonful was a revelation. It wasn’t just a dessert; it was an experience. The creamy, slightly tangy cheesecake filling, the bright, sweet-tart burst of fresh raspberries, and the soft, yielding angel food cake that soaked up all the delicious flavors—it was pure harmony. My notoriously picky nephew asked for seconds, my mother-in-law asked for the recipe, and the bowl was scraped clean. It has since become a mandatory feature at holidays, potlucks, and any celebration that calls for something truly special. It’s the recipe people talk about, the one they remember, and the one that proves you don’t need to be a pastry chef to create a masterpiece.
The Ultimate Raspberry Cheesecake Trifle: A Symphony of Layers
Before we dive into the “how-to,” let’s talk about the “why.” What makes this specific Raspberry Cheesecake Trifle recipe so spectacular? It’s the thoughtful balance of textures and flavors. Many trifles can be one-note—just sweet on top of sweet. This recipe, however, is a carefully orchestrated performance for your palate.
- The Creaminess: The no-bake cheesecake filling is the star. It’s velvety, rich, and has that signature tang from the cream cheese, which cuts through the sweetness and prevents the dessert from becoming cloying. It’s substantial enough to hold its own but light enough to feel luxurious, not heavy.
- The Tartness: Fresh raspberries are non-negotiable for the best result. We macerate them lightly with sugar and a hint of lemon juice, which draws out their natural juices and creates a vibrant, syrupy sauce. This pop of tartness is the perfect counterpoint to the creamy cheesecake layer, waking up your taste buds with every bite.
- The Softness: We use angel food cake for a reason. Its light, airy, and almost spongy texture is the ideal vehicle for absorbing the raspberry juices and the essence of the cheesecake filling without turning to complete mush. Unlike dense pound cake, it provides structure while maintaining an ethereal, cloud-like quality.
- The Visual Appeal: Let’s be honest—we eat with our eyes first. A trifle is all about the layers, and this one is a work of art. The stark white, deep red, and pale yellow create a stunning visual contrast that looks incredibly impressive in a glass trifle bowl. It’s a dessert that commands attention and promises something delicious is on its way.
Complete Ingredients for Your Masterpiece
Precision is key to recreating this dessert perfectly. Using high-quality ingredients will elevate the final result from good to unforgettable. Here’s exactly what you’ll need, with a few notes on why each component matters.
For the No-Bake Cheesecake Filling:
- Cream Cheese (16 ounces / 452g): Use two full-fat blocks, softened to room temperature. This is crucial for a smooth, lump-free filling. Low-fat or whipped cream cheese will result in a runnier, less flavorful base.
- Granulated Sugar (1 cup / 200g): Provides the sweetness to balance the tangy cream cheese.
- Heavy Whipping Cream (2 cups / 480ml): Must be very cold. This is what gives the filling its light, airy, and mousse-like texture. Do not substitute with half-and-half or milk.
- Powdered Sugar (1/4 cup / 30g): Used to stabilize the whipped cream and add a touch of smooth sweetness.
- Pure Vanilla Extract (2 teaspoons): Use pure vanilla, not imitation, for the best, most aromatic flavor.
- Lemon Juice (1 tablespoon): Freshly squeezed is best. This small amount brightens the entire filling and enhances the natural tang of the cream cheese, making the whole dessert taste fresher.
For the Raspberry Layer:
- Fresh Raspberries (24 ounces / 680g): This is about 4 standard 6-ounce containers. You’ll use some for the sauce and reserve some for layering and garnish. While you can use frozen in a pinch (see FAQ), fresh provides the best texture and flavor.
- Granulated Sugar (1/4 cup / 50g): This is to macerate the raspberries. You can adjust this amount slightly depending on the sweetness of your berries.
- Lemon Zest (from 1 lemon): Adds a beautiful, fragrant citrus note that pairs perfectly with raspberries.
For the Cake Layer:
- Angel Food Cake (1 large, pre-made, about 14-16 ounces): A store-bought angel food cake is a fantastic time-saver and works perfectly here. Its porous structure is ideal for soaking up the juices. Alternatively, you can use a large pound cake for a denser, more buttery trifle, or about 24-30 ladyfingers for a more classic, tiramisu-like texture.
For Garnish (Optional but Recommended):
- Fresh Raspberries: A handful of the most perfect berries for scattering on top.
- Fresh Mint Sprigs: The touch of green adds a beautiful color contrast.
- White Chocolate Shavings: Adds a touch of elegance and another layer of creamy flavor.
- Toasted Sliced Almonds: For a delightful textural crunch.
Step-by-Step Instructions for Assembling the Trifle
Assembling a trifle is an art form, but a very simple one. The key is to work methodically and keep your layers as clean and distinct as possible for that stunning visual effect.
Step 1: Prepare the Cake and Raspberries
- Cube the Cake: Using a serrated knife, cut your angel food cake (or pound cake) into 1-inch cubes. Set them aside in a large bowl.
- Macerate the Raspberries: In a separate medium bowl, combine 20 ounces of your fresh raspberries with 1/4 cup of granulated sugar and the lemon zest. Gently stir to combine, being careful not to mash the berries completely. You want some to remain whole while others break down. Let this mixture sit at room temperature for about 20-30 minutes. This process, called maceration, will draw the natural juices out of the berries, creating a luscious, natural syrup.
Step 2: Create the Velvety Cheesecake Filling
- Beat the Cream Cheese: In a large mixing bowl, using a hand mixer or a stand mixer fitted with the paddle attachment, beat the softened cream cheese on medium speed until it is completely smooth and free of lumps. This is the most important step for a silky texture. Scrape down the sides and bottom of the bowl to ensure everything is incorporated.
- Add Sugar and Flavorings: Add the 1 cup of granulated sugar, vanilla extract, and fresh lemon juice to the cream cheese. Beat on medium speed for another 2 minutes, or until the sugar is fully dissolved and the mixture is light and creamy. Scrape the bowl down again.
- Whip the Cream: In a separate, chilled mixing bowl, pour in the very cold heavy whipping cream and the 1/4 cup of powdered sugar. Using clean beaters, whip the cream on medium-high speed until it forms stiff peaks. You’ll know it’s ready when you can lift the beaters out and the peak of cream holds its shape without flopping over. Be careful not to over-whip, or it will turn grainy.
- Fold It All Together: Gently fold about one-third of the whipped cream into the cream cheese mixture using a rubber spatula. This lightens the base. Once incorporated, add the remaining whipped cream and fold until just combined. The goal is to keep the airiness of the whipped cream, so use gentle, sweeping motions from the bottom of the bowl up and over the top. The final filling should be thick, light, and spreadable.
Step 3: The Art of Layering
This is where the magic happens. You’ll need a large glass trifle bowl (typically 3-4 quarts) to show off your work.
- First Cake Layer: Arrange half of the angel food cake cubes in a single, even layer at the bottom of the trifle bowl. Pack them in snugly but don’t compress them too much.
- First Raspberry Layer: Spoon half of the macerated raspberry mixture, including all the glorious juices, evenly over the cake layer. The cake will begin to soak up that delicious syrup.
- First Cheesecake Layer: Carefully spoon half of the cheesecake filling over the raspberries. Using the back of a spoon or a small offset spatula, gently spread the filling to the edges of the bowl, creating a clean, solid white layer.
- Repeat the Layers: Repeat the process. Add the remaining angel food cake cubes, followed by the remaining raspberry mixture, and finish with the remaining cheesecake filling, spreading it smoothly to the top.
- Chill to Perfection: Cover the trifle bowl tightly with plastic wrap and refrigerate for at least 6 hours, but preferably overnight. This chilling time is not optional! It allows the flavors to meld together, the cake to soften perfectly, and the cheesecake filling to set up firmly.
Step 4: Garnish and Serve
Just before you’re ready to serve, uncover the trifle and add your garnishes. Arrange the reserved fresh raspberries in the center, tuck in a few sprigs of fresh mint, and sprinkle with white chocolate shavings or toasted almonds if desired.
Nutrition Facts
- Servings: 12-16
- Calories per serving: Approximately 450-550 kcal (This is an estimate and can vary based on specific ingredients used, such as the type of cake and fat content of the cream.)
Preparation Time
- Active Prep Time: 25 minutes
- Maceration & Chill Time: 6.5 hours (30 minutes for berries, 6 hours for trifle)
- Total Time: Approximately 7 hours
How to Serve Your Raspberry Cheesecake Trifle
Serving this dessert is part of the fun. The goal is to ensure everyone gets a perfect spoonful with all the layers intact.
- The Right Utensil: Use a very large, long-handled serving spoon. This allows you to dig straight down to the bottom of the bowl, capturing a vertical slice of all the layers—cake, raspberry, and cream—in a single scoop.
- Serving Vessels:
- Small Bowls: The classic way to serve trifle. Small glass or ceramic dessert bowls work perfectly.
- Wine Glasses or Coupes: For a more elegant presentation, serve individual portions in large wine glasses or champagne coupes. This highlights the layers beautifully on a smaller scale.
- Mason Jars: For a rustic or picnic-friendly option, you can assemble individual trifles directly into small mason jars with lids. They are perfectly portioned and easy to transport.
- Accompaniments: This dessert is a star on its own and doesn’t need much else. However, if you want to offer an extra touch:
- A small pitcher of extra raspberry coulis on the side.
- A small bowl of whipped cream for those who want an extra dollop.
- Crisp, buttery shortbread cookies for dipping.
Additional Tips for Trifle Perfection
Master the details to ensure your trifle is flawless every single time.
- Ensure Cream Cheese is Truly Softened: If your cream cheese is even slightly cool, it will leave tiny lumps in your filling no matter how much you beat it. To soften it quickly, you can submerge the sealed foil packages in a bowl of warm (not hot) water for 10-15 minutes.
- Don’t Skimp on the Chill Time: I know it’s tempting to dig in early, but the 6+ hour chilling period is critical. It’s when the magic happens. The cake absorbs the raspberry syrup, the cheesecake filling firms up, and all the individual flavors marry into one cohesive, delicious dessert. A rushed trifle will be soupy and its flavors disjointed.
- Layer with Care for Clean Lines: For that picture-perfect look, be deliberate with your layering. After spreading the cheesecake filling, run a clean paper towel around the inside rim of the glass bowl above the layer. This removes any smudges and ensures the next layer looks clean and distinct.
- Control the Moisture: Angel food cake is perfect because it’s thirsty. However, if you’re using a denser cake like pound cake, be mindful of how much raspberry juice you add, as it won’t absorb as much liquid. You may want to drain the raspberries slightly before layering to prevent a watery bottom.
- Taste and Adjust: The sweetness of raspberries can vary wildly. Before you start layering, taste your macerated raspberry mixture. If your berries are particularly tart, you might want to add another tablespoon of sugar. If they’re very sweet, you might want to add an extra squeeze of lemon juice to brighten the flavor. Trust your palate!
Frequently Asked Questions (FAQ)
Here are answers to some of the most common questions about making this Raspberry Cheesecake Trifle.
1. Can I make this dessert ahead of time?
Absolutely! In fact, it’s designed to be made ahead. This trifle is best made the day before you plan to serve it. An overnight chill gives it the perfect amount of time for the flavors to meld and the structure to set. It can be made up to 48 hours in advance, though it will be at its textural peak around the 24-hour mark. Just be sure to keep it tightly covered in the refrigerator and wait to add the final garnishes until just before serving to keep them fresh.
2. Can I use frozen raspberries instead of fresh?
Yes, you can use frozen raspberries, which makes this a great dessert to make year-round. Thaw the frozen raspberries completely in a colander set over a bowl. Reserve the juice that drains off. Macerate the thawed berries with the sugar and lemon zest as directed, then add back a few tablespoons of the reserved juice until you reach a nice, syrupy consistency. Using all the juice from thawed frozen berries can sometimes make the trifle too watery.
3. My trifle seems a bit watery at the bottom. What went wrong?
A watery trifle is usually caused by one of two things. First, too much liquid in the raspberry layer (often an issue when using very juicy berries or improperly drained frozen ones). Second, the cheesecake filling may not have been thick enough. This can happen if you use low-fat cream cheese or if your heavy cream wasn’t whipped to stiff peaks. To prevent this, ensure you use full-fat cream cheese, whip your cream properly, and if your raspberries seem excessively juicy, drain a small amount of the liquid before layering.
4. How do I store leftover trifle?
Store any leftover trifle tightly covered with plastic wrap in the refrigerator. It will keep for up to 3 days. Be aware that after the second day, the cake will become much softer, and the layers may start to bleed into each other slightly. While still delicious, it won’t be as texturally distinct or visually appealing as it was on the first day. Unfortunately, trifle does not freeze well.
5. What are some fun variations of this recipe?
This recipe is a fantastic base for creativity! Here are a few popular variations:
- Strawberry Cheesecake Trifle: Simply substitute the raspberries with fresh, sliced strawberries. A dash of balsamic vinegar in the macerating liquid is a wonderful addition.
- Mixed Berry Cheesecake Trifle: Use a combination of raspberries, blueberries, blackberries, and sliced strawberries for a “fruit of the forest” version.
- Lemon Blueberry Cheesecake Trifle: Replace the raspberries with a homemade blueberry compote and add the zest of a whole lemon to the cheesecake filling for an extra citrusy punch.
- Chocolate Raspberry Cheesecake Trifle: Add a layer of chocolate. You can use cubes of brownie instead of angel food cake, or add a layer of rich chocolate pudding or ganache between the raspberry and cheesecake layers.
- Peach & Ginger Cheesecake Trifle: In the summer, use fresh, ripe peaches instead of raspberries. Macerate them with a little brown sugar and a teaspoon of finely grated fresh ginger for a warm, spicy twist.
Raspberry Cheesecake Trifle recipe
Ingredients
For the No-Bake Cheesecake Filling:
-
Cream Cheese (16 ounces / 452g): Use two full-fat blocks, softened to room temperature. This is crucial for a smooth, lump-free filling. Low-fat or whipped cream cheese will result in a runnier, less flavorful base.
-
Granulated Sugar (1 cup / 200g): Provides the sweetness to balance the tangy cream cheese.
-
Heavy Whipping Cream (2 cups / 480ml): Must be very cold. This is what gives the filling its light, airy, and mousse-like texture. Do not substitute with half-and-half or milk.
-
Powdered Sugar (1/4 cup / 30g): Used to stabilize the whipped cream and add a touch of smooth sweetness.
-
Pure Vanilla Extract (2 teaspoons): Use pure vanilla, not imitation, for the best, most aromatic flavor.
-
Lemon Juice (1 tablespoon): Freshly squeezed is best. This small amount brightens the entire filling and enhances the natural tang of the cream cheese, making the whole dessert taste fresher.
For the Raspberry Layer:
-
Fresh Raspberries (24 ounces / 680g): This is about 4 standard 6-ounce containers. You’ll use some for the sauce and reserve some for layering and garnish. While you can use frozen in a pinch (see FAQ), fresh provides the best texture and flavor.
-
Granulated Sugar (1/4 cup / 50g): This is to macerate the raspberries. You can adjust this amount slightly depending on the sweetness of your berries.
-
Lemon Zest (from 1 lemon): Adds a beautiful, fragrant citrus note that pairs perfectly with raspberries.
For the Cake Layer:
-
Angel Food Cake (1 large, pre-made, about 14-16 ounces): A store-bought angel food cake is a fantastic time-saver and works perfectly here. Its porous structure is ideal for soaking up the juices. Alternatively, you can use a large pound cake for a denser, more buttery trifle, or about 24-30 ladyfingers for a more classic, tiramisu-like texture.
For Garnish (Optional but Recommended):
-
Fresh Raspberries: A handful of the most perfect berries for scattering on top.
-
Fresh Mint Sprigs: The touch of green adds a beautiful color contrast.
-
White Chocolate Shavings: Adds a touch of elegance and another layer of creamy flavor.
-
Toasted Sliced Almonds: For a delightful textural crunch.
Instructions
Step 1: Prepare the Cake and Raspberries
-
Cube the Cake: Using a serrated knife, cut your angel food cake (or pound cake) into 1-inch cubes. Set them aside in a large bowl.
-
Macerate the Raspberries: In a separate medium bowl, combine 20 ounces of your fresh raspberries with 1/4 cup of granulated sugar and the lemon zest. Gently stir to combine, being careful not to mash the berries completely. You want some to remain whole while others break down. Let this mixture sit at room temperature for about 20-30 minutes. This process, called maceration, will draw the natural juices out of the berries, creating a luscious, natural syrup.
Step 2: Create the Velvety Cheesecake Filling
-
Beat the Cream Cheese: In a large mixing bowl, using a hand mixer or a stand mixer fitted with the paddle attachment, beat the softened cream cheese on medium speed until it is completely smooth and free of lumps. This is the most important step for a silky texture. Scrape down the sides and bottom of the bowl to ensure everything is incorporated.
-
Add Sugar and Flavorings: Add the 1 cup of granulated sugar, vanilla extract, and fresh lemon juice to the cream cheese. Beat on medium speed for another 2 minutes, or until the sugar is fully dissolved and the mixture is light and creamy. Scrape the bowl down again.
-
Whip the Cream: In a separate, chilled mixing bowl, pour in the very cold heavy whipping cream and the 1/4 cup of powdered sugar. Using clean beaters, whip the cream on medium-high speed until it forms stiff peaks. You’ll know it’s ready when you can lift the beaters out and the peak of cream holds its shape without flopping over. Be careful not to over-whip, or it will turn grainy.
-
Fold It All Together: Gently fold about one-third of the whipped cream into the cream cheese mixture using a rubber spatula. This lightens the base. Once incorporated, add the remaining whipped cream and fold until just combined. The goal is to keep the airiness of the whipped cream, so use gentle, sweeping motions from the bottom of the bowl up and over the top. The final filling should be thick, light, and spreadable.
Step 3: The Art of Layering
This is where the magic happens. You’ll need a large glass trifle bowl (typically 3-4 quarts) to show off your work.
-
First Cake Layer: Arrange half of the angel food cake cubes in a single, even layer at the bottom of the trifle bowl. Pack them in snugly but don’t compress them too much.
-
First Raspberry Layer: Spoon half of the macerated raspberry mixture, including all the glorious juices, evenly over the cake layer. The cake will begin to soak up that delicious syrup.
-
First Cheesecake Layer: Carefully spoon half of the cheesecake filling over the raspberries. Using the back of a spoon or a small offset spatula, gently spread the filling to the edges of the bowl, creating a clean, solid white layer.
-
Repeat the Layers: Repeat the process. Add the remaining angel food cake cubes, followed by the remaining raspberry mixture, and finish with the remaining cheesecake filling, spreading it smoothly to the top.
-
Chill to Perfection: Cover the trifle bowl tightly with plastic wrap and refrigerate for at least 6 hours, but preferably overnight. This chilling time is not optional! It allows the flavors to meld together, the cake to soften perfectly, and the cheesecake filling to set up firmly.
Step 4: Garnish and Serve
Just before you’re ready to serve, uncover the trifle and add your garnishes. Arrange the reserved fresh raspberries in the center, tuck in a few sprigs of fresh mint, and sprinkle with white chocolate shavings or toasted almonds if desired.
Nutrition
- Serving Size: one normal portion
- Calories: 450-550 kcal


