

The aroma of a Hong Kong bakery is a memory etched into my senses. It’s a warm, sweet, buttery cloud that hits you the moment you walk through the door, a symphony of freshly baked goods that promises pure comfort. And at the heart of that symphony, sitting like golden-crowned jewels in the display case, are the Pineapple Buns. I remember my first bite as a child, the sheer confusion and delight. The name promised fruit, but the flavor was a paradox of a crackly, sweet, buttery cookie crust giving way to the softest, milkiest, most ethereal bread I had ever tasted. There was no pineapple, and yet, it was perfect. That experience sparked a lifelong love affair and a baking quest to recreate that specific magic in my own kitchen. This recipe is the culmination of that quest. It’s a tribute to the countless bakers in cha chaan tengs across the world and a love letter to a bun that is so much more than the sum of its parts. It has become a weekend baking ritual in my home, filling my kitchen with that same nostalgic aroma and bringing smiles to my family’s faces with every messy, flaky, wonderful bite.
The Legendary Hong Kong Pineapple Bun (Bolo Bao): A Baking Adventure
Welcome to the ultimate guide to making authentic Hong Kong-style Pineapple Buns, or Bolo Bao (菠蘿包). If you’ve ever stepped into a Chinese bakery, you’ve undoubtedly seen these iconic golden domes. This bun is a cornerstone of Cantonese baking culture, a staple breakfast item, and the perfect accompaniment to a cup of Hong Kong milk tea.
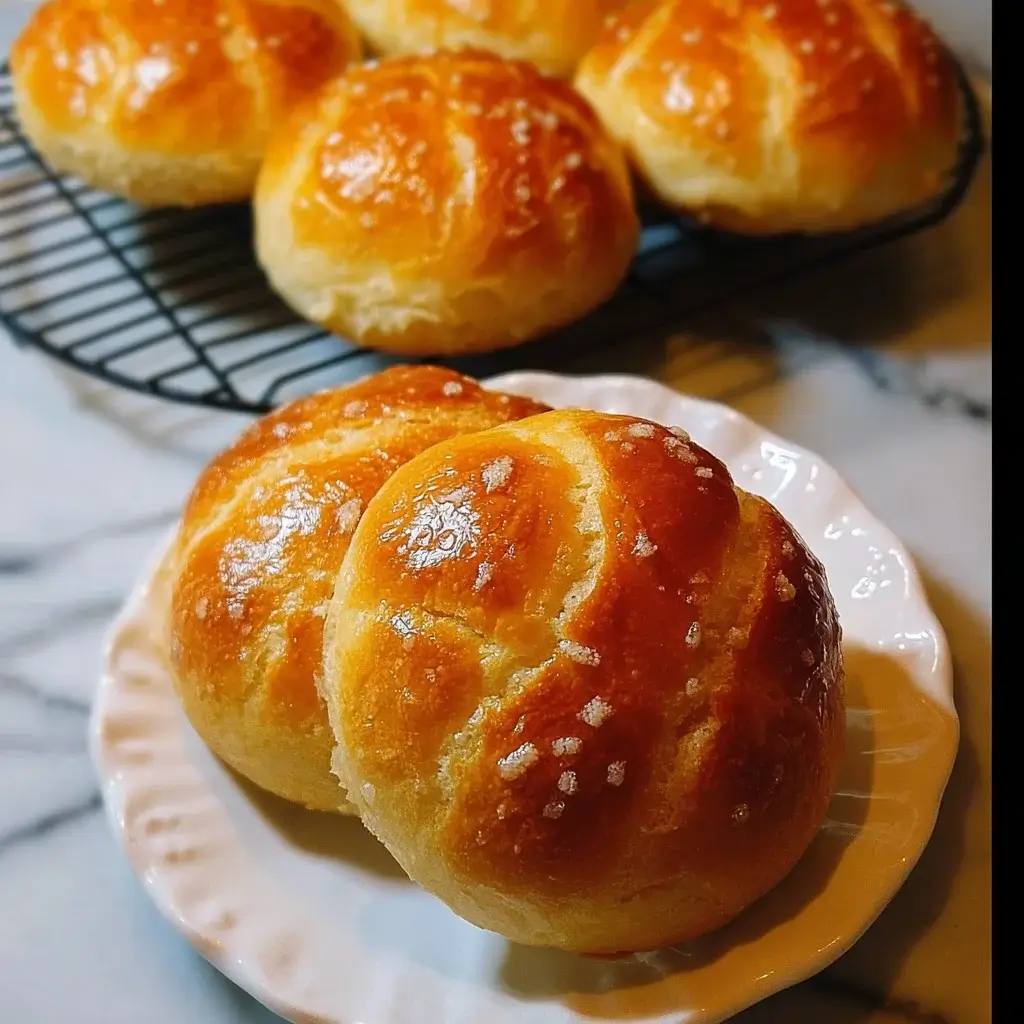
But first, let’s address the pineapple in the room: There is no pineapple in a pineapple bun. The name comes purely from its appearance. The golden, crackly, sugary topping, with its signature crosshatch pattern, resembles the textured skin of a pineapple. The magic of this bun lies in the textural contrast between this crunchy, cookie-like crust and the incredibly soft, fluffy, and slightly sweet milk bread underneath. It’s a masterpiece of texture and simple, comforting flavors.
Making them from scratch may seem daunting, but it’s a deeply rewarding process. This recipe breaks it down into manageable steps, utilizing the “Tangzhong” method to create a bread so soft and moist it will stay fresh for days, rivaling any bakery’s best.
The Anatomy of a Perfect Pineapple Bun: Understanding the Components
A perfect Bolo Bao is a tale of two distinct, yet harmonious, parts:
- The Bread (The Tangzhong Milk Bread): The soul of the bun is an enriched milk bread. To achieve its signature cloud-like softness and extended shelf life, we use the Tangzhong method. This involves cooking a small portion of the flour and liquid into a thick paste (a roux) before adding it to the rest of the dough. This pre-gelatinizes the starches, allowing them to absorb more moisture, which results in a miraculously soft and fluffy crumb.
- The Topping (The “Pineapple” Crust): This is essentially a simple sugar cookie dough made from butter, sugar, flour, and egg. The key to a perfect topping is keeping the ingredients cold and working quickly. This ensures the topping bakes into a distinct, crisp, and crumbly layer rather than melting into the bread.
Complete Ingredients for Authentic Pineapple Buns (Bolo Bao)
This recipe is broken down into three parts for clarity: the Tangzhong, the main bread dough, and the crispy topping.
Yields: 12 buns
Prep time: 40 minutes
Proofing time: 1.5 – 2 hours
Cook time: 15-18 minutes
For the Tangzhong (Water Roux):
- 20g (2.5 tablespoons) bread flour
- 100g (a little less than 1/2 cup) water
For the Milk Bread Dough:
- 350g (approx. 2 3/4 cups) bread flour
- 55g (1/4 cup) granulated sugar
- 5g (1 teaspoon) instant yeast
- 5g (1 teaspoon) salt
- 20g (2.5 tablespoons) milk powder
- 1 large egg, lightly beaten
- 110g (1/2 cup) whole milk, lukewarm
- All of the prepared Tangzhong (from above)
- 40g (3 tablespoons) unsalted butter, softened to room temperature
For the Crispy Pineapple Topping:
- 115g (1 cup) all-purpose flour
- 60g (1/4 cup + 1 tablespoon) granulated sugar
- 1/4 teaspoon baking soda
- 1/4 teaspoon baking powder
- Pinch of salt
- 55g (4 tablespoons) cold unsalted butter, cut into small cubes
- 1 large egg yolk
- 1 tablespoon whole milk
For the Egg Wash:
- 1 large egg, whisked with 1 tablespoon of milk
Step-by-Step Instructions: Your Journey to Bolo Bao Perfection
Follow these detailed steps carefully for bakery-quality results.
Step 1: Make the Tangzhong
- In a small saucepan, whisk together the 20g of bread flour and 100g of water until no lumps remain.
- Place the saucepan over medium-low heat. Cook, whisking constantly, until the mixture thickens into a smooth, thick paste, similar to pudding. You should see lines forming on the bottom of the pan as you whisk. This will take about 2-3 minutes.
- Immediately transfer the Tangzhong to a small bowl, cover it with plastic wrap touching the surface to prevent a skin from forming, and let it cool to room temperature. You can place it in the fridge to speed this up.
Step 2: Make and Knead the Milk Bread Dough
- Combine Dry Ingredients: In the bowl of a stand mixer fitted with a dough hook, combine the 350g of bread flour, 55g of sugar, 5g of yeast, 5g of salt, and 20g of milk powder. Briefly mix to combine.
- Add Wet Ingredients: Add the beaten egg, lukewarm milk, and the cooled Tangzhong to the dry ingredients.
- Knead (Part 1): Mix on low speed until a shaggy dough forms. Increase the speed to medium and knead for about 5-7 minutes, until the dough comes together and looks smooth.
- Add the Butter: Add the 40g of softened butter, one tablespoon at a time, waiting until each piece is incorporated before adding the next. The dough may look greasy and separated at first—this is normal. Keep kneading.
- Knead (Part 2): Continue to knead on medium speed for another 10-15 minutes, until the dough is very smooth, elastic, and pulls away from the sides of the bowl.
- The Windowpane Test: To check if it’s ready, take a small piece of dough and gently stretch it between your fingers. It should stretch thin enough to be translucent without tearing. This indicates proper gluten development.
Step 3: The First Proof
- Form the dough into a smooth ball. Place it in a lightly greased bowl, cover it with plastic wrap or a damp towel, and let it rise in a warm, draft-free place for 60-90 minutes, or until it has doubled in size.
Step 4: Prepare the Crispy Topping
- Combine Dry Ingredients: While the dough is proofing, make the topping. In a medium bowl, whisk together the 115g of all-purpose flour, 60g of sugar, baking soda, baking powder, and salt.
- Cut in the Butter: Add the cold, cubed butter to the flour mixture. Use your fingertips or a pastry cutter to quickly rub the butter into the flour until the mixture resembles coarse, sandy crumbs.
- Add Wet Ingredients: In a small separate bowl, whisk together the egg yolk and milk. Pour this into the flour-butter mixture.
- Form the Dough: Use a spatula or your hands to gently and quickly bring the mixture together into a soft dough. Do not overwork it.
- Chill: Wrap the topping dough in plastic wrap and chill it in the refrigerator for at least 30 minutes.
Step 5: Shape the Buns and the Topping
- Divide the Bread Dough: Once the dough has doubled, gently punch it down to release the air. Transfer it to a lightly floured surface and divide it into 12 equal pieces (each should be about 55-60g).
- Shape the Buns: Roll each piece of dough into a smooth, tight ball. Place the balls on a large baking sheet lined with parchment paper, leaving a few inches of space between them.
- Shape the Topping: Remove the chilled topping dough from the fridge and divide it into 12 equal pieces. Roll each piece into a ball. Place one ball of topping between two sheets of parchment paper and gently press or roll it into a thin, flat circle, just large enough to cover the top and most of the sides of a bread bun.
- Apply the Topping: Carefully peel the topping circle off the parchment and drape it over one of the dough balls, gently pressing it onto the surface. Repeat for all 12 buns.
Step 6: The Second Proof
- Cover the assembled buns loosely with plastic wrap and let them rise in a warm place for another 30-45 minutes, or until they are puffy and have increased in size by about 50%.
Step 7: Final Touches and Baking
- Preheat Oven: While the buns are proofing, preheat your oven to 375°F (190°C).
- Apply Egg Wash: Gently brush the exposed sides of the bread dough only with the prepared egg wash. Try to avoid getting egg wash on the cookie topping, as this will give you a better visual contrast after baking.
- Score the Topping (Optional but Recommended): For the classic look, use a bench scraper or the back of a knife to gently press a crosshatch (diamond) pattern into the cookie topping. Be careful not to cut all the way through to the bread.
- Bake: Place the baking sheet in the preheated oven and bake for 15-18 minutes, or until the buns are a deep golden brown and the topping is crisp and golden.
- Cool: Let the buns cool on the baking sheet for a few minutes before transferring them to a wire rack to cool completely. They are best enjoyed warm.
Nutrition Facts (Estimated)
- Servings: 12 buns
- Calories per serving: Approximately 300-350 kcal
Preparation and Cooking Time
- Active Preparation Time: 40 minutes
- Proofing Time: 1.5 – 2 hours
- Cooking Time: 15-18 minutes
- Total Time: Approximately 2.5 – 3 hours
How to Serve Your Pineapple Buns
These buns are a delight on their own, but here are the most popular ways to enjoy them:
- Fresh and Warm: The absolute best way to eat a pineapple bun is fresh from the oven, when the topping is at its crispiest and the bread is at its softest.
- The “Bo Lo Yau” (菠蘿油): This is the iconic Hong Kong cha chaan teng preparation. Slice a warm pineapple bun in half horizontally and sandwich a thick, cold slab of salted butter inside. The contrast of the warm, soft bun, the crunchy topping, and the cold, melting, salty butter is pure heaven.
- With Coffee or Tea: Pineapple buns are the perfect partner for a strong Hong Kong-style milk tea or a “Yuenyeung” (a coffee-and-tea mixture).
- As a Sandwich: While less traditional, you can slice them and use them as a bun for a savory filling like a slice of Spam or a fried egg.
5 Pro-Tips for Bakery-Worthy Pineapple Buns
- Don’t Skip the Tangzhong: This is the non-negotiable secret to achieving the ultra-soft, moist crumb that defines a great Bolo Bao. It’s a simple extra step that pays huge dividends in the final texture.
- Keep the Topping Cold, Cold, Cold: The key to a distinct, crumbly cookie crust is cold butter and minimal handling. If the topping dough becomes warm and greasy, it will melt and spread during baking instead of holding its shape. If it gets too soft while you’re working, pop it back in the fridge.
- Master the Windowpane Test: Don’t just time your kneading; test your dough. Achieving a proper windowpane ensures you have developed enough gluten, which is essential for a strong structure and a light, airy rise.
- Gentle Shaping After the First Proof: When you divide and shape the dough after the first rise, be gentle. You want to degas it slightly but not completely knock out all the air you worked so hard to develop. This helps maintain a light, open crumb.
- Precise Egg Wash Application: For that professional bakery look, be meticulous when applying the egg wash. Brushing only the exposed bread portion and not the cookie topping creates a beautiful two-tone effect: a glossy, deep-brown bread base and a matte, golden cookie top.
Frequently Asked Questions (FAQ)
1. Why is it called a pineapple bun if there’s no pineapple?
This is the most common and beloved question! The name comes from the way the cracked, golden-brown cookie topping looks after baking, which is said to resemble the rough, textured exterior of a pineapple. The name is purely descriptive of its appearance, not its ingredients.
2. Can I make the dough ahead of time?
Yes. You can perform the first proof in the refrigerator overnight. After kneading, place the dough in a greased bowl, cover it, and refrigerate for 8-12 hours. The next day, let it sit at room temperature for about an hour to warm up slightly before dividing, shaping, and proceeding with the second proof.
3. My cookie topping melted into a greasy mess. What went wrong?
This almost always happens because the topping dough got too warm. The butter melted before it had a chance to set in the oven. To prevent this, make sure your butter is very cold when you cut it into the flour, handle the dough as little as possible, and keep it chilled in the refrigerator until the very moment you’re ready to roll it out and place it on the buns.
4. What is milk powder, and is it essential for the recipe?
Milk powder is essentially dehydrated milk. In baking, it adds a rich, concentrated dairy flavor, contributes to a softer crumb, and helps with browning. While you could technically omit it from the bread dough (you might need to slightly reduce the liquid), it is highly recommended for achieving that authentic, rich, milky flavor in both the bread and the topping.
5. How do I store leftover pineapple buns?
Store leftover buns in an airtight container at room temperature for up to 3 days. The topping will lose its crispness over time. To revive them and bring back that glorious texture, reheat them in an oven or air fryer at 350°F (175°C) for 3-5 minutes. This will re-crisp the topping beautifully. Avoid the microwave, which will make the topping soft and the bread tough.
Conclusion: A Taste of Hong Kong in Your Own Kitchen
Baking Pineapple Buns is more than just following a recipe; it’s an act of love and a deeply satisfying journey into the heart of Cantonese baking. The process, from making the soft Tangzhong to carefully placing the signature cookie topping, is a rewarding experience that culminates in a truly special treat. Whether you enjoy them fresh from the oven or as a decadent “Bo Lo Yau,” these buns are a guaranteed source of comfort, nostalgia, and pure, unadulterated joy.
Print
Pineapple Buns Recipe
Ingredients
For the Tangzhong (Water Roux):
-
20g (2.5 tablespoons) bread flour
-
100g (a little less than 1/2 cup) water
For the Milk Bread Dough:
-
350g (approx. 2 3/4 cups) bread flour
-
55g (1/4 cup) granulated sugar
-
5g (1 teaspoon) instant yeast
-
5g (1 teaspoon) salt
-
20g (2.5 tablespoons) milk powder
-
1 large egg, lightly beaten
-
110g (1/2 cup) whole milk, lukewarm
-
All of the prepared Tangzhong (from above)
-
40g (3 tablespoons) unsalted butter, softened to room temperature
For the Crispy Pineapple Topping:
-
115g (1 cup) all-purpose flour
-
60g (1/4 cup + 1 tablespoon) granulated sugar
-
1/4 teaspoon baking soda
-
1/4 teaspoon baking powder
-
Pinch of salt
-
55g (4 tablespoons) cold unsalted butter, cut into small cubes
-
1 large egg yolk
-
1 tablespoon whole milk
For the Egg Wash:
-
1 large egg, whisked with 1 tablespoon of milk
Instructions
Step 1: Make the Tangzhong
-
In a small saucepan, whisk together the 20g of bread flour and 100g of water until no lumps remain.
-
Place the saucepan over medium-low heat. Cook, whisking constantly, until the mixture thickens into a smooth, thick paste, similar to pudding. You should see lines forming on the bottom of the pan as you whisk. This will take about 2-3 minutes.
-
Immediately transfer the Tangzhong to a small bowl, cover it with plastic wrap touching the surface to prevent a skin from forming, and let it cool to room temperature. You can place it in the fridge to speed this up.
Step 2: Make and Knead the Milk Bread Dough
-
Combine Dry Ingredients: In the bowl of a stand mixer fitted with a dough hook, combine the 350g of bread flour, 55g of sugar, 5g of yeast, 5g of salt, and 20g of milk powder. Briefly mix to combine.
-
Add Wet Ingredients: Add the beaten egg, lukewarm milk, and the cooled Tangzhong to the dry ingredients.
-
Knead (Part 1): Mix on low speed until a shaggy dough forms. Increase the speed to medium and knead for about 5-7 minutes, until the dough comes together and looks smooth.
-
Add the Butter: Add the 40g of softened butter, one tablespoon at a time, waiting until each piece is incorporated before adding the next. The dough may look greasy and separated at first—this is normal. Keep kneading.
-
Knead (Part 2): Continue to knead on medium speed for another 10-15 minutes, until the dough is very smooth, elastic, and pulls away from the sides of the bowl.
-
The Windowpane Test: To check if it’s ready, take a small piece of dough and gently stretch it between your fingers. It should stretch thin enough to be translucent without tearing. This indicates proper gluten development.
Step 3: The First Proof
-
Form the dough into a smooth ball. Place it in a lightly greased bowl, cover it with plastic wrap or a damp towel, and let it rise in a warm, draft-free place for 60-90 minutes, or until it has doubled in size.
Step 4: Prepare the Crispy Topping
-
Combine Dry Ingredients: While the dough is proofing, make the topping. In a medium bowl, whisk together the 115g of all-purpose flour, 60g of sugar, baking soda, baking powder, and salt.
-
Cut in the Butter: Add the cold, cubed butter to the flour mixture. Use your fingertips or a pastry cutter to quickly rub the butter into the flour until the mixture resembles coarse, sandy crumbs.
-
Add Wet Ingredients: In a small separate bowl, whisk together the egg yolk and milk. Pour this into the flour-butter mixture.
-
Form the Dough: Use a spatula or your hands to gently and quickly bring the mixture together into a soft dough. Do not overwork it.
-
Chill: Wrap the topping dough in plastic wrap and chill it in the refrigerator for at least 30 minutes.
Step 5: Shape the Buns and the Topping
-
Divide the Bread Dough: Once the dough has doubled, gently punch it down to release the air. Transfer it to a lightly floured surface and divide it into 12 equal pieces (each should be about 55-60g).
-
Shape the Buns: Roll each piece of dough into a smooth, tight ball. Place the balls on a large baking sheet lined with parchment paper, leaving a few inches of space between them.
-
Shape the Topping: Remove the chilled topping dough from the fridge and divide it into 12 equal pieces. Roll each piece into a ball. Place one ball of topping between two sheets of parchment paper and gently press or roll it into a thin, flat circle, just large enough to cover the top and most of the sides of a bread bun.
-
Apply the Topping: Carefully peel the topping circle off the parchment and drape it over one of the dough balls, gently pressing it onto the surface. Repeat for all 12 buns.
Step 6: The Second Proof
-
Cover the assembled buns loosely with plastic wrap and let them rise in a warm place for another 30-45 minutes, or until they are puffy and have increased in size by about 50%.
Step 7: Final Touches and Baking
-
Preheat Oven: While the buns are proofing, preheat your oven to 375°F (190°C).
-
Apply Egg Wash: Gently brush the exposed sides of the bread dough only with the prepared egg wash. Try to avoid getting egg wash on the cookie topping, as this will give you a better visual contrast after baking.
-
Score the Topping (Optional but Recommended): For the classic look, use a bench scraper or the back of a knife to gently press a crosshatch (diamond) pattern into the cookie topping. Be careful not to cut all the way through to the bread.
-
Bake: Place the baking sheet in the preheated oven and bake for 15-18 minutes, or until the buns are a deep golden brown and the topping is crisp and golden.
-
Cool: Let the buns cool on the baking sheet for a few minutes before transferring them to a wire rack to cool completely. They are best enjoyed warm.
Nutrition
- Serving Size: one normal portion
- Calories: 300-350 kcal


