
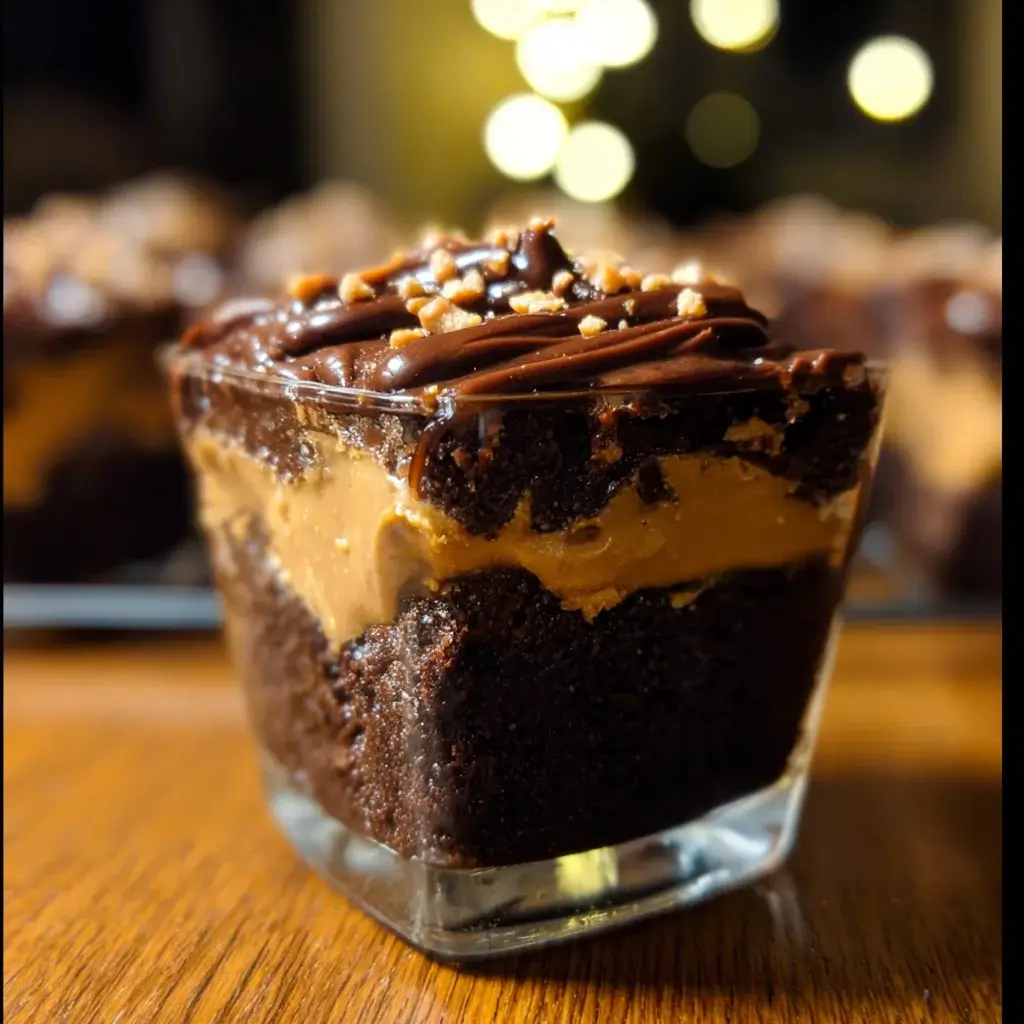

There are flavor combinations that are pleasant, and then there are flavor combinations that are legendary. Chocolate and peanut butter belong in the latter category. It’s a culinary power couple, a perfect marriage of rich, dark, slightly bitter chocolate and creamy, sweet, and salty peanut butter. This Peanut Butter Brownie Bliss Cupcake Cake is my ultimate tribute to that iconic duo. I’ll never forget the first time I made it for a casual game night with friends. I set it on the coffee table, and the conversation just… stopped. It wasn’t a cake in the traditional sense, but a beautiful mosaic of dark, glossy brownie tops, each crowned with a magnificent, fluffy swirl of peanut butter frosting. The real magic happened when my friend, instead of asking for a plate, simply reached out and pulled one of the brownie cupcakes away from the whole. It was a moment of pure, shareable joy. The base isn’t a cupcake at all, but a true, unadulterated brownie—intensely fudgy, dense, and chewy, with a deep chocolate flavor that borders on sinful. Then comes the frosting. It’s a cloud of the lightest, silkiest peanut butter buttercream you’ve ever tasted, perfectly balancing the richness of the brownie. It’s not just sweet; it has that essential hint of salt that makes the peanut butter flavor pop. This recipe isn’t just about creating a dessert; it’s about creating an experience. It’s the dessert that disappears first at every potluck, the one that earns gasps of delight, and the recipe my friends and family beg for again and again. I’m thrilled to share the complete guide to achieving this state of pure bliss in your own kitchen.
The Ultimate Peanut Butter Brownie Bliss Cupcake Cake
This recipe celebrates the ultimate comfort food pairing in a fun, modern, and crowd-pleasing format. By using a true brownie batter instead of a chocolate cake batter, we achieve a dense, fudgy, and intensely satisfying base that stands up perfectly to the rich peanut butter frosting. Get ready to create the most decadent and shareable dessert imaginable.
Complete Ingredients List
Precision is the key to achieving the perfect fudgy brownie texture. Using a kitchen scale for flour and sugar measurements is highly recommended. Ensure your eggs and butter for the frosting are at room temperature for the best results.
For the Ultimate Fudgy Brownie Cupcakes (Yields 24):
- Unsalted Butter: 1 cup (226g), melted
- Semi-Sweet Chocolate Chips or Chopped Chocolate Bar: 4 ounces (113g)
- Granulated Sugar: 1 ½ cups (300g)
- Light Brown Sugar: ½ cup (110g), packed
- Large Eggs: 4, at room temperature
- Pure Vanilla Extract: 1 tablespoon
- All-Purpose Flour: 1 cup (125g)
- Unsweetened Cocoa Powder: ½ cup (50g), sifted
- Salt: ½ teaspoon
For the Dreamy Peanut Butter Buttercream Frosting:
- Unsalted Butter: 1 cup (226g or 2 sticks), softened to room temperature
- Creamy Peanut Butter: 1 cup (260g) – Use a standard processed brand like Jif or Skippy, not natural-style.
- Powdered Sugar: 4 cups (480g), sifted
- Heavy Cream or Whole Milk: 3-4 tablespoons
- Pure Vanilla Extract: 1 teaspoon
- Salt: ½ teaspoon (this is crucial for balancing the sweetness)
For Garnish and Assembly (Optional but Recommended):
- Mini Peanut Butter Cups: Chopped
- Roasted Peanuts: Chopped
- Chocolate Sauce or Melted Chocolate: For drizzling
- Flaky Sea Salt: For a final sprinkle
Step-by-Step Instructions
Follow this detailed guide for a flawless Peanut Butter Brownie Bliss Cupcake Cake. We’ll bake the brownies, whip the frosting, and then assemble our masterpiece.
Part 1: Baking the Fudgy Brownie Cupcakes
The foundation of our recipe is a brownie that is unapologetically rich and fudgy, not light and cakey. The secret is in the technique.
- Preheat and Prepare: Preheat your oven to 350°F (175°C). Line two standard 12-cup muffin tins with paper liners for a total of 24. This is important for the “pull-apart” cupcake cake format.
- Melt Chocolate and Butter: In a medium, microwave-safe bowl, combine the 1 cup of melted butter and the 4 ounces of semi-sweet chocolate. Microwave in 30-second increments, stirring in between, until the chocolate is completely melted and the mixture is smooth. Set aside to cool slightly.
- Whisk Eggs and Sugars: In a large mixing bowl (or the bowl of a stand mixer fitted with the whisk attachment), add the 4 room-temperature eggs, granulated sugar, and light brown sugar. Whisk on medium-high speed for about 3-4 minutes. The mixture should become pale, thick, and airy. This step is crucial for creating that classic, crackly top on the brownies.
- Combine Wet Ingredients: Turn the mixer speed to low and slowly stream in the slightly cooled melted chocolate-butter mixture and the vanilla extract. Mix until just combined.
- Fold in Dry Ingredients: In a separate bowl, whisk together the all-purpose flour, sifted cocoa powder, and salt. Add this dry mixture to the wet ingredients. Mix on the lowest possible speed or fold by hand with a rubber spatula until just combined. This is the most critical step for fudgy brownies. Do not overmix! Stop as soon as you no longer see streaks of flour. Overmixing develops gluten and will make your brownies cakey and tough.
- Fill and Bake: Using a large cookie scoop (about 3 tablespoons), divide the thick brownie batter evenly among the 24 prepared cupcake liners. The batter will be thick, so you may need to spread it slightly to fill the liner. Fill each liner about two-thirds to three-quarters full.
- Bake to Perfection: Bake for 22-26 minutes. The edges should look set, and the center should look just slightly underdone. To test for doneness, a toothpick inserted into the center should come out with moist, fudgy crumbs attached, not clean. If it comes out clean, the brownies are over-baked.
- Cool Completely: Allow the brownie cupcakes to cool in the tins for at least 20-30 minutes, as they will be very soft right out of the oven. Then, carefully transfer them to a wire rack to cool completely to room temperature. This will take at least 2 hours. Do not attempt to frost warm brownies.
Part 2: Whipping the Dreamy Peanut Butter Frosting
This frosting is light, fluffy, and intensely flavorful. Using room temperature butter and standard creamy peanut butter is essential.
- Beat Butter and Peanut Butter: In the bowl of a stand mixer with the paddle attachment, or in a large bowl using a hand mixer, beat the softened butter and the creamy peanut butter together on medium-high speed for about 3 minutes. The mixture should be completely smooth, homogenous, and light in color.
- Incorporate Sugar: Turn the mixer speed down to low. Gradually add the sifted powdered sugar, one cup at a time, mixing until just incorporated after each addition. This prevents a sugar cloud from covering your kitchen.
- Add Flavor and Adjust Consistency: Once all the sugar is added, the mixture will be thick. Add the vanilla extract, salt, and 3 tablespoons of heavy cream.
- Whip to Fluffy Perfection: Increase the mixer speed to medium-high and beat for another 3-5 minutes. The frosting will transform, becoming incredibly light, fluffy, and airy. Scrape down the sides and bottom of the bowl to ensure everything is incorporated. If the frosting seems too stiff to pipe, add the remaining tablespoon of cream and beat again.
Part 3: Assembling the Blissful Cupcake Cake
This is where the magic happens and your individual brownie cupcakes become a show-stopping cake.
- Arrange the Brownies: On a large serving platter, a sturdy cake board, or a parchment-lined baking sheet, arrange the completely cooled brownie cupcakes. They should be placed right next to each other, touching, to form the shape of a single cake. A 4×6 rectangle or a circle are both great options.
- Pipe the Frosting: Transfer the peanut butter buttercream to a large piping bag fitted with a large star tip (like a Wilton 1M or 2D). Pipe a generous, tall swirl on top of each brownie cupcake. Since the brownies are touching, the frosting swirls will also touch, creating the beautiful illusion of a single, lavishly frosted cake.
- Garnish and Serve: Now for the fun finishing touches. Sprinkle the chopped mini peanut butter cups and chopped roasted peanuts over the frosting. Drizzle with chocolate sauce. For a final gourmet touch, add a very light sprinkle of flaky sea salt over the top to enhance all the flavors.
Nutrition Facts
Please note that these values are an estimate and will vary based on the specific brands of ingredients used and the exact serving size.
- Servings: 24 (1 brownie cupcake per serving)
- Calories per Serving: Approximately 580 kcal
This is a celebration dessert, built for pure, decadent indulgence.
Preparation Time
Breaking down the timing helps you plan your baking day effectively.
- Prep Time: 25 minutes (mixing batter and frosting)
- Cook Time: 26 minutes (baking the brownies)
- Cooling & Assembly Time: 2.5 hours (essential for cooling and frosting)
- Total Time: Approximately 3 hours and 21 minutes
How to Serve This Masterpiece
The pull-apart nature of this “cake” makes it the ultimate party dessert. No knives, no plates, no forks required—just pure, grab-and-go bliss.
- The Ultimate Game Day Treat: Arrange it on a platter for your next football party or game night. It’s the perfect, easy-to-eat dessert that guests can enjoy without missing any of the action.
- A Birthday Dream Come True: For the peanut butter and chocolate lover in your life, this is the ultimate birthday cake. You can even arrange the brownie cupcakes into the shape of their initial or age.
- The Potluck Superstar: Be prepared to leave with an empty platter. This dessert is easy to transport and is always the first thing to disappear from the potluck table.
- With a Glass of Cold Milk: Serve a brownie cupcake alongside a tall, cold glass of milk for a nostalgic and deeply satisfying combination that brings out the best in both the chocolate and peanut butter.
- A La Mode Decadence: Gently warm one of the brownie cupcakes for 10-15 seconds in the microwave and serve it in a bowl with a big scoop of vanilla bean or rich chocolate ice cream. It’s an unforgettable dessert experience.
5 Additional Tips for Success
These expert tips will ensure your Peanut Butter Brownie Bliss is perfect every single time.
- Do Not Overbake the Brownies: This is the number one rule for fudgy brownies. It is always better to err on the side of slightly underbaking. The brownies will continue to cook from residual heat as they cool in the pan. A toothpick should come out with moist, sticky crumbs, not clean.
- Use the Right Peanut Butter: For the smoothest, most stable frosting, use a standard, processed creamy peanut butter (like Jif, Skippy, or a store brand equivalent). Natural-style peanut butters, where the oil separates, can make the frosting greasy, grainy, or cause it to break.
- Salt is Your Secret Weapon: Don’t skip the salt in the frosting! Peanut butter and chocolate are both rich, and sugar is obviously sweet. The ½ teaspoon of salt in the buttercream is crucial for balancing the sweetness and making the peanut butter and chocolate flavors taste more vibrant and complex.
- The Crackly Top Secret: The key to getting that classic, paper-thin, crackly top on your brownies is to whip the eggs and sugar together for several minutes until the mixture is pale and thick. This dissolves the sugar and incorporates air, which rises and creates that signature crust.
- Cool Completely Before Frosting: I know I’ve said it before, but it bears repeating. Brownies, especially fudgy ones, are delicate and soft when warm. Frosting them too early will result in a soupy, melted mess as the warm brownies melt the butter in your frosting. Be patient; the reward is worth the wait.
Frequently Asked Questions (FAQ)
Here are answers to some common questions you might have about this decadent recipe.
1. Can I use a boxed brownie mix to save time?
Yes, you certainly can. A high-quality “fudgy” style boxed mix is a great shortcut. Prepare two 8×8 or one 9×13 pan mix according to package directions, but divide the batter among the 24 cupcake liners. Bake according to your mix’s cupcake instructions, making sure not to overbake. The homemade frosting will elevate it beautifully.
2. How should I store the leftover Peanut Butter Brownie Bliss cake?
Due to the butter and cream in the frosting, leftovers must be stored in the refrigerator. Place the entire cake in a large, airtight container (a cake or cupcake carrier is perfect) to keep it fresh and prevent it from absorbing any fridge odors. It will keep for up to 5 days.
3. My frosting seems too thick/thin. How can I fix it?
This is an easy fix! If your frosting is too thick and stiff to pipe, add more heavy cream, one tablespoon at a time, until it reaches the desired consistency. If it’s too thin or soft (which can happen in a warm kitchen), add more sifted powdered sugar, a quarter cup at a time, until it firms up. You can also chill it in the refrigerator for 15-20 minutes to help it set.
4. Can I make this with a different kind of nut butter?
Absolutely! This recipe would be fantastic with creamy almond butter or even cashew butter for a different flavor profile. For a nut-free alternative, creamy sunflower seed butter (SunButter) or cookie butter (like Biscoff) would make a delicious and unique frosting.
5. How do I serve this from the fridge? The frosting is hard.
For the best experience, you should let the brownie cupcakes sit at room temperature for about 30-60 minutes before serving. This allows the fudgy brownie to soften slightly and the peanut butter buttercream to return to its silky, creamy texture. It will taste much better than it does straight from the cold fridge.
Peanut Butter Brownie Bliss recipe
Ingredients
For the Ultimate Fudgy Brownie Cupcakes (Yields 24):
-
Unsalted Butter: 1 cup (226g), melted
-
Semi-Sweet Chocolate Chips or Chopped Chocolate Bar: 4 ounces (113g)
-
Granulated Sugar: 1 ½ cups (300g)
-
Light Brown Sugar: ½ cup (110g), packed
-
Large Eggs: 4, at room temperature
-
Pure Vanilla Extract: 1 tablespoon
-
All-Purpose Flour: 1 cup (125g)
-
Unsweetened Cocoa Powder: ½ cup (50g), sifted
-
Salt: ½ teaspoon
For the Dreamy Peanut Butter Buttercream Frosting:
-
Unsalted Butter: 1 cup (226g or 2 sticks), softened to room temperature
-
Creamy Peanut Butter: 1 cup (260g) – Use a standard processed brand like Jif or Skippy, not natural-style.
-
Powdered Sugar: 4 cups (480g), sifted
-
Heavy Cream or Whole Milk: 3-4 tablespoons
-
Pure Vanilla Extract: 1 teaspoon
-
Salt: ½ teaspoon (this is crucial for balancing the sweetness)
For Garnish and Assembly (Optional but Recommended):
-
Mini Peanut Butter Cups: Chopped
-
Roasted Peanuts: Chopped
-
Chocolate Sauce or Melted Chocolate: For drizzling
-
Flaky Sea Salt: For a final sprinkle
Instructions
Part 1: Baking the Fudgy Brownie Cupcakes
The foundation of our recipe is a brownie that is unapologetically rich and fudgy, not light and cakey. The secret is in the technique.
-
Preheat and Prepare: Preheat your oven to 350°F (175°C). Line two standard 12-cup muffin tins with paper liners for a total of 24. This is important for the “pull-apart” cupcake cake format.
-
Melt Chocolate and Butter: In a medium, microwave-safe bowl, combine the 1 cup of melted butter and the 4 ounces of semi-sweet chocolate. Microwave in 30-second increments, stirring in between, until the chocolate is completely melted and the mixture is smooth. Set aside to cool slightly.
-
Whisk Eggs and Sugars: In a large mixing bowl (or the bowl of a stand mixer fitted with the whisk attachment), add the 4 room-temperature eggs, granulated sugar, and light brown sugar. Whisk on medium-high speed for about 3-4 minutes. The mixture should become pale, thick, and airy. This step is crucial for creating that classic, crackly top on the brownies.
-
Combine Wet Ingredients: Turn the mixer speed to low and slowly stream in the slightly cooled melted chocolate-butter mixture and the vanilla extract. Mix until just combined.
-
Fold in Dry Ingredients: In a separate bowl, whisk together the all-purpose flour, sifted cocoa powder, and salt. Add this dry mixture to the wet ingredients. Mix on the lowest possible speed or fold by hand with a rubber spatula until just combined. This is the most critical step for fudgy brownies. Do not overmix! Stop as soon as you no longer see streaks of flour. Overmixing develops gluten and will make your brownies cakey and tough.
-
Fill and Bake: Using a large cookie scoop (about 3 tablespoons), divide the thick brownie batter evenly among the 24 prepared cupcake liners. The batter will be thick, so you may need to spread it slightly to fill the liner. Fill each liner about two-thirds to three-quarters full.
-
Bake to Perfection: Bake for 22-26 minutes. The edges should look set, and the center should look just slightly underdone. To test for doneness, a toothpick inserted into the center should come out with moist, fudgy crumbs attached, not clean. If it comes out clean, the brownies are over-baked.
-
Cool Completely: Allow the brownie cupcakes to cool in the tins for at least 20-30 minutes, as they will be very soft right out of the oven. Then, carefully transfer them to a wire rack to cool completely to room temperature. This will take at least 2 hours. Do not attempt to frost warm brownies.
Part 2: Whipping the Dreamy Peanut Butter Frosting
This frosting is light, fluffy, and intensely flavorful. Using room temperature butter and standard creamy peanut butter is essential.
-
Beat Butter and Peanut Butter: In the bowl of a stand mixer with the paddle attachment, or in a large bowl using a hand mixer, beat the softened butter and the creamy peanut butter together on medium-high speed for about 3 minutes. The mixture should be completely smooth, homogenous, and light in color.
-
Incorporate Sugar: Turn the mixer speed down to low. Gradually add the sifted powdered sugar, one cup at a time, mixing until just incorporated after each addition. This prevents a sugar cloud from covering your kitchen.
-
Add Flavor and Adjust Consistency: Once all the sugar is added, the mixture will be thick. Add the vanilla extract, salt, and 3 tablespoons of heavy cream.
-
Whip to Fluffy Perfection: Increase the mixer speed to medium-high and beat for another 3-5 minutes. The frosting will transform, becoming incredibly light, fluffy, and airy. Scrape down the sides and bottom of the bowl to ensure everything is incorporated. If the frosting seems too stiff to pipe, add the remaining tablespoon of cream and beat again.
Part 3: Assembling the Blissful Cupcake Cake
This is where the magic happens and your individual brownie cupcakes become a show-stopping cake.
-
Arrange the Brownies: On a large serving platter, a sturdy cake board, or a parchment-lined baking sheet, arrange the completely cooled brownie cupcakes. They should be placed right next to each other, touching, to form the shape of a single cake. A 4×6 rectangle or a circle are both great options.
-
Pipe the Frosting: Transfer the peanut butter buttercream to a large piping bag fitted with a large star tip (like a Wilton 1M or 2D). Pipe a generous, tall swirl on top of each brownie cupcake. Since the brownies are touching, the frosting swirls will also touch, creating the beautiful illusion of a single, lavishly frosted cake.
-
Garnish and Serve: Now for the fun finishing touches. Sprinkle the chopped mini peanut butter cups and chopped roasted peanuts over the frosting. Drizzle with chocolate sauce. For a final gourmet touch, add a very light sprinkle of flaky sea salt over the top to enhance all the flavors.
Nutrition
- Serving Size: one normal portion
- Calories: 580 kcal


