

Of all the recipes in my arsenal for feeding a hungry crowd, none disappears faster or elicits more “oohs” and “aahs” than this one for Party-Sized Chicken Parmesan Sandwiches. I first made these for a Super Bowl party a few years back, feeling ambitious but also a little overwhelmed by the guest list. The thought of making individual sandwiches for twenty people was daunting. That’s when the idea struck: why not transform the beloved, classic Chicken Parmesan into a giant, shareable, pull-apart masterpiece? The result was nothing short of legendary. The aroma of garlic butter-toasted buns and savory marinara filled the house, and when I brought the sizzling, cheese-blanketed tray out of the oven, the room went quiet for a moment before erupting in cheers. Watching my friends and family eagerly pull away their own personal, perfect portion of cheesy, saucy, crispy chicken sandwich was pure hosting bliss. It’s more than just a recipe; it’s an event. It’s the ultimate comfort food, scaled up for maximum joy and minimum last-minute fuss. Since that day, these sandwiches have become a non-negotiable staple for game days, family movie nights, potlucks, and any occasion that calls for delicious, communal eating.
The Ultimate Crowd-Pleaser: Why You’ll Love This Party-Sized Chicken Parmesan Sandwich Recipe
Before we dive into the delicious details, let’s talk about why this recipe will become your new go-to for any gathering. This isn’t just another sandwich; it’s a culinary strategy for effortless entertaining and delivering unforgettable flavor.
- Feeds a Crowd with Ease: The single greatest advantage of this recipe is its scalability. Instead of frying individual chicken cutlets and assembling sandwiches one by one, you create one giant, cohesive sandwich on a sheet pan. It’s the perfect solution for feeding a dozen or more people without spending the entire party in the kitchen.
- The Perfect Balance of Textures and Flavors: This recipe is a masterclass in culinary harmony. You get the tender, juicy chicken, the crispy, savory breadcrumb coating, the rich and tangy marinara sauce, the glorious, melty pull of mozzarella cheese, and the final, irresistible touch of garlic-and-herb-infused butter toasted into the buns. Every single bite is a symphony of classic Italian-American flavors.
- Make-Ahead Friendly: Great party food should allow the host to enjoy the party. A significant portion of this recipe can be prepared in advance. You can cook the chicken, prepare the garlic butter, and have everything ready to assemble and bake just before your guests arrive, saving you precious time and stress.
- Incredibly Satisfying Comfort Food: Chicken Parmesan is the heavyweight champion of comfort food. It’s warm, hearty, cheesy, and universally loved. Turning it into a pull-apart sandwich format makes it fun, interactive, and even more satisfying. It’s the kind of food that makes people feel happy and well-cared for.
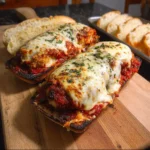
- Visually Impressive: Don’t underestimate the power of presentation. Bringing a bubbling, golden-brown tray of these sandwiches to the table is a show-stopping moment. The vibrant red of the sauce, the blanket of white mozzarella, and the flecks of green parsley create a dish that looks as amazing as it tastes.
Complete Ingredients for Party-Sized Chicken Parmesan Sandwiches
Sourcing high-quality ingredients is the first step toward a truly spectacular sandwich. While simple, the quality of each component shines through in the final product. Here’s exactly what you’ll need:
For the Crispy Chicken:
- Chicken: 2 lbs thin-sliced chicken breast cutlets (about 8-10 cutlets)
- Flour: 1 cup all-purpose flour
- Seasoning for Flour: 1 teaspoon salt, 1/2 teaspoon black pepper
- Eggs: 3 large eggs, beaten
- Breadcrumbs: 2 cups Italian-style breadcrumbs
- Cheese: 1/2 cup grated Parmesan cheese
- Oil for Frying: 1/2 cup vegetable or canola oil (or more, as needed)
For the Sandwich Assembly:
- Slider Buns: 24-count package of slider buns (King’s Hawaiian rolls are a popular and delicious choice, but any soft dinner roll or slider bun that is connected in a slab will work)
- Marinara Sauce: 2 cups of your favorite high-quality marinara sauce, warmed
- Mozzarella Cheese: 16 ounces (1 lb) fresh, whole milk mozzarella, thinly sliced or shredded from a block. Avoid pre-shredded bagged cheese if possible, as it contains anti-caking agents and doesn’t melt as well.
- Provolone Cheese (Optional but Recommended): 8 slices of mild provolone cheese for an extra layer of flavor and cheese-pull.
For the Garlic Herb Butter Topping:
- Butter: 1/2 cup (1 stick) unsalted butter, melted
- Garlic: 3 cloves garlic, minced (or 1 teaspoon garlic powder)
- Italian Seasoning: 2 teaspoons dried Italian seasoning
- Fresh Parsley: 2 tablespoons fresh parsley, finely chopped
- Parmesan Cheese: 2 tablespoons grated Parmesan cheese
Step-by-Step Instructions for Assembly and Baking
Follow these detailed instructions carefully to ensure your sandwiches are perfectly crispy, saucy, and cheesy. The process is broken down into three main stages: preparing the chicken, assembling the sandwiches, and the final bake.
Part 1: Preparing the Crispy Chicken Cutlets
- Set Up Your Breading Station: This is a classic three-step process. Prepare three shallow dishes or pie plates. In the first dish, whisk together the all-purpose flour, salt, and pepper. In the second dish, beat the eggs until they are uniform. In the third dish, combine the Italian breadcrumbs and the 1/2 cup of grated Parmesan cheese, mixing them well. Arrange these dishes in a line for an efficient workflow: flour, eggs, then breadcrumbs. Place a large plate or a baking sheet at the end of the line for the breaded chicken.
- Prepare the Chicken: If your chicken cutlets are thicker than 1/4 inch, place them between two sheets of plastic wrap and gently pound them to an even thickness with a meat mallet or a heavy rolling pin. This ensures they cook quickly and evenly. Pat each cutlet dry with a paper towel; this helps the flour adhere better.
- Dredge and Coat: Working with one cutlet at a time, first dredge it in the flour mixture, shaking off any excess. Next, dip it completely into the beaten eggs, allowing the excess to drip off. Finally, press the cutlet firmly into the breadcrumb-parmesan mixture, ensuring it’s thoroughly coated on all sides. Place the coated cutlet on the clean plate or baking sheet. Repeat with all remaining chicken cutlets.
- Pan-Fry the Chicken: Heat the vegetable oil in a large skillet or frying pan over medium-high heat. The oil is ready when a pinch of breadcrumbs sizzles immediately upon contact. Carefully place 2-3 chicken cutlets in the hot oil, being sure not to overcrowd the pan. Fry for 3-4 minutes per side, or until golden brown, crispy, and cooked through. The internal temperature should reach 165°F (74°C).
- Drain and Cool: As the chicken is cooked, remove it from the skillet and place it on a wire rack set over a baking sheet. This allows air to circulate and prevents the bottom from becoming soggy while letting excess oil drip away. Continue frying the remaining chicken in batches, adding a little more oil to the pan if needed. Once all the chicken is cooked, let it rest for a few minutes before chopping.
- Chop the Chicken: Once the chicken is cool enough to handle, chop it into bite-sized, 1/2-inch to 1-inch pieces. This is the key that transforms it from a standard chicken parm into a perfect sandwich filling.
Part 2: Assembling the Party-Sized Sandwiches
- Preheat and Prepare the Pan: Preheat your oven to 375°F (190°C). Lightly grease a large, rimmed baking sheet or a 9×13-inch baking dish.
- Prepare the Buns: Do not separate the individual slider buns. Using a large serrated bread knife, carefully slice the entire slab of buns in half horizontally, creating a single large top piece and a single large bottom piece. Place the entire bottom slab of buns onto your prepared baking sheet or dish.
- Layer the Flavors: This is where the magic happens. Build your giant sandwich in the following order:
- Optional Cheese Barrier: For extra protection against sogginess, lay the 8 slices of provolone cheese over the bottom buns. This creates a delicious barrier between the bread and the sauce.
- The Chicken: Evenly distribute the chopped, crispy chicken pieces over the bottom buns (or provolone layer), covering the entire surface.
- The Sauce: Spoon the warmed marinara sauce over the chicken. Try to cover the chicken evenly without completely drenching the bread.
- The Mozzarella: Generously sprinkle the sliced or shredded mozzarella cheese over the sauce-covered chicken, ensuring every inch is covered for that perfect cheese pull.
- Place the Top: Carefully place the top slab of buns over the cheese layer, lining it up with the bottom.
Part 3: The Final Bake to Golden Perfection
- Prepare the Garlic Butter Topping: In a small, microwave-safe bowl, melt the stick of butter. Whisk in the minced garlic, dried Italian seasoning, chopped fresh parsley, and the 2 tablespoons of grated Parmesan cheese.
- Brush the Buns: Using a pastry brush, generously brush the garlic herb butter mixture all over the top of the buns. Make sure to cover the entire surface and let some drip down the sides. This step creates a golden, fragrant, and irresistibly crispy crust.
- Bake: Cover the baking sheet loosely with aluminum foil. This prevents the tops from burning while the cheese melts and the inside heats through. Bake in the preheated oven for 15 minutes.
- Final Browning: After 15 minutes, carefully remove the aluminum foil. Return the sandwiches to the oven and bake for another 5-10 minutes, or until the cheese is completely melted and bubbly, and the tops of the buns are golden brown and toasted.
- Rest and Serve: Let the sandwiches rest for 5 minutes before serving. This allows the cheese to set slightly, making them easier to cut or pull apart. Use a sharp knife to cut along the lines of the individual buns, or simply let your guests pull their own sandwiches from the tray.
Nutrition Facts
- Servings: This recipe makes approximately 12 generous servings.
- Calories Per Serving: Approximately 550-650 calories per serving, depending on the specific brands of cheese, sauce, and buns used.
Preparation and Cook Time
Understanding the time commitment helps with party planning.
- Prep Time: 25 minutes (for breading chicken and chopping)
- Cook Time: 35 minutes (20 minutes for frying chicken, 15-20 minutes for baking)
- Total Time: Approximately 1 hour
How to Serve Your Party-Sized Chicken Parmesan Sandwiches
Presentation and pairings can elevate these sandwiches from a simple meal to a full-fledged feast. Here are some ideas to create the perfect serving setup.
Perfect Pairings and Side Dishes
- Fresh Salads:
- Classic Caesar Salad: The crisp romaine, crunchy croutons, and creamy, tangy dressing cut through the richness of the sandwiches perfectly.
- Simple Arugula Salad: A bed of peppery arugula tossed with lemon vinaigrette, shaved Parmesan, and cherry tomatoes provides a light, fresh contrast.
- Vegetable Sides:
- Roasted Broccoli or Broccolini: Tossed with garlic, olive oil, and a sprinkle of red pepper flakes, roasted broccoli adds a healthy and flavorful component.
- Garlic Green Beans: Quickly blanched and sautéed with garlic for a crisp-tender side dish.
- Starchy Companions:
- Classic French Fries or Tater Tots: A crowd-pleasing, can’t-go-wrong option. Serve with a side of ketchup or garlic aioli.
- Italian Pasta Salad: A cold pasta salad with olives, peppers, onions, and a zesty Italian dressing complements the theme wonderfully.
Garnishes and a Topping Bar
Set up a small station with bowls of various toppings so guests can customize their sandwiches:
- Fresh Basil: Chiffonade (thinly sliced ribbons) of fresh basil adds a burst of authentic Italian flavor.
- Extra Grated Parmesan: For the true cheese lovers.
- Red Pepper Flakes: For those who like a little bit of heat.
- A Drizzle of Pesto: Adds a nutty, herby complexity.
- Extra Marinara Sauce: Serve a bowl of warm marinara on the side for dipping.
5 Additional Tips for Sandwich Success
These expert tips will help you troubleshoot common issues and ensure your sandwiches are flawless every time.
- The Secret to Crispy (Not Soggy) Bottoms: The biggest enemy of a great baked sandwich is a soggy bottom bun. To combat this, lightly toast the bottom slab of buns in the oven for 3-5 minutes before you begin assembly. This creates a slightly firm surface that resists moisture. Using a layer of sliced provolone as a barrier, as mentioned in the instructions, is another fantastic pro-tip.
- Don’t Skimp on the Sauce Quality: The marinara sauce is a major flavor component. Choose a high-quality jarred sauce that you genuinely enjoy the taste of on its own. Look for sauces with simple ingredients like tomatoes, garlic, onion, and herbs, without a lot of added sugar or preservatives. Or, if you have the time, use your favorite homemade recipe.
- Block Cheese is Best: While pre-shredded cheese is convenient, it contains starches and cellulose to prevent clumping. These agents inhibit a smooth, glorious melt. For the ultimate cheese pull, buy a block of whole milk mozzarella and shred it yourself, or buy fresh mozzarella and slice it thinly. The difference in texture is significant.
- Embrace the Make-Ahead Method: To make party day a breeze, you can fry and chop the chicken a day in advance. Store it in an airtight container in the refrigerator. You can also prepare the garlic butter and store it in the fridge (just microwave it briefly to re-melt before brushing). On party day, all you have to do is assemble and bake.
- Customize Your Buns: While Hawaiian rolls are a sweet and soft favorite, feel free to experiment! A slab of brioche slider buns will add a rich, buttery flavor. A sturdy ciabatta slab or classic dinner rolls will also work beautifully. The key is to find buns that come connected so you can slice them as one large unit.
Frequently Asked Questions (FAQ)
Here are answers to some of the most common questions about making these party-sized sandwiches.
1. Can I use pre-cooked chicken, like frozen chicken tenders or a rotisserie chicken?
Yes, you can use pre-cooked chicken as a shortcut, but the texture will be different. For the best result, use frozen crispy chicken tenders or patties. Bake them according to the package directions until crispy, then chop them up and proceed with the assembly. If using rotisserie chicken, shred the meat and mix it with a bit of the marinara sauce before layering it on the buns. You will miss the signature crispy, breaded texture, but it will still be a delicious and cheesy chicken sandwich.
2. How do I store and reheat leftovers?
Leftovers are fantastic! For best results, wrap the remaining slab of sandwiches tightly in aluminum foil or place them in an airtight container. They can be stored in the refrigerator for up to 3 days. To reheat, place the foil-wrapped sandwiches in a 350°F (175°C) oven for 10-15 minutes, or until warmed through. You can also reheat individual sandwiches in an air fryer for a few minutes to re-crisp the bread.
3. What’s the best way to transport these to a potluck or party?
These sandwiches travel remarkably well. Assemble them completely in a disposable foil baking pan. Keep the garlic butter topping in a separate small container. When you arrive at the party, simply brush the tops with the garlic butter and bake them in the host’s oven as directed. This ensures they are served hot, fresh, and perfectly melty, rather than getting soggy during transit.
4. Can I make this recipe spicy?
Absolutely! There are several ways to add a kick. You can add 1/2 to 1 teaspoon of red pepper flakes to the breadcrumb mixture, or to the marinara sauce. You could also use pepper jack cheese in place of or in addition to the provolone for a creamy heat. For a more intense spice, add a few dashes of your favorite hot sauce to the marinara.
5. Can I prepare the entire unbaked sandwich ahead of time?
You can assemble the entire dish a few hours ahead of time, but it’s not recommended to do it a full day in advance as the bread will inevitably absorb moisture from the sauce and become soft. If you need to assemble it a few hours before baking, follow the tips for preventing sogginess (toasting the bottom bun, using a cheese barrier), then cover it tightly with plastic wrap and refrigerate. Remove it from the fridge about 20-30 minutes before baking to let it come closer to room temperature for more even heating.
Party-Sized Chicken Parmesan Sandwiches recipe
Ingredients
For the Crispy Chicken:
-
Chicken: 2 lbs thin-sliced chicken breast cutlets (about 8-10 cutlets)
-
Flour: 1 cup all-purpose flour
-
Seasoning for Flour: 1 teaspoon salt, 1/2 teaspoon black pepper
-
Eggs: 3 large eggs, beaten
-
Breadcrumbs: 2 cups Italian-style breadcrumbs
-
Cheese: 1/2 cup grated Parmesan cheese
-
Oil for Frying: 1/2 cup vegetable or canola oil (or more, as needed)
For the Sandwich Assembly:
-
Slider Buns: 24-count package of slider buns (King’s Hawaiian rolls are a popular and delicious choice, but any soft dinner roll or slider bun that is connected in a slab will work)
-
Marinara Sauce: 2 cups of your favorite high-quality marinara sauce, warmed
-
Mozzarella Cheese: 16 ounces (1 lb) fresh, whole milk mozzarella, thinly sliced or shredded from a block. Avoid pre-shredded bagged cheese if possible, as it contains anti-caking agents and doesn’t melt as well.
-
Provolone Cheese (Optional but Recommended): 8 slices of mild provolone cheese for an extra layer of flavor and cheese-pull.
For the Garlic Herb Butter Topping:
-
Butter: 1/2 cup (1 stick) unsalted butter, melted
-
Garlic: 3 cloves garlic, minced (or 1 teaspoon garlic powder)
-
Italian Seasoning: 2 teaspoons dried Italian seasoning
-
Fresh Parsley: 2 tablespoons fresh parsley, finely chopped
-
Parmesan Cheese: 2 tablespoons grated Parmesan cheese
Instructions
Part 1: Preparing the Crispy Chicken Cutlets
-
Set Up Your Breading Station: This is a classic three-step process. Prepare three shallow dishes or pie plates. In the first dish, whisk together the all-purpose flour, salt, and pepper. In the second dish, beat the eggs until they are uniform. In the third dish, combine the Italian breadcrumbs and the 1/2 cup of grated Parmesan cheese, mixing them well. Arrange these dishes in a line for an efficient workflow: flour, eggs, then breadcrumbs. Place a large plate or a baking sheet at the end of the line for the breaded chicken.
-
Prepare the Chicken: If your chicken cutlets are thicker than 1/4 inch, place them between two sheets of plastic wrap and gently pound them to an even thickness with a meat mallet or a heavy rolling pin. This ensures they cook quickly and evenly. Pat each cutlet dry with a paper towel; this helps the flour adhere better.
-
Dredge and Coat: Working with one cutlet at a time, first dredge it in the flour mixture, shaking off any excess. Next, dip it completely into the beaten eggs, allowing the excess to drip off. Finally, press the cutlet firmly into the breadcrumb-parmesan mixture, ensuring it’s thoroughly coated on all sides. Place the coated cutlet on the clean plate or baking sheet. Repeat with all remaining chicken cutlets.
-
Pan-Fry the Chicken: Heat the vegetable oil in a large skillet or frying pan over medium-high heat. The oil is ready when a pinch of breadcrumbs sizzles immediately upon contact. Carefully place 2-3 chicken cutlets in the hot oil, being sure not to overcrowd the pan. Fry for 3-4 minutes per side, or until golden brown, crispy, and cooked through. The internal temperature should reach 165°F (74°C).
-
Drain and Cool: As the chicken is cooked, remove it from the skillet and place it on a wire rack set over a baking sheet. This allows air to circulate and prevents the bottom from becoming soggy while letting excess oil drip away. Continue frying the remaining chicken in batches, adding a little more oil to the pan if needed. Once all the chicken is cooked, let it rest for a few minutes before chopping.
-
Chop the Chicken: Once the chicken is cool enough to handle, chop it into bite-sized, 1/2-inch to 1-inch pieces. This is the key that transforms it from a standard chicken parm into a perfect sandwich filling.
Part 2: Assembling the Party-Sized Sandwiches
-
Preheat and Prepare the Pan: Preheat your oven to 375°F (190°C). Lightly grease a large, rimmed baking sheet or a 9×13-inch baking dish.
-
Prepare the Buns: Do not separate the individual slider buns. Using a large serrated bread knife, carefully slice the entire slab of buns in half horizontally, creating a single large top piece and a single large bottom piece. Place the entire bottom slab of buns onto your prepared baking sheet or dish.
-
Layer the Flavors: This is where the magic happens. Build your giant sandwich in the following order:
-
Optional Cheese Barrier: For extra protection against sogginess, lay the 8 slices of provolone cheese over the bottom buns. This creates a delicious barrier between the bread and the sauce.
-
The Chicken: Evenly distribute the chopped, crispy chicken pieces over the bottom buns (or provolone layer), covering the entire surface.
-
The Sauce: Spoon the warmed marinara sauce over the chicken. Try to cover the chicken evenly without completely drenching the bread.
-
The Mozzarella: Generously sprinkle the sliced or shredded mozzarella cheese over the sauce-covered chicken, ensuring every inch is covered for that perfect cheese pull.
-
-
Place the Top: Carefully place the top slab of buns over the cheese layer, lining it up with the bottom.
Part 3: The Final Bake to Golden Perfection
-
Prepare the Garlic Butter Topping: In a small, microwave-safe bowl, melt the stick of butter. Whisk in the minced garlic, dried Italian seasoning, chopped fresh parsley, and the 2 tablespoons of grated Parmesan cheese.
-
Brush the Buns: Using a pastry brush, generously brush the garlic herb butter mixture all over the top of the buns. Make sure to cover the entire surface and let some drip down the sides. This step creates a golden, fragrant, and irresistibly crispy crust.
-
Bake: Cover the baking sheet loosely with aluminum foil. This prevents the tops from burning while the cheese melts and the inside heats through. Bake in the preheated oven for 15 minutes.
-
Final Browning: After 15 minutes, carefully remove the aluminum foil. Return the sandwiches to the oven and bake for another 5-10 minutes, or until the cheese is completely melted and bubbly, and the tops of the buns are golden brown and toasted.
-
Rest and Serve: Let the sandwiches rest for 5 minutes before serving. This allows the cheese to set slightly, making them easier to cut or pull apart. Use a sharp knife to cut along the lines of the individual buns, or simply let your guests pull their own sandwiches from the tray.
Nutrition
- Serving Size: one normal portion
- Calories: 550-650


