
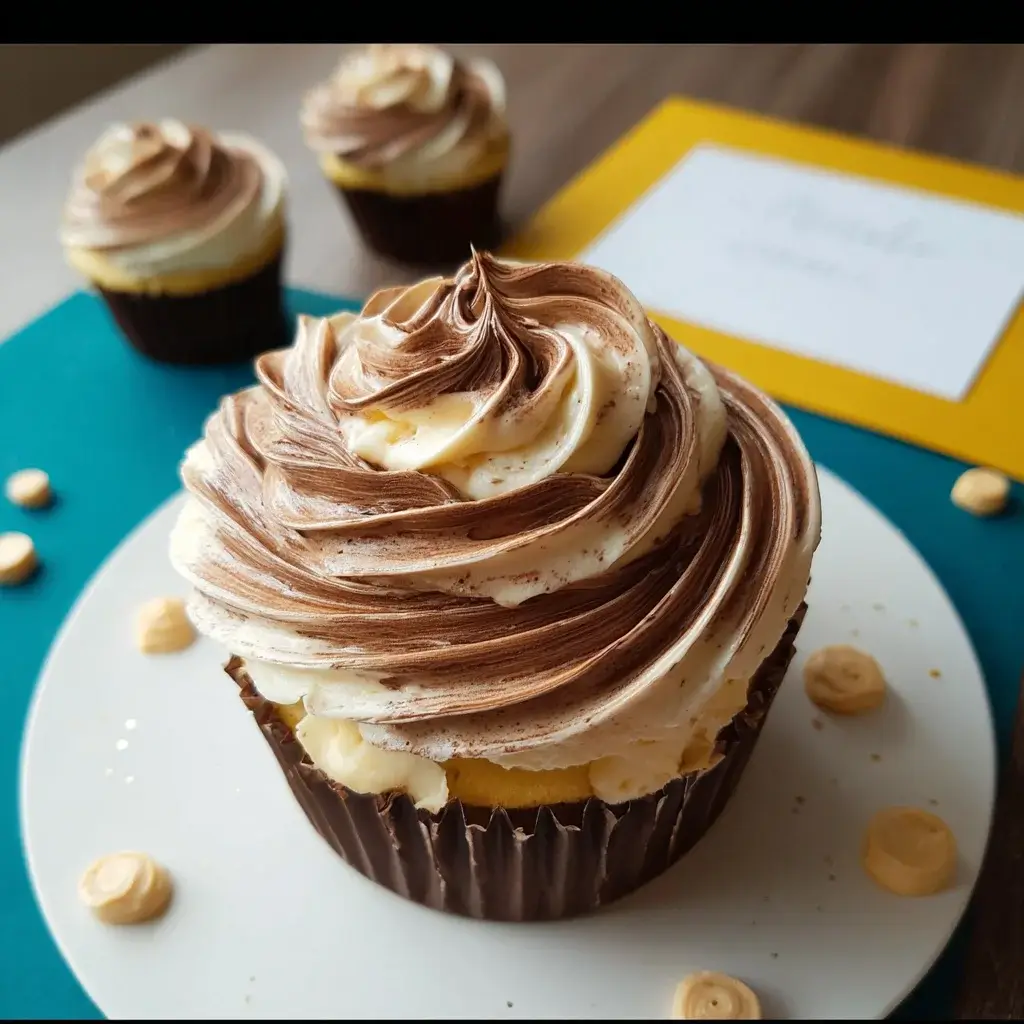

Of all the desserts I’ve ever made, few have elicited the same universal gasp of delight as this Nutella Swirl Cupcake Cake. The first time I brought it to a family potluck, the room went quiet for a moment. My nieces and nephews, usually a whirlwind of chaotic energy, stood frozen, their eyes wide with wonder. It wasn’t just a cake; it was an edible sculpture, a mosaic of perfectly arranged cupcakes crowned with luscious, two-toned swirls of frosting. The real magic, however, happened when the first person reached out and simply pulled a cupcake away. No knife, no messy slicing, just pure, shareable joy. The cake itself is a dream—an impossibly moist, deep chocolate cupcake that serves as the perfect vessel for the main event: the frosting. It’s a velvety, rich cream cheese frosting, but with a generous, decadent swirl of pure Nutella woven through it. The combination is heavenly. The slight tang of the cream cheese cuts through the sweetness, balancing the iconic, nutty richness of the chocolate-hazelnut spread. It’s the kind of recipe that creates memories, the one that becomes a birthday tradition, the one people ask for again and again. This isn’t just a dessert; it’s an experience, and I’m thrilled to share the complete guide to creating this showstopper in your own kitchen.
The Ultimate Nutella Swirl Cupcake Cake Recipe
This recipe is designed to be a crowd-pleaser, combining the individual charm of cupcakes with the communal spirit of a cake. It’s visually stunning and surprisingly straightforward to assemble. We’ll break down the process into three main parts: baking the perfect chocolate cupcakes, whipping up the irresistible frosting, and finally, bringing it all together into a beautiful pull-apart creation.
Complete Ingredients List
Precision in baking is key to achieving the perfect texture and flavor. I highly recommend using a kitchen scale for the most accurate measurements, especially for the flour. Gathering all your ingredients and having them at room temperature before you begin will make the process smoother and more successful.
For the Moist Chocolate Cupcakes (Yields 24 Cupcakes):
- All-Purpose Flour: 2 cups (250g)
- Granulated Sugar: 2 cups (400g)
- Unsweetened Cocoa Powder: ¾ cup (75g), sifted to remove lumps
- Baking Soda: 2 teaspoons
- Baking Powder: 1 teaspoon
- Salt: 1 teaspoon
- Large Eggs: 2, at room temperature
- Buttermilk: 1 cup (240ml), at room temperature (see tips for a substitute)
- Vegetable Oil: ½ cup (120ml)
- Pure Vanilla Extract: 2 teaspoons
- Hot Brewed Coffee or Hot Water: 1 cup (240ml) – the coffee enhances the chocolate flavor without tasting like coffee.
For the Decadent Nutella Cream Cheese Frosting:
- Full-Fat Block Cream Cheese: 16 ounces (452g or 2 blocks), softened to room temperature
- Unsalted Butter: 1 cup (226g or 2 sticks), softened to room temperature
- Powdered Sugar: 4 cups (480g), sifted
- Pure Vanilla Extract: 1 tablespoon
- Salt: ¼ teaspoon
- Nutella (Chocolate Hazelnut Spread): 1 cup (260g), at room temperature for easy swirling
Step-by-Step Instructions
Follow these detailed instructions carefully for a flawless Nutella Swirl Cupcake Cake. We will start with the cupcake base, move on to the frosting, and finish with the assembly.
Part 1: Baking the Perfect Chocolate Cupcakes
The foundation of our cupcake cake is a deeply flavorful and moist chocolate cupcake. The use of both oil and buttermilk is the secret to a tender crumb that stays fresh for days.
- Preheat and Prepare: Preheat your oven to 350°F (175°C). Line two standard 12-cup muffin tins with paper liners. This recipe makes exactly 24 cupcakes.
- Combine Dry Ingredients: In a large mixing bowl, or the bowl of your stand mixer fitted with a paddle attachment, whisk together the all-purpose flour, granulated sugar, sifted cocoa powder, baking soda, baking powder, and salt. Stirring them together at this stage ensures that the leavening agents are evenly distributed, which is crucial for a consistent rise.
- Combine Wet Ingredients: In a separate medium bowl, whisk together the room temperature eggs, buttermilk, vegetable oil, and vanilla extract until they are fully combined and smooth.
- Mix the Batter: Pour the wet ingredients into the bowl with the dry ingredients. Mix on low speed until just combined. Be careful not to overmix at this stage; a few small lumps are perfectly fine. Overmixing develops the gluten in the flour, which can lead to tough, dense cupcakes.
- Add the Hot Liquid: With the mixer still on low, very carefully and slowly pour in the hot coffee or hot water. The batter will be very thin and liquidy—this is completely normal! This “blooms” the cocoa powder, unlocking its deepest flavor, and adds significant moisture to the final product. Scrape down the sides and bottom of the bowl with a rubber spatula to ensure everything is incorporated, and give it one final, brief mix.
- Fill the Liners: Using a cookie scoop or a measuring cup (a ¼ cup measure works well), divide the batter evenly among the 24 prepared cupcake liners. Fill each liner about two-thirds full. This will give the cupcakes enough room to rise without spilling over the top.
- Bake to Perfection: Bake in the preheated oven for 18-22 minutes. To check for doneness, insert a toothpick into the center of a cupcake. If it comes out clean or with a few moist crumbs attached, they are ready. If it comes out with wet batter, they need a few more minutes.
- Cool Completely: Allow the cupcakes to cool in the muffin tins for about 5-10 minutes before carefully transferring them to a wire rack. It is absolutely essential that the cupcakes cool completely to room temperature before you attempt to frost them. Frosting warm cupcakes will result in a melted, soupy mess. This can take at least 1-2 hours.
Part 2: Making the Heavenly Nutella Cream Cheese Frosting
This frosting is the star of the show. The key to a smooth, non-lumpy cream cheese frosting is ensuring your butter and cream cheese are truly at room temperature.
- Beat the Base: In the bowl of a stand mixer fitted with the paddle attachment, or in a large bowl using a hand mixer, beat the softened cream cheese and softened butter together on medium-high speed for about 3-4 minutes. Scrape down the sides and bottom of the bowl periodically. The mixture should be completely smooth, creamy, and light in color, with no lumps remaining.
- Incorporate Sugar: Turn the mixer down to low speed and gradually add the sifted powdered sugar, one cup at a time. Mixing on low will prevent a sugar cloud from exploding all over your kitchen. Once all the sugar is incorporated, add the salt and the vanilla extract.
- Whip It Good: Increase the mixer speed to medium-high and beat for another 2-3 minutes until the frosting is light, fluffy, and airy. Do not overbeat, as cream cheese frosting can sometimes become too thin if whipped for too long.
- Prepare for the Swirl: Transfer about half of the vanilla cream cheese frosting to a separate bowl. To the frosting remaining in the mixing bowl, add the 1 cup of Nutella. Mix on low speed until the Nutella is just combined. You don’t want to overmix it, just get it incorporated. Now you have two bowls of frosting: one plain cream cheese and one Nutella cream cheese.
Part 3: Assembling the Nutella Swirl Cupcake Cake
This is the fun, creative part! You get to build your edible masterpiece.
- Arrange the Cupcakes: On a large serving platter, cake board, or a baking sheet lined with parchment paper, arrange your completely cooled cupcakes. They should be placed right next to each other, touching, to form the shape of a single cake. You can create a simple rectangle, a circle, a heart shape, or even a number for a birthday. A 4×6 rectangle is a great starting point.
- Create the Two-Tone Swirl: To get the beautiful swirl effect, you’ll need a large piping bag fitted with a large star tip (like a Wilton 1M or 2D). To fill the bag, lay it flat on the counter. Spoon the plain cream cheese frosting along one side of the bag, from the tip to the top. Then, spoon the Nutella frosting along the other, empty side of the bag. Try to keep them as separate as possible.
- Frost the Cake: Squeeze the piping bag until both colors of frosting begin to emerge from the tip. Starting from the outside edge of a cupcake, pipe a generous rosette-style swirl, moving towards the center. Repeat this process for every single cupcake. The magic is that because the cupcakes are all touching, the individual swirls of frosting will also touch, creating the illusion of a single, beautifully frosted cake.
- Finishing Touches (Optional): For an extra touch of elegance and flavor, you can sprinkle some chopped toasted hazelnuts, mini chocolate chips, or chocolate shavings over the top of the finished cupcake cake.
Nutrition Facts
Please note that these values are an estimate and can vary based on the specific brands of ingredients used and the exact serving size.
- Servings: 24 (1 cupcake per serving)
- Calories per Serving: Approximately 485 kcal
This is a decadent, celebratory treat, and the nutritional information reflects that. It’s meant to be enjoyed in moderation as part of a special occasion.
Preparation Time
Breaking down the timing helps you plan your baking day effectively.
- Prep Time: 25 minutes (mixing batter and frosting)
- Cook Time: 22 minutes (baking the cupcakes)
- Cooling & Assembly Time: 2 hours (essential for cooling and frosting)
- Total Time: Approximately 2 hours and 47 minutes
How to Serve This Masterpiece
The beauty of a cupcake cake lies in its effortless serving style. There’s no need for plates, forks, or a cake knife, making it perfect for casual gatherings and parties. Here are some wonderful ways to present and serve your Nutella Swirl Cupcake Cake:
- The Ultimate Birthday Centerpiece: Arrange the cupcakes in the shape of the birthday person’s age or initial. Place candles directly into a few of the cupcakes for a memorable celebration. Guests can simply pull their own cupcake when it’s time for dessert.
- Effortless Party Platter: For potlucks, office parties, or school events, a simple rectangular cupcake cake is ideal. It’s easy to transport (on a sturdy baking sheet or cake board) and eliminates the hassle of slicing and serving for the host.
- Dessert Charcuterie Board: Create an epic dessert board with the Nutella Swirl Cupcake Cake as the star. Surround it with bowls of fresh berries (strawberries and raspberries are fantastic), extra chopped hazelnuts, chocolate-covered pretzels, and a small bowl of extra Nutella for dipping.
- An Elegant Evening Treat: For a more sophisticated affair, serve individual cupcakes pulled from the “cake” alongside a shot of hot espresso or a small glass of dessert wine. The rich chocolate and hazelnut pair beautifully with coffee.
- With a Scoop of Ice Cream: Nothing beats a warm-ish (or room temperature) chocolate cupcake with a scoop of vanilla bean or hazelnut gelato on the side. The contrast of temperatures and textures is pure bliss.
5 Additional Tips for Success
These expert tips will elevate your Nutella Swirl Cupcake Cake from great to unforgettable.
- The Room Temperature Rule is Non-Negotiable: I cannot stress this enough. For the creamiest, smoothest frosting, your butter and cream cheese must be softened to room temperature. Cold cream cheese will result in a lumpy frosting, no matter how long you beat it. Similarly, room temperature eggs and buttermilk create a more uniform, emulsified batter, leading to a lighter, more tender cupcake.
- Don’t Overmix the Cupcake Batter: The moment the flour is incorporated, stop mixing. Overmixing develops gluten, which is great for bread but terrible for cakes, leading to a tough, rubbery texture. The final, thin batter is a good thing—it’s the secret to that super moist crumb.
- Mastering the Perfect Swirl: The two-tone frosting technique sounds harder than it is. For an even cleaner result, you can lay a long piece of plastic wrap on your counter, spread the two frostings side-by-side, roll it into a log, twist the ends, snip one end off, and place this entire log into your piping bag. This method gives you a perfect half-and-half distribution with less mess.
- DIY Buttermilk in a Pinch: If you don’t have buttermilk on hand, you can easily make a substitute. For every 1 cup of milk (whole milk is best), stir in 1 tablespoon of lemon juice or white vinegar. Let it sit for 5-10 minutes. The milk will curdle slightly and thicken, and it’s ready to use. This acidic element is crucial for reacting with the baking soda to create a tender crumb.
- Make-Ahead and Storage Strategy: You can bake the cupcakes a day in advance. Store them in an airtight container at room temperature once they are completely cool. The frosting can also be made a day or two ahead and stored in an airtight container in the refrigerator. Let the frosting come to room temperature and give it a quick whip with your mixer to restore its fluffy texture before piping. The assembled cupcake cake is best enjoyed the day it’s made but will keep in an airtight container in the refrigerator for up to 3 days.
Frequently Asked Questions (FAQ)
Here are answers to some common questions you might have about this Nutella Swirl Cupcake Cake recipe.
1. Can I use a different kind of frosting?
Absolutely! While the Nutella cream cheese swirl is the signature of this recipe, the chocolate cupcakes are a fantastic base for many frostings. A classic vanilla buttercream, a rich chocolate fudge frosting, or even a simple Nutella-only frosting (just beat Nutella with some butter and powdered sugar) would all be delicious.
2. How do I store leftovers of the assembled cupcake cake?
The best way to store the finished cake is in a large, airtight container in the refrigerator due to the cream cheese frosting. A cake carrier works perfectly. If you don’t have one large enough, you can loosely cover the platter with plastic wrap, using toothpicks to prop up the wrap so it doesn’t smudge the frosting. It will stay fresh for up to 3 days. Let it sit at room temperature for about 20-30 minutes before serving for the best flavor and texture.
3. Is it possible to make this recipe gluten-free?
Yes, you can adapt this recipe to be gluten-free. Substitute the all-purpose flour with a high-quality 1-to-1 gluten-free baking flour blend (one that contains xanthan gum). The texture may be slightly denser, but the flavor will still be wonderfully rich and chocolatey. Ensure all other ingredients, like your cocoa powder and baking powder, are certified gluten-free.
4. My cream cheese frosting seems too thin (or too thick). How can I fix it?
This is a common frosting issue that’s easy to fix! If your frosting is too thin, it’s likely your butter or cream cheese was too soft, or you’re in a very warm kitchen. The solution is to add more sifted powdered sugar, a couple of tablespoons at a time, until it reaches the desired consistency. You can also chill the frosting in the refrigerator for 20-30 minutes to help it firm up. If the frosting is too thick, you can thin it by adding a splash of milk or heavy cream (a teaspoon at a time) until it’s perfect for piping.
5. Why is it called a “cupcake cake”? What’s the advantage?
It’s called a cupcake cake, or a pull-apart cake, because it has the visual impact and size of a traditional cake but is made from individual cupcakes. The main advantage is the ease of serving. There’s no cutting involved, which means no mess, no need for extra utensils, and perfect portion control. It’s especially fantastic for kids’ parties and large, casual gatherings where convenience is a top priority. It combines the best of both worlds: the communal feel of a cake and the individual delight of a cupcake.

Nutella Swirl Cupcake Cake recipe
Ingredients
For the Moist Chocolate Cupcakes (Yields 24 Cupcakes):
-
All-Purpose Flour: 2 cups (250g)
-
Granulated Sugar: 2 cups (400g)
-
Unsweetened Cocoa Powder: ¾ cup (75g), sifted to remove lumps
-
Baking Soda: 2 teaspoons
-
Baking Powder: 1 teaspoon
-
Salt: 1 teaspoon
-
Large Eggs: 2, at room temperature
-
Buttermilk: 1 cup (240ml), at room temperature (see tips for a substitute)
-
Vegetable Oil: ½ cup (120ml)
-
Pure Vanilla Extract: 2 teaspoons
-
Hot Brewed Coffee or Hot Water: 1 cup (240ml) – the coffee enhances the chocolate flavor without tasting like coffee.
For the Decadent Nutella Cream Cheese Frosting:
-
Full-Fat Block Cream Cheese: 16 ounces (452g or 2 blocks), softened to room temperature
-
Unsalted Butter: 1 cup (226g or 2 sticks), softened to room temperature
-
Powdered Sugar: 4 cups (480g), sifted
-
Pure Vanilla Extract: 1 tablespoon
-
Salt: ¼ teaspoon
-
Nutella (Chocolate Hazelnut Spread): 1 cup (260g), at room temperature for easy swirling
Instructions
Part 1: Baking the Perfect Chocolate Cupcakes
The foundation of our cupcake cake is a deeply flavorful and moist chocolate cupcake. The use of both oil and buttermilk is the secret to a tender crumb that stays fresh for days.
-
Preheat and Prepare: Preheat your oven to 350°F (175°C). Line two standard 12-cup muffin tins with paper liners. This recipe makes exactly 24 cupcakes.
-
Combine Dry Ingredients: In a large mixing bowl, or the bowl of your stand mixer fitted with a paddle attachment, whisk together the all-purpose flour, granulated sugar, sifted cocoa powder, baking soda, baking powder, and salt. Stirring them together at this stage ensures that the leavening agents are evenly distributed, which is crucial for a consistent rise.
-
Combine Wet Ingredients: In a separate medium bowl, whisk together the room temperature eggs, buttermilk, vegetable oil, and vanilla extract until they are fully combined and smooth.
-
Mix the Batter: Pour the wet ingredients into the bowl with the dry ingredients. Mix on low speed until just combined. Be careful not to overmix at this stage; a few small lumps are perfectly fine. Overmixing develops the gluten in the flour, which can lead to tough, dense cupcakes.
-
Add the Hot Liquid: With the mixer still on low, very carefully and slowly pour in the hot coffee or hot water. The batter will be very thin and liquidy—this is completely normal! This “blooms” the cocoa powder, unlocking its deepest flavor, and adds significant moisture to the final product. Scrape down the sides and bottom of the bowl with a rubber spatula to ensure everything is incorporated, and give it one final, brief mix.
-
Fill the Liners: Using a cookie scoop or a measuring cup (a ¼ cup measure works well), divide the batter evenly among the 24 prepared cupcake liners. Fill each liner about two-thirds full. This will give the cupcakes enough room to rise without spilling over the top.
-
Bake to Perfection: Bake in the preheated oven for 18-22 minutes. To check for doneness, insert a toothpick into the center of a cupcake. If it comes out clean or with a few moist crumbs attached, they are ready. If it comes out with wet batter, they need a few more minutes.
-
Cool Completely: Allow the cupcakes to cool in the muffin tins for about 5-10 minutes before carefully transferring them to a wire rack. It is absolutely essential that the cupcakes cool completely to room temperature before you attempt to frost them. Frosting warm cupcakes will result in a melted, soupy mess. This can take at least 1-2 hours.
Part 2: Making the Heavenly Nutella Cream Cheese Frosting
This frosting is the star of the show. The key to a smooth, non-lumpy cream cheese frosting is ensuring your butter and cream cheese are truly at room temperature.
-
Beat the Base: In the bowl of a stand mixer fitted with the paddle attachment, or in a large bowl using a hand mixer, beat the softened cream cheese and softened butter together on medium-high speed for about 3-4 minutes. Scrape down the sides and bottom of the bowl periodically. The mixture should be completely smooth, creamy, and light in color, with no lumps remaining.
-
Incorporate Sugar: Turn the mixer down to low speed and gradually add the sifted powdered sugar, one cup at a time. Mixing on low will prevent a sugar cloud from exploding all over your kitchen. Once all the sugar is incorporated, add the salt and the vanilla extract.
-
Whip It Good: Increase the mixer speed to medium-high and beat for another 2-3 minutes until the frosting is light, fluffy, and airy. Do not overbeat, as cream cheese frosting can sometimes become too thin if whipped for too long.
-
Prepare for the Swirl: Transfer about half of the vanilla cream cheese frosting to a separate bowl. To the frosting remaining in the mixing bowl, add the 1 cup of Nutella. Mix on low speed until the Nutella is just combined. You don’t want to overmix it, just get it incorporated. Now you have two bowls of frosting: one plain cream cheese and one Nutella cream cheese.
Part 3: Assembling the Nutella Swirl Cupcake Cake
This is the fun, creative part! You get to build your edible masterpiece.
-
Arrange the Cupcakes: On a large serving platter, cake board, or a baking sheet lined with parchment paper, arrange your completely cooled cupcakes. They should be placed right next to each other, touching, to form the shape of a single cake. You can create a simple rectangle, a circle, a heart shape, or even a number for a birthday. A 4×6 rectangle is a great starting point.
-
Create the Two-Tone Swirl: To get the beautiful swirl effect, you’ll need a large piping bag fitted with a large star tip (like a Wilton 1M or 2D). To fill the bag, lay it flat on the counter. Spoon the plain cream cheese frosting along one side of the bag, from the tip to the top. Then, spoon the Nutella frosting along the other, empty side of the bag. Try to keep them as separate as possible.
-
Frost the Cake: Squeeze the piping bag until both colors of frosting begin to emerge from the tip. Starting from the outside edge of a cupcake, pipe a generous rosette-style swirl, moving towards the center. Repeat this process for every single cupcake. The magic is that because the cupcakes are all touching, the individual swirls of frosting will also touch, creating the illusion of a single, beautifully frosted cake.
-
Finishing Touches (Optional): For an extra touch of elegance and flavor, you can sprinkle some chopped toasted hazelnuts, mini chocolate chips, or chocolate shavings over the top of the finished cupcake cake.
Nutrition
- Serving Size: one normal portion
- Calories: 485 kcal


