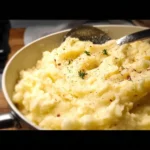
I’ll let you in on a little secret: for years, the mashed potatoes were my most dreaded Thanksgiving task. It wasn’t the peeling or the mashing; it was the sheer chaos of it all. Finding the largest pot, waiting for what felt like an eternity for the water to boil, and then nervously draining a massive, steaming cauldron of potatoes without scalding myself—all while juggling three other pans on a crowded stovetop. It was a stressful, messy affair. That all changed a few years ago when I stumbled upon this no-boil method. The idea of baking the potatoes first seemed almost too simple, too good to be true. The first time I tried it, I was a convert for life. The potatoes emerged from the oven with a deep, earthy aroma. When I scooped the fluffy flesh from their skins and mashed them with butter and cream, the result was transformative. They were intensely potato-y, rich, and creamy, without a hint of the waterlogged blandness that can sometimes plague boiled potatoes. My family noticed the difference immediately. They weren’t just mashed potatoes anymore; they were a standout star of the meal. Now, this no-boil recipe is my only method. It’s my secret weapon for stress-free holidays and the key to the most flavorful, creamiest mashed potatoes you will ever taste.
Why This No Boil Method is a Culinary Revolution
Before we get to the recipe, it’s essential to understand why this method isn’t just a gimmick—it’s a fundamental improvement on a classic dish. By eliminating the boiling water, you unlock a depth of flavor and a perfect texture that is simply unattainable with the traditional method.
Concentrated, Intense Potato Flavor
The single biggest advantage of the no-boil method is flavor. Think about what happens when you boil potatoes: you are submerging them in a large volume of water. As the starches cook, the potatoes inevitably absorb some of this water. At the same time, some of their natural, earthy flavor leaches out into that very same water, which you then pour down the drain. You are literally draining away flavor.
By baking or roasting the potatoes whole, you do the exact opposite. The dry heat of the oven drives off excess moisture and concentrates the natural sugars and starches within the potato. The result is a potato pulp that is dense, dry, and packed with an intense, robust potato flavor. When you mash this concentrated potato flesh with rich butter and cream, the final dish is profoundly more savory and delicious. It tastes more like a potato than any boiled potato ever could.
The End of Gummy, Watery Potatoes
The texture of mashed potatoes is a delicate science, and the enemy of fluffy potatoes is excess water and overworked starch. Waterlogged potatoes, a common result of boiling, require more vigorous mashing to become smooth, which can easily lead to overworking the starches. When potato starch cells are ruptured through over-mixing, they release a sticky, glue-like substance, resulting in a gummy, wallpaper-paste consistency.
Because baked potatoes have a much lower moisture content, their flesh is naturally fluffier and drier. This dry, starchy pulp requires significantly less effort to break down. A gentle mashing or a pass through a potato ricer is all it takes to achieve a perfectly smooth, lump-free texture. This gentle handling keeps the starch granules intact, guaranteeing a light, fluffy, and creamy result every single time. The risk of gummy potatoes is virtually eliminated.
Unparalleled Convenience and a Cleaner Kitchen
Beyond the superior taste and texture, this method is a game-changer for kitchen logistics, especially during busy holiday cooking.
- Frees Up Stovetop Space: On days like Thanksgiving or Christmas, stovetop real estate is prime territory. Gravy, sauces, and other side dishes all compete for a burner. By moving the potatoes to the oven, you free up a large burner and eliminate the need for your biggest pot, streamlining your entire cooking process.
- Less Active Monitoring: Boiling potatoes requires you to keep a close eye on them to prevent them from boiling over or becoming too mushy. Baking is a much more hands-off process. Once the potatoes are in the oven, you can set a timer and focus on other tasks.
- Safer and Cleaner: There’s no risk of a pot of boiling water splashing or boiling over, and you don’t have to wrestle with a heavy, hot colander in the sink. The cleanup is also simpler—just the baking sheet, a bowl, and your masher.
Complete Ingredients for the Fluffiest Potatoes
The beauty of this recipe lies in its simplicity. Using high-quality ingredients will make a noticeable difference in the final product. This recipe serves 6-8 people.
- Potatoes: 4 lbs (about 1.8 kg) Russet or Yukon Gold potatoes, scrubbed clean
- Unsalted Butter: 1 cup (2 sticks or 226g), cut into pieces, plus more for serving
- Heavy Cream or Whole Milk: 1 to 1 ½ cups, warmed
- Salt: 1 ½ teaspoons, or to taste
- Black Pepper: ½ teaspoon, freshly ground, or to taste
- Optional for Garnish: Chopped fresh chives or parsley
A Note on Ingredients:
- Potatoes: Russet potatoes are the classic choice for baking and result in an exceptionally light and fluffy mash. Yukon Golds have a naturally buttery flavor and a denser, creamier texture. Both are excellent choices.
- Butter: Use high-quality, unsalted butter. This allows you to control the total salt content of the dish.
- Dairy: Heavy cream will yield the richest, most decadent mashed potatoes. Whole milk creates a lighter, but still creamy, result. For a middle ground, you can use half-and-half. The key is to use a full-fat dairy product.
Step-by-Step Instructions
Follow these simple steps to achieve mashed potato perfection without a drop of boiling water.
Step 1: Prepare and Bake the Potatoes
Preheat your oven to 400°F (200°C). Scrub the potatoes thoroughly under running water and pat them completely dry. Using a fork or a sharp knife, pierce each potato several times all over. This allows steam to escape during baking and prevents the potatoes from exploding in the oven. Place the pierced potatoes directly on the oven rack or on a baking sheet. Bake for 60 to 75 minutes, or until the skins are papery and crisp and the potatoes are completely tender when pierced with a skewer or fork. The skewer should slide in and out with absolutely no resistance.
Step 2: Warm the Dairy and Butter
About 10 minutes before the potatoes are done baking, warm your dairy and butter. You can do this in a small saucepan over low heat or in a microwave-safe bowl. Gently heat the cream (or milk) and the butter together until the butter is fully melted and the liquid is hot to the touch but not boiling. Keeping the dairy and fat warm is a crucial step; adding cold liquids to hot potatoes can result in a gluey texture and prevent them from absorbing the fat properly.
Step 3: Scoop the Potato Flesh
Once the potatoes are fully cooked, carefully remove them from the oven. They will be extremely hot. Using an oven mitt to hold a potato, slice it in half lengthwise. Use a large spoon to scoop the hot, fluffy interior out of the skins and into a large bowl. Discard the skins (or save them to make crispy potato skins later!). Work quickly to ensure the potatoes stay as hot as possible.
Step 4: Mash the Potatoes
Immediately after scooping, it’s time to mash. While the potato flesh is still steaming hot, mash it thoroughly. For the fluffiest possible texture, press the cooked potato through a potato ricer or a food mill. This breaks down the potato into fine, rice-like strands without overworking the starch. If you don’t have a ricer, a hand-held potato masher will also work well. Mash until there are no large lumps remaining. Avoid using a food processor or an electric hand mixer, as the high speed of the blades will almost certainly overwork the starches and turn your potatoes into a gummy paste.
Step 5: Add the Hot Liquid and Season
Pour about half of the hot cream and butter mixture over the mashed potatoes. Gently fold it in with a spatula or wooden spoon until just combined. Add the remaining liquid in splashes, mixing gently after each addition, until the potatoes reach your desired consistency. You may not need all the liquid, so add it gradually. Finally, fold in the salt and freshly ground black pepper.
Step 6: Taste and Serve
Give the mashed potatoes a final taste and adjust the seasoning with more salt and pepper if needed. Transfer them to a warm serving bowl, top with an extra pat of butter, and garnish with fresh chives or parsley. Serve immediately.
Nutrition Facts
This is an indulgent side dish. The nutritional information is an approximation and can vary based on the specific ingredients used.
- Servings: 8
- Calories Per Serving: Approximately 390 kcal
- Fat: 28g
- Carbohydrates: 32g
- Dietary Fiber: 4g
- Protein: 5g
Preparation Time
This recipe is largely hands-off, with the oven doing most of the work.
- Prep Time: 5 minutes
- Cook Time: 60-75 minutes
- Total Time: Approximately 1 hour 15 minutes
How to Serve Your Perfect Mashed Potatoes
Mashed potatoes are a beloved comfort food that pairs beautifully with a wide array of dishes. Here’s how to make them the star of any meal.
- The Classic Centerpiece Side:
- Thanksgiving/Christmas Dinner: Serve in a large, warmed bowl alongside roasted turkey or ham, with a well in the center for gravy.
- Steakhouse Dinner: A perfect accompaniment to a seared steak, grilled pork chops, or roasted chicken.
- Comfort Food Classics: The essential partner for meatloaf, Salisbury steak, or chicken fried steak.
- Create a Mashed Potato Bar:
- This is a fun and interactive idea for parties or family dinners.
- Set out the bowl of hot mashed potatoes and provide an array of toppings in separate bowls for everyone to customize their own serving.
- Topping Ideas: Shredded cheddar cheese, crumbled bacon, sour cream, sliced green onions, caramelized onions, sautéed mushrooms, roasted garlic, or crispy fried onions.
- As a Topping or Base:
- Use as the classic topping for a hearty Shepherd’s Pie or Cottage Pie.
- Serve as a fluffy bed for saucy dishes like beef stew, coq au vin, or Swedish meatballs to soak up all the delicious sauce.
Additional Tips for Masterful Mashed Potatoes (5 tips)
- Always Use a Potato Ricer for the Fluffiest Texture: If you are serious about mashed potatoes, a potato ricer is the single best tool you can own. It works by forcing the cooked potato through small holes, creating fine, airy strands that result in an incredibly light and smooth mash without any risk of gumminess. It’s a small investment that pays huge dividends in texture.
- Infuse Your Dairy for Extra Flavor: To add another layer of gourmet flavor, infuse your milk or cream. While warming the dairy and butter, add a few sprigs of fresh thyme, a couple of smashed garlic cloves, or a bay leaf to the saucepan. Let it steep for 10-15 minutes over low heat, then strain the liquid before adding it to the potatoes.
- Ensure Your Dairy is Hot: This tip was mentioned in the instructions, but it’s critical enough to repeat. Adding cold butter or milk to hot potatoes will cool them down instantly, which hinders their ability to absorb the fat and can lead to a dense, pasty texture. Warm dairy is essential for creamy, dreamy results.
- Don’t Overmix: The golden rule of mashed potatoes is to handle them as little as possible once the liquid is added. Mix only until the butter and cream are just incorporated. The more you stir and whip, the more starch you release, and the closer you get to gummy territory. A gentle fold with a spatula is all you need.
- Make-Ahead and Reheating Trick: You can easily make these potatoes ahead of time. Prepare the recipe completely, then transfer the mashed potatoes to a slow cooker set to the “Warm” setting for up to 2-3 hours. Alternatively, place them in a heatproof bowl, cover it tightly with foil, and set it over a pot of simmering water to keep them hot. To reheat from the fridge, place them in an oven-safe dish with a few extra pats of butter on top, cover with foil, and bake at 350°F (175°C) for 20-25 minutes, stirring halfway through.
Frequently Asked Questions (FAQ)
Here are answers to some of the most common questions about the no-boil mashed potato method.
1. Can I use other types of potatoes besides Russet or Yukon Gold?
While Russets and Yukon Golds are highly recommended for their high starch content and fluffy/creamy textures, you can use other potatoes. Red potatoes or other waxy varieties can be used, but the result will be different. They have a lower starch content and will produce a denser, creamier, and slightly “wetter” mash. You may need less milk or cream when using waxy potatoes.
2. How can I make this recipe dairy-free or vegan?
Absolutely. For a delicious dairy-free version, substitute the butter with a high-quality vegan butter substitute. Replace the heavy cream or whole milk with an unsweetened, unflavored, creamy plant-based milk like oat milk or soy milk. Full-fat canned coconut milk can also work for a very rich result, though it may impart a subtle coconut flavor.
3. Why did my mashed potatoes turn out gummy?
Gummy mashed potatoes are almost always the result of overworking the starches. This happens when the potato cells are ruptured, releasing excess starch. The most common culprits are: 1) Using a food processor, blender, or electric mixer to mash the potatoes. The high-speed blades are too aggressive. 2) Excessive stirring or whipping after the liquid has been added. Always mash gently and mix just until combined.
4. What can I do with the leftover potato skins?
Don’t throw them away! The leftover skins from the baked potatoes can be turned into a fantastic snack. Toss the skins with a little olive oil, salt, pepper, and smoked paprika. Spread them on a baking sheet and bake at 400°F (200°C) for 10-15 minutes, or until crispy. Serve them with a dollop of sour cream and chives.
5. How do I store and reheat leftover mashed potatoes?
Store leftovers in an airtight container in the refrigerator for up to 4 days. Mashed potatoes tend to thicken and dry out when chilled. The best way to reheat them is on the stovetop. Place the potatoes in a saucepan over low heat with a splash of milk or cream. Stir gently until they are warmed through and have returned to a creamy consistency. You can also reheat them in the microwave, stopping to stir every minute or so.
No Boil Mashed Potatoes recipe
Ingredients
-
Potatoes: 4 lbs (about 1.8 kg) Russet or Yukon Gold potatoes, scrubbed clean
-
Unsalted Butter: 1 cup (2 sticks or 226g), cut into pieces, plus more for serving
-
Heavy Cream or Whole Milk: 1 to 1 ½ cups, warmed
-
Salt: 1 ½ teaspoons, or to taste
-
Black Pepper: ½ teaspoon, freshly ground, or to taste
-
Optional for Garnish: Chopped fresh chives or parsley
Instructions
Step 1: Prepare and Bake the Potatoes
Preheat your oven to 400°F (200°C). Scrub the potatoes thoroughly under running water and pat them completely dry. Using a fork or a sharp knife, pierce each potato several times all over. This allows steam to escape during baking and prevents the potatoes from exploding in the oven. Place the pierced potatoes directly on the oven rack or on a baking sheet. Bake for 60 to 75 minutes, or until the skins are papery and crisp and the potatoes are completely tender when pierced with a skewer or fork. The skewer should slide in and out with absolutely no resistance.
Step 2: Warm the Dairy and Butter
About 10 minutes before the potatoes are done baking, warm your dairy and butter. You can do this in a small saucepan over low heat or in a microwave-safe bowl. Gently heat the cream (or milk) and the butter together until the butter is fully melted and the liquid is hot to the touch but not boiling. Keeping the dairy and fat warm is a crucial step; adding cold liquids to hot potatoes can result in a gluey texture and prevent them from absorbing the fat properly.
Step 3: Scoop the Potato Flesh
Once the potatoes are fully cooked, carefully remove them from the oven. They will be extremely hot. Using an oven mitt to hold a potato, slice it in half lengthwise. Use a large spoon to scoop the hot, fluffy interior out of the skins and into a large bowl. Discard the skins (or save them to make crispy potato skins later!). Work quickly to ensure the potatoes stay as hot as possible.
Step 4: Mash the Potatoes
Immediately after scooping, it’s time to mash. While the potato flesh is still steaming hot, mash it thoroughly. For the fluffiest possible texture, press the cooked potato through a potato ricer or a food mill. This breaks down the potato into fine, rice-like strands without overworking the starch. If you don’t have a ricer, a hand-held potato masher will also work well. Mash until there are no large lumps remaining. Avoid using a food processor or an electric hand mixer, as the high speed of the blades will almost certainly overwork the starches and turn your potatoes into a gummy paste.
Step 5: Add the Hot Liquid and Season
Pour about half of the hot cream and butter mixture over the mashed potatoes. Gently fold it in with a spatula or wooden spoon until just combined. Add the remaining liquid in splashes, mixing gently after each addition, until the potatoes reach your desired consistency. You may not need all the liquid, so add it gradually. Finally, fold in the salt and freshly ground black pepper.
Step 6: Taste and Serve
Give the mashed potatoes a final taste and adjust the seasoning with more salt and pepper if needed. Transfer them to a warm serving bowl, top with an extra pat of butter, and garnish with fresh chives or parsley. Serve immediately.
Nutrition
- Serving Size: one normal portion
- Calories: 390
- Fat: 28g
- Carbohydrates: 32g
- Fiber: 4g
- Protein: 5g