


Of all the desserts that evoke a sense of pure, unadulterated comfort, banana pudding reigns supreme. For me, it’s the taste of childhood picnics and celebratory family gatherings, a spoonful of creamy, sweet nostalgia. I’ve always been a purist, believing that the classic recipe of Nilla wafers, fresh bananas, and vanilla pudding was sacred territory. That was until a sweltering summer afternoon when the thought of turning on my oven was simply unbearable. I had promised to bring a dessert to a friend’s barbecue, and the bananas on my counter were reaching that perfect, sugar-speckled stage of ripeness. A cheesecake was my initial thought, but the heat vetoed that idea. Then, a spark of inspiration hit: why not combine the two? Why not create a dessert that marries the rich, tangy decadence of cheesecake with the comforting, homespun charm of banana pudding? That was the day my No-Bake Banana Pudding Cheesecake was born. The first time I made it, I was almost nervous to slice into its beautifully layered perfection. The crust, made from crushed Nilla wafers, was the perfect nod to the original. The cheesecake filling, lightened with whipped cream and infused with the unmistakable flavor of banana cream pudding, was silky and luscious. And the layers of fresh banana and whole wafers hidden within were like discovering buried treasure. When I presented it at the barbecue, the reaction was immediate and overwhelming. It was the first dessert to disappear, with friends and family coming back for second (and even third) helpings, their eyes wide with delight. It has since become my signature dessert, the one I’m always asked to bring, the one that proves that sometimes, the most beloved classics can be reinvented into something even more magical.
The Ultimate Dessert Hybrid: No-Bake Banana Pudding Cheesecake
Imagine the creamiest, dreamiest dessert you can conjure. Now, imagine it requires absolutely no baking, keeping your kitchen cool and your stress levels low. This No-Bake Banana Pudding Cheesecake is that dream dessert brought to life. It is a masterful fusion of two beloved American classics, capturing the tangy, velvety richness of cheesecake and the sweet, comforting, and nostalgic flavors of traditional banana pudding. This recipe is more than just a simple dessert; it’s an experience. It’s the perfect centerpiece for any occasion, from a casual family dinner to a festive holiday gathering. Its layered beauty, with a crisp cookie crust, a silky smooth cheesecake filling, and tender slices of fresh banana, makes for a stunning presentation that looks like it came straight from a gourmet bakeshop.
What makes this recipe truly special is its accessibility. You don’t need to be a seasoned pastry chef to achieve spectacular results. The process is straightforward, relying on simple techniques like whipping cream and folding ingredients together. The “no-bake” aspect is a game-changer, especially during warmer months or when your oven is already occupied. This dessert is a celebration of textures and flavors working in perfect harmony. The crunchy, buttery Nilla wafer crust provides the ideal foundation for the rich yet surprisingly light cheesecake filling. The authentic flavor of banana is woven throughout, not from artificial extracts, but from real, fresh bananas and a touch of banana cream pudding mix, which lends an authentic, custard-like taste. This is the dessert that will have everyone asking for the recipe, a guaranteed showstopper that tastes even better than it looks.
Why This Recipe is a Must-Try
- Completely No-Bake: This is the ultimate appeal. Avoid heating up your kitchen and save your oven space for other dishes. It’s the perfect dessert for summer potlucks, holidays, or any day you want a stunning treat without the fuss of baking.
- A Fusion of Classics: It takes the best elements of two iconic desserts and combines them into one unforgettable experience. If you love banana pudding and you love cheesecake, this hybrid will be your new obsession.
- Incredibly Creamy Texture: The combination of cream cheese, whipped cream, and pudding mix creates a filling that is exceptionally smooth, airy, and luscious. It melts in your mouth, delivering a rich flavor that isn’t overly heavy.
- Crowd-Pleasing Flavor: The comforting, sweet flavor of banana pudding is a universally loved taste. This cheesecake version elevates that familiar flavor into something truly special, making it a guaranteed hit with both adults and children.
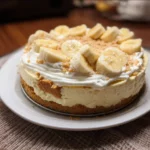
- Visually Stunning: With its distinct layers of crust, cheesecake, bananas, and whipped cream topping, this dessert is a feast for the eyes. It looks impressive and complex, but it’s deceptively simple to assemble.
Complete with the Ingredients Amount
Achieving the perfect balance of flavors and the dreamiest texture requires using the right ingredients in the right proportions. Here is your complete shopping and measuring list:
- For the Nilla Wafer Crust:
- 1 ½ cups Nilla wafer crumbs (from about one 11-ounce box of Nilla Wafers)
- 6 tablespoons unsalted butter, melted
- For the Banana Cheesecake Filling:
- 16 ounces (two 8-ounce blocks) full-fat cream cheese, softened to room temperature
- 1 cup powdered sugar
- 1 (3.4 ounce) box instant banana cream pudding mix (just the dry mix)
- 1 teaspoon pure vanilla extract
- 2 cups heavy whipping cream, cold
- For the Layers and Topping:
- 3-4 medium ripe bananas, sliced
- 1 tablespoon fresh lemon juice (to prevent browning)
- 1 cup heavy whipping cream, cold
- ¼ cup powdered sugar
- ½ teaspoon pure vanilla extract
- About 20-30 whole Nilla wafers for decoration
- Extra Nilla wafer crumbs for sprinkling
Ingredient Notes and Substitutions
- Cream Cheese: Full-fat, block-style cream cheese is essential for the proper structure and richness of the cheesecake. Do not use whipped cream cheese or low-fat varieties, as they will result in a runny, unset filling.
- Nilla Wafers: This is the classic choice for authentic banana pudding flavor. However, if unavailable, you could substitute with shortbread cookies or digestive biscuits.
- Instant Pudding Mix: Make sure you use the “instant” variety, not the “cook-and-serve” type. The instant mix contains thickeners that are crucial for helping the cheesecake set up without baking.
- Heavy Whipping Cream: Cold heavy cream is key to creating stable, voluminous whipped cream. Do not substitute with half-and-half or milk. For a shortcut, you could use two 8-ounce tubs of Cool Whip in place of the homemade whipped cream in the filling, but the flavor and texture of real whipped cream are superior.
Instructions
Follow these detailed, step-by-step instructions to assemble your stunning No-Bake Banana Pudding Cheesecake. Organization is key, so read through all the steps before you begin.
Part 1: Making the Nilla Wafer Crust
- Prepare the Pan: Lightly grease the bottom and sides of a 9-inch springform pan. This will help with a clean release later.
- Make the Crumbs: Place the Nilla wafers into a food processor and pulse until you have fine, even crumbs. If you don’t have a food processor, you can place the wafers in a large, sealed zip-top bag and crush them with a rolling pin or a heavy can. Measure out 1 ½ cups of the crumbs.
- Combine and Press: In a medium bowl, combine the Nilla wafer crumbs and the 6 tablespoons of melted butter. Mix with a fork until all the crumbs are evenly moistened and the texture resembles wet sand.
- Form the Crust: Pour the buttery crumbs into the prepared springform pan. Using the flat bottom of a measuring cup or a glass, press the crumbs firmly and evenly into the bottom of the pan and slightly up the sides.
- Chill the Crust: Place the pan in the freezer to chill and firm up for at least 15-20 minutes while you prepare the filling. This step is crucial for ensuring the crust is solid and doesn’t crumble when you add the filling.
Part 2: Creating the Silky Cheesecake Filling
- Whip the Heavy Cream: In a large, chilled bowl, using a stand mixer with the whisk attachment or a hand mixer, whip the 2 cups of cold heavy whipping cream on medium-high speed until stiff peaks form. Stiff peaks mean that when you lift the beaters out of the cream, the peak that forms holds its shape and doesn’t flop over. Be careful not to over-whip, or it will turn into butter. Scrape the whipped cream into a separate bowl and set it aside in the refrigerator.
- Beat the Cream Cheese: In the same large bowl (no need to wash it), beat the softened cream cheese on medium speed until it is completely smooth and free of lumps. This is a critical step; any lumps now will remain in the final product.
- Add Flavors: Add the 1 cup of powdered sugar, the dry instant banana cream pudding mix, and the 1 teaspoon of vanilla extract to the smooth cream cheese. Beat on low speed at first to combine, then increase to medium speed and beat for about 2 minutes, until everything is well-incorporated and the mixture is smooth and fluffy. Scrape down the sides and bottom of the bowl as needed.
- Fold in Whipped Cream: Retrieve the whipped cream from the fridge. Using a rubber spatula, gently fold about one-third of the whipped cream into the cream cheese mixture. This lightens the base, making it easier to incorporate the rest. Then, add the remaining whipped cream and continue to fold gently until just combined. Do not stir or beat; the folding motion preserves the airiness of the whipped cream.
Part 3: Assembling the Cheesecake
- Prepare the Bananas: Slice your bananas into ¼-inch thick rounds. Place them in a small bowl and gently toss with the 1 tablespoon of lemon juice. This prevents them from oxidizing and turning brown.
- First Layer: Remove the chilled crust from the freezer. Spread about half of the cheesecake filling over the crust in an even layer.
- Banana Layer: Arrange a single layer of the sliced bananas over the top of the filling. You can also press a few whole Nilla wafers around the outer edge of the pan, standing them up against the side, for a decorative effect when sliced.
- Second Layer: Gently spoon the remaining cheesecake filling over the banana layer and spread it carefully to cover the bananas completely, smoothing the top with an offset spatula or the back of a spoon.
- Chill to Set: Cover the springform pan with plastic wrap, being careful not to let it touch the surface of the cheesecake. Refrigerate for at least 6-8 hours, but preferably overnight. This dessert cannot be rushed; it needs this long chilling time to fully set and for the flavors to meld together.
Part 4: Decorating and Serving
- Make the Topping: Just before serving, prepare the whipped cream topping. In a chilled bowl, whip the 1 cup of cold heavy cream, ¼ cup of powdered sugar, and ½ teaspoon of vanilla extract until stiff peaks form.
- Decorate: Remove the cheesecake from the refrigerator. Carefully run a thin knife around the edge of the cheesecake to loosen it from the pan before releasing the springform collar. Transfer the cheesecake to a serving platter. You can either spread the whipped cream topping evenly over the top or pipe it on using a piping bag with a decorative tip for a more elegant look. Garnish with whole or halved Nilla wafers and a generous sprinkle of Nilla wafer crumbs. For an extra flourish, you can add a few fresh banana slices right before serving (don’t add them too early, as they will brown).
- Slice and Serve: Use a long, sharp knife to slice the cheesecake. For the cleanest slices, wipe the knife clean with a warm, damp cloth between each cut.
Nutrition Facts (Servings and calories per serving)
This is a decadent dessert, meant to be enjoyed as a special treat. The nutritional information is an estimate and will vary based on the specific brands of ingredients used.
- Servings: 12-16 slices
- Calories per serving (for 12 slices): Approximately 450-550 kcal
Estimated Nutritional Breakdown per Slice (for 12 slices):
- Total Fat: 35-45g
- Saturated Fat: 20-25g
- Cholesterol: 100-120mg
- Sodium: 300-400mg
- Total Carbohydrates: 30-40g
- Dietary Fiber: 1-2g
- Total Sugars: 20-30g
- Protein: 5-7g
Preparation time
While the hands-on time is minimal, this dessert requires significant chilling time to set properly. Plan accordingly.
- Prep Time: 30 minutes
- Chill Time: 8 hours (or overnight)
- Total Time: 8 hours and 30 minutes
How to Serve
This No-Bake Banana Pudding Cheesecake is a star on its own, but a few simple touches can elevate the serving experience.
- On a Cake Stand: Present the fully decorated cheesecake on a beautiful cake stand or pedestal to showcase its impressive layers and height.
- With a Drizzle: For an extra touch of decadence, serve each slice with a drizzle of:
- Caramel Sauce: A warm caramel or dulce de leche drizzle complements the banana flavor perfectly.
- Chocolate Sauce: A light drizzle of chocolate sauce adds a rich, contrasting flavor.
- Garnish Each Plate:
- Add a small fan of fresh banana slices right before serving.
- Place a single, perfect Nilla wafer alongside the slice.
- A sprig of fresh mint can add a pop of color.
- Pair with a Beverage:
- Serve with a hot cup of coffee or a cold glass of milk for a classic dessert pairing.
- For adults, a coffee liqueur or a sweet dessert wine would also be a delightful accompaniment.
Additional tips (5 tips)
- Room Temperature is Crucial for Cream Cheese: This is the most important tip for a lump-free cheesecake filling. Take your cream cheese out of the refrigerator at least 2-3 hours before you begin. Softened cream cheese will beat into a perfectly smooth, creamy base. If you’re short on time, you can submerge the foil-wrapped blocks in a bowl of warm (not hot) water for about 15 minutes.
- Use Ripe, But Not Mushy, Bananas: For the best flavor, use bananas that are bright yellow with a few brown sugar spots. These bananas are at their peak sweetness. Avoid green bananas, which lack flavor, and overly black, mushy bananas, which can make the filling watery.
- The “Folding” Technique is Key: When combining the whipped cream with the cream cheese base, use a gentle hand. The goal is to incorporate the two mixtures while retaining as much of the air from the whipped cream as possible. This is what gives the cheesecake its light, airy texture. Use a large rubber spatula to cut down through the middle of the mixture, scrape along the bottom, and “fold” it over the top, rotating the bowl as you go.
- Freeze the Crust Solid: Don’t skip the step of chilling the crust in the freezer. A frozen crust is much more stable and won’t buckle or mix in with the filling as you spread the first layer. This simple 20-minute step ensures a clean, distinct crust line in your finished cheesecake.
- Patience is an Ingredient: The hardest part of this recipe is waiting for the cheesecake to chill. Do not try to rush it. The 6-8 hours (or preferably overnight) in the refrigerator is not just for the cheesecake to become firm; it’s also when the flavors meld and deepen. The Nilla wafers soften slightly, the banana flavor infuses the filling, and the whole dessert becomes more cohesive and delicious.
FAQ section (5 Q/A)
1. Can I make this cheesecake ahead of time?
Absolutely! This is a perfect make-ahead dessert. You can make it up to 2 days in advance. Simply assemble the cheesecake as directed, cover it with plastic wrap, and store it in the refrigerator. Wait to add the final whipped cream topping and garnishes until just before you plan to serve it for the freshest appearance.
2. My cheesecake didn’t set properly. What went wrong?
There are a few potential reasons for a runny cheesecake. The most common is not chilling it for long enough; it truly needs at least 6-8 hours. Another culprit could be using low-fat or whipped cream cheese instead of the full-fat block variety. Finally, ensure you whip your heavy cream to stiff peaks; under-whipped cream won’t provide enough structure. The instant pudding mix is also a critical setting agent, so make sure you didn’t accidentally omit it or use the cook-and-serve kind.
3. Can I freeze this No-Bake Banana Pudding Cheesecake?
Yes, this cheesecake freezes surprisingly well. For best results, freeze it whole, before adding the final whipped cream topping. After it has fully set in the refrigerator, wrap the entire cheesecake (still in the springform pan) tightly in a layer of plastic wrap, followed by a layer of aluminum foil. It can be frozen for up to one month. To thaw, transfer it to the refrigerator and let it thaw overnight. Decorate with fresh whipped cream just before serving. Note that the texture of the bananas may soften slightly after freezing.
4. How do I prevent my bananas from turning brown?
The key is to toss the banana slices in a small amount of acidic liquid. Lemon juice is the most common and effective choice. The acidity prevents the oxidation process that causes browning. Since the bananas are completely enclosed within the cheesecake filling, they are protected from the air, so browning is less of an issue than it would be in a traditional, layered banana pudding. However, the lemon juice is still a good protective measure.
5. Can I make this recipe without a springform pan?
Yes, you can. If you don’t have a springform pan, you can make this dessert in a 9×13 inch baking dish or a 9-inch deep-dish pie plate. If using a 9×13 dish, you may want to consider doubling the crust ingredients to ensure full coverage. The presentation will be different, as you’ll serve it in squares scooped from the dish rather than in perfect slices, but it will be just as delicious. This “casserole style” is perfect for casual potlucks.
No-Bake Banana Pudding Cheesecake recipe
Ingredients
For the Crust:
-
2 1/2 cups of vanilla wafer crumbs (from about one 11-ounce box)
-
1/2 cup of unsalted butter, melted
For the Cheesecake Filling:
-
16 ounces of full-fat cream cheese, softened to room temperature
-
1 cup of powdered sugar
-
1/4 cup of sour cream
-
1 tablespoon of fresh lemon juice
-
1 teaspoon of pure vanilla extract
-
1 1/2 cups of cold heavy whipping cream
For the Banana Pudding Layer:
-
1 (3.4-ounce) box of instant banana cream pudding mix
-
1 1/2 cups of cold whole milk
-
4-5 ripe but firm bananas, sliced
-
Whipped cream, for topping
-
Additional vanilla wafers, for garnish
Instructions
To Make the Crust:
-
In a medium bowl, combine the vanilla wafer crumbs and melted butter.
-
Mix until the crumbs are fully moistened.
-
Press the mixture firmly and evenly into the bottom and up the sides of a 9-inch springform pan.
-
Place the crust in the freezer to set while you prepare the filling.
To Make the Cheesecake Filling:
-
In a large bowl, beat the softened cream cheese with an electric mixer on medium speed until smooth and creamy, about 2-3 minutes.
-
Add the powdered sugar, sour cream, lemon juice, and vanilla extract. Beat until well combined and smooth.
-
In a separate large bowl, whip the heavy cream on high speed until stiff peaks form.
-
Gently fold the whipped cream into the cream cheese mixture until just combined. Be careful not to overmix.
To Make the Banana Pudding Layer:
-
In a medium bowl, whisk together the instant banana cream pudding mix and cold whole milk for about 2 minutes, until it starts to thicken.
-
Let it sit for about 5 minutes to fully set.
To Assemble the Cheesecake:
-
Remove the crust from the freezer.
-
Spread half of the cheesecake filling evenly over the crust.
-
Arrange a single layer of sliced bananas over the cheesecake filling.
-
Carefully spread the prepared banana pudding over the bananas.
-
Top with the remaining cheesecake filling, spreading it gently to cover the pudding layer.
-
Cover the cheesecake with plastic wrap and refrigerate for at least 6-8 hours, or preferably overnight, to allow it to fully set.
Before Serving:
-
Carefully run a knife around the edge of the cheesecake before releasing the springform pan.
-
Top with fresh whipped cream, additional vanilla wafers, and banana slices.
Nutrition
- Serving Size: one normal portion
- Calories: 450-550 kcal


